Honeywell S8610U - Intermittent Pilot Gas Ignition Control Quick Manual
- Installation instructions manual (25 pages) ,
- Quick reference manual (2 pages) ,
- Installation instructions manual (21 pages)
Advertisement
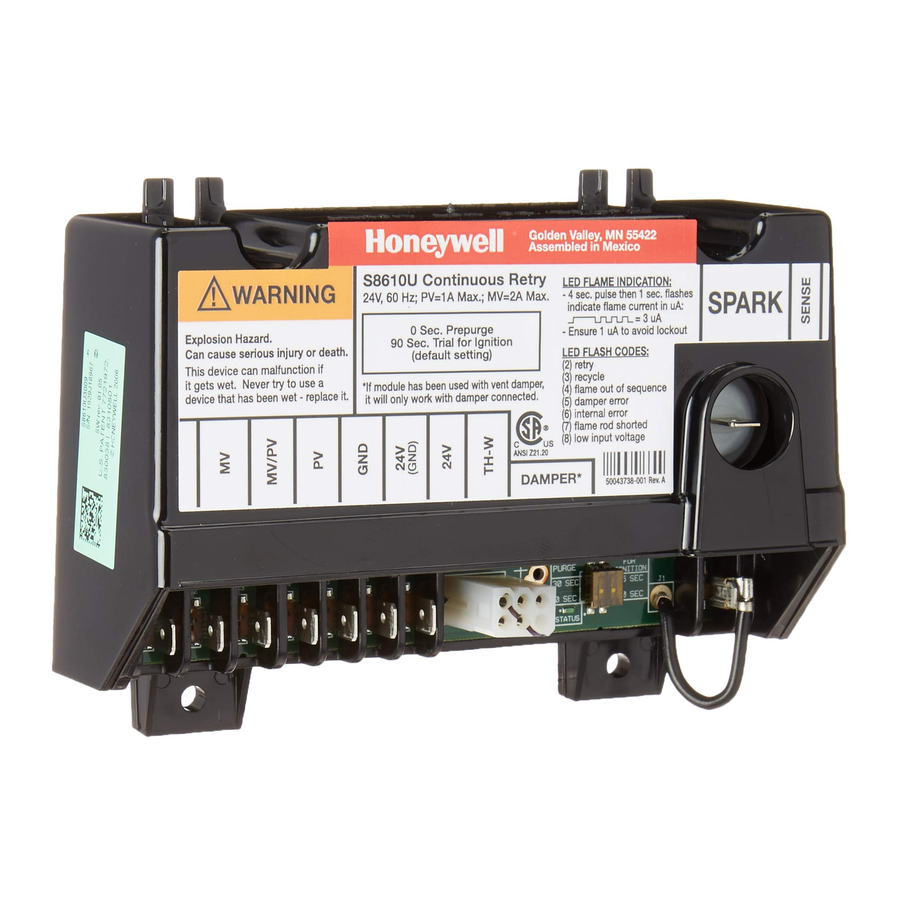
Wiring Connections

Fig. 1. Typical wiring connections.
Table 1. Typical wiring connections.
| Connector Label | Size or Type | Description |
| MV | 1/4 inch | Main Valve connection |
| MV/PV | 1/4 inch | Common terminal for gas valves |
| PV | 1/4 inch | Pilot Valve connection |
| BRN GND | 1/4 inch | Burner Ground |
| 24V GND | 1/4 inch | Return path to transformer |
| 24V | 1/4 inch | Optional—24 Vac power connection for Vent Damper |
| TH-W | 1/4 inch | Connector for "Call for Heat" signal from thermostat |
| P1 | 6-pin keyed plug | Connector for Vent Damper connection (used to control a connected damper in atmospheric appliances) |
| P2 ECOM | 3-pin | EnviraCOM™ communications connector |
| P4 (Jumper) Jumper | Provides a lockout for the DIP switch settings | |
| SENSE JUMPER WIRE | Wire with 3/16 inch quick connect | Connects to the REMOTE SENSE connector for installations with a single spark rod (local flame sensing) NOTE: For installations with remote flame sensing (separate spark and sensor rods), this jumper wire is clipped as close to the circuit board as possible and the wire is discarded. |
| REMOTE SENSE | 3/16 inch | Flame Sensor connector For single rod installations, connect the SENSE JUMPER WIRE to this terminal connector. For dual rod installations, connect the flame sense wire from the burner/igniter to this terminal connector. |
| SPARK | 1/4 inch | High voltage sparking electrode |
Settings and Adjustments
DIP SWITCH (S1) SETTINGS
When replacing an existing ignition control with the S8610U, refer to 69-1955 for the correct DIP switch settings.

Do not power the ignition control prior to setting the DIP switches.
The following timing parameters may be set with this 2-position DIP switch.
PrePurge
To select Prepurge, set SW1 according to Table 2.
Trial for igniTion (Tfi)
To select the Trial for Ignition timing, set SW2 according to Table 2.
Table 2. diP Switch (S1) Settings.
| Prepurge | Trial For Ignition | SW1 | SW2 |
| None | 90 seconds | OFF | OFF |
| 30 seconds | 90 seconds | ON | OFF |
| None | 15 seconds | OFF | ON |
| 30 seconds | 15 seconds | ON | ON |
NOTE: The default factory settings (all OFF) are in Bold in Table 2.

Fig. 2. diP Switch (S1) and jumper (P4) location.

Fig. 3. diP Switch (S1)—shown with factory default settings (off) for Sw1 and Sw2.
LED Status and Troubleshooting
The ignition control module has two LEDs; one for flame sensing and one for system status:

Fig. 4. location of leds.
FLAME LED (YELLOW)
Indicates flame presence and strength. See Table 3.
STATUS LED (GREEN)
Indicates system operation status and error conditions. See Table 4 and the "Troubleshooting Guide" in 69-1955.
Table 3. Yellow led flame codes.
| Yellow LED Flash Code a | Indicates | Recommended Service Action |
| Heartbeat | Normal Flame Signal | Not applicable |
| 2 | Weak Flame Signal— System will operate reliably but flame signal is less than desired. NOTE: This indication may flash temporarily during or shortly after lightoff on some applications. | Perform routine maintenance to assure optimum flame signal. |
| 1 | Marginal Flame Signal—System may not operate reliably over time. Service call recommended. NOTE: This indication may flash temporarily during or shortly after lightoff on some applications. | Check gas supply, pilot burner, flame sense wiring, contamination of flame rod, burner ground connection. |
| OFF | Flame Signal below minimum threshold for system operation. | Check gas supply, pilot burner, flame sense wiring, contamination of flame rod, burner ground connection. |
Flash Code Descriptions:
- Heartbeat: Constant 1/2 second bright, 1/2 second dim cycles.
- The flash code number signifies that the LED flashes X times at 2 Hz, remains off for two seconds, and then repeats the sequence.
Table 4. green led Status codes.
| Green LED Flash Code (X + Y) | Indicates | Next System Action | Recommended Service Action |
| OFF | No "Call for Heat" | Not applicable | None |
| Flash Fast | Startup – Flame sense calibration | Not applicable | None |
| Heartbeat | Normal operation | Not applicable | None |
| 2 | 5 minute Retry Delay Pilot flame not detected during trial for ignition. | Initiate new trial for ignition after retry delay completed. | If system fails to light on next trial for ignition, check gas supply, pilot burner, spark and flame sense wiring, flame rod contaminated or out of position, burner ground connection. |
| 3 | Recycle – Flame failed during run. | Initiate new trial for ignition. Flash code will remain through the ignition trial until flame is proved. | If system fails to light on next trial for ignition, check gas supply, pilot burner, flame sense wiring, contamination of flame rod, burner ground connection. |
| 4 | Flame sensed out of sequence. | If situation self corrects within 10 seconds, control module returns to normal sequence. If flame out of sequence remains longer than 10 seconds, control module goes to Flash code 6+4 (see below). | Check for pilot flame. Replace gas valve if pilot flame present. If no pilot flame, cycle "Call for Heat." If error repeats, replace control. |
| 5 | Damper Error:
| If damper error corrects, ignition control resumes normal operation. | Check damper connection, damper wiring, and 24V connection on control. Replace damper if necessary. |
| 7 | Flame sense leakage to ground. | Control module remains in wait mode. When the fault corrects, control module resumes normal operation after a one minute delay. | Check flame sense lead wire for damage or shorting. Check that flame rod is in proper position. Check flame rod ceramic for cracks, damage or tracking. |
| 8 | Low secondary voltage supply. | Control module remains in wait mode. When the fault corrects, control module resumes normal operation after a one minute delay. | Check transformer and AC line for proper input voltage to the control. Check with full system load on the transformer. |
| 6+2 | 5 minute Retry Delay
| Initiate new trial for ignition after retry delay completed. | Check gas supply, pilot burner, spark and flame sense wiring, flame rod contaminated or out of position, burner ground connection. |
| 6+3 | On every 6th flame failure during run on the same "Call for Heat." | Initiate new trial for ignition after retry delay completed. | Check gas supply, pilot burner, flame sense wiring, contamination of flame rod, burner ground connection. |
| 6+4 | Flame sensed out of sequence for longer than 10 seconds. | Control module waits until flame is no longer sensed and then goes to soft lockout. Flash code continues. Control module auto resets from soft lockout after one hour. | Check for pilot flame. Replace gas valve if pilot flame present. If no pilot flame, cycle "Call for Heat." If error repeats, replace the S8610U control module. |
| ON | Soft lockout due to error detected during self check sequences. | Control module auto resets from soft lockout after one hour. | Reset by cycling "Call for Heat." If error repeats, replace the S8610U control module. |
Flash Code Descriptions:
- Flash Fast: rapid blinking.
- Heartbeat: Constant 1/2 second bright, 1/2 second dim cycles.
- A single flash code number signifies that the LED flashes X times at 2 Hz, remains off for two seconds, and then repeats the sequence.
- X + Y flash codes signify that the LED flashes X times at 2 Hz, remains off for two seconds, flashes Y times at 2Hz, remains off for three seconds, and then repeats the sequence.
Table 5. conversion from honeywell intermittent Pilot modules.
| Terminal Function | Replacement Control | Old Control | Procedural Notes | ||||
| S8610U | S86A,C | S86B,D | S86E,F,G,H | S90A,B S8600A,B,C S8610A,B,C S8610U1003 S8620C, S8660D,J S8670D,J S8680D,J | S8600F,H,M S8610F,H,M S8660E,K S8670E,K | ||
| Main Valve Operator | MV | MV | MV | MV | MV | MV | — |
| Main Valve and Pilot Common | MV/PV | MV/PV | MV/PV | MV/PV | MV/PV | MV/PV | — |
| Pilot Valve Operator | PV | PV | PV | PV | PV | PV | — |
| Burner Ground Connection (BURNER) | GND (BURNER) | GND | GND | GND (BURNER) | GND (BURNER) | GND (BURNER) | — |
| Transformer Secondary (unswitched leg) | 24V GND | 25V (2) | 25V | 25V (2) a | 24V GND | 24V GND | — |
| Transformer Secondary (switched leg) | 24V * | 25V (2) | 25V | 25V (2) a * | 24V * | 24V * | * Important If the old module had a vent damper connector but a vent damper was not installed, or if it did not have a vent damper connector, then connect the 25V (2) or 24V wire from the old module to the TH-W terminal on the S8610U. Do not use the 24V terminal on the S8610U. If the old module had a vent damper, connect it to the P1 connector on the module, and wire the terminals as indicated in Table 1. |
| 25V (2) or 24V used only in systems where plug-in cable connects damper to module | |||||||
| TH-W | TH-R b | TH-R b | TH-R b | TH-W (This terminal is not included on S90.) | TH-W | ||
| TH-W c | TH-W | TH-W c | |||||
| Flame Sensor | SENSEd | e | e | e | SENSEd | e | — |
| Igniter /Sensor | SPARK | IGN COIL f | IGN COIL f | IGN COIL f | SPARK | SPARK | — |
a Terminals may be marked 25V on some models and 24V on later models. These are functionally equivalent.
b If 25V (2) and TH-R have wires connected, disconnect and splice together with solderless connector.
c If TH-R and TH-W are jumpered together, connect 25V (2) lead from S86 to TH-W on S8610U.
d On dual igniter and sensor models, remove jumper wire quick connect from S8610U Remote Sense terminal, then cut jumper wire at circuit board and discard.
e Leave black jumper connected.
f Use Rajah to quick connector adapter (supplied) or cut Rajah connector off ignition cable at module end and attach insulated quick connect for connection to S8610U.
Honeywell International Inc.
Honeywell Limited-Honeywell Limitée
1985 Douglas Drive North
35 Dynamic Drive
Golden Valley, MN 55422 Toronto, Ontario M1V 4Z9 http://yourhome.honeywell.com

Documents / Resources
References
Download manual
Here you can download full pdf version of manual, it may contain additional safety instructions, warranty information, FCC rules, etc.
Download Honeywell S8610U - Intermittent Pilot Gas Ignition Control Quick Manual
Advertisement
Thank you! Your question has been received!


Need Assistance?
Do you have a question about the S8610U that isn't answered in the manual? Leave your question here.