Table of Contents
Advertisement
Available languages
Available languages
Quick Links
ÍNDICE DE CONTENIDO
*****************
• INSTRUCCIONES DE SEGURIDAD . . . . . . . . . . . . . . . 2
• INTRODUCCIÓN . . . . . . . . . . . . . . . . . . . . . . . . . . . 4
• ENSAMBLAJE . . . . . . . . . . . . . . . . . . . . . . . . . . . . . 6
• FUNCIONAMIENTO . . . . . . . . . . . . . . . . . . . . . . . . 11
• ALMACENAMIENTO . . . . . . . . . . . . . . . . . . . . . . . . 16
• MANTENIMIENTO . . . . . . . . . . . . . . . . . . . . . . . . . 18
• PIEZAS DE REPUESTO . . . . . . . . . . . . . . . . . . . . . . 21
• GARANTÍA . . . . . . . . . . . . . . . . . . . . . . . . . . . . . 22
ADVERTENCIA:
Para reducir el riesgo de lesiones, el
usuario debe leer y comprender el manual
del usuario antes de usar este producto.
GUARDE ESTE MANUAL
PARA REFERENCIA FUTURA
Part No. SP7082
SP7082 RT1600M0 Spanish English.indd 1
Call Us 1
For any questions about:
• Operation
• Warranty
(See back cover)
• Technical Assistance
• Repair Parts
Please have your Model Number a nd
Serial Number on hand when calling.
1-800-474-3443
FOR QUESTIONS OR INFORMATION CONTACT US AT
Wet/Dry Vacs
01-800-701-9811 FROM MEXICO
WET/DRY VAC PARTS
& ACCESSORIES
For service parts visit store.ridgid.com/provacs
MANUAL DEL USUARIO
OWNER'S MANUAL
ASPIRADORA PARA MOJADO/SECO
60 Litros / 16 Galones EE.UU.
60 Liter / 16 U.S. Gallon
st
TABLE OF CONTENTS
*****************
• SAFETY INSTRUCTIONS. . . . . . . . . . . . . . . . . . . . . 23
• INTRODUCTION . . . . . . . . . . . . . . . . . . . . . . . . . . 25
• ASSEMBLY . . . . . . . . . . . . . . . . . . . . . . . . . . . . . 27
• OPERATION . . . . . . . . . . . . . . . . . . . . . . . . . . . . . 32
• STORAGE. . . . . . . . . . . . . . . . . . . . . . . . . . . . . . . 37
• MAINTENANCE . . . . . . . . . . . . . . . . . . . . . . . . . . . 39
• REPAIR PARTS . . . . . . . . . . . . . . . . . . . . . . . . . . . 42
• WARRANTY . . . . . . . . . . . . . . . . . . . . . . . . . . . . . 44
WARNING:
To reduce the risk of injury, the user must
read and understand the owner's manual
before using this product.
SAVE THIS MANUAL
FOR FUTURE REFERENCE
1
DESMONTABLE DE
DETACHABLE
WET/DRY VAC
RT1600M0
Printed in Mexico
1/15/19 4:26 PM
Advertisement
Table of Contents

Related Manuals for RIDGID RT1600M0


Summary of Contents for RIDGID RT1600M0
-
Page 1: Table Of Contents
GUARDE ESTE MANUAL SAVE THIS MANUAL PARA REFERENCIA FUTURA FOR FUTURE REFERENCE Part No. SP7082 Printed in Mexico SP7082 RT1600M0 Spanish English.indd 1 1/15/19 4:26 PM... -
Page 2: Instrucciones De Seguridad
• No recoja con la aspiradora nada que esté ardiendo Mantenga el cordón alejado de las superficies o humeando, como cigarrillos, fósforos o cenizas calientes. calientes. • No maneje el enchufe, el interruptor o la aspiradora con las manos mojadas. SP7082 RT1600M0 Spanish English.indd 2 1/15/19 4:26 PM... - Page 3 Para reducir el riesgo de sacudidas eléctricas, No use la unidad como rociador. no exponga la aspiradora a la lluvia y almacénela en interiores. GUARDE ESTE MANUAL SP7082 RT1600M0 Spanish English.indd 3 1/15/19 4:26 PM...
-
Page 4: Introducción
Tubo extensor del soplador: Se conecta directamente al ensamblaje del cabezal del motor y concentra el aire para realizar aplicaciones de soplado. SP7082 RT1600M0 Spanish English.indd 4 1/15/19 4:26 PM... - Page 5 Soporte para accesorios ..Manual del usuario ....1 * El filtro viene preensamblado. SP7082 RT1600M0 Spanish English.indd 5 1/15/19 4:26 PM...
-
Page 6: Ensamblaje
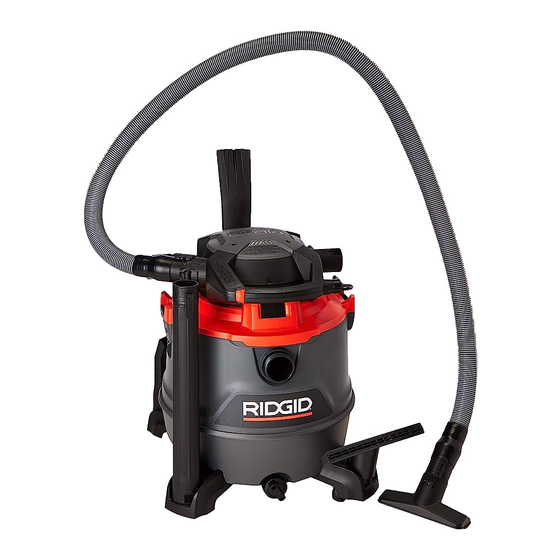
6. Ponga el tambor en posición vertical. Soporte para Caddy accesorios Pie de ruedecilla Caster Foot Caster Foot Agujero del pie Post Hole de ruedecilla para el poste Post Poste Dust Tambor Drum para polvo SP7082 RT1600M0 Spanish English.indd 6 1/15/19 4:26 PM... - Page 7 Powerhead Ensamblaje Assembly del cabezal del motor Extended Reborde extendido Latches Pestillos del tambor (2) Dust Tambor Vac Inlet Drum Entrada de la para polvo aspiradora Entrada de la Vac Inlet aspiradora SP7082 RT1600M0 Spanish English.indd 7 1/15/19 4:26 PM...
- Page 8 Release Button del tubo extensor Accessory Nozzle Salientes de la boquilla Ridges del accesorio Extension Wand Botón de liberación Release Button del tubo extensor Accessory Nozzle Salientes de la boquilla Ridges del accesorio SP7082 RT1600M0 Spanish English.indd 8 1/15/19 4:26 PM...
- Page 9 Manguera con fijación profesional BOTÓN DE LIBERACIÓN PROFESSIONAL LOCKING HOSE DE LA MANGUERA CON RELEASE BUTTON FIJACIÓN PROFESIONAL BOTÓN DE FIJACIÓN PROFESSIONAL DE LA MANGUERA LOCKING HOSE LOCKING BUTTON CON FIJACIÓN PROFESIONAL SP7082 RT1600M0 Spanish English.indd 9 1/15/19 4:26 PM...
- Page 10 Blower Latch del soplador desmontable Detachable Pestillo del soplador Blower Latch desmontable Detachable Blower Handle Asa del soplador desmontable Detachable Pestillo Blower Latch del soplador desmontable Powerhead Ensamblaje Assembly del cabezal del motor SP7082 RT1600M0 Spanish English.indd 10 1/15/19 4:26 PM...
-
Page 11: Funcionamiento
Después de enchufar el cordón de energía en el Detachable Asa del soplador Blower Handle tomacorriente, encienda la unidad empujando el desmontable interruptor de la posición “O” a la posición “|”. SP7082 RT1600M0 Spanish English.indd 11 1/15/19 4:26 PM... - Page 12 Para reducir el riesgo de daños a IMPORTANTE: la aspiradora, no tenga en marcha el motor con el flotador en la posición elevada. SP7082 RT1600M0 Spanish English.indd 12 1/15/19 4:26 PM...
- Page 13 Saque o haga salir una cantidad suficiente del contenido para hacer que la aspiradora sea suficientemente liviana como para poder levantarla cómodamente. Drum Enganche del Catch (2) tambor (2) Vac Inlet Entrada de la aspiradora SP7082 RT1600M0 Spanish English.indd 13 1/15/19 4:26 PM...
- Page 14 Para reducir el riesgo de daños a la audición, use protectores de oídos cuando utilice la aspiradora/soplador durante muchas horas seguidas o cuando la utilice en un área ruidosa. SP7082 RT1600M0 Spanish English.indd 14 1/15/19 4:26 PM...
- Page 15 3. ENCIENDA el soplador deslizando el interruptor ubicado en el asa del soplador hasta la posición “I”. "ON" “ENCENDIDO” "OFF" “APAGADO” Switch Interruptor Detachable Asa del soplador Blower Handle desmontable SP7082 RT1600M0 Spanish English.indd 15 1/15/19 4:26 PM...
-
Page 16: Almacenamiento
Power Cord Cable de alimentación & Plug y enchufe Detachable Blower Lengüetas del enrollador del cable Cord Wrap Tabs (2) del soplador desmontable (2) SP7082 RT1600M0 Spanish English.indd 16 1/15/19 4:26 PM... - Page 17 Professional Manguera con Locking Hose fijación profesional Rear Hose Clip trasero de Storage Clip almacenamiento de la manguera SP7082 RT1600M0 Spanish English.indd 17 1/15/19 4:26 PM...
-
Page 18: Mantenimiento
Deje que la almohadilla de espuma se seque. PELIGRO: 5. Examine la almohadilla de espuma para determinar puede reutilizar. No utilice la unidad sin reinstalar el escudo necesita reemplazarla, consulte en línea en de entrada. store.ridgid.com/provacs. SP7082 RT1600M0 Spanish English.indd 18 1/15/19 4:26 PM... - Page 19 Qwik Lock™. 2. Asegúrese de que la empaquetadura de goma ubicada en la parte inferior del filtro Qwik Lock™ se asiente alrededor de la base de la jaula del filtro. SP7082 RT1600M0 Spanish English.indd 19 1/15/19 4:26 PM...
- Page 20 “Limpieza de un filtro mojado”. ADVERTENCIA: Para garantizar la SEGURIDAD y CONFIABILIDAD del producto, cualquier otro mantenimiento, reparación y ajuste deberá ser realizado por centros de servicio Autorizados, utilizando siempre piezas de repuesto RIDGID. SP7082 RT1600M0 Spanish English.indd 20 1/15/19 4:26 PM...
-
Page 21: Piezas De Repuesto
60 Litros (de 16 Galones EE.UU.) Número de modelo RT1600M0 Clasificaciones eléctricas: 120 V~ 12 A 60 Hz Las piezas RIDGID se encuentran disponibles en línea conectándose a store.ridgid.com/provacs Pida siempre por número de pieza —no por número de clave ADVERTENCIA:... -
Page 22: Garantía
• Cómo puede obtener servicio Para obtener los beneficios de la garantía, contáctenos en ridgid.com/vacwarranty, lleve su producto a la tienda con esta garantía y un comprobante de compra o llame al 018007019811 y le dirigiremos a su centro de servicio más cercano para que lleve su aspiradora para inspección, reparación o reemplazo, y... -
Page 23: Safety Instructions
• Do not vacuum anything that is burning away from heated surfaces. or smoking, such as cigarettes, matches, or hot ashes. • Do not handle plug, switch, or the Vac with wet hands. SP7082 RT1600M0 Spanish English.indd 23 1/15/19 4:26 PM... - Page 24 IDENTICAL REPLACEMENT PARTS. debris or draining liquid. • To reduce the risk of personal injury WARNING: or damage to Vac, use only RIDGID recommended accessories. • For your own safety, read and • When using as a detached blower: understand owner’s manual.
-
Page 25: Introduction
Extension Wands - These wands can interiors and most upholstery cleaning. be connected together and provide additional length. Blower Wand - Attaches directly to the power assembly and concentrates the air for blowing applications. SP7082 RT1600M0 Spanish English.indd 25 1/15/19 4:26 PM... - Page 26 Qwik Lock™ Filter .......1 Professional Locking Hose ..1 Extension Wands ......2 Blower Wand .......1 Car Nozzle ........1 Utility Nozzle .......1 Wet Nozzle ........1 Accessory Caddy ......1 Owner’s Manual ......1 * The Filter comes preassembled. SP7082 RT1600M0 Spanish English.indd 26 1/15/19 4:26 PM...
-
Page 27: Assembly
Accessory 5. Repeat for the other three Caster/ Caddy Caster Foot assemblies. 6. Turn the Dust Drum upright. Caster Foot Caster Foot Post Hole Post Dust Drum SP7082 RT1600M0 Spanish English.indd 27 1/15/19 4:26 PM... - Page 28 Dust Drum. Do not force the Latches to Inlet. Be sure Powerhead Assembly is rotate more than slightly outside Drum fully seated on the Dust Drum. flange. Powerhead Powerhead Assembly Assembly Latches Extended Vac Inlet Dust Drum Vac Inlet SP7082 RT1600M0 Spanish English.indd 28 1/15/19 4:26 PM...
- Page 29 Nozzle Ridges of the Accessory with the Release Button of your Extension Wand. Press to secure the Nozzle to the Extension Wand. CONNECT: Extension Wand Release Button Accessory Nozzle Ridges Extension Wand Release Button Accessory Nozzle Ridges SP7082 RT1600M0 Spanish English.indd 29 1/15/19 4:26 PM...
- Page 30 Professional Locking Hose. The Vac is Hose ready for use. Release Button INSERT HOSE Drum Inlet Ridges Hose Release Button Professional Locking Hose PROFESSIONAL LOCKING HOSE RELEASE BUTTON PROFESSIONAL LOCKING HOSE LOCKING BUTTON SP7082 RT1600M0 Spanish English.indd 30 1/15/19 4:26 PM...
- Page 31 BLOWER UP to the Powerhead Assembly. Detachable Blower Handle Detachable TO REPLACE: ROTATE Blower Handle DETACHABLE BLOWER DOWN Detachable Blower Latch Detachable Blower Latch Detachable Blower Handle Detachable Blower Latch Powerhead Assembly SP7082 RT1600M0 Spanish English.indd 31 1/15/19 4:26 PM...
-
Page 32: Operation
Outlet, reverse the Plug. If it still does "OFF" not fit, contact a qualified electrician to Switch install the proper Outlet. Do not change the Plug in any way. Detachable Blower Handle SP7082 RT1600M0 Spanish English.indd 32 1/15/19 4:26 PM... - Page 33 4. Following use of Vac for wet pick up, allow Filter to dry completely to avoid mildew and Filter damage. IMPORTANT: To reduce the risk of damage to the Vac, do not run Motor with Float in raised position. SP7082 RT1600M0 Spanish English.indd 33 1/15/19 4:26 PM...
- Page 34 Vac heavy with liquid or debris. Scoop or drain enough contents out to make the Vac light enough to lift comfortably. Drum Catch (2) Vac Inlet SP7082 RT1600M0 Spanish English.indd 34 1/15/19 4:26 PM...
- Page 35 Wear a dust mask if blowing creates dust which might be inhaled. Detachable Blower Latch CAUTION: To reduce the risk of hearing damage, wear ear protectors when using the Vac/Blower for extended time or in a noisy area. SP7082 RT1600M0 Spanish English.indd 35 1/15/19 4:26 PM...
- Page 36 Detachable Blower TO LOCK Blower Port Wand 3. Turn the Blower “ON” by sliding the Switch in the Handle of the Blower to the “I” position. "ON" "OFF" Switch Detachable Blower Handle SP7082 RT1600M0 Spanish English.indd 36 1/15/19 4:26 PM...
-
Page 37: Storage
To store the Cord, wrap it around the Detachable Blower Cord Wrap Two Tabs. Secure the Cord using the Cord Clip on the Plug. Power Cord & Plug Detachable Blower Cord Wrap Tabs (2) SP7082 RT1600M0 Spanish English.indd 37 1/15/19 4:26 PM... - Page 38 Professional openings. Do not vacuum with any Locking Hose ventilation openings blocked; keep free of dust, lint, hair or anything that may reduce air flow. Professional Locking Hose Rear Hose Storage Clip SP7082 RT1600M0 Spanish English.indd 38 1/15/19 4:26 PM...
-
Page 39: Maintenance
Allow Foam Pad to dry. DANGER: 5. Examine Foam Pad for reuse. If you need to replace it, check on-line at Do not operate without reinstalling store.ridgid.com/provacs. the intake shield. SP7082 RT1600M0 Spanish English.indd 39 1/15/19 4:26 PM... - Page 40 Qwik Lock™ Integrated Filter Plate. 2. Make sure the Rubber Gasket at the bottom of the Qwik Lock™ Filter seats around the base of the Filter Cage. SP7082 RT1600M0 Spanish English.indd 40 1/15/19 4:26 PM...
- Page 41 “Cleaning A Wet Filter”. WARNING: To assure product SAFETY and RELIABILITY, any other maintenance, repairs and adjustments should be performed by Authorized Service Centers, always using RIDGID replacement parts. SP7082 RT1600M0 Spanish English.indd 41 1/15/19 4:26 PM...
-
Page 42: Repair Parts
Model Number RT1600M0 Electrical Ratings: 120 V~ 12.0 A 60 Hz RIDGID parts are available on-line at store.ridgid.com/provacs Always order by Part Number - Not by Key Number WARNING: To reduce the risk of injury from electrical shock, unplug power cord before servicing the electrical parts of the Wet/Dry Vac. - Page 43 NOTES SP7082 RT1600M0 Spanish English.indd 43 1/15/19 4:26 PM...
-
Page 44: Warranty
• How to Obtain Service To obtain warranty benefits, contact us at ridgid.com/vacwarranty, bring your product to the store with this warranty and proof of purchase or call 018007019811 and we will direct you to your nearest service center to return your vacuum for inspection, repairs or replacement, then bring your product to the directed service center with this warranty and proof of purchase.