Advertisement
Quick Links
Test Equipment Depot - 800.517.8431 - TestEquipmentDepot.com
TABLE OF CONTENTS
*****************
• SAFETY INSTRUCTIONS. . . . . . . . . . . 2
• INTRODUCTION . . . . . . . . . . . . . . . . . . 4
• ASSEMBLY . . . . . . . . . . . . . . . . . . . . . . 6
• OPERATION . . . . . . . . . . . . . . . . . . . . . 8
• STORAGE . . . . . . . . . . . . . . . . . . . . . . 11
• MAINTENANCE. . . . . . . . . . . . . . . . . . 12
• REPAIR PARTS . . . . . . . . . . . . . . . . . 14
!
WARNING:
the user must read and
understand the owner's
manual before using this
product.
SAVE THIS MANUAL
FOR FUTURE REFERENCE
Part No. SP7063
SP7063.indb 1
Call Us 1
For any questions about:
• Operation
• Warranty
(See back cover)
• Technical Assistance
• Repair Par t s
Please have your Model Number a nd
Serial Number on hand when calling.
1-800-474-3443
FOR QUESTIONS OR INFORMATION CONTACT US AT
Wet/Dry Vacs
1-800-4-RIDGID (1-800-474-3443) from the US and Canada
WET/DRY VAC PARTS
& ACCESSORIES
For service parts visit store.ridgid.com/provacs
ÍNDICE DE CONTENIDO
*****************
• INSTRUCCIONES DE SEGURIDAD . 15
• INTRODUCCIÓN . . . . . . . . . . . . . . . . . 17
• ENSAMBLAJE . . . . . . . . . . . . . . . . . . 19
• FUNCIONAMIENTO . . . . . . . . . . . . . . 21
• ALMACENAMIENTO. . . . . . . . . . . . . . 24
• MANTENIMIENTO. . . . . . . . . . . . . . . . 25
• PIEZAS DE REPUESTO . . . . . . . . . . . 27
!
ADVERTENCIA:
Para reducir el riesgo de
lesiones, el usuario debe
leer y comprender el
manual del usuario antes
de usar este producto.
GUARDE ESTE MANUAL
PARA REFERENCIA FUTURA
OWNER'S MANUAL
MANUAL DEL USUARIO
6 U.S. GALLON / 22.5 Liter
ASPIRADORA PARA MOJADO/SECO DE
6 GALONES EE.UU. / 22,5 Litros
ASPIRATEUR DE LIQUIDES ET
22,5 Litres / 6 GALLONS DES É-U
st
TABLE DES MATIÈRES
• INSTRUCTIONS RELATIVES
À LA SÉCURITÉ . . . . . . . . . . . . . . . . . 28
• INTRODUCTION . . . . . . . . . . . . . . . . . 30
• ASSEMBLAGE . . . . . . . . . . . . . . . . . . 32
• FONCTIONNEMENT . . . . . . . . . . . . . . 34
• RANGEMENT . . . . . . . . . . . . . . . . . . . 37
• ENTRETIEN. . . . . . . . . . . . . . . . . . . . . 38
• PIÈCES DE RECHANGE . . . . . . . . . . 40
!
CONSERVER CE MANUEL
POUR RÉFÉRENCE FUTURE
MODE D'EMPLOI
WET/DRY VAC
DE POUSSIÈRES DE
RT06000
*****************
AVERTISSEMENT :
Pour réduire les risques
de blessures, l'utilisateur
doit lire et veiller à bien
comprendre
le
mode
d'emploi avant d'utiliser
ce produit.
Printed in Mexico
5/17/18 4:07 PM
Advertisement

Related Manuals for RIDGID 095691626981


Summary of Contents for RIDGID 095691626981
-
Page 1: Table Of Contents
Please have your Model Number a nd Serial Number on hand when calling. 1-800-474-3443 FOR QUESTIONS OR INFORMATION CONTACT US AT Wet/Dry Vacs 1-800-4-RIDGID (1-800-474-3443) from the US and Canada WET/DRY VAC PARTS & ACCESSORIES For service parts visit store.ridgid.com/provacs TABLE OF CONTENTS ÍNDICE DE CONTENIDO... -
Page 2: Safety Instructions
IMPORTANT SAFETY INSTRUCTIONS Safety is a combination of using common • Do not vacuum drywall dust, cold sense, staying alert, and knowing how your fireplace ash, or other fine dusts with Wet/Dry Vacuum Cleaner (“Vac”) works. standard filter. These may pass through the filter and be exhausted back into the Safety Signal Words air. - Page 3 • To reduce the risk of personal injury • Do not run unattended. or damage to Vac, use only RIDGID • Do not pick up hot ashes, recommended accessories. coals, toxic, flammable or other •...
-
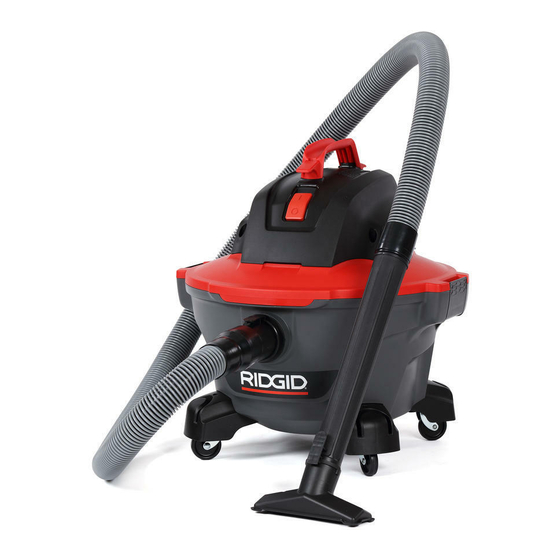
Page 4: Introduction
INTRODUCTION This Wet/Dry Vac is intended for house- Read this Owner’s Manual to familiarize hold use. It may be used for vacuuming yourself with the product features and wet or dry media and may be used as a to understand the specific usage of your blower. - Page 5 Unpacking This Product Requires Assembly. Check all parts from carton against the Carton Contents List. If any parts are damaged or missing contact 1-800-4-RIDGID (US and Canada) or by email at info.info@emerson.com. Carton Contents List Description Wet/Dry Vac .......1 Professional Locking Hose ..1 Casters ........4...
-
Page 6: Assembly
ASSEMBLY Caster/Caster Foot Assembly Wet/Dry Vac Assembly Attaching Powerhead Assembly NOTE: Remove Powerhead Assembly to Dust Drum from Dust Drum prior to assembly of Casters and Caster Feet. 1. Place Powerhead Assembly on top of 1. Turn Dust Drum upside down on floor. Dust Drum with the extended lip of the lid aligned with the Dust Drum inlet. - Page 7 ASSEMBLY Carry Handle Assembly Inserting the Professional Locking Hose 1. Locate the Carry Handle and the two (2) #10 x 3/4” (19 mm) Pan Head Screws in 1. Insert the larger end of the Professional loose parts bag. Locking Hose into the Inlet Port. Engage the Professional Locking Hose 2.
-
Page 8: Operation
OPERATION WARNING: To reduce the risk of fire, explosion, or damage to Vac: • Do not leave Vac running while unattended - you may fail to notice important signs indicating abnormal operation such as loss of suction, debris/liquid exiting the exhaust, or abnormal motor noises. Immediately stop using Vac if you notice these signs. - Page 9 OPERATION Vacuuming Liquids After you plug the Power Cord into the Outlet, turn the Vac on by pushing the 1. Vacuuming up small amounts of liquid Switch from position “O” to position “l”. (less than 2” (5 cm) collected in Dust The symbols used on the Switch Actuator Drum) does not require the removal of are international “On &...
- Page 10 OPERATION Emptying the Dust Drum 3. (Optional) Attach the Extension Wand to swivel end of the Hose. WARNING: To reduce the risk 4. Turn the Vac on and you are ready to of injury from accidental starting, use your Vac as a Blower. unplug power cord before emptying the drum.
-
Page 11: Storage
ACCESSORY & HOSE STORAGE Accessory Storage Cord Storage 1. For storage, slide the Extension Wands To store the Cord, wrap it around the top and the Accessories onto Posts of the Handle/Cord Wrap beneath the two Tabs. Caster Feet. Secure the Cord using the Cord Clip on the Plug. -
Page 12: Maintenance
MAINTENANCE Filter NOTE: Failure to properly seat the bottom Gasket and Integrated Filter Plate to the Filter Cage could result in debris WARNING: To reduce the risk bypassing the Filter. of injury from accidental starting, unplug power cord before changing or cleaning filter. - Page 13 (no debris), run water through it as described under “Cleaning A Wet Filter”. WARNING: To assure product SAFETY and RELIABILITY, any other maintenance, repairs and adjustments should be performed by Authorized Service Centers, always using RIDGID replacement parts. SP7063.indb 13 5/17/18 4:07 PM...
-
Page 14: Repair Parts
Wet/Dry Vac. This product has a 90 day Satisfaction Guarantee Policy as well as a Limited Lifetime Warranty. For Warranty and Policy details go to RIDGID.com/VacWarranty or call 1-800-4-RIDGID. Part No. SP7063 Form No. SP7063 Printed in Mexico 05/18...