Table of Contents
Advertisement
Quick Links
MODEL G0879
FLUX CORE MIG WELDER
OWNER'S MANUAL
(For models manufactured since 6/19)
4009939
COPYRIGHT © DECEMBER, 2021 BY GRIZZLY INDUSTRIAL, INC.
WARNING: NO PORTION OF THIS MANUAL MAY BE REPRODUCED IN ANY SHAPE
OR FORM WITHOUT THE WRITTEN APPROVAL OF GRIZZLY INDUSTRIAL, INC.
V1.12.21
#SS22162 PRINTED IN CHINA
Advertisement
Table of Contents

Related Manuals for Grizzly G0879


Summary of Contents for Grizzly G0879
- Page 1 (For models manufactured since 6/19) 4009939 COPYRIGHT © DECEMBER, 2021 BY GRIZZLY INDUSTRIAL, INC. WARNING: NO PORTION OF THIS MANUAL MAY BE REPRODUCED IN ANY SHAPE OR FORM WITHOUT THE WRITTEN APPROVAL OF GRIZZLY INDUSTRIAL, INC. V1.12.21 #SS22162 PRINTED IN CHINA...
- Page 2 This manual provides critical safety instructions on the proper setup, operation, maintenance, and service of this machine/tool. Save this document, refer to it often, and use it to instruct other operators. Failure to read, understand and follow the instructions in this manual may result in fire or serious personal injury—including amputation, electrocution, or death.
-
Page 3: Table Of Contents
Table of Contents INTRODUCTION ..........................2 Contact Info ..........................2 Manual Accuracy ........................2 Identification ..........................3 Controls & Components ......................4 Additional Sources for ........................ 6 Welding Codes and Standards ....................6 Machine Data Sheet ........................7 SECTION 1: SAFETY ........................8 Safety Instructions for Machinery .................... -
Page 4: Introduction
ID label (see below). This information is required for us to provide proper tech support, and it helps us determine if updated documentation is available for your machine. Manufacture Date Serial Number Model G0879 (Mfd. Since 6/19) -
Page 5: Identification
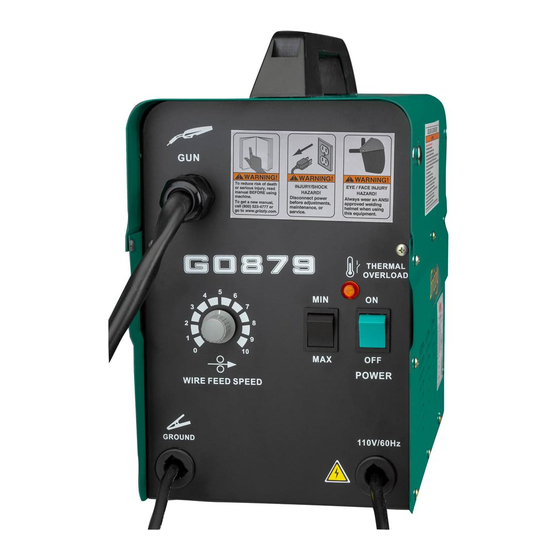
Become familiar with the names and locations of the controls and features shown below to better understand the instructions in this manual. Wire Feed Driver Control Panel Wire Spool Mount Ground Clamp Welding Gun To reduce your risk of serious injury, read this entire manual BEFORE using machine. Model G0879 (Mfd. Since 6/19) -
Page 6: Controls & Components
C. MIN/MAX Power Switch: Switches machine welding circuit. between its minimum and maximum output amperage settings. MIN setting will yield a 60A output, and MAX will yield 70A output. D. ON/OFF Switch: Turns machine ON and OFF. Model G0879 (Mfd. Since 6/19) - Page 7 K. Tension Knob: Adjusts wire feed tension. O. Spool Collar: Secures wire spool on spindle. Tension Roller: Applies tension to wire by pressing against drive roller. Amount of ten- sion can be adjusted with tension knob. Model G0879 (Mfd. Since 6/19)
-
Page 8: Additional Sources For
Failure to do so could result in serious per- ity of operator injury. If normal safety pre- sonal injury, damage to equipment, or poor cautions are overlooked or ignored, serious work results. personal injury may occur. Model G0879 (Mfd. Since 6/19) -
Page 9: Machine Data Sheet
Low 60A and High 70A Modes Capable of Welding Steel and Stainless Steel Accessories: Brush/Chipping Hammer 0.030 in. & 0.035 in. Tips 1 lb. of 0.035 in. Flux Wire Model G0879 (Mfd. Since 6/19) Model G0879 Page 1 of 1... -
Page 10: Section 1: Safety
Never operate under the influence of drugs or injury or blindness from flying particles. Everyday alcohol, when tired, or when distracted. eyeglasses are NOT approved safety glasses. Model G0879 (Mfd. Since 6/19) - Page 11 Make sure they are properly installed, you experience difficulties performing the intend- undamaged, and working correctly BEFORE ed operation, stop using the machine! Contact our operating machine. Technical Support at (570) 546-9663. Model G0879 (Mfd. Since 6/19)
-
Page 12: Additional Safety For Welders
Exploding pressurized gas cylinders can cause or being within 50 feet of welding operations. serious property damage, personal injury, or death. -10- Model G0879 (Mfd. Since 6/19) -
Page 13: Section 2: Power Supply
-11- Model G0879 (Mfd. Since 6/19) - Page 14 Two-prong outlets do not meet the grounding requirements for this machine. Do not modify or use an adapter on the plug provided—if it will not fit the outlet, have a qualified electrician install the proper outlet with a verified ground. -12- Model G0879 (Mfd. Since 6/19)
-
Page 15: Grounding For Welding Safety
Welding Machine Ground When properly connected to a power source, the Model G0879 welder is grounded through the power cord and power grid. The internal welding Always ensure that the ground for the circuit of the welder is insulated from the external incoming power circuit to the welder and enclosure. -
Page 16: Section 3: Setup
IMPORTANT: Save all packaging materials until you are completely satisfied with the machine and have resolved any issues between Grizzly or the shipping agent. You MUST have the original pack- aging to file a freight claim. It is also extremely helpful if you need to return your machine later. -
Page 17: Site Considerations
Make sure all power cords are protected from traffic, material handling, moisture, chemicals, or other hazards. Make sure to leave enough space around machine to disconnect power supply or apply a lockout/tagout device, if required. -15- Model G0879 (Mfd. Since 6/19) -
Page 18: Assembly
Spool Collar Figure 11. Wire spool installed. Assemble face shield by folding edges and snapping together. Install face shield handle by snapping it to front of face shield. Cover Latch Figure 10. Handle installed. -16- Model G0879 (Mfd. Since 6/19) - Page 19 Verify motor operation by slowly turning wire feed speed dial. Squeeze trigger briefly to verify that dial adjusts wire feed speed. Cut excess wire off so stickout is approxi- mately ⁄ ". Turn machine OFF and disconnect from power. -17- Model G0879 (Mfd. Since 6/19)
-
Page 20: Section 4: Operations
Regardless of the content in this sec- Properly connects ground clamp as close as tion, Grizzly Industrial will not be held liable possible to workpiece, or to metal workbench for accidents caused by lack of training. - Page 21 (see Figure 14). Wire Drive Roller Cap Tension Knob Wire Guide Wire Housing Tension Tension Knob Figure 12. Wire installed in wire feed driver. Figure 14. Wire feed driver with wire installed. -19- Model G0879 (Mfd. Since 6/19)
-
Page 22: Test Run
11. Pointing gun away from yourself and any conductive material, squeeze trigger to begin feeding wire through machine. Once wire appears at gun tip, release trigger (see Figure 16). Welding Wire Figure 16. Wire extending from gun. -20- Model G0879 (Mfd. Since 6/19) -
Page 23: Adjusting Wire Feed Tension
If wire tension is too low, it can cause wire spool to unravel. Once desired wire tension is achieved, close top cover of machine. Tension Knob Figure 18. Wire feed driver assembly locked. -21- Model G0879 (Mfd. Since 6/19) -
Page 24: Operation Guidelines
8 minutes before starting the arc again. • Establish a safe and efficient welding envi- The Model G0879 has a cooling fan and an inter- ronment, and ensure that you are properly nal thermostat that will shut the welder down if protected for the welding operation. -
Page 25: Workpiece Inspection
Point gun away from yourself and any con- ductive material. Squeeze trigger to release welding wire. Cut back wire to about ⁄ " stick- out from contact tip (see Figure 20). ⁄ " Figure 20. Welding wire stick-out. -23- Model G0879 (Mfd. Since 6/19) - Page 26 “HIGH” amperage setting. 11. When weld is complete, release trigger on welding gun to stop weld. 15° 15° Perpendicular Push Drag 12. Allow machine to cool, then turn machine OFF. (Welding Direction) Figure 22. Welding angle. -24- Model G0879 (Mfd. Since 6/19)
-
Page 27: Welding Tips
• Gun Travel Speed: Too slow of gun travel speed can cause built-up and convex welds with bad slag coverage. Too fast of gun travel speed can cause narrow, globby welds with minimal penetration. -25- Model G0879 (Mfd. Since 6/19) -
Page 28: Section 5: Accessories
To reduce this risk, only install accessories recommended for this machine by Grizzly. NOTICE Refer to our website or latest catalog for additional recommended accessories. H7439—Kinco - 20" Welding Bib This welding bib measures 22"... - Page 29 Use for welding, soldering, and assembly. Multi- angle design can be used at 45°, 90°, or 135°. Capacity: 75 lbs. Figure 28. T28932 Welding Table. Figure 30. T31756 Arrow Welding Magnet. www.grizzly.com 1-800-523-4777 order online at or call -27- Model G0879 (Mfd. Since 6/19)
- Page 30 T31740 and T31741—U.S. Forge E71T-GS Flux T30369 and T30370—Contact Tips Cored Wire - 2 lb. Contact Tip for use with the G0879 Flux Core Mig Use Flux Cored Wire to create strong, clean Welder. Sizes .030" and .035". welds, with a smooth surface for efficient wire feed.
- Page 31 T30371—MIG Nozzle T30367—Torch Neck for G0879 MIG Nozzle for use with the G0879 Welder. Torch Neck for use with the G0879 Welder. Figure 35. T30371 Nozzle for G0879. Figure 36. T30367 Torch Neck for G0879. www.grizzly.com 1-800-523-4777 order online at...
-
Page 32: Section 6: Maintenance
DISCONNECT MACHINE FROM POWER! and see Troubleshooting on Page 31 for other possible problems. Raise top cover of machine, as shown in Assembly on Page 16. Replace clear cap over fuse. Re-install left side panel. -30- Model G0879 (Mfd. Since 6/19) -
Page 33: Section 7: Service
6. Welding wire corroded. 7. Ground clamp not connected to workpiece/ 7. Connect the ground clamp close to your workpiece. too far from weld location/bad ground Make sure ground clamp is connected/terminals are connection. clean. -31- Model G0879 (Mfd. Since 6/19) - Page 34 Burning holes 1. Material too thin for welding operation. 1. Use thicker material. Not recommended to weld " steel with G0879 (Page 7). in workpiece. material thinner than ⁄ 2. Welding amperage output too high.
-
Page 35: Warranty & Returns
WARRANTY & RETURNS Grizzly Industrial, Inc. warrants every product it sells for a period of 1 year to the original purchaser from the date of purchase. This warranty does not apply to defects due directly or indirectly to misuse, abuse, negligence, accidents, repairs or alterations or lack of maintenance.