
Related Manuals for Honeywell HUSS-E4V


Summary of Contents for Honeywell HUSS-E4V
- Page 1 Honeywell HUSS-E4V System Digital Video Encoder User Guide Document 800-10618 Rev. A...
-
Page 3: Table Of Contents
How to Use this Document ................... 2 2 General Information ...................... 4 Overview ........................4 HUSS-E4V ........................5 3 Installing and Operating HUSS-E4V ................10 Panel Description ....................... 10 Front Panel ......................10 Rear Panel ......................12 Installing Notes ......................13 Connecting External Power ................... - Page 4 Honeywell 4 HUSS-E4V Network Client ..................19 Internet Explorer Settings ................... 19 Login ........................... 21 Real-time Video ......................24 Intercom ........................25 PTZ Control and Auxiliary ..................26 Configuration ......................30 System Setting ....................... 32 Video Display Setting..................... 49 Recording Setting ....................55 Network Setting .....................
-
Page 5: About This Document
Honeywell 1 About This Document Audience Thank you for purchasing HUSS (Honeywell Ultra-Smart Streamer). This manual will guide you through installing, configuring and operating HUSS system. Overview of Contents This document contains the following chapters: • Document, a brief introduction of this book. -
Page 6: Font And Symbols
• The manual has been reviewed and the accuracy is guaranteed. If there is any uncertainty or controversy, please refer to the final explanation of Honeywell. Honeywell does not take any responsibility for any consequences caused by misunderstanding of the manual or improper operations. - Page 7 Honeywell • For more information, please visit http://www.cn.security.honeywell.com.
-
Page 8: General Information
HUSS-E4V can be configured easily through IE browser. And real-time video encoded by the HUSS-E4V is displayed directly on the network client of each PC. HUSS-M video client decodes the encoded video files from HUSS-E4V and displays it on PC, with audio signal played synchronously. For detail, refer to HUSS-M Video Client User Guide. -
Page 9: Huss-E4V
Alarm IN Alarm OUT 报警输入 报警输出 HUSS-E4 Ethernet 以太网 Encoder 视频编码器 模拟音频输入 HUSS-E4 Analog Encoder 视频编码器 Audio IN Analog RS485/422 Audio OUT Analog 模拟音频 模拟音频 Analog RS485/ 模拟音频输出 Audio IN Audio OUT 输入 输出 Analog Video 模拟视频 HUSS-E4V Figure 2-2 HUSS-E4V... - Page 10 Great network and security performance—with built-in Web Server, HUSS-E4V can be configured remotely through network. And users can also watch real-time video from HUSS-E4V remotely through network. It features multiple user profiles, motion detection and alarm reporting, which all guarantee users’ security. Local backup and system log protect the integrity of information effectively from network breakdown.
- Page 11 Output, Output voltage: 0.707VRMS. Audio sample frequency 8kHz Audio bandwidth 64kb Audio intercom Intercom with HUSS-E4V or HUSS-M. TCP, UDP, RTP, RTSP, DHCP, ICMP, IGMP, HTTP, Protocol ARP, NTP. Supports unit-cast and multi-cast ( and adjusted). Firmware Update Network client remote update...
- Page 12 General Information Parameter Description Security performance Multiple user profiles Information Protection Log Information Record Clock Build-in clock, Server Net Auto Sync RJ-45,10/100/1000BASE-T IEEE802.3 Network interface Serial port RS485(PTZ control), RS-232 Pelco D, Pelco P, KD6, Scan Dome, VCL. PTZ protocol Relay input Relay output Supports Multiline OSD...
- Page 13 Honeywell Parameter Description Dimension 120 (W) x 165 (L) x 43 (H) Mounting Rack-mounting/desktop-mounting/wall-mounting Power 12VDC Power consumption 9.6W Weight 700g Network browser IE 6 or IE 8...
-
Page 14: Installing And Operating Huss-E4V
Installing and Operating HUSS-E4V 3 Installing and Operating HUSS-E4V Panel Description Front Panel Figure 3-1 Front Panel of HUSS-E4V AUDIO IN 1~AUDIO IN 4 INDICATORS INTERCOM RESETTING BUTTON Refer to the following table for ports information on the front panel:... - Page 15 Honeywell Table 3-1 Front Panel Interface Description Intercom Intercom Audio input/output port RS485 communication status Power indicator; when the power is on, the indicator is on. 4 Video status indicators. INDICATORS Flashes green when encoder is encoding; turns red when motion is detected;...
-
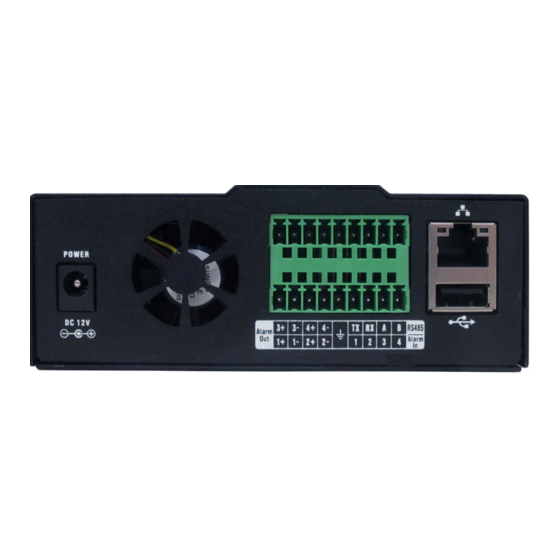
Page 16: Rear Panel
Installing and Operating HUSS-E4V Rear Panel Figure 3-2 Rear Panel The rear panel of Video Encoder is shown in Figure 3-2. Refer to the following table for all the ports information: Table 3-2 Ports Information of Rear Panel Interface Description... -
Page 17: Installing Notes
Honeywell ETHERNET RJ-45 network interface Ground Connection Interface Installing Notes Connecting External Power Please use the 12V DC power in the package. Plug them into the power interface. Mounting Encoder Video encoders may be desktop-mounting, rack-mounting or wall-mounting. For desktop-mounting, encoders can be placed or fixed on desk. -
Page 18: Connecting Video/Audio Input/Output
Installing and Operating HUSS-E4V Figure 3-3 Install Encoder in Cabinet Connecting Video/Audio Input/output Connecting Video Input The Video Input interface of encoders should be BNC (1.0V , 75 Ω). The input PAL/NTSC video signal should meet national standard: high SNR, low distortion and interference. -
Page 19: Connecting Audio Input
Honeywell • Make sure the signal of camera is stable and reliable Camera should be mounted in right place to avoid backlight and low luminance environment. Or use cameras with good backlight compensation or low luminance. • Make sure the transmission is stable and reliable To transmit signal reliably, high quality BNC with excellent shielding performance is used and its type shall be selected in terms of transmitting distance. -
Page 20: Connecting Alarm In And Out Device
Installing and Operating HUSS-E4V Connecting Alarm In and Out Device Connecting Alarm Input Device • Alarm input is Normal Open and Normal Close type. • Alarm detector should be powered by external power. • Earth terminal of alarm detector should be connected to its COM port. -
Page 21: Connecting Ptz
For PTZ device with RS-485 interface, connect the Rx+ and Rx- cables to A and B on the rear panel of HUSS-E4V encoder. You can also connect several PTZs in parallel form. If numbers of connected PTZs is larger, connect an impedance of 120Ω between the farthest terminal of A and B. -
Page 22: Start Or Shut Down
To restore factory value, use a thin object (e.g. a needle) to hold down the hidden button on the rightmost of HUSS-E4V for 5 seconds until the four indicators flash. Then system restores factory settings and reboot. After the product is rebooted, the default IP address of HUSS-E4V is 192.168.1.90. -
Page 23: Huss-E4V Network Client
Honeywell 4 HUSS-E4V Network Client HUSS-E4V digital video encoder can be accessed by Internet Explorer (IE6 or IE8) directly without installing any software. Internet Explorer Settings Make sure Internet Explorer supports ActiveX controls before accessing HUSS-E4V through internet. Take Internet Explorer 6 as example. Open a new Internet Explorer Browser Page. On the Tools menu, click “Internet Options”,... - Page 24 HUSS-E4V Network Client Click “Security” tab, Figure 4-2 is displayed: Figure 4-2 Security Click Custom level… , Figure 4-3 is displayed:...
-
Page 25: Login
Honeywell Figure 4-3 Security Settings Select “Enable” or “Prompt” for all the options in “ActiveX controls and plug-ins” section. Login Enter IP address of HUSS-E4V encoder (Default IP: http: //192.168.1.90) in the Internet Explorer address bar. - Page 26 HUSS-E4V Network Client To modify the default IP address, see Basic Settings on Page 32. For the first login, a prompt window asks the user whether to install “HUSSE4VE.cab”: Figure 4-4 Install HUSSE4VE.cab Click Install and it begins installation. After the installation is completed, the following...
- Page 27 Honeywell Figure 4-5 Login Enter in the “User Name” and “Password”, select the language and click Log on to log on HUSS-E4V. Click “简体中文”, “繁體中文”or “English” to select the language to display.
-
Page 28: Real-Time Video
HUSS-E4V Network Client Figure 4-6 HUSS-E4V Network Client Main Screen Video Configuration PTZ Control Auxiliary Device List Single Display Layout Four Window Display Layout Alarm Information Real-time Video Right-click the target device on the left device list, and select Playing Mode (Main Stream Multicast, Main Stream Unicast, Aux Stream Multicast or Aux Stream Unicast);... -
Page 29: Intercom
Right-click the video playing window, select “Sound”, “Full Screen” or “Stop Video”. Intercom Right -click the device list “HUSS-E4V” on the left pane and select “Intercom”. “Intercom” is checked. It indicates that intercom is enabled with HUSS-E4V. Right-click the device list “HUSS-E4V” again, uncheck “Intercom”, the intercom is stopped. -
Page 30: Ptz Control And Auxiliary
HUSS-E4V Network Client Figure 4-8 Intercom failed PTZ Control and Auxiliary • Before controlling any channel, the real-time video of the channel must be displayed. See Real-time Video on page 24. • Before the PTZ control, PTZ setting must be configured. See on page 52. - Page 31 Honeywell Figure 4-9 PTZ Control...
- Page 32 HUSS-E4V Network Client Select the target channel on the left video layout, and then do the PTZ control on the right pane. Set the “Step” value (default step is “5” and the scale is from “1~9” while “1” is the lowest.).
- Page 33 Honeywell Figure 4-10 PTZ Auxiliary Click the relevant icon to execute the corresponding function, referring to the table below:...
-
Page 34: Configuration
HUSS-E4V Network Client Lighting ON Lighting OFF Wiper ON Wiper OFF Washer ON Washer OFF To enable or disable the auxiliary operation, input the number and click ON or OFF. Configuration Click “Configuration” tab on the main screen and the “Configuration” window is displayed as follows, including 5 tabs: “System Setting”, “Video Display Setting”, “Record Setting”,... - Page 35 Honeywell Figure 4-11 Configuration Only an “admin” can modify the settings in the “Configuration” tab.
-
Page 36: System Setting
HUSS-E4V Network Client System Setting System Setting includes Basic Settings, Time Settings, Device Info, System Log, User Management, Online User Info and Config Settings. User can check the relevant information and modify relevant information here. Basic Settings In the main screen (Figure 4-6), navigate to ConfigurationSystem SettingBasic... - Page 37 Honeywell Device Name – Modify device name of HUSS-E4V. Default Language – Select English, Chinese or Traditional Chinese to display the network client. Max Clients – Enter the maximum clients, the system allow maximum 20 clients to log in the system simultaneously.
- Page 38 HUSS-E4V Network Client Figure 4-13 Time Settings When “Time Mode” is set to “Manual”, you can set the date and time in “System Time”. Date range: “Jan 1, 2000” to “Dec 31, 2037”; Time range: “00:00” to “23:59”. When this setting is changed and click Save, it will pop up the message for you to confirm the operation.
- Page 39 Honeywell DST – Check it to apply DST (Daylight Saving Time) during the preset time period. To set the time period, click Set and the “DST Setting” window is displayed. The time period can be set by “Day of Week” or “Date”.
- Page 40 HUSS-E4V Network Client Select the start and end date/time to apply the DST. When the setting is complete, click OK; click Cancel to close the window without saving the settings. Then it returns to “Time Settings”. NTP Server IP and Port – If “Time Mode” is set to “NTP”, enter “NTP Server IP” and “Port”...
- Page 41 Honeywell Figure 4-16 Device Info It displays the system information (Model Name, MAC Address, Release Date, Alarm Input No., Protocol Version, Serial No., Firmware Version, Video Channel No., and Alarm Output No.) and you can upgrade the software version. To upgrade the software version, perform the following steps:...
- Page 42 HUSS-E4V Network Client Figure 4-17 Select Upgrading File Select the upgrade file and click Open. It will analyze the file and display the version information of the current system and the upgrade file.
- Page 43 Honeywell Figure 4-18 Version Information Click Yes to start upgrade. Wait until the message pops up indicating that the upgrade is complete. Click OK and a message will display for you to confirm to restart. Click OK to restart. After it is rebooted, it applies the upgraded version.
- Page 44 HUSS-E4V Network Client Figure 4-19 System Log To search logs, specify the “Start Time” and “End Time”, and select the log type. Click Search. It will display the search result in below tables. User can click and check the target log directly.
- Page 45 Honeywell Figure 4-20 Log Backup Select the directory you want to save the log and click Save to start log backup (the backup file is named “honlog-mm-dd-hh-mm-ss.txt”) and return to the “System Log” window. Click Delete All to delete all logs; or click OK to return to the main window.
- Page 46 HUSS-E4V Network Client Figure 4-21 User Management HUSS-E4V supports multiple user and different authority management: admin and guest. User can modify user information. Admin cover all authorities and function while guest can only view video and control PTZ. Modifying a User...
- Page 47 Honeywell Figure 4-22 Modify User Select the target user in the drop-down list of “User” and select “Live View” or “PTZ”. Click OK. Or click Cancel to give up the operation and return to the “User Management” window (Figure 4-21).
- Page 48 HUSS-E4V Network Client Click Modify Password in 4-21and the following window is displayed: Figure Figure 4-23 Modify Password Select the target user name in the drop-down list and enter old password, new password and confirm password. Click OK. Or click Cancel to give up the operation and return to the “User Management”...
- Page 49 Honeywell Figure 4-24 Online User Info Click OK to return to the main window (Figure 4-6). Config Settings 4-6), navigate to ConfigurationSystem SettingConfig In the main screen (Figure Settings and the following window is displayed:...
- Page 50 HUSS-E4V Network Client Figure 4-25 Config Settings To restore default settings, click Default and the following window pops up. Click OK to restart HUSS-E4V and HUSS-E4V will apply all default settings.
- Page 51 Honeywell Figure 4-26 Default To import configuration file, click Import in and the following window is Figure 4-25 displayed: Figure 4-27 Confirm to Import Click Yes to confirm import and the following window is displayed:...
- Page 52 Select the importing file and click OK to start importing configuration files. After it is complete, HUSS-E4V will reboot automatically and indicating “The system is restarted, please logon the system again.” in the left bottom. It applies the new configurations after reentering the network client.
-
Page 53: Video Display Setting
Honeywell To export the configuration file (exclude the IP settings), click Export in Figure 4-25 the following window is displayed: Figure 4-29 Export the Configuration File Enter the file name and click Save to start export configure file, after it is complete, the system will display message in the left bottom indicating that the export is completed. - Page 54 HUSS-E4V Network Client Basic Settings In the main screen (Figure 4-6), navigate to ConfigurationVideo Display SettingBasic Settings and the following window is displayed: Figure 4-30 Basic Settings You can configure the following settings in this window: Video Standard – PAL/NTSC. Select the target video standard and click Apply, it displays that the change is saved successfully in the left bottom.
- Page 55 Honeywell Intercom Output Volume – Adjust the audio intercom output volume (0-99) on the slider. Click OK to apply the new settings; click Cancel to give up the changes and return to the main window; click Default , the default setting is displayed on the screen; then click OK or Apply to restore default settings.
- Page 56 HUSS-E4V Network Client Figure 4-31 Image Select the target channel number from 1~4 or All Channels to apply the settings. Configure the image setting of the channel as below: Adjust the image parameters – hue, brightness, contrast and saturation accordingly (0- 99).
- Page 57 Honeywell Figure 4-32 PTZ Select the target channel number from 1~4 or All Channels to apply the settings. Configure the PTZ setting of the channel as below: Protocol – Select from the drop-down list, None, KD6, Schandome, Pelco-D, Pelco-P or VCL.
- Page 58 HUSS-E4V Network Client Sensitivity – Select from the drop-down list, High, Medium or Low. Click OK to apply the new settings; click Cancel to give up the changes and return to the main window; click Default , the default setting is displayed on the screen; then click OK or Apply to restore default settings.
-
Page 59: Recording Setting
Honeywell Date Format – Select from the drop-down list, YYYY-MM-DD, MM-DD-YYYY or DD-MM- YYYY. Time Format – Select from the drop-down list, 12HR or 24HR. Date Time Position – Specify the position where the date and time is displayed. Select from the drop-down list, Left-Bottom, Left-Middle, Left-Top, Middle-Bottom, Middle-Middle, Middle-Top, Right-Bottom, Right-Middle or Right-Top. - Page 60 HUSS-E4V Network Client Figure 4-34 Main Stream Encoder Select the target channel number from 1~4 or All Channels to apply the settings. Configure the following settings of the channel as below: Coder Type – H.264 Resolution – Select from the drop-down list, D1, 2CIF, QCIF, CIF, VGA or QVGA.
- Page 61 Honeywell Control Mode – Constant Bit rate (CBR) or Variable Bit rate (VBR). In VBR control mode, bit rate is adjusted automatically when the image moves slowly to save the network bandwidth usage which can be applied when the network bandwidth is limited. In CBR...
-
Page 62: Network Setting
Aux Stream Encoder setting is the same as main stream encoder. Network Setting Network Setting includes Basic Settings and Multicast Settings. User can check the relevant information and modify relevant information here. Basic Settings Users can access HUSS-E4V remotely after configuring network settings properly. - Page 63 Honeywell In the main screen (Figure 4-6), navigate to ConfigurationNetwork SettingsBasic Settings and the following window is displayed: Figure 4-36 Basic Settings The following parameters can be configured in this window: DHCP Enable – Check this box to enable DHCP. Or uncheck it to allow users to configure “IP Address”, “Mask”...
- Page 64 HUSS-E4V Network Client Figure 4-37 Confirm Change of IP Address When changing the IP settings, it will stop the video task of current network client. Click YES to proceed and apply the new settings. Click OK to apply the new settings; click Cancel to give up the changes and return to the main window;...
- Page 65 Honeywell Figure 4-38 Multicast Settings Select the target channel number from 1~4 or All Channels to apply the settings. Configure the multicast settings of the channel as below: Enable – Check it to enable multicast stream of the channel. Main Stream Multicast IP Address – Enter a proper D class IP address (224.0.1.0~239.255.255.255) as the destination address to which the main stream is sent.
-
Page 66: Alarm & Event Setting
HUSS-E4V Network Client The value of Multicast IP Port must be bigger than 1024. Click OK to apply the new settings; click Cancel to give up the changes and return to the main window; click Default , the default setting is displayed on the screen; then click OK or Apply to restore default settings Alarm &... - Page 67 Honeywell Figure 4-39 Motion Detection Select the target channel number from 1~4 or All Channels to do the motion detection. Enable – Allow Motion detection to be triggered. Sensitivity – Select from the drop-down list to set the sensitivity threshold level for detecting motions.
- Page 68 PTZ Action – According to the camera; select the PTZ action from the drop-down list, None, Preset or Pattern; enter the switch number for Preset or Pattern.HUSS-E4V will interlock PTZ to action when motion is detected. Click OK to apply the new settings; click Cancel to give up the changes and return to the main window;...
- Page 69 Honeywell Video Loss In the main screen (Figure 4-6), navigate to ConfigurationAlarm&Event SettingVideo Loss and the following window is displayed: Figure 4-41 Video Loss Channel – Select the target channel number from 1~4 or All Channels to do the Video Loss action.
- Page 70 HUSS-E4V Network Client PTZ Action – According to the camera; select the PTZ action from the drop-down list, None, Preset or Pattern; enter the switch number for Preset or Pattern.HUSS-E4V will interlock PTZ to action when video loss is detected.
- Page 71 Alarm Output – Select the Output Port to do the Alarm output. PTZ Activation – According to the camera; select the PTZ action from the drop-down list, None, Preset or Pattern; enter the switch number for Preset or Pattern.HUSS-E4V will interlock PTZ to action when Alarm Input is detected.
- Page 72 HUSS-E4V Network Client Figure 4-43 Alarm Output According to the output number, check the related boxes to set the trigger mode, “Automatic”, “Manual On” or “Manual Off”. The “Status” field is not editable. It shows the current status of the alarm output ports automatically.
-
Page 73: Logout
Honeywell Logout Click Logout tab on the up-right corner of the web page to exit the configuration page and return to the login page (Figure 4-44). Enter the user name and password that you want to login (Figure 4-6) and click Log On. Or click Cancel to give up logging out. -
Page 74: Troubleshooting
Troubleshooting 5 Troubleshooting Q: Why do I can’t see images when login the system? A: Please configure the Internet Explorer so that it supports installation and operation of ActiveX com. • For IE 6, please refer to Internet Explorer Settings on page 19. - Page 75 Honeywell Figure 5-2 Internet Security Properties Uncheck “Enable Protected Mode (requires restarting Internet Explorer)” and restart the IE 8. • If the images remain invisible, click StartControl PanelWindows FirewallExceptions. Figure 5-3 is displayed. Select Internet Explore Check box on the Exception tab.
- Page 76 Troubleshooting Figure 5-3 Windows Firewall Q: Why do images from HUSS – E4V can not be displayed under Windows 2003. A: Default settings of Windows 2003 dose not select DirectX performance. To solve this problem, click StartsRun. Figure 5-4 is displayed. Enter “dxdiag” to use DirectX Diagnostic Tool, as displayed by 5-5.
- Page 77 Honeywell Figure 5-4 Run dxdiag...
- Page 78 Troubleshooting Figure 5-5 Apply DirectX Diagnostic Tool Q: Why is PTZ not able to be controlled? A: Please check if RS485 has been connected correctly. See if PTZ protocol, address and baud rate match with each other. Q: Why does images can not be displayed correctly on client when video type (PAL or NTSC) is changed or new camera is connected.
- Page 79 Q: Why does the language change after I login to the web server? A: Since HUSS-E4V allows login of multiple users, after one user login, other user may change the language setting. If this occurs, please logout, make sure no other users login,...
- Page 82 TEL +86 21 22196888 FAX +86 21 62370740 Honeywell Security Block 28, Section 2, Huai De Cui Gang Industrial Estate Fu Yong, Bao An, Shenzhen, P.R.China TEL +86 755 27326500 FAX +86 755 27391736 Honeywell © 2012 Honeywell International Inc. http://www.cn.security.honeywell.com http://www.security.honeywell.com/...