Cisco WVC210 Quick Start Manual
Wireless-g ptz internet video camera with 2-way audio
Hide thumbs
Also See for WVC210:
- Quick start manual ,
- Administration manual (85 pages) ,
- Reference manual (85 pages)
Advertisement
Quick Links
Quick Start Guide
Cisco Small Business
Model WVC210 Wireless-G PTZ
Internet Video Camera with 2-Way Audio
Package Contents
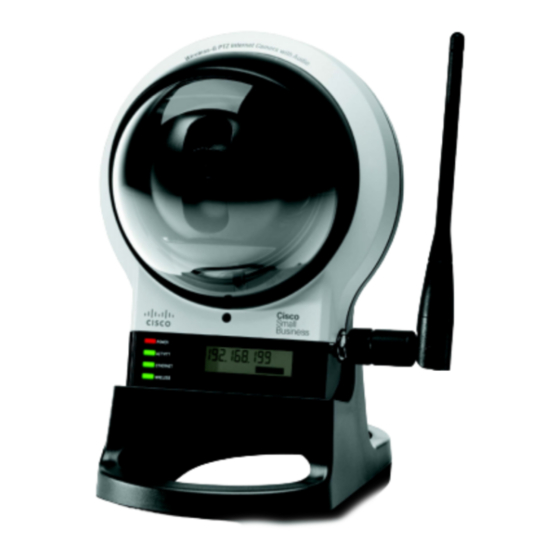
WVC210 Camera
•
•
Power Adaptor
Antenna
•
Camera Desktop Stand
•
•
Quick Start Guide
6-Foot Ethernet Cable
•
Setup and Documentation CD-ROM
•
1
Before You Begin
To configure the Cisco WVC210 camera, you need at least one computer
•
with an active LAN IP connection.
You must perform the initial configuration of the Cisco WVC210 camera
•
from a personal computer connected to the camera using a wired
connection to the Ethernet port. The initial configuration cannot be
performed over a wireless connection.
Once the hardware installation is complete, Cisco strongly recommends that
you run the Setup Wizard on the Setup CD-ROM for first-time software
installation of the camera. Advanced users can set up the Cisco WVC210
directly from the web interface of the camera.
2
Camera Installation
To install the Cisco WVC210 camera, follow these steps.
S
1
Connect the antenna to the antenna connector on the camera.
TEP
S
2
(Optional) The Cisco WVC210 camera includes a camera desktop
TEP
stand. Set the bottom of the camera into the stand.
.
S
3
Place the camera, and adjust its aim accordingly.
TEP
S
4
Connect the included Ethernet network cable to the network router or
TEP
switch.
Network Switch,
or Router
PC connected
to Network
S
5
Connect the other end of the cable to the Cisco WVC210 camera's
TEP
Ethernet port.
Camera
Network Switch
or Router
S
6
Connect the included power adapter to the camera's Power port. Plug
TEP
the other end into a standard electrical outlet.
Outlet
Camera
Power
S
7
Verify that the camera LEDs are lit.
TEP
Refer to the following table that describes the LEDs and their functions.
The Cisco WVC210 camera has four LEDs to let you know how the camera is
functioning.
LED
Color
Description
Power
Amber
The POWER LED lights up when the camera is
powered on. It flashes for about 10-15 seconds while
the camera is initializing.
Activity
Green
The ACTIVITY LED flashes when there is activity.
Ethernet
Green
The ETHERNET LED lights up when there is a
connection to a wired network. It flashes when data
is transmitted to or received from the wired network.
Wireless
Green
The WIRELESS LED lights up when there is a
connection to a wireless network. It flashes when
data is transmitted to or received from the wireless
network.
S
8
(Optional) If the Cisco WVC210 camera is not functioning correctly,
TEP
you can press the Reset button to reset the camera. The Reset button
is found next to the Ethernet port. Insert a paper clip into the opening
and hold it in for more than three seconds. Be aware that resetting the
camera will erase all of your settings and return the camera to factory
defaults.
Advertisement

Related Manuals for Cisco WVC210


Summary of Contents for Cisco WVC210
- Page 1 Network Switch Verify that the camera LEDs are lit. or Router Refer to the following table that describes the LEDs and their functions. The Cisco WVC210 camera has four LEDs to let you know how the camera is functioning. Color Description...
- Page 2 800 553-NETS (6387) Fax: 408 527-0883 Cisco, Cisco Systems, the Cisco logo, and the Cisco Systems logo are registered trademarks or trademarks of Cisco Systems, Inc. and/or its affiliates in the United States and certain other countries. All other trademarks mentioned in this document or Website are the property of their respective owners.