Table of Contents
Advertisement
Email: support@potensic.com
Email: support.uk@potensic.com
Email: support.de@potensic.com
ATOM
User Manual
V02. 23. 12
Email: support.fr@potensic.com
Email: support.it@potensic.com
Email: support.es@potensic.com
DANGER
Only suitable
16+
for ages 16+
Email: support.jp@potensic.com
Web: www.potensic.com
FB: www.facebook.com/Potensic
Advertisement
Table of Contents

Related Manuals for Potensic ATOM


Summary of Contents for Potensic ATOM
- Page 1 DANGER ATOM Only suitable for ages 16+ User Manual V02. 23. 12 Email: support@potensic.com Email: support.fr@potensic.com Email: support.jp@potensic.com Email: support.uk@potensic.com Email: support.it@potensic.com Web: www.potensic.com Email: support.de@potensic.com Email: support.es@potensic.com FB: www.facebook.com/Potensic...
-
Page 2: Table Of Contents
Contents 1. Disclaimer & Precautions 6. PotensicPro App 1.1 Disclaimer 6.1 App Homepage 1.2 Safety & Precautions 6.2 Flight Interface 1.3 Warning & Prompts 7. Flight 2. Reading Tips 7.1 Requirements of Flight Environment 2.1 Symbols 7.2 Flight Precautions 2.2 Suggestions of Use 7.3 Connection 2.3 Tutorial Video/Download App 7.4 Flight Modes... -
Page 3: Disclaimer & Precautions
For any problem in use, handling and maintenance, please feel free to contact our local dealer or the Company. Potensic reserves the final interpretation right of this document and related product documents, and is subject to change without notice. Please visit https://www.potensic.com for the latest information. -
Page 4: Reading Tips
(Note: An Internet connection is required for registration) Help Thanks for purchasing ATOM drone. Please read the Manual carefully. Please contact our support team at support@potensic.com if anything needs help, when requesting an after-sales service, it is required to submit order ID and details of the issues. -
Page 5: Technical Terms
2.5 Technical Terms IMU (inertial measurement unit), the most important core sensor of the drone. TOF (time of flight), the period from transmission and receiving of TOF (Time of Flight) detection infrared signal, in order to determine the target distance. The sensor system, which lies at the bottom of the drone and consists Downward Vision System of camera and TOF module. -
Page 6: Overview
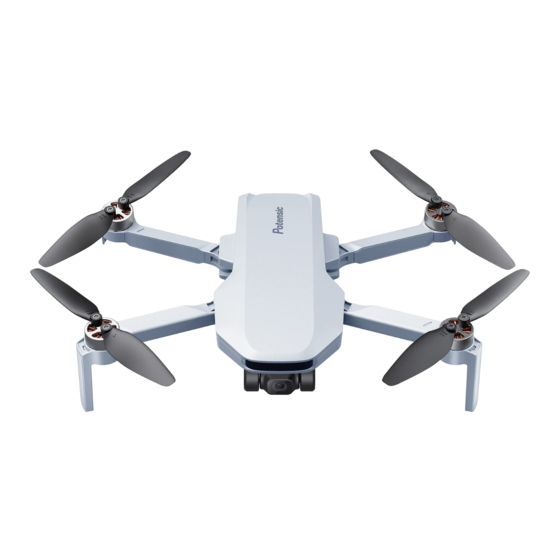
3. Overview This chapter introduces the functional characteristics of ATOM, as well as the diagrams of the drone and the remote controller. 3.1 Introduction With foldable arms and weight below 250g, the product is portable and easy to use. The product is equipped with a vision positioning system, to realize precise hovering at low altitude indoor and outdoor environment. -
Page 7: Preparing The Remote Controller
3.3 Remote Controller Diagram 1. Power button 6. Control stick Long press it for 2s to power on/off. 7. Foldable dual antennas 2. Power indicator Indicate the power level or other status 8. Installation position of mobile device of the remote controller. To place mobile device. -
Page 8: Remote Controller Diagram
3.4 Preparing the Drone The product is delivered under folded status. Please unfold it as follows: 1. Remove the gimbal protector. 2. Unfold the front arm before the rear arm. 3. Unfold the propeller blades. 3.5 Preparing the Remote Controller Installation of mobile phone and control stick 1. -
Page 9: Charging/Startup And Shutdown
3.6 Charging / Startup and Shutdown When receiving a new drone battery, it is required to charge it to wake it up, otherwise the drone wouldn't start. Connect the TYPE-C charging port of battery and a USB charger to the AC power supply to finish one-time charging (USB charger is not included in the package. -
Page 10: Drone
This chapter sets down the functions of all parts of the drone. 4.1 Positioning ATOM adopts Potensic's new SurgeFly™ flight control technology, which supports the following two positioning modes: GPS positioning: Provide precise positioning and navigation to the drone; support precise hovering, smart flight and auto return. -
Page 11: Drone Status Indicator
For the sake of safety, please check the camera and TOF transceiver tube before the flight, and clean it with a soft cloth if there is any dirt, dust, or water on it; Contact Potensic Support if there is any damage to the Vision System. -
Page 12: Smart Battery
4.4 Smart Battery 4.4.1 Function ATOM smart battery is mounted with high-energy cell and advanced BMS. The details are as follows: Basic Parameters Model: DSBT02B Cell Qty. 2 series Battery Capacity 2230mAh Rated Voltage 7.7V Charge Completion Voltage 8.8V TYPE-C/... - Page 13 4.4.2 Battery Installation & Removal Installation: Removal: Push the battery into the product’s battery Firstly, press the buckle of smart battery, bin horizontally as shown in picture below, hold the upper cover of battery to pull out the battery buckle is bounced and locked the battery.
-
Page 14: Propellers
4.5 Propellers There are two types of ATOM propellers, which are designed to spin in different directions. Marks are used to indicate which propellers should be attached to which motors, the two blades attached to one motor are the same. -
Page 15: Gimbal And Camera
FOV is about 36°. 4.7.3 Image Storage The videos and pictures recorded by ATOM will be stored in SD card, instead of App or user’s album. Make sure to insert SD card prior to flight. Otherwise, it is unable to record and shoot. -
Page 16: Remote Controller
5. Remote Controller 5.1 Overview Potensic ATOM is equipped with the DSRC02A remote controller, which boasts Potensic long-range PixSync 3.0™ video transmission technology, offering a maximum transmission range of 6km/19,685ft and 720p when displaying video from the drone to PotensicPro App on your mobile device. Easily control the drone and camera using the onboard buttons. -
Page 17: Function
5.3 Function 5.3.1 Function List 1. Connect the USB Charger to the Type-C charging port. 2. The battery is being charged when power indicator starts flashing. Charge 3. Charging is completed when 4 LED indicators are solid on and data cable can be removed. - Page 18 5.3.2 Indicator As shown in the picture below, the remote controller is fitted with 4 white LED indicators to indicate the power level and other status. Indicator is on LED 4 LED 1 Indicator is flashing LED 2 LED 3 Indicator is off Charging indication LED 1...
-
Page 19: Antenna Angle
5.3.3 Remote Controller Function The ATOM drone and the remote controller can be used immediately after startup since they have been paired before delivery. Frequency pairing is only required when using a new drone or remote controller for the first time. -
Page 20: Potensicpro App
6. PotensicPro App 6.1 App Homepage Tap to view the flight logs and Potensic Academy Tap to choose the corresponding model. The drone model will be matched automatically if user has connected the remote controller to the mobile phone Display connection status... -
Page 21: Flight Interface
6.2 Flight Interface 1. Return button: 5. Positioning mode: Tap to return to the homepage GPS positioning Vision positioning 2. Navigation prompt bar: Display drone status and flight mode Attitude mode, no positioning 3. Gimbal angle: 6. GPS status: Display current gimbal pitch angle Display GPS signal status and quantity of satellites searched 4. - Page 22 Control Remote Controller Settings: Tap to switch control stick mode (Mode 1: Left Hand Throttle; Mode 2: Right Hand Throttle) Gimbal Settings: Tap to set gimbal maximum pitch speed, gimbal angle (0°/-90°), and to switch between Gimbal Stable Mode or FPV Mode. Camera General Settings: Tap to set white balance, gridlines, segmental recording, etc.
- Page 23 13. Digital Zoom Mode: The icon displays the current zooming setting. Tap to quickly switch between 1x, 2x or 3x to zoom in or out. For a more precise zoom, touch and hold the zoom icon then drag the dial up and down. You can also pinch in or out on the screen with two fingers to zoom in and out.
- Page 24 It is recommended to replace any outdated mobile device which may have a negative impact on user experience of App and lead to potential dangers. For any poor user experience and safety problems due to the use of an outdated mobile device, Potensic does not bear any liability.
-
Page 25: Flight
It is advised to tap and follow the animated guide to operate for first-time users. 7.4 Flight Mode ATOM has three flight modes-Video/Normal/Sport, which can be switched via the App. Video Mode Ascent speed: 2m/s, descent speed: 2m/s, flight speed: 6m/s The drone enters Beginner Mode by default when being used for the first time. -
Page 26: Beginner Mode
Be vigilant and maintain adequate maneuvering space during flight, as the responsiveness of the drone significantly increases in Sport mode. The maximum speed and braking distance of the drone significantly increase in Sport Mode. A minimum braking distance of 30 m (100 ft) is required in windless conditions to ensure safety. When flying in Sport Mode or strong wind, the gimbal may shake, which is normal. -
Page 27: Intelligent Flight Modes
7.6.2 One-key Takeoff / Landing One-key takeoff One-key landing Tap one-key takeoff button in App, then Tap one-key landing button in App, then swipe right in the pop-up window to start the swipe left in the pop-up window to land the drone automatically then ascend to the height drone, or swipe right to start returning. - Page 28 Use QuickShots at locations that are clear of buildings and other obstacles. Make sure there are no humans, animals, or other obstacles on the flight path. Before getting familiar with the flight path of QuickShots, please try a smaller flight distance first. Be ready to take over control of the drone by moving any control stick at any time in emergency and the drone will exit QuickShots and hover in place.
- Page 29 Use Visual Tracking at locations that are clear of buildings and other obstacles. Make sure there are no humans, animals, or other obstacles on the flight path. DO NOT use Visual Tracking in places that are close to buildings or where the GPS signal is weak. Otherwise, the flight path will be unstable.
- Page 30 7.7.3 Waypoint Flight When Waypoint Flight is enabled, you can pin 2 or more waypoint coordinates in App map, Description and the drone will fly over the corresponding waypoints sequentially. When the GPS signal is strong, tap the map in the lower left corner of the App to switch to map, then tap on the right to enter Waypoint Flight mode, tap on the map to pin multiple waypoints, after that tap...
-
Page 31: Return(Rth)
7.8 Return(RTH) 7.8.1 Regular Return The regular return consists of three steps, as follows: 1. Ascent: The drone ascends to the set return altitude (this step is skipped if the drone's altitude is already higher than the return altitude). 2. Level flight: The drone maintains a straight flight at the set altitude towards the HOME point. 3. -
Page 32: Emergency Stop
Please pay attention to return safety, because the drone does not support obstacle avoidance and may crash when colliding with obstacles during the return course. For any GPS signal anomaly in communication loss return, the drone will maintain hovering at ATTI mode, until GPS signal is strong enough and the return will resume. -
Page 33: Calibration
8. Calibration This chapter mainly introduces the calibration-related functions in Settings, including compass calibration, gimbal calibration, gimbal fine-tuning, remote controller calibration, and drone re-pairing. 8.1 Compass Calibration 8.1.1 When to perform compass calibration 1. Before the first flight 2. Flying at a location farther than 50km (31miles) away from the location the drone was last flown Do not calibrate the compass in locations where magnetic interference may occur, such as close to magnetic deposits or large metallic structures such as parking structures, steel reinforced basements, bridges, cars, or scaffolding. -
Page 34: Gimbal Calibration
8.2 Gimbal Calibration 8.2.1 When to perform gimbal calibration 1. When the gimbal is not working or obviously unlevel after powering on and before take-off, please calibrate the gimbal. 2. When the gimbal is unstable or unable to stay level in flight, please land the drone and calibrate the gimbal. 8.2.2 Calibration Procedure 1. -
Page 35: Remote Controller Calibration
8.4 Remote Controller Calibration 8.4.1 When to perform remote controller calibration 1. When the drone drifts automatically in one direction without any toggling of the control sticks. 2. When the drone auto-rotating sideway continuously. 3. When the control sticks are over-sensitive or lack sensitivity. 8.4.2 Calibration Procedure 1. -
Page 36: Appendix
Make sure the distance between the remote controller and the drone is within 1m (3.3ft) and away from other 2.4G frequency interference during the frequency pairing process. If the pairing has failed, please check if there is any interference from the current location, if any other drones are under pairing, or if the distance is too far between the remote controller and the drone or any blocks between them. - Page 37 5. Scenarios with drastic change of light; for example, the drone flies to outdoor space with strong light from indoor space 6. The places with weak or strong light 7. The surface with repeating identical patterns or textures, such as floor tile with the same texture and size 8.
- Page 38 DANGER Only suitable for ages 16+ Warning: The product should only be used by adults and children over 16 years. Adult supervision is required for children under 16 years. Hinweis: Dieses Produkt ist für die Erwachsene und die Kinder ab 16 Jahren. Die Kinder unter 16 Jahren müssen von Erwachsenen beaufsichtigt werden.
Need help?
Do you have a question about the ATOM and is the answer not in the manual?
Questions and answers