
Related Manuals for Potensic D58


Summary of Contents for Potensic D58
- Page 1 D58 GPS Drone Operation Guidance This product supports GPS positioning and is recommended for outdoor flight! * This drone's WiFi camera is 5G signal , please make sure that your phone are compatible with it.
-
Page 3: Table Of Contents
http://www.ipotensic.com Catalog Overview of drone and transmitter Parts install and disassemb Check list before flight Flight steps Function introduction Know your APP To take photo and record video Spare parts Troubleshooting... -
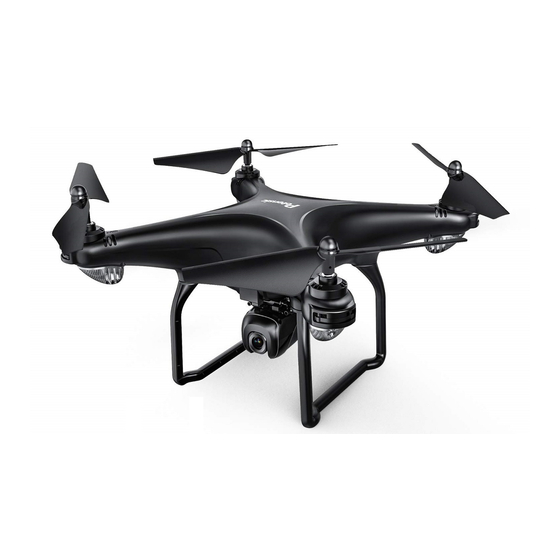
Page 4: Overview Of Drone And Transmitter
http://www.ipotensic.com Overview of drone and transmitter Drone Front Propeller A Propeller B Drone Cover Left Right Power Switch Battery Back Cover Propeller B Propeller A Rear Front Light Front Light Camera (Green) (Green) Landing Gear Rear Light Rear Light (Red) (Red) Main parameter Flight distance and radius About 150 m (Without... - Page 5 http://www.ipotensic.com Exploded view...
- Page 6 http://www.ipotensic.com NAME NAME Propeller plug Drone bottom Propeller A Lamp shade Propeller B Landing gear Bearing Camera box Drone cover Right front LED board(green light/red plug) Gear Right rear LED board(red light/white plug) Motor holder GPS module Shaft Power button Power button board A propeller motor (black and white cable/white plug)
-
Page 7: Battery Installation
http://www.ipotensic.com Key function Left stick To control the drone up / down / turn left / turn right. Right stick To control the drone forward / backward / left side flying / right side flying. Power switch Push power switch from left to right to turn on the drone. Gimbal adjustment key Slide the key to adjust the camera angle up and down. -
Page 8: Parts Install And Disassemb
http://www.ipotensic.com The installation methods of mobile phone Hold the bottom buckle of transmitter; Pull down the holder until it can fit the mobile phone; Put on the phone and release the holder; and then the phone is fixed well. (Picture 2/3) Picture 2 Picture 3 Notice: Don’t clamp the buttons of the phone. - Page 9 http://www.ipotensic.com Landing gear install and disassemb As the diagram shows, aim the landing gear pillar to the body hole and press down, then tighten the screws on the landing gear. When disassembling, loose the screws and pull out the landing gear(Picture 4). Note: Make the landing gear close to the drone level,otherwise it will be unstable and affect the stability of the drone.
- Page 10 http://www.ipotensic.com Diagram of motor replacement 1. Remove the screw and the lampshade with a screwdriver counter-clockwise, and remove the damaged motor after disconnect the motor terminator. 2. Replace with the same new motor, connect the motor wire, put on the lampshade, then tighten the screws in clockwise.
- Page 11 http://www.ipotensic.com Camera box installation diagram When install the camera box, connect the drone and camera box socket, aim the camera buckle at the drone bottom position(picture 11), and then push in and rotate 90 degrees. Front Front Connection terminator Rear Rear Diagram of battery loading and unloading When install, it’s a must to press down two buckles of the battery cover,...
-
Page 12: Check List Before Flight
http://www.ipotensic.com Check List Before Flight 1) Make sure the drone and transmitter battery are fully charged. 2) Make sure the Throttle Stick of the transmitter in the middle position. 3) Please strictly obey the order of turn on and turn off before operation. Turn on the transmitter power first and then turn on the drone power before flying;... - Page 13 http://www.ipotensic.com Compass Calibration Horizontally rotating the drone( picture 19), until the transmitter sounds long “ di...” , and it shows the horizontal calibration is finished. Left navigation LED gets a solid light and right navigation LED flashes, it enters to vertical calibration status. Vertically rotating the drone (picture 20), until the transmitter sounds long “...
- Page 14 http://www.ipotensic.com Calibration (This action is used when flying abnormally) After finishing the compass calibration, push the right stick to the bottom right 45 degrees, the drone LED lights will flash and release it, this means the gyroscope calibration is completed. Tips: When the drone is fiercely impacted or crashed, it may cause the gyro can not recover and cause difficult to control, if so, then you need to power off and power on again to calibrate.
-
Page 15: Function Introduction
http://www.ipotensic.com Trimmer mode Trimmer mode Forward and backward trimmer When take off, if the drone tilts forward, press down the trimmer button, and push the right stick backwards. Otherwise push forwards. Left and right side flying trimmer When take off, if the drone tilts to left, then press down the trimmer button and push the right stick backwards to adjust. - Page 16 http://www.ipotensic.com Take Photos While taking photos, click the key to take a photo. If you click the key continuously, you can take several photos (While taking photos, click the key, the transmitter sounds “di” to remind you). Gimbal Adjustment Slide the key of gimbal adjustment, the gimbal begins to swing up and down, with video in your phone, you can turn it to the angle you want, loose the key, the gimbal function stops.
- Page 17 http://www.ipotensic.com Encircling flight Click the encircling button, the transmitter will make the sound of “di”, then it goes to the function of encircling flight. The drone will fly to a default location and wait for the direction controlled by the user to adjust the speed and direction of the drone by manipulating the right stick.
- Page 18 http://www.ipotensic.com High / Medium/Low Speed Mode Switch Click this button,then it will sound “ di”, it means low speed mode “L”; when it sounds “ di.di”,means medium speed “M”; and sounds “ di.di.di” means high speed mode “H”. Low Speed Mode(Mode L) 1.
-
Page 19: Know Your App
LED will get a solid light and stuck protection will be released and the drone can fly again. Know your APP Download and install APP: potensic This software is suitable for mobile phones in the IOS and Android system, please download and install it via APP store. -
Page 20: Spare Parts
http://www.ipotensic.com 3. Power off the drone first when finish aerial photography. Take out TF card and insert the card to a card reader. Connect the card reader with computer USB port. After a while, view the aerial photography data from “my computer”- ”mobile disk”. - Page 21 http://www.ipotensic.com A propeller motor B propeller motor Lipo battery USB charger ( Black&white cable / ( Red&blue cable / white socket ) red socket ) Gear Shaft TF card Card reader Camera box Transmitter Screw driver Important Notice Our company's products are improving all the time, design and specifications are subject to change without notice.
-
Page 22: Troubleshooting
http://www.ipotensic.com Troubleshooting Problem Problem Cause Solution 1. Low battery. 1. Replace the controller battery. 2. Install the batteries following the polarity 2. The batteries are incorrectly positioned. controller indicators. indicator 3. Clean the dirt between the battery and light is off. 3. - Page 23 http://www.ipotensic.com FCC Note This equipment has been tested and found to comply with the limits for a Class B digital device, pursuant to Part 15 of the FCC Rules. These limits are designed to provide reasonable protection against harmful interference in a residential installation.
- Page 24 http://www.ipotensic.com...
Need help?
Do you have a question about the D58 and is the answer not in the manual?
Questions and answers