Table of Contents
Advertisement
Advertisement
Table of Contents

Related Manuals for Potensic A20


Summary of Contents for Potensic A20
- Page 1 Operations Guide...
- Page 3 http://www.ipotensic.com Overview of drone and transmitter Parts loading and unloading Precautions before ying Flying procedures Function Introductions Assembly Parts list Troubleshooting...
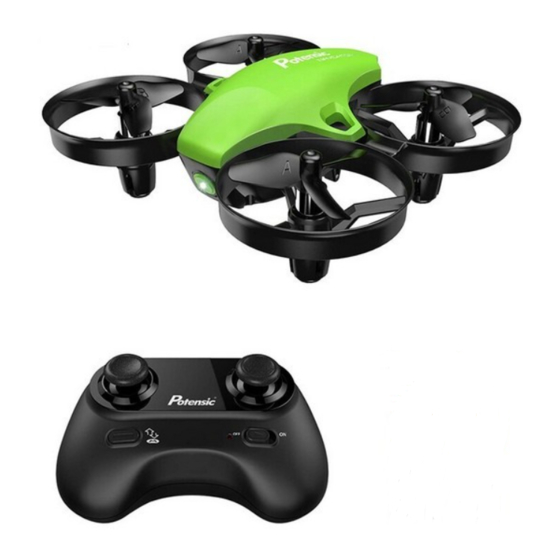
- Page 4 http://www.ipotensic.com Front Propeller B Propeller A Left Right Drone cover Propeller A Propeller B Rear LED light Motor Motor Holder Holder Motor Motor Holder Holder Power switch...
- Page 5 http://www.ipotensic.com Drone size 90x80x32mm Flying time 5~6 mins The main Weight of drone 25.8g 0615x4 motor Remote Propeller diameter Ø32mm 2.4Ghz control mode The drone battery 3.7Vx180mAh Flying distance 10~15 m The charging time of the drone battery 40 mins Name Name Drone cover...
- Page 6 http://www.ipotensic.com Headless Non function High / Medium/ Low Speed button Left Stick Right Stick One button Power Switch Take O / Landing / Emergency Power indicator Stop Button...
- Page 7 http://www.ipotensic.com Trimmer mode button (Press down) Move the Stick to forward / backward / left / right to Left Stick y the drone up / down / turn left / turn right. Move the Stick to forward / backward / left / right to Right Stick y the drone forward / backward / left / right.
- Page 8 http://www.ipotensic.com Open the battery cover of the transmitter, insert 3 AAA batteries following the polarity indicators ( Picture below, battery is not included) and then close it. Battery Cover 3X1.5V Alkaline Batteries Notice: 1. Make sure the electrodes are 3. Do not mix di erent kinds of correct.
- Page 9 http://www.ipotensic.com Phone Charger Power Bank Computer Charging Car Charger * For faster charging, it is recommended to use an adapter with 5V 2A output current (not included) to charge the battery Wasted Lithium-Polymer batteries must not be placed with household trash. Please contact local environmental or waste agency or the supplier of your model or your nearest Li-Po battery recycling center.
- Page 10 http://www.ipotensic.com Buckle down the battery cover, put the battery into the drone, and then buckle up the battery cover ( Picture 3/4). Picture 3 Picture 4...
- Page 11 http://www.ipotensic.com 1. Make sure the transmitter and the battery of the drone are fully charged. 2. Before starting, please con rm that the left stick of the transmitter is in the middle position. 3. Please follow the correct steps to turn on the drone/transmitter. Before ight, turn on transmitter and then the the drone.
- Page 12 http://www.ipotensic.com Turn on the drone. The drone body lights will ash rapidly at rst. When it ashes slowly, indicating entering frequency pairing. It must be placed on a surface! Turn on the transmitter and the power indicator light on it ashes rapidly. Pull the left stick to the lowest position and then release.
- Page 13 http://www.ipotensic.com After calibration successfully, press this button, the drone will y up and keep ying at an altitude of approximately 1.2 meters automatically. Press it to land the drone automatically. (In this mode, DO NOT touch the left stick, otherwise it might not work). In an emergency situation, such as if it is about to hit people or obstacles, press the Take O / Landing / Emergency Stop Button and hold it for more than 1 second.
- Page 14 http://www.ipotensic.com (This action is used in case of ight abnormality) Push the right stick as picture shown after successful frequency pairing(DO NOT push the left stick before it) . Please loose it when the drone front body light ash 3 times and turn a solid color , indicating that calibration is completed.
- Page 15 http://www.ipotensic.com Push the stick, then the drone ies up. Pull the stick, Left Stick the drone goes down. Move the stick to the left, the drone rotates counterclockwise Move the stick to the right, the drone rotates clockwise.
- Page 16 http://www.ipotensic.com Push the stick, the drone ies forward. Right Stick Pull the stick, the drone goes backward. Move the stick to the left, the drone moves the left Move the stick to the right, the drone moves to the right...
- Page 17 http://www.ipotensic.com Forward and backward trimmer When ying, if the drone tilts forward, press down the trimmer button, and push the right stick backwards. Otherwise push forwards. Left/Right Rotates Trimmer When ying, if the drone head rotates to the left, press the trimmer button, and push left stick to right.
- Page 18 http://www.ipotensic.com Intelligent ight control system calculates the hovering position, makes it easier for beginners to control. Release the stick, the drone will keep hovering, capturing clear aerial photos & videos. Note: If there’s propeller or motor is damaged, the constant height function will not work.
- Page 19 http://www.ipotensic.com The default setting is NOT Headless Mode. Under headless mode, the users can operate the drone without worrying about the orientation (left is left and right is right all the time, regardless of where your drone is pointing at).Headless Mode is designed for beginners, users who y the drone in daylight or at far distances, or those with di culty identifying the drone orientation.
- Page 20 http://www.ipotensic.com * Press headless mode button to activate the function, at this time the LED light on the rear of drone keeps shiny for three times and stops for 1s; To exit the Headless Mode, press the button again, at this time the LED light on the rear of drone will turn a solid color.
- Page 21 (Sold separately) For convenience, the spare parts are listed for you to choose, which can be purchased from the local seller. A20-01 A20-02 A20-03 Drone Cover Drone Bottom Propeller A A20-04 A20-05 A20-06 Propeller B Lampshade Pressure Parts A20-07...
- Page 22 A20-10 A20-11 A20-12 USB Cable Clockwise Motor Counterclockwise (Red and Blue wire) Motor (Black and White wire) A20-13 Transmitter Important Notice Our company's products are improving all the time, design and speci cations are subject to change without notice.
- Page 23 http://www.ipotensic.com...
- Page 24 http://www.ipotensic.com...
- Page 25 http://www.ipotensic.com FCC Note This equipment has been tested and found to comply with the limits These limits are designed to provide reasonable protection against harmful interference in a residential installation. This equipment generates uses and can radiate radio frequency energy and, if notinstalled and used in accordance with the instructions, may cause harmful interference to radio communications.
- Page 26 http://www.ipotensic.com FCC Notice The equipment may generate or use radio frequency energy. Changes unless the modi cations are expressly approved in the instruction manual. Modi cations not authorized by the manufacturer may void user’s authority to operate this device. This device complies with Part 15 of the FCC Rules. Operation is subject to the following two conditions: (1) This device may not cause harmful interference.
Need help?
Do you have a question about the A20 and is the answer not in the manual?
Questions and answers
le drone s'envole toujours sur l'avant a quoi correspond la tondeuse
quel bouton corespond a la tondeuse