Advertisement
QUICK OPERATION INSTRUCTION
- Insert SD card and connect the device to power outlet. Long press "ON/OFF" button for 2 seconds to power on.(See Operation section of the User Manual for details.)
- Enter the film type setting to select the corresponding film mode.(See Settings Mode section of the User Manual for details.)
- Enter the SCAN interface, press the "SCAN" button to scan and save the image.
- Enter the gallery to see the scanned images.(See Gallery Mode section of the User Manual for details.)
- Connect the film scanner to the computers.(See USB Upload section of the User Manual for details.)
- You can access the scanner through the mobile APP.
FEATURES
- Converts 35mm, 126, 110 and Super 8 and 8mm film negatives and slides to JPEGS in seconds
- 14/22 megapixel resolution
- Support wifi wireless connection
- No computer or software required
- Adjustable scanning resolution, brightness and coloration
- Tilt-up 3.5" color TFT color LCD screen
- Saves images to SD memory card (not included) or computer
- Video-out for TV connection (TV and HDMI cables included)
- Convenient, easy-loading film and negative adapters and inserts
- MAC and PC compatible
PACKAGE CONTENTS
Digital film scanner
Video cable
AC adapter
Adapter trays X3
HDMI cable
Cleaning brush
Inserts X3
USB cable
User's Manual
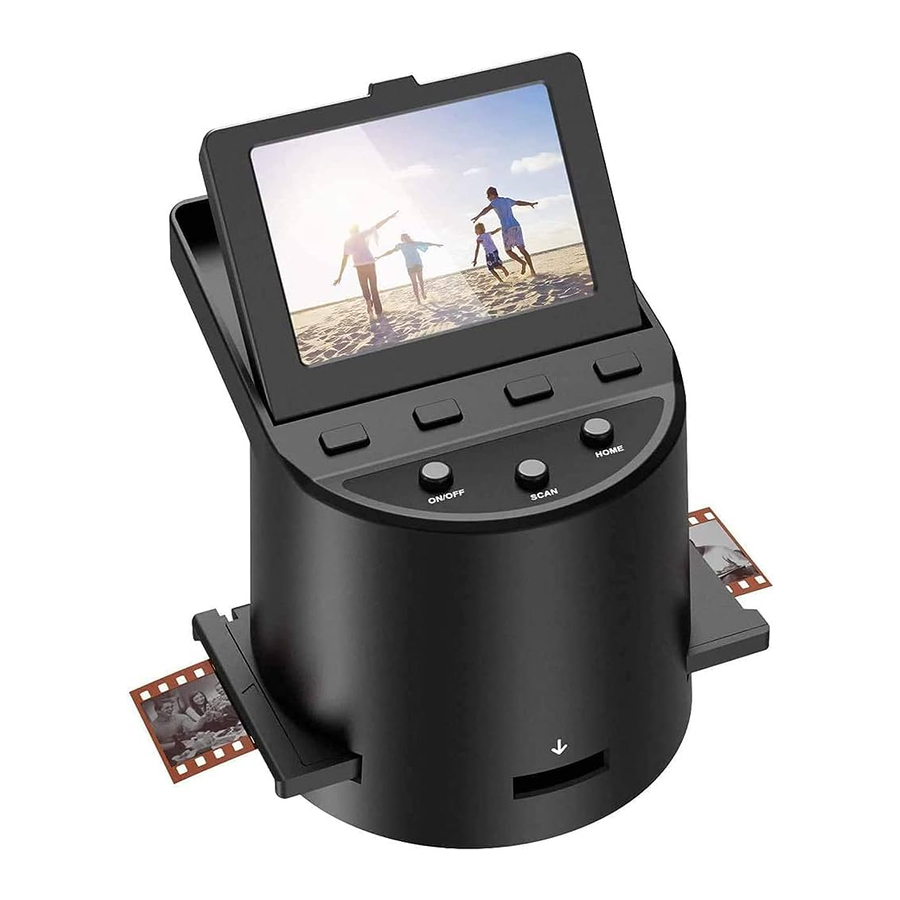
OPERATING INSTRUCTIONS

NOTE: Illustrations are for instructional purposes only, and may be different from the actual product.
- Function Keys
- Power On/Off Button
- Capture Button
- Tilt-up LCD Screen
- Home Button
CONTROLS
- Function keys (soft keys): The function is indicated by the text that will appear on the screen above the corresponding key.
- Power button: Press and hold to turn the device on and off.
- Capture button: Captures the image or brings up the capture view screen.
- Tilt-up LCD screen: Displays the image to be captured and scanned as well as functions and menus.
- Home button: Takes you to the Home screen.
PREPARING MEDIA TO SCAN
Before using your film scanner, you must insert an SD card (not included) or the unit will not operate. There is no built-in memory. Load your film/slide into the appropriate adapter and insert according to the Tray Directory below. ( can be found at Home>Help). Each adapter tray and insert is clearly marked and numbered.

TRAY DIRECTORY
| FILM TYPE | FILM TYPE | ADAPTER NEEDED | INSERT NEEDED |
| Negative | Color Negative 135 | No. 2 | None |
| Color Negative 126 | No. 1 | None | |
| Color Negative 110 | No. 2 | No. 5 | |
| Slide | Slide Positive 135 | No. 1* | None |
| Slide Positive 126KPK | No. 1* | None | |
| Slide Positive 110 | No. 1* | No. 6 | |
| Slide Positive Super 8 | None | No. 4 | |
| Slide Positive 8MM | None | No. 4 | |
| Black & White | Black & White 135 | No. 2 | None |
| Black & White 126KPK | No. 1 | None | |
| Black & White 110 | No. 2 | No. 5 |
*Note: Use adapter # 3 for slides with a thicker casing (plastic). Use adapter # 1 for slides with a thin cardboard casing.
| Slides | 35mm | 110 | 110 | 126 | 127 |
| Mount | 2"x2" | 2"x2" | 1"x1" | 2"x2" | 2"x2" |
| Film Size | 24x36mm | 13x17mm | 13x17mm | 28x28mm | 40x40mm |

Flip up the top cover of the adapter.

Place insert with your slide or film into adapter.

This film scanner features speed-load adapters to make scanning easy and straightforward. Simply push them into the device until you hear a click, and you can feed in slides or negatives one after the other without needing to remove and reload the adapters.

Note: When loading 8mm film, always ensure that the side ridges are facing to the right side of the adapter, towards where the number is written.

OPERATION
- Insert the SD card (not included) into the scanner first, then connect the scanner to the power supply via USB cable, then press and hold the "ON/OFF" button for 2 seconds. After booting, the HOME main interface will be displayed. The HOME main interface contains 4 sub-menus: Gallery, Capture, Settings, Help. The 4 submenu on the screen corresponds to 4 function keys, Pressing each function key will enter the corresponding menu.

- At any time, simply press the Capture button and the film scanner will automatically enter the Capture main interface. At any time, simply press the Home button and the film scanner will automatically enter the Home main interface.


CAPTURE MODE
- Press the corresponding function key on the HOME main interface to enter the shooting interface, press the CAPTURE button (camera icon) to shoot and save the image, or press the SELECT button to shoot. The number of photos that can be displayed in the upper right corner of the screen will be reduced. To exit the capture mode, press the "BACK" button.
Note: If the SD card is not inserted (not included), the message " No memory card inserted" will be displayed.


- Press the (<) (>) button to switch between shooting, color adjustment, and film type information options. Press the SELECT button to confirm the entry. To exit the option, press the BACK button.


COLOR AND BRIGHTNESS ADJUSTMENT
- To adjust the color and brightness, press the (<) (>) button to switch the status bar option at the top of the screen to the color adjustment, then press the SELECT button to confirm the entry option, press the (-) minus function button to decrease the value, and the (+) add function key to increase, press the ( ) function key to switch to the next option adjustment, press the ( ) function key to switch to the previous option adjustment, press the BACK key to go back to the previous option.
There are 4 color adjustment settings:
R = red, G = green, B = blue, RESET = default color and brightness settings.
Note: After restarting the film scanner, the color adjustment will be reset to the default setting of "0".


- Press the (<) (>) button to toggle the status bar option at the top of the screen to the film type information option to view the current film type information. Press the BACK button to go back to the previous level option.


GALLERY MODE
- In the HOME main interface, press the corresponding function key of the GALLERY to enter the gallery interface, press the SELECT key to confirm the view, press (<) on the left to view the previous one, press (>) on the right to view the next one, to exit the gallery mode, press the BACK button.


- Press the (<) (>) button to switch between rotation, flip, delete and slide. Press the ENTER button to confirm the entry. To exit the option, press the BACK button.


ROTATE
- To rotate the picture, press the (<) (>) button to toggle the status bar option at the top of the screen to (
![]() ) rotate, then press the SELECT button to confirm the entry option, press (
) rotate, then press the SELECT button to confirm the entry option, press (![]() ) to rotate left, press (
) to rotate left, press (![]() ) to rotate right, to exit the rotate mode, press the BACK button.
) to rotate right, to exit the rotate mode, press the BACK button.

 ) rotate, then press the SELECT button to confirm the entry option, press (
FLIP IMAGE
- To flip the picture, press the (<)(>) left and right button to switch the status bar option at the top of the screen to (
![]() ), then press the SELECT button to confirm the entry option, press (
), then press the SELECT button to confirm the entry option, press (![]() ) to flip left and right, press (
) to flip left and right, press (![]() ) to flip up and down, to exit the flip mode, press the BACK button.
) to flip up and down, to exit the flip mode, press the BACK button.

 ), then press the SELECT button to confirm the entry option, press (
 ) to flip left and right, press (
 ) to flip up and down, to exit the flip mode, press the BACK button.
DELETE
- To delete the picture, press the (<) (>) left or right button to switch the status bar option at the top of the screen to (
![]() ) delete, then press the SELECT button to confirm the entry option, press the (<) left button to select the previous one, press ( >) right button to select the next one, press the SELECT button to confirm the deletion, the system will ask you to confirm whether you want to delete the image, press Yes to delete, to exit the deletion, press the BACK button twice.
) delete, then press the SELECT button to confirm the entry option, press the (<) left button to select the previous one, press ( >) right button to select the next one, press the SELECT button to confirm the deletion, the system will ask you to confirm whether you want to delete the image, press Yes to delete, to exit the deletion, press the BACK button twice.


SLIDESHOW
- To play the slideshow, press the (<) (>) button to switch the status bar option at the top of the screen to the slideshow, then press the SELECT button to confirm the entry, press (
![]() ) to start the slideshow, press ( ǁ ) to pause. To exit the slideshow, press the BACK button to exit the slideshow.
) to start the slideshow, press ( ǁ ) to pause. To exit the slideshow, press the BACK button to exit the slideshow.

 ) to start the slideshow, press ( ǁ ) to pause. To exit the slideshow, press the BACK button to exit the slideshow.
SETTINGS MODE
- Press the corresponding function button on the HOME main interface to enter the setting page. Press the (<) (>) left and right button to switch between movie type, language, LCD brightness, memory, resolution, USB upload. Press the SELECT button to confirm the entry of the corresponding option. To exit the settings page, press the BACK button.


FILM TYPE
- In the setting interface, press the SELECT function key corresponding to the film type to enter the film type setting, press the (<) (>) left and right button to switch between the film type Negative, Slides, B&W options, press the SELECT key to confirm the entry of the corresponding option. To exit the film type setting, press the BACK button.


- After entering, press the (<) (>) left and right button to select the film size, press the SELECT button to confirm the selection, the interface displays the tray information, And then press the SELECT button to confirm the entry of capture mode.
Negative: 135,126, 110
Slides: 135,126, 110, SUPER8, 8MM
B&W: 135, 126,110


RESOLUTION
- In the setting interface, press the SELECT function key corresponding to the resolution to enter the resolution setting. Press the (<) (>) left and right button to select the standard 14 megapixel scan, Or enable built-in software interpolation to boost image quality to 22 million pixels with a professional algorithm, press the SELECT button to confirm the selection, to exit the resolution settings, press the BACK button.


LCD BRIGHTNESS
- In the setting interface, press the SELECT function button corresponding to the LCD brightness to enter the LCD brightness setting. Press the (-) minus function button to decrease the brightnessthe, Press the (+) increase function button to increase the brightness. To exit the LCD brightness setting, press the BACK button.


USB UPLOAD
In the setting interface, press the USB UPLOAD function key corresponding selection to enter USB upload. This mode allows the SD card to be accessed from your computer (not included), press the SELECT button to confirm the connection.
- Wait for the scanner to connect to your computer. This may take a few seconds. When connecting, your computer recognizes the scanner as an external device.
- When finished, to disconnect, press the BACK button.
Note: Although connected to a computer, you will not be able to use the film scanner.
- Use the included USB cable to connect the scanner directly to your computer.
- Select USB UPLOAD from the Settings menu.


MEMORY
In the setting interface, press the MEMORY corresponding selection function key to enter the memory view. To exit the memory view, press the BACK key.

You will be able to see the current and available space on the inserted SD card(not included). The image count is an approximation and may not be an accurate reflection of the available space.
Note: This film scanner is not equipped with internal memory and an SD card (not included) must be inserted to save the photo.
LANGUAGE
In the setting interface, press the corresponding function key of the language to enter the language setting, press the (<) (>) left and right button to select the language, press the SELECT key to confirm the setting, to exit the language setting, press the BACK key.

Available languages include: English, French, Italian, German, Spanish.
WIFI
In the setting interface, press the WIFI corresponding SELECT function button to open the WIFI hotspot. To turn off the WIFI, press the BACK button.

This mode allows you to access the scanner via mobile WIFI, scan the QR code on the box or on the front cover of the instruction manual to install the mobile application, after installation, you can access the scanner through the mobile APP.
Open the "Film Scanner" software on the mobile APP you just installed, follow the software prompts to search for WiFi hotspot with the name "C101_xxx", then enter the password "12345678" to confirm the connection, after connecting, re-open the "Film Scanner" software, click to open the "DCIM" folder that appears, and then open the "PHOTO" folder, you will see photos you scanned. You can view, download or delete the photos.
HELP MODE
Press the HELP function key on the HOME main interface to enter the help. Go to Help to view the tray information and you will be able to see the adapter information required for each compatible film or slide type. Press the (<) (>) button to switch between tray information. To exit the help, press the BACK button.

Note: The film type cannot be actively changed from the HELP tray information. To change the film type, select the film type from the SETTINGS menu as described in section 9A of this user manual.
SPECIFICATIONS
Power source: AC adapter, USB DC5V output
Sensor: 14MP CMOS sensor
File format: JPEG
Resolution: 14MP/22MP interpolation
Supported film/negative types: 135mm, 126, 110, Super 8, 8mm
LCD: 3.5" TFT LCD
External memory: SD/SDHC memory card (not included)
Interfaces: USB (2.0) port, SD card slot, TV-out (3.5mm phone jack), HDMI port
Dimensions: 102 x 102 x 119mm
Weight: 360g


Illustrations are for instrutional purpose only, and may be different from the actual product.
Documents / Resources
References
Download manual
Here you can download full pdf version of manual, it may contain additional safety instructions, warranty information, FCC rules, etc.
Advertisement
Thank you! Your question has been received!


Need Assistance?
Do you have a question about the C101 that isn't answered in the manual? Leave your question here.