PRx Performance Profile PRO Squat Rack with Kipping Bar 90” Assembly Instructions Manual
Hide thumbs
Also See for Profile PRO Squat Rack with Kipping Bar 90”:
- Assembly instructions manual (10 pages) ,
- Install instructions manual (12 pages) ,
- Assembly instructions manual (10 pages)
Advertisement
Quick Links
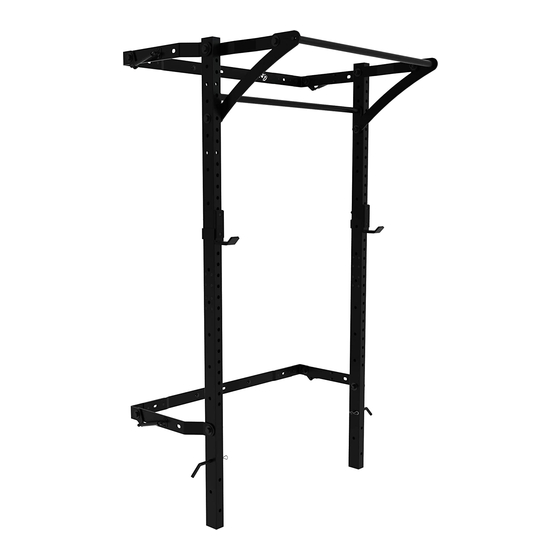
Profile® PRO Squat Rack with Kipping™ Bar 90"
PRx Performance Retractable Wall Mounted Exercise Rack System, also known as the Profile
Rack and Profile PRO:
U.S. Patent No. 9,333,387
U.S. Patent No. 9,409,048
U.S. Patent No. 9,498,670
U.S. Patent No. 9,649,525
U.S. Patent No. 9,844,691
For installation video visit:
prxperformance.com/pages/support
Advertisement

Related Manuals for PRx Performance Profile PRO Squat Rack with Kipping Bar 90”


Summary of Contents for PRx Performance Profile PRO Squat Rack with Kipping Bar 90”
- Page 1 Profile® PRO Squat Rack with Kipping™ Bar 90” PRx Performance Retractable Wall Mounted Exercise Rack System, also known as the Profile Rack and Profile PRO: U.S. Patent No. 9,333,387 U.S. Patent No. 9,409,048 U.S. Patent No. 9,498,670 U.S. Patent No. 9,649,525 U.S.
- Page 2 Profile® PRO Squat Rack with Kipping™ Bar 90" Tools Needed - Cordless drill - 3/16” drill bit - Stud finder - Level - Tape measure - Pencil - Plumb line - Ratchet - 15/16” socket - 15/16” Open-ended wrench - 1/2” Open-ended wrench prxperformance.com...
-
Page 3: Getting Started
Getting Started Assemble all the tools listed on page 2 and clear your working space Measure your ceiling height to ensure your wall space can accommodate the Rack Recruit a work partner to assist with steps that require lifting and holding the Rack 20.25 38.25 21.75... - Page 4 Required Ceiling Height Upper Bracket Lower Bracket Distance between brackets (center to center) 108” 88” 19” 69” prxperformance.com...
- Page 5 Locate Studs Profile® PRO Squat Rack with Kipping™ Bar is designed to be mounted to wooden studs with standard 16” or 24” spacing, with or without drywall For mounting your rack to a wall with non-standard stud spacing, please see or email us at sales@prxperformance.com PRx recommends professional installation for mounting the wall brackets to a block, concrete, or metal stud wall Use a stud finder to locate the rightmost stud where you intend to install the right side of your Rack Begin at the height of your lower bracket (19”)
- Page 6 Linkage Arms to Wall Brackets 1. Place the small side of the Plastic Spacer (#9) in the straight, gas shock facing portion of unbent end of the linkage arm (as pictured above) 2. Place the linkage arm with the Plastic Spacer (#9) facing the inside of the wall bracket “ear” 3.
- Page 7 Attach Kipping Bar To Uprights Kipping Bar Arm 1. Lay uprights on ground facing upward (with space between for Kipping Bar) 2. Lay the Kipping Bar flat on the ground so it is curving upward between the tops of the uprights (see diagram).
- Page 8 Attach Kipping Bar to Linkage Arms Upper Linkage Arms 1. Attach the left linkage arm by removing the ⅝” x 5” hex head bolt (#13) from the top left pull up bar. Place the Plastic Spacer on the inside of the linkage arm and place it against the top hole of the upright 2.
- Page 9 Attach Gas Shocks to Wallbrackets 1. *ATTENTION: TEAM LIFT the rack by holding each upright and pushing up against the wall. NOTE: The rack will be heavy 2. Attach Gas Shocks to ‘ear’ of the wall bracket with the 5/16” Serr Flange Nut (#8 already attached to the shock)and tighten using a two ½”...
- Page 10 Need some programming to go along with your new rack? Download our mobile app PRx Fit prxperformance.com...
Need help?
Do you have a question about the Profile PRO Squat Rack with Kipping Bar 90” and is the answer not in the manual?
Questions and answers