Table of Contents
Advertisement
Advertisement
Table of Contents

Related Manuals for Innova 3568


Summary of Contents for Innova 3568
-
Page 2: Table Of Contents
Table of Contents Paragraph Page No. SAFETY GUIDELINES......................1 VEHICLE SERVICE MANUALS....................2 GENERAL INFORMATION ..................... 3 ENGINE TIMING AND TUNE-UPS..................3 ABOUT THE TIMING LIGHT ....................3 USING YOUR TIMING LIGHT....................5 BEFORE YOU BEGIN ......................5 ENGINE PREPARATION BEFORE TIMING ................5 TIMING LIGHT CONNECTION.................... -
Page 3: Safety Guidelines
Safety Guidelines SAFETY EQUIPMENT Fire Extinguisher Keep a fire extinguisher suitable for gasoline/chemical/electrical fires on hand whenever working on a vehicle. Fireproof Container Store rags and flammable liquids only in fireproof containers. Allow soaked rags to dry thoroughly in open air before discarding. Safety Goggles Wear safety goggles when working on a vehicle to protect your eyes from battery acid, gasoline, and airborne dust and dirt from moving engine parts. -
Page 4: Vehicle Service Manuals
Vehicle Service Manuals Contact your local car dealership, auto parts store, bookstore or public library for availability of service manuals for your vehicle. The following companies publish valuable repair manuals. Write to them for availability and prices. Be sure to include the make, model and year of your vehicle. FACTORY SOURCES Ford/General Motors Service Manuals Helm Inc. -
Page 5: General Information
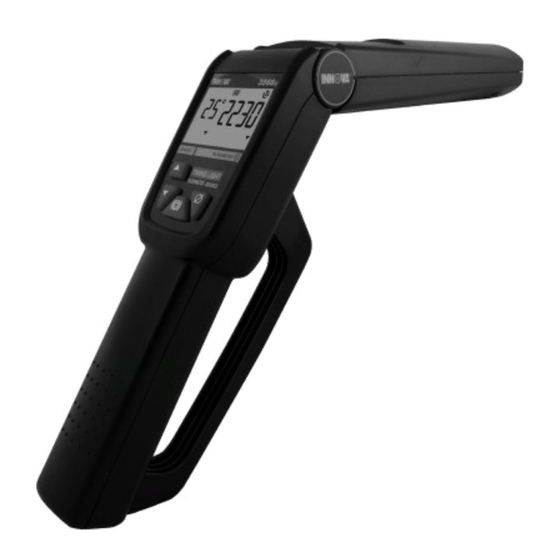
General Information ENGINE TIMING AND TUNE-UPS Proper ignition timing is critical in order to achieve peak engine performance and to ensure maximum fuel economy. An ignition system timing check is critical during any tune-up procedure. Your timing light provides a simple and efficient means of checking your vehicle's ignition timing, and provides the additional ability to check the operation of your vehicle's mechanical or vacuum advance timing controls. - Page 6 General Information Fig. 1 Timing Light Controls - General Advance Increment Switch — Increments through degrees of advance. Advance Decrement Switch — Decrements through degrees of advance. Zeroing Switch — Returns LCD advance display to 0 (zero) degrees. Flash Switch — Push to turn strobe light on. Push again to turn strobe light off. 10.
-
Page 7: Using Your Timing Light
Using Your Timing Light BEFORE YOU BEGIN Make a thorough check before starting any test procedure and fix any known mechanical prob-lems before performing any test. Loose or dam-aged hoses, wiring, or electrical connectors are often responsible for poor engine performance. Refer to your vehicle’s service manual for proper connection of vacuum hoses, electrical wiring, and wiring harness connectors. -
Page 8: Timing Light Connection
Using Your Timing Light TIMING LIGHT CONNECTION To ensure personal safety and reliable operation of the timing light, use the following procedure to connect the timing light: WARNING! Always keep hands, timing light, lead wires and clips away from moving engine parts and hot surfaces. -
Page 9: Timing Adjustment
Using Your Timing Light Adjust the timing light barrel, as needed, to adequately light the timing marks. Note the position of the rotating timing mark Fig. 4. Reading Timing Marks in relation to the reference pointer. See Figure 4. ROTATING ■... - Page 10 Using Your Timing Light Checking Mechanical/Centrifugal Timing Advance MAKE SURE the timing light Advance Display shows 0 (zero) degrees. Press the Zeroing Switch if necessary to obtain 0 degree indication. While performing an INITIAL (BASE) TIMING CHECK as previously described, slowly increase engine speed to the manufacturer's specified rpm for mechanical/centrifugal advance, and observe the rotating timing mark for change.
- Page 11 Using Your Timing Light Aim the timing light at the timing marks and press the Advance Increment and Advance Decrement switches, as necessary, until the timing marks are realigned to the initial (base) timing mark as recorded in step 3. The difference between the reading obtained in step 3 {initial (base) timing} and the value obtained in step 5 is the vehicle's vacuum advance.
-
Page 12: Troubleshooting
Troubleshooting If the timing light fails to operate or operates erratically, make the following checks: Make sure the battery clips are firmly connected to the battery terminals. Make sure the battery clip polarity is correct (red battery clip is connected to the positive (+) battery terminal, black battery clip is connected to the negative (–) battery terminal). -
Page 13: Care And Maintenance
Care and Maintenance CLEANING THE INDUCTIVE PICKUP CLIP Dirt or grease on the inside surfaces of the induc- Fig. 6. Cleaning the Inductive tive pickup clip can result in erratic flashing or poor Pickup Clip operation of the timing light. Periodically clean the contact surfaces inside the inductive pickup clip by wiping with a soft cloth. - Page 14 Notes...
-
Page 15: Warranty And Service
Warranty and Service LIMITED ONE YEAR WARRANTY The Manufacturer warrants to the original purchaser that this unit is free of defects in materials and workmanship under normal use and maintenance for a period of one (1) year from the date of original purchase.
Need help?
Do you have a question about the 3568 and is the answer not in the manual?
Questions and answers
I have a new innova 3468 timing light the advance and retard buttons on the light have zero effect on the timing marks. Am I doing something wrong? When I use the buttons the mark stays where it was.
The advance and retard buttons on the Innova 3568 timing light have no effect on the actual timing marks because they do not change engine timing. Instead, they adjust the displayed timing value on the light to help align the timing mark with the reference pointer. This allows easier reading of base and advanced timing without physically changing engine timing.
This answer is automatically generated
@Mr. Anderson I understand that I would have to turn the distributor to change the actual timing. My problem is no matter what amount of advance I set on the display it has no effect on the position of the mark in relation to the pointer. Let’s say if my timing is set to 12 degrees BTDC and I set the display to 12 degrees BTDC shouldn’t the marks line up? It doesn’t.
@Mr. Anderson
I corresponded with a Mr Anderson yesterday about the problem I’m having with my 3568 timing light. The advance buttons on the light have no effect on the relationship between the mark on the pulley and the pointer. If it set the display to say 12 degrees BTDC and the distributor is set at 12 degrees BTDC shouldn’t the marks on the pulley align with the pointer?
The advance buttons on the Innova 3568 timing light have no effect on the alignment of the marks on the pulley and the pointer because their purpose is to adjust the digital display to match the timing mark and pointer alignment. The physical marks on the pulley and pointer do not move; instead, the advance buttons electronically shift the timing light's flash to measure timing advance.
This answer is automatically generated