Table of Contents

Related Manuals for Kees van der Westen Speedster 2020


Summary of Contents for Kees van der Westen Speedster 2020
- Page 1 Installation and user manual Speedster Espresso machine Model 2020 230Vac, standard (3100W; 13.5A) and Low-Amp (2200W; 9.6A) versions (Original instructions) Document ID: Sup-Sium-Eng Date of issue: June 10, 2020 Revision date: N.A.
-
Page 2: Table Of Contents
CONTENT Designation .............................. 2 Precaution..............................2 Safe operation ............................2 Water Quality ............................3 Parts identification ........................... 4 Dimensions and characteristics ....................... 5 Water supply ............................6 Water treatment system .......................... 6 Waste/drain ............................. 6 Machine location ............................6 Surface ..............................6 Pump location ............................ -
Page 3: Designation
WELCOME Designation This manual applies to the Speedster espresso machine manufactured by Kees van der Westen Espressonistic Works B.V. A separate rotational pump with electric motor is part of the appliance. Precaution Hot surfaces! Parts of the machine will be hot when the machine is turned ON. -
Page 4: Water Quality
WELCOME Water Quality Have a water treatment system installed and its function checked regularly. The treatment system should at least have a carbon block that not only traps drug-remnants, Chlorine and organic compounds but also prevents rigid particles >30 μm to enter the pump. Optimally, the water fed into the espresso machine would fall in the SCA “core zone”, see Figure 1, and have a pH of 7.0-7.5 (at 25°C). -
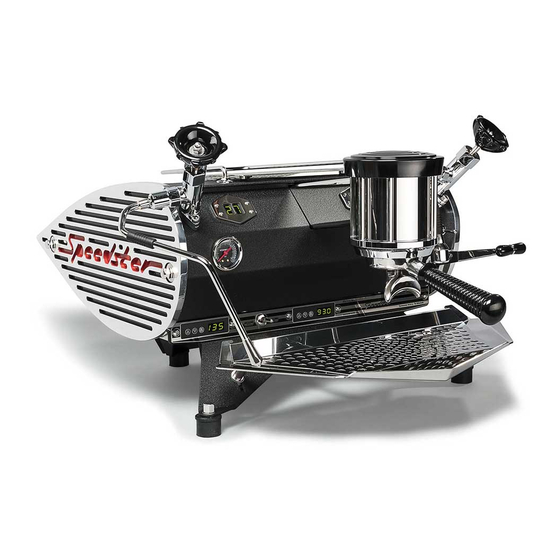
Page 5: Parts Identification
WELCOME Parts identification identity Figure 2. Showing the main operational parts of the Speedster. 1. Mains switch 2. Filter holder 3. Hot water spout 4. Coffee boiler PID with temperature display 5. 3-way brewing lever 6. 3-way hot water toggle switch 7. -
Page 6: Dimensions And Characteristics
INSTALLATION MANUAL – check location Dimensions and characteristics ≈235 ≈600 Figure 3. Side view (left) and top view (right) of the Speedster. Also shown the rubber feet (Ø=30 mm, in purple) and optimal position (green circle Ø≥42mm) and near optimal location (green square 125x110mm) of counter-top feed-through. -
Page 7: Water Supply
INSTALLATION MANUAL – check location Water supply Rated pressure: 0.1-0.5 MPa (1-5 bar) Rated flow: minimum 4 litre/minute The water supply should be able to deliver a minimum amount of 4 litres per minute in the range 0.1- 0.5 MPa (1-5 bar). The machine and accompanying rotary vane pump must be connected with the supplied new set of high-pressure hoses (two hoses, each 1.5 meter long), old hose-sets should not be re-used. -
Page 8: Electric Mains
INSTALLATION MANUAL – check location Electric mains Rated voltage: ~230V, 50/60Hz Rated power: standard: 13.5 Amp, low peak power: 9.6 Amp (see Table 3 for details). version standard low peak power Peak power Watt Ampere Watt Ampere Coffee boiler heating power Steam boiler heating power 1800 1800... -
Page 9: Unpack
INSTALLATION Unpack 1. Straighten the tabs that fixate the lid to the wooden crate, then remove the lid. 2. Unpack only the loose materials inside the crate. 3. Remove the shelf from the crate. 4. Straighten the tabs on the two diagonally ribs of the crate. 5. -
Page 10: Installation
INSTALLATION Installation Caution! Installation of and maintenance on the Speedster should be done by a qualified technician. Parts of the machine can reach a temperature of close to 135 °C (275 °F). The steam/hot water boiler contains water and pressurised steam of 135 °C at 2.2 bar overpressure (275 °F at 33 PSI), temperature and pressure in the coffee system reaches up to 100 °C at 12.5 bar overpressure (212 °F at 181 PSI). -
Page 11: Connect Water Supply
INSTALLATION Connect water supply Rated pressure: 0.1-0.5 MPa (1-5 bar) Rated flow: minimum 4 litre/minute 1. Attach a suitable water treatment system to the water tap. 2. Flush the water treatment system according to manufacturer's instruction. 3. Attach the high pressure hose without push-in fitting to the outgoing side on the water treatment system. - Page 12 INSTALLATION pump assembly pump cord plugs power mains supply cable pump cord Figure 6. Water supply, discharge hose and pump motor are connected. discharge pipe hose clamp Figure 7. discharge hose is clamped to discharge pipe and water supply is pushed into the machine. Notes Use the new hoses supplied with the machine.
-
Page 13: Connect Water Discharge
INSTALLATION Connect water discharge 1. Position the stainless steel hose clamp on one end of the discharge hose. Slide the end of the hose over the discharge-pipe of the drip tray (see Figure 7) and tighten the hose clamp. 2. Insert the other end of the discharge hose into the sewer or a discharge container. Beware! To prevent sedimentation of smudge, the discharge hose should slope down to your sewer or discharge container over the entire length of the hose, see Figure 8. -
Page 14: Connect To Mains Power And Switch On
INSTALLATION Connect to mains power and switch on Rated voltage: ~230Vac, 50/60Hz Rated power: standard: 13.5 Amp, low peak power: 9.6 Amp (see Table 3 for details). Danger If the supply cord or the pump connection cord is damaged it must be replaced by the manufacturer, its service agent or similarly qualified persons in order to avoid a hazard. -
Page 15: Adjust Pump Pressure
INSTALLATION Adjust pump pressure The pressure gauge displays the actual brew pressure (the water pressure on the coffee bed). The minimum value when the machine is at rest is 0. Factory setting of the maximum pressure in the boiler is 11.5-12.5 bar. Above this value the expansion valve in the coffee circuit will open, thus bleeding pressure until the maximum value is no longer exceeded (this occurs when water with a lower temperature than the set value enters the coffee boiler, heats up and thus expands). -
Page 16: Using The Machine
USER MANUAL Using the machine Brewing espresso The 3-way brewing lever on the right hand side of the machine (see Figure 10) operates the group valve and the pump. The lever can be fixed in 2 slots and thus has three operating positions: 1. -
Page 17: Shot Timer
USER MANUAL Shot timer When the group valve is active (open) for longer than 0.1 second, a timer first re-sets to zero and then starts to count. The display (see Figure 11) will show the seconds passed since the valve was opened. It does not distinct between pump active or inactive. -
Page 18: Hot Water
USER MANUAL Hot water A three-way toggle switch, located on the right hand side between the brew lever and the hot water valve, controls the hot-water distribution (see Figure 10 and Figure 12). The valve knob itself is purely visual and has no operational function. valve knob;... - Page 19 USER MANUAL Figure 13. Showing how to adjust the mix-water temperature. tools needed • small screw driver with short handle • (very) quick response thermometer procedure 1. Have the machine at operation for at least 30 minutes with the steam valve used for at least 30 seconds continuously.
-
Page 20: Steam
USER MANUAL Steam The left valve is the steam valve (see Figure 14). Turning the steam valve knob counter-clockwise will open the valve. Before steaming milk it is necessary to open the valve for a short while to purge the water from the steam wand. -
Page 21: Change Boiler Temperatures
USER MANUAL Change boiler temperatures The factory settings of the coffee boiler and steam boiler temperature controllers are 93 and 135 degrees Centigrade (°C) respectively (200 and 275 °F). Saturated steam overpressure at 135 °C is approximately equivalent to 2.2 bar. The controllers are locked to prohibit unintended changes but allow, within limits, for changes in operational temperature. -
Page 22: Cleaning The Machine
USER MANUAL Cleaning the machine Remove filter basket Materials needed • Group screen extractor Procedure 1. Remove the filter holder. 2. Pry the filter basket with the pointed end of the extractor from the filter holder (see Figure 16). 3. When remounting the filter basket, make sure the spring snaps into the basket. Figure 16. -
Page 23: Clean Exterior
USER MANUAL Clean exterior The outside of the machine can be cleaned with window cleaner in a hand spray flask in combination with a soft, often washed, cotton cloth. When the machine is turned “ON” it will be warm and you have to work swiftly to prevent stripes: spray and immediately rub. -
Page 24: Replace Group Seal
USER MANUAL Replace group seal Most group seals are made out of rubber-like material that will harden in time and thus over time need increasing force to properly seal. We advise to replace such group seals at least every 6 months or more often when needed. -
Page 25: Clean Group Dispersion Plate
USER MANUAL Clean group dispersion plate The group dispersion plate ensures more uniform wetting of the coffee bed. When dirty, the wetting will become less uniform. The new PEEK material used for the dispersion set has a very long life-span when cleaned periodically. -
Page 26: Maintenance
USER MANUAL Maintenance Below is the recommended maintenance scheme. Up to one year, the maintenance is easy and does not require any technical knowledge. However, checking, adjusting and/or replacing parts inside the machine should be done with care and requires some technical skills. Recommended maintenance scheme Daily (depending on use, see user manual) •... -
Page 27: Maintenance Records
USER MANUAL Maintenance Records Date Task Comments Speedster I&U manual page 26... -
Page 28: Contact Information
INFORMATION Contact information Kees van der Westen Espressonistic Works B.V. Van Elderenlaan 6 5581WJ WAALRE The Netherlands Telephone +31 40 2223433 Keep machine number at hand Email for technical questions support@keesvanderwesten.com Forward machine number Website www.keesvanderwesten.com Ordering replacement parts http://www.keesvanderwesten.com/assets/speedster-parts-list.pdf for the spare parts list.
Need help?
Do you have a question about the Speedster 2020 and is the answer not in the manual?
Questions and answers