
Related Manuals for Kees van der Westen Mirage Slim Jim


Summary of Contents for Kees van der Westen Mirage Slim Jim
- Page 1 User manual Slim Jim – in progress Document ID: Sup-Tum-Eng Date of issue: December 20, 2018 Revision date: - - - Slim Jim User manual page 0...
-
Page 2: Table Of Contents
CONTENTS Water Quality ............................2 Parts identification ..........................3 Operational features ..........................4 MAIN switch ............................4 HEAT switches ............................ 4 Circuit breakers ........................... 4 Temperature display ..........................6 On control panel ..........................6 On 3-digit displays ........................... 6 Shot time.............................. 6 Pressure gauge ........................... -
Page 3: Water Quality
Water Quality Have a water treatment system installed and its function checked regularly. The treatment system should at least have a carbon block that not only traps drug-remnants, Chlorine and organic compounds but also prevents rigid particles >30 μm to enter the pump. Optimally, the water fed into the espresso machine would fall in the SCA “core zone”, see Figure 1, and have a pH of 7.0-7.5 (at 25°C). -
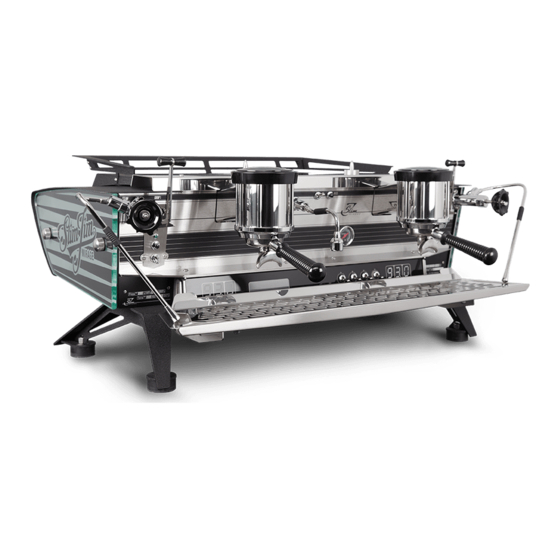
Page 4: Parts Identification
WELCOME Parts identification Figure 2. Showing the main operational parts of the Slim Jim Duette Bastone version. The Slim Jim Triplette has three groups but its functions are identical to the Duette. On the Touchpad version, the group brewing lever units are replaced with touchpads (see Figure 5). 1. -
Page 5: Operational Features
USER MANUAL - operation Operational features MAIN switch The main switch (see Figure 3) is located at the right hand side of the machine and has 2 positions: DOWN=OFF Power to the controller is disconnected. When the machine is functioning correctly, all heating is also off, whatever the position of the heat switches. - Page 6 USER MANUAL - operation Bastone unit start/stop A bastone unit includes a brew lever, an volumes indicator light, a momentary push button and a two-position toggle switch. Shortly pressing the brew lever will start the pre- set volume determined by the toggle-switch. A pre-set volume can be stopped before the volume is reached by shortly pressing the brew lever again.
-
Page 7: Temperature Display
USER MANUAL - operation Temperature display Each boiler is equipped with its own temperature controlling system. Measured temperature values can be displayed 2-ways: on the control panel and/or on the large 3-digit displays underneath each group (see Figure 6). In the barista menu, the temperature unit can be switched from °C to °F. On control panel At “normal”... -
Page 8: Pressure Gauge
USER MANUAL - operation Pressure gauge While brewing a real shot the coffee-bed becomes less permeable during wetting (pre-infusion stage) and pressure will rise until pump-pressure is reached (ideally 9 bar). The pressure gauges display the pressure in the line that runs from group-valve to group-screen. This means that when a group is inactive or when no portafilter is locked in, the pressure gauge will display 0 bar. -
Page 9: Steaming
USER MANUAL - operation Steaming The Slim Jim has two identical mechanical steam valves that can optionally be equipped with foot operated solenoid valves. Before steaming milk it is necessary to open the valve for a short while to purge water from the steam wand and heat up the wand and valve. -
Page 10: Pre-Infusion Cylinder
USER MANUAL - operation Pre-infusion cylinder The piston rod will rise up during the initial stage of a brew. A double spring assembly inside the pre-infusion cylinder assures a slow-starting and gradual pressure build-up to about 3 bar when the maximum displacement of the piston is reached. -
Page 11: Control Panel
USER MANUAL - operation Control panel The control panels of the Triplette and Duette are very similar and has a 5-“button” capacitive touch screen. When at operation, the display will show the temperatures in °C or °F without the temperature unit. -
Page 12: Go To Stand-By
MODE touch touch “NO HEAT”: the THURSDAY - 13:57 NO HEAT KEES VAN DER WESTEN no-heat window machine will cool TECHNICAL ASSISTANCE SLIM JIM down “ECO”: the THURSDAY - 13:57 KEES VAN DER WESTEN machine will settle... -
Page 13: Sensor Malfunction
The back button will return to “NO HEAT” or “ECO MODE”, whatever the earlier setting was. “NO HEAT”: the THURSDAY - 13:57 NO HEAT KEES VAN DER WESTEN no-heat window machine will cool TECHNICAL ASSISTANCE SLIM JIM down “ECO”: the... -
Page 14: Use External Temperature Sensor (Option)
USER MANUAL - operation Use external temperature sensor (option) An external NTC-sensor can be plugged into the bottom of the electrics tray. The temperature of the external sensor can be shown on the control panel instead of the steam boiler temperature. GROUP 1 GROUP 2 GROUP 3... -
Page 15: Program Volumes With Touchpad Or Bastone
USER MANUAL - operation Program volumes with touchpad or bastone The bastone version of the Slim Jim has 2 pre-set volumes per group, the touchpad version has 4 pre- set volumes per group. When water flows through a coffee group, the flow meter of that group sends pulses to the controller. -
Page 16: Change Settings In The Barista Menu
USER MANUAL - operation Change settings in the Barista menu You have to leave the operational window of the controller and choose the correct parameter-set to change individual settings. GROUP 1 GROUP 2 GROUP 3 STEAM MENU operational window 93.4 45.6 93.2 124.6... -
Page 17: Sub-Menu Volume Setting
USER MANUAL - operation Note! Do not adjust the temperature of the hot water dispense by changing the temperature of the steam-boiler. Have a technician adjust the mix-water dispense temperature by turning a set screw on the inlet manifold (inside the machine). Sub-menu VOLUME SETTING In the sub-menu volume setting you can consecutively adjust the following: parameter... -
Page 18: Why Switch To Eco
USER MANUAL - operation • Using the “auto off” function will turn the machine to stand-by (ECO or NO HEAT) at a pre-set time (e.g. at the end of the day). It is especially meant to facilitate the use of the ECO function. •... -
Page 19: Pump-Pressure
USER MANUAL - operation Pump-pressure Check Check the pump-pressure when an actual brew is at the infusion stage; i.e. the highest pressure reached during a brew. Make sure that only a single group is active during this check as multiple “users”... -
Page 20: Cool Down The Machine
USER MANUAL - operation Cool down the machine (re-locate to technical manual?) As the steam boiler is isolated, the temperature in the steam boiler will drop very slowly when heating is turned off and the machine is otherwise untouched. It will take about 5 hrs to cool down to its ECO temperature of 70°C. -
Page 21: Daily To Weekly Routine
USER MANUAL – routine Daily to weekly routine Use hot water from the machine Even the best treated water will lead to scale deposition in the steam boiler if the steam boiler is predominantly used to steam milk. If the hot water-tap on the espresso machine is hardly ever used get into the habit of doing your daily clean-up up with mix-water drawn from the espresso-machine instead of from the buildings hot-water supply. -
Page 22: Clean Steam Wand
USER MANUAL – routine Clean steam wand Milk easily bakes to the hot inner and outer surfaces of the steam wand and tip. Therefore, the steam wand and tip should be cleaned with a damp cloth directly after each use. Do not use this cloth for anything else than the steam wand. -
Page 23: Clean Group Screen, Check And Replace Group Seal
USER MANUAL – routine Clean group screen, check and replace group seal The group screen helps to disperse the incoming hot water onto the coffee bed and also prevents coffee grinds entering the group. The black group seal will remain flexible for a long time but will harden eventually. We advise to check the group seal regularly and replace when needed. -
Page 24: Clean Group Dispersion Plate
USER MANUAL – routine Clean group dispersion plate The group (lower) dispersion plate ensures uniform wetting of the coffee bed. When dirty, the wetting will become less uniform. As the dispersion plate and base are made of plastic material, which is heat neutral, no oils and fats will bake on easily and plate and base will remain clean for quite long. -
Page 25: Replace Dispersion Base And Plate
USER MANUAL – routine Replace dispersion base and plate The dispersion base and plate are sold as a set only (with new screws) as both parts deteriorate simultaneously. The protrusion on the dispersion base easily breaks off when the plastic material is affected (by cleaning powder). -
Page 26: Check Machine Condition, Report Malfunctions
USER MANUAL – check condition Check machine condition, report malfunctions It will help the maintenance technician solving problems if some information about the machine is known before he makes a house-call. This information should include: 1. serial number of the machine 2. -
Page 27: Check Pressure Gauges
USER MANUAL – check condition Check pressure gauges 1. No pressure: when not brewing, the needles on all gauges should be in “resting position” (indicating close to 0 bar). 2. Identical pressure: with a blind filter in all groups, all groups active and all pre-infusion cylinders completely full, all gauges should display identical pressures. - Page 28 USER MANUAL – check condition GROUP 1 GROUP 2 GROUP 3 STEAM MENU operational group 3 shows a window flow-meter error 93.4 45.6 flow m. 124.6 Figure 20. Error report if the flow-rate during a brew falls outside the flow-meter range. When you prefer to brew real slowly, we advise to use scales under the cup in combination with manually (de-) activating the group for best weight consistency in the cup.
-
Page 29: Recommended Maintenance Scheme
USER MANUAL – maintenance Recommended maintenance scheme Daily (see user manual) • Clean steam wand • Back flush groups • Clean filter holder Weekly (see user manual) • Clean group screen • Clean group dispersion plate Monthly (see user manual) •... -
Page 30: Maintenance Record
USER MANUAL – maintenance Maintenance Record (machine number: __________________ , installation date:_________________________________ ) Date Technician Task Comments Slim Jim User manual page 29... - Page 31 USER MANUAL – maintenance Slim Jim User manual page 30...
-
Page 32: Contact Information
When seeking contact with the e-mail address above, please forward the model and serial number of the machine in question. Contact information Kees van der Westen Espressonistic Works B.V. Van Elderenlaan 6 5581WJ WAALRE The Netherlands Telephone +31 40 2223433 Email support@keesvanderwesten.com...
Need help?
Do you have a question about the Mirage Slim Jim and is the answer not in the manual?
Questions and answers