
Related Manuals for Kees van der Westen Spirit DUETTE


Summary of Contents for Kees van der Westen Spirit DUETTE
- Page 1 User manual Spirit (original instructions) Document ID: Sup-Rum-Eng Date of issue: October 22, 2015 Revision date: June 24, 2020 Spirit User manual page 0...
-
Page 2: Table Of Contents
CONTENTS Designation ............................2 Precaution .............................. 2 Safe operation ............................2 Water Quality ............................3 User manual ............................4 Parts identification ..........................4 Mains switch ............................5 Back light switch ..........................5 Temperature controller switches ......................6 Volumetric stop of a brew ........................6 Consistency in programmed volumes ..................... -
Page 3: Designation
Designation This manual applies to the Spirit 2-group (Duette) and 3-group (Triplette) espresso machines with touchpad or Bastone operation manufactured by Kees van der Westen Espressonistic Works B.V. Separate rotational pumps with electric motors are part of the appliance. Precaution Hot surfaces! Parts of the machine will be hot when the machine is turned ON. -
Page 4: Water Quality
WELCOME Water Quality Have a water treatment system installed and its function checked regularly. The treatment system should at least have a carbon block that not only traps drug-remnants, Chlorine and organic compounds but also prevents rigid particles >30 μm to enter the pump. Optimally, the water fed into the espresso machine would fall in the upper-right part of the SCA “core zone”, see Figure 1, and have a pH of 7.0-7.5 (at 25°C). -
Page 5: User Manual
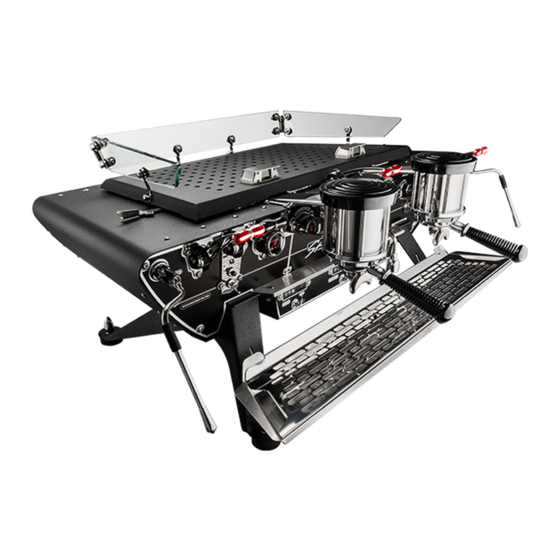
User manual Parts identification Figure 2. Showing main operational parts of the Spirit Duette Bastone version. The Spirit Triplette is wider since it has three groups but its functions are identical to the Duette. On the Touchpad version, the group brewing lever units are replaced with touchpads (see photo in Table 2). -
Page 6: Mains Switch
USER MANUAL Mains switch The mains switch (see Figure 3 a) is located at the right hand side of the machine and has 3 positions: All power to the machine is disconnected. NO HEAT The machine is connected to power, but power to the heating elements is disconnected. The machine functions but there is no heat and thus neither hot water nor steam pressure. -
Page 7: Temperature Controller Switches
ON-OFF switches Figure 5. Showing the temperature controllers with their ON-OFF switches for the steam boiler and the two groups on a Spirit Duette. Switches are in the OFF position with levers pointing down, displays are unlit. Volumetric stop of a brew When water flows through a coffee group, the flow meter of that group sends pulses to the controller. - Page 8 USER MANUAL The amount of water in the feed line from group-valve to coffee-bed should not vary. When a brew is finished, excess pressure on the coffee-bed is released via the 3-way group valve at the back of the coffee boiler neck. This line may or may not drain completely before a new shot is started.
-
Page 9: Touchpad
USER MANUAL Touchpad Each group is operated by a touchpad and each touchpad has 5 buttons with internal LED’s (see photo in Table 2). The left hand side touchpad has some functions which are not available on the other touchpad(s). ON-OFF The upper button (larger circle) is an ON-OFF group switch with programming function. -
Page 10: Program Hot Water Timer
USER MANUAL Left hand rules Attention! Programming the left hand group overrides the stored volumes of the other group(s). If you want different volumes on each group, start by programming the left group (using the left hand touchpad), then program the other group(s). Program hot water timer The left hand touchpad also governs the hot water timer. -
Page 11: Bastone
USER MANUAL Bastone (bastone = Italian for stick) The Bastone version is very similar to the touchpad version but the touchpads have been replaced by Bastone units that include a brew lever, an indicator light, a push button and a toggle switch. The push button underneath each brew lever is the continuous (ON-OFF) switch for that group. -
Page 12: Program Hot Water Timer
USER MANUAL Program hot water timer 1. Press-hold the push button underneath the left brew lever for 6 seconds (all indicator lights start flashing), then release. 2. Within the next 20 seconds: press the hot water lever briefly to start flow. The indicator lights of both groups will be lit continuously. -
Page 13: Dispensing Hot Water
USER MANUAL Dispensing hot water Place a cup under the hot water spout and press the hot water lever down briefly (see Figure 8). The flow will stop when the pre-set time has elapsed, or when the lever is pressed down briefly again, whichever comes first. -
Page 14: Change Boiler Temperatures
USER MANUAL Change boiler temperatures The factory set operational temperatures of the boilers are 93 °C (coffee) and 125 °C (steam) (199 °F and 257 °F) respectively. 125 °C is equivalent to approximately 1.35 Bar steam overpressure. Switch boiler temperatures with Störk ST25-Eco controllers Your machine is equipped with Störk ST25-Eco controllers which allow you to easily change the temperature of the corresponding boiler to a second (lower) setpoint. -
Page 15: Brew Pressure Gauge
USER MANUAL Notes! The temperature sensor of the steam-boiler is placed above the water-level for quick response to steam withdrawal. At temperatures below 110 °C (230 °F) the sensor will not register a change in (water) temperature quickly. For that reason, the steam-boiler temperature may be up to 6 °C higher than the Eco-setpoint at the moment you switch from Eco to operational mode. -
Page 16: Set Hot Water Temperature
USER MANUAL Set hot water temperature Hot water from the steam/hot water boiler is mixed with some cold water before it is dispensed. Water temperature at the hot water spout depends on the temperature and amount of the mixed-in cold water. -
Page 17: Shot Timers
USER MANUAL Shot timers The timers on top of each group (see Figure 13) measure the time in seconds that the corresponding group valve is open and thus indicate the brew-time. As soon as the group valve opens the time is set to zero and counting starts. -
Page 18: Indicator Lights
STEAM COFFEE Figure 14. The heating element indicator lights on a Spirit Duette, left indicator lights for the steam boiler, right for the coffee boilers. The indicator dot on the left hand coffee boiler controller is lit and the corresponding indicator light (left light of right set) as well. The indicator dot on the steam boiler controller is lit, as are all steam boiler indicator lights (left set). -
Page 19: Daily To Weekly Routine
Daily to weekly routine Clean body The outside of the machine can be cleaned with window cleaner in a hand spray flask in combination with a soft, clean, cotton cloth. When the machine is turned “ON” it will be warm and you have to work swiftly to prevent stripes: spray and immediately rub. -
Page 20: Clean Steam Wand
DAILY TO WEEKLY ROUTINE Clean steam wand Milk easily bakes to the hot inner and outer surfaces of the steam wand and tip. Therefore, the steam wand and tip should be cleaned with a damp cloth directly after each use. Do not use this cloth for anything else than the steam wand. -
Page 21: Clean Group Screen, Check And Replace Group Seal
DAILY TO WEEKLY ROUTINE Clean group screen, check and replace group seal The group screen helps to disperse the incoming hot water onto the coffee bed and also prevents coffee grinds entering the group. The group seal will deteriorate slowly over time. We advise to check the group seal regularly and replace when needed. -
Page 22: Clean Group Dispersion Plate
DAILY TO WEEKLY ROUTINE Clean group dispersion plate The group (lower) dispersion plate ensures uniform wetting of the coffee bed. When dirty, the wetting will become less uniform. As the dispersion plate is made of plastic material, it is heat neutral such that no oils and fats will bake on. -
Page 23: Replace Dispersion Base And Plate
DAILY TO WEEKLY ROUTINE Replace dispersion base and plate When the dispersion plate is to be renewed, you should renew the dispersion base as well. The protrusion on the dispersion base easily breaks off when the plastic material is deteriorated (by cleaning powder). -
Page 24: Recommended Maintenance Scheme
Recommended maintenance scheme Daily (see user manual) • Clean filter holder • Clean steam wand • Back flush groups Weekly (see user manual) • Clean group screen • Clean group dispersion plate Monthly (see user manual) • Check pump pressure •... -
Page 25: Maintenance Record
Maintenance Record (machine number: __________________ , installation date:_________________________________ ) Date Task Comments Spirit User manual page 24... -
Page 26: Notice
When seeking contact with the e-mail address above, please forward the model and serial number of the machine in question. Contact information Kees van der Westen Espressonistic Works B.V. Van Elderenlaan 6 5581WJ WAALRE The Netherlands Telephone +31 40 2223433 Email support@keesvanderwesten.com...
Need help?
Do you have a question about the Spirit DUETTE and is the answer not in the manual?
Questions and answers