Advertisement
Quick Links
Thank you for purchasing a Sealey Rivet Kit. Manufactured to a high standard this product will, if used according to these instructions
and properly maintained, give you years of trouble free performance.
IMPORTANT: PLEASE READ THESE INSTRUCTIONS CAREFULLY. NOTE THE SAFE OPERATIONAL REQUIREMENTS, WARNINGS AND
CAUTIONS. USE THE PRODUCT CORRECTLY AND WITH CARE FOR THE PURPOSE FOR WHICH IT IS INTENDED. FAILURE TO DO SO MAY
CAUSE DAMAGE AND/OR PERSONAL INJURY AND WILL INVALIDATE THE WARRANTY. PLEASE KEEP INSTRUCTIONS SAFE FOR FUTURE USE.
1.
SAFETY INSTRUCTIONS
F WARNING! Ensure Health & Safety, local authority and general workshop practice regulations are adhered to when using this equipment.
! Familiarise yourself with the application and limitations of the riveter, as well as the potential hazards.
! Maintain the riveter in good condition (use an authorised service agent).
! Replace or repair damaged parts. Use genuine parts only. Unauthorised parts may be dangerous and will invalidate the warranty.
! Keep the work area clean, uncluttered and ensure that there is adequate lighting.
! Keep the riveter clean for best and safest performance.
F WARNING! Always wear approved eye or face protection when operating the riveter.
! Keep children and unauthorised persons away from the work area.
! Check moving parts alignment on a regular basis.
% DO NOT hold the workpiece by hand. Secure workpiece with a clamp, vice or other adequate holding device.
% DO NOT use the riveter for any purpose other than that for which it is designed.
% DO NOT operate the riveter if any parts are damaged or missing, as this may cause failure and/or personal injury.
! When not in use return to the case and store in a safe, dry, childproof area.
2.
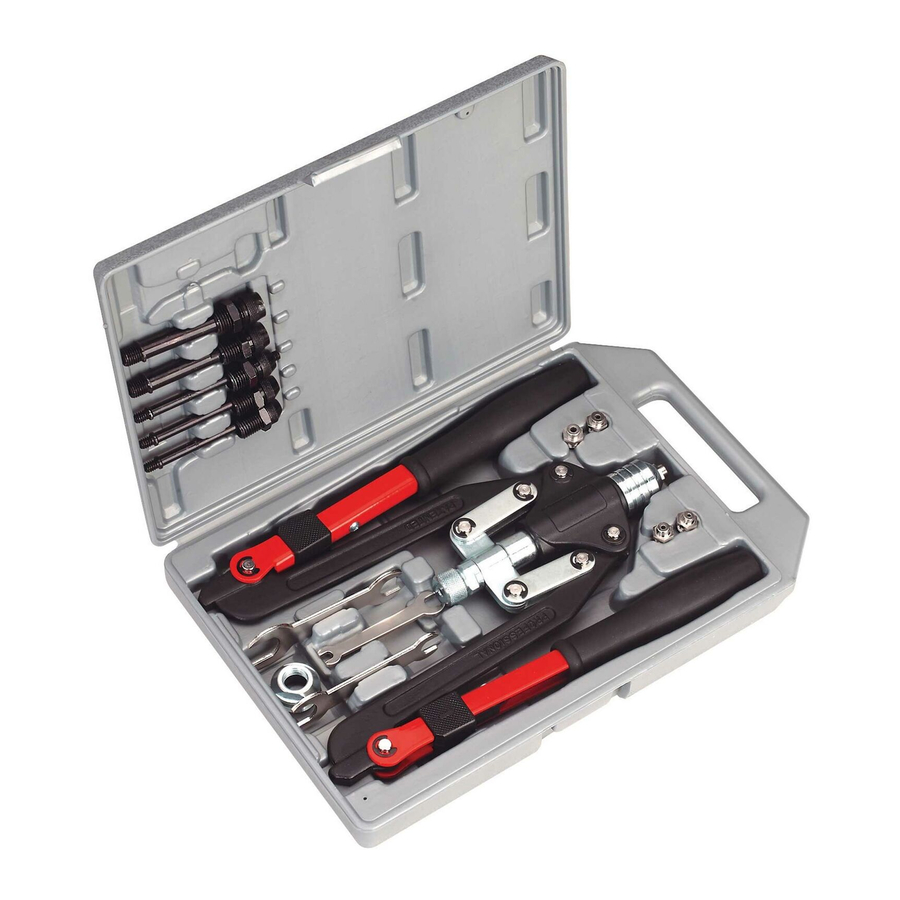
CONTENTS
Check the contents of the kit against the item list and fig. 1. If any item is found to be damaged or missing
contact your dealer immediately.
1. Riveter
2. Pop Rivet Mandrels, 5 (1 in riveter)
3. Nut Rivet Mandrels & Bars, 5, M4 x 0.7, M5 x 0.8, M6 x 1.0, M8 x 1.25, M10 x 1.5
4. Nosepiece for Nut Rivet Mandrel
5. Spanners, 5.5/8.5mm, 12/17mm, 15/19mm
3.
INTRODUCTION
Drop forged frame with patented folding mechanism for compact storage.
Comfortable cushion grips. Suitable for installing threaded nut rivets for
securing threads in thin sheet material. Heavy-duty head accepts threaded
rivets up to M10. Suitable for aluminium and steel nut rivets and pop rivets.
4.
APPLICATIONS
The AK39602 kit is suitable for fitting threaded nut rivets of the following materials
and sizes together with pop rivets up to 6.4mm (1/4”) diameter.
M4 x 0.7
Aluminium
!
Steel
!
5.
OPERATION
5.1.
Pop Rivets
5.1.1. Select the mandrel (fig. 2.A) which matches the shaft diameter of the rivet and screw it to the nosepiece (fig. 2.B) of the riveter.
5.1.2. With the riveter handles extended and open, fully insert the rivet shaft into the mandrel.
5.1.3. Place rivet in hole in the workpiece and squeeze the riveter handles closed to deform the rivet.
5.1.4. If the rivet stem does not shear, open the handles, push the riveter further onto the stem and
then close the handles again.
5.1.5. When the stem shears, open the handles and remove the stem from the riveter.
5.2.
Threaded Nut Rivets
5.2.1. Unscrew the pop rivet nosepiece (fig. 2.B) from the riveter body.
5.2.2. Unscrew the jaw case assembly (fig. 4) from the draw bar body (fig. 2.F).
5.2.3. Screw the nut rivet nosepiece (fig. 2.C) into the riveter body.
5.2.4. Screw the appropriate mandrel bar (fig. 2.D) into the draw bar body. Note left-hand thread.
5.2.5. Screw the corresponding mandrel (fig. 2.E) into the nosepiece.
Note: Always use mandrel and mandrel bar of the same size, determined by the size of nut rivet.
To ensure that the nut rivet is compressed by the correct amount it is necessary to set the height
of the mandrel by doing the following test.
5.2.6.
Prepare a sample of the workpiece material with a hole slightly larger than the nut rivet diameter.
5.2.7.
Screw the nut rivet fully onto the mandrel bar.
5.2.8.
Place the nut rivet in the hole in the sample and press down so that the nut flange is held firmly against the
upper face of the sample.
M5 x 0.8
M6 x 1.0
!
!
!
!
INSTRUCTIONS FOR:
RIVET &THREADED NUT RIVET KIT
Model No:
M8 x 1.25
M10 x 1.5
!
!
!
!
AK39602
fig. 2
fig. 1
AK39602 -1 - 160603
Advertisement

Related Manuals for Sealey Professional AK39602


Summary of Contents for Sealey Professional AK39602
- Page 1 AK39602 Model No: Thank you for purchasing a Sealey Rivet Kit. Manufactured to a high standard this product will, if used according to these instructions and properly maintained, give you years of trouble free performance. IMPORTANT: PLEASE READ THESE INSTRUCTIONS CAREFULLY. NOTE THE SAFE OPERATIONAL REQUIREMENTS, WARNINGS AND CAUTIONS.
- Page 2 The jaw case assembly (fig. 4) should be disassembled, cleaned and oiled at regular intervals, depending on the frequency of use. The need for cleaning/jaw (fig. 4.A) replacement will be indicated by the riveter failing to grip the rivet shaft. fig. 4 ALUMINIUM RIVETS Aluminium threaded and pop rivets are available from your Sealey dealer. Nut Rivets Thread Quantity...