
Related Manuals for Vemer CHRONOS Series


Summary of Contents for Vemer CHRONOS Series
- Page 1 Cronotermostato Digitale CHRONOS Manuale d’Uso User Manual DIGITAL PROGRAMMABLE THERMOSTAT...
- Page 3 Indice ■ Dimensioni Pagina ■ Schemi di collegamento Pagina ■ Avvertenze di sicurezza Pagina ■ Caratteristiche tecniche Pagina ■ Display e tastiera Pagina ■ Installazione Pagina ■ Menù di programmazione Pagina 12 - Modifica ora e data Pagina 12 - Modifica programmi Pagina 12 - Modifica temperature T1, T2, T3 Pagina 14...
- Page 4 Cronotermostato digitale CHRONOS e nero (sensibile al tocco delle dita) - 2 - Manuale d’Uso Cronotermostato CHRONOS...
- Page 5 Cronotermostato digitale CHRONOS Chronos 230 Chronos 230 Chronos Chronos Modello Bianco Nero Bianco Nero batterie 2 x 1,5V (tipo AAA) 230Vac 50/60 Hz Alimentazione Display multicolore rosso/verde/blu monocromatico (blu) Ingresso Accensione/spegnimento con — digitale combinatore telefonico A parete Installazione (o a copertura della scatola 503) - 3 - Manuale d’Uso Cronotermostato CHRONOS...
- Page 6 DIMENSIONI SCHEMI DI COLLEGAMENTO - 4 - Manuale d’Uso Cronotermostato CHRONOS...
- Page 7 Serie di cronotermostati elettronici touch screen con installazione a parete, adatti alla regolazione della temperatura in ambienti domestici. Sono proposti in due varianti: ■ CHRONOS, alimentati a batteria, con display retroilluminato monocolore (blu) e ingresso per contatto esterno con il quale accendere/spegnere il cronotermostato da remoto (via telefono) ■...
-
Page 8: Caratteristiche Tecniche
CARATTERISTICHE TECNICHE Alimentazione Chronos: – 2 batterie alcaline da 1,5V (tipo AAA) – autonomia: 1 anno – indicazione batterie scariche – riserva di carica (per sostituzione batterie): 1 minuto – 230Vac (-15% ÷ +10%) 50/60Hz – consumo massimo: 6 VA / 230Vac –... -
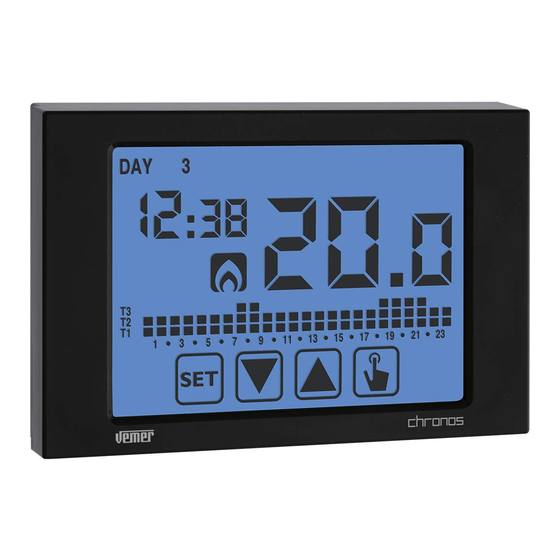
Page 9: Display E Tastiera
DISPLAY E TASTIERA ① Giorno della settimana (DAY 1 = lunedì) ② Menù di programmazione: : impostazione data/ora e ora legale : modifica programmi (per funzionamento automatico) : impostazione temperature T1, T2, T3 : menù temporizzazioni : menù programmazione avanzata : non utilizzato : non utilizzato ③... - Page 10 ■ Tastiera I tasti assumono funzioni diverse a seconda dello stato dello strumento e verranno descritte man mano in questo manuale d’uso Non sono previste funzioni multi-tasto, ovvero pressioni contemporanee di 2 o più tasti Esistono due tipi di pressione: - pressione breve - pressione lunga, con durata superiore a 3 secondi Durante la pressione di un tasto, il display è...
- Page 11 I cronotermostati della serie Chronos sono progettati per l’installazione da parete. In alternativa possono essere installati a copertura della scatola 503. pavimento, al riparo dall’irraggiamento diretto, lontano da porte, finestre, fonti di calore, posizioni con eccesso o totale mancanza di aereazione. Collegare i cavi alla morsettiera posta Fissare la base a muro utilizzando le sul retro della base, come mostrato...
- Page 12 Una volta alimentato lo strumento, impostare l’orologio (inserimento di ora e data). I parametri da inserire sono: secondi (solo sincronizzazione al valore 00), minuti, ore, anno, mese, giorno. Utilizzare i tasti per incrementare e decrementare i valori e il tasto confermare e passare al parametro successivo.
- Page 13 GIORNO TEMPERATURA A questo punto il cronotermostato inizierà a funzionare con i parametri di default impostati (vedere pag. 33), visualizzando a display il giorno della settimana, l’ora, la temperatura ambiente e il grafico del programma attivo. GRAFICO DEL PROGRAMMA - 11 - Manuale d’Uso Cronotermostato CHRONOS...
- Page 14 Tramite questo menù è possibile modifi care i seguenti parametri di funzionamento: - Data e ora - Programmi funzionamento automatico - Temperature funzionamento automatico - Temporizzazioni - Funzioni avanzate. Per modifi care l’ora e la data impostate: 1. Dalla schermata di funzionamento normale, tenere premuto a lungo il tasto fi...
- Page 15 sabato e la domenica (i profili dei programmi sono riportati in fondo a questo manuale a pag. 34-35). È possibile cambiare questa programmazione qualora non soddisfi le esigenze. Per modificare la programmazione: 1. Dalla schermata di funzionamento normale, tenere premuto a lungo il tasto finchè...
- Page 16 assegnato per quella determinata ora (00:00). Usare i tasti per cambiare livello di temperatura e il tasto per passare all’ora successiva. Impostare così per ogni ora della giornata il livello di temperatura desiderato. 3.2.1.1. Per ciascuna ora è anche possibile ritardare l’inizio della regolazione di 15’, 30’...
- Page 17 3. Viene visualizzato il valore della temperatura T1 lampeggiante. Modificare il valore con i tasti e premere il tasto passare alla modifica di T2. 4. Viene visualizzato il valore della temperatura T2 lampeggiante. Modificare il valore con i tasti e premere il tasto passare alla modifica di T3.
- Page 18 Questo menù consente di impostare una temporizzazione sul modo di funzionamento corrente, espressa in ore o giorni. Per maggiori informazioni sulle temporizzazioni, vedere il capitolo “Temporizzazioni: cosa sono” a pag. 29. Per impostare una temporizzazione: 1. Dalla schermata di funzionamento normale, tenere premuto a lungo il tasto fi...
- Page 19 5. Una volta impostati tutti i parametri, per uscire e tornare al menù di programmazione, premere brevemente il tasto Per uscire e tornare al normale funzionamento (automatico, manuale) premere a lungo il tasto o attendere lo scadere del time-out (circa 30 secondi). Se è...
- Page 20 Questo parametro consente di specifi care la modalità di funzionamento del cronotermostato, tra invernale/riscaldamento ( ) ed estivo-condizionamento ( Per maggiori informazioni sul modo di funzionamento vedere il capitolo “Tipo di regolazione” a pag. 27. (solo per funzionamento riscaldamento) Per il modo di funzionamento riscaldamento è possibile scegliere tra regolazione on/off (Reg 0) o proporzionale (rEg P ).
- Page 21 Nel caso di regolazione l’unico parametro da impostare è il differenziale (dIF), che può assumere valori tra 0,1°C e 1°C. Nel caso di regolazione i parametri da impostare sono la banda di regolazione (bnd) e il periodo di regolazione (PEr). Per maggiori informazioni su come scegliere questi valori vedere il capitolo “Tipo di regolazione”...
- Page 22 Quando la tastiera è bloccata, il cronotermostato svolge tutte le sue funzioni utilizzando i parametri di regolazione impostati. Se il blocco tastiera è attivo e viene premuto un tasto, a display compare per qualche secondo la scritta bL0c la tastiera, la quale rimarrà sbloccata per 30 secondi dall’ultima pressione. Questa pagina mostra il numero di ore complessive di funzionamento dell’impianto (relè...
- Page 23 In funzionamento manuale lo strumento si comporta come un normale termostato, regolando secondo la temperatura Tm (setpoint manuale), indipendentemente dal giorno e dall’ora in cui si trova. Il funzionamento manuale è segnalato dall’accensione del simbolo nel campo Per passare dal funzionamento automatico al funzionamento manuale: 1.
- Page 24 In funzionamento spento lo strumento non esegue alcuna regolazione (*) ma continua a visualizzare il giorno, l’ora e la temperatura misurata. (*) Nel caso di funzionamento in riscaldamento/inverno lo strumento mantiene comunque una temperatura minima - temperatura di antigelo Toff - onde evitare congelamenti dell’impianto o degli ambienti in cui lo strumento è...
- Page 25 I Chronos alimentati a batteria dispongono di un ingresso per il collegamento di un contatto pulito al quale collegare ad esempio un attivatore telefonico per accendere e spegnere a distanza il cronotermostato con il proprio telefono. Il contatto può trovarsi in una delle seguenti posizioni: - aperto funzionamento normale (secondo le impostazioni) - chiuso...
- Page 26 I cronotermostati della serie Chronos dispongono di un display retroilluminato a led. Sono presenti delle differenze tra i modelli alimentati a batterie e i modelli alimentati da rete elettrica. I modelli alimentati a batterie dispongono di una retroilluminazione di colore blu, che si attiva soltanto qualora ci si trovi all’interno di qualche menù...
- Page 27 E’ possibile configurare la retroilluminazione tenendo premuto il tasto 3 secondi: si accede al menù di configurazione ed è possibile scegliere tra rgb, blu, red, gre, 0ff. E’ possibile visualizzare i valori di temperatura minima e massima misurati. Per visualizzare tali valori premere il tasto (valore massimo Hi) o (valore minimo L0).
- Page 28 Per cambiare impostazioni: 1. accedere al menù di cambio ora e data, tenendo premuto a lungo il tasto finchè comincia a lampeggiare il simbolo 2. premere il tasto per accedere alla modifica di ora e data. A questo punto, durante la modifica di uno qualsiasi dei parametri (secondi, minuti, ora, anno, mese o giorno) tenere premuto a lungo il tasto...
- Page 29 terza, quarta, ultima – LA) iii. il mese (1…12) iv. l’ora 6. Una volta impostati tutti i parametri, per uscire e tornare al menù di programmazione, premere brevemente il tasto Per uscire e tornare al funzionamento normale premere a lungo il tasto o attendere lo scadere del time-out (circa 30 secondi).
- Page 30 setpoint – banda > temperatura ambiente) o sempre spento (se setpoint + banda < temperatura ambiente). di accensione + tempo di spegnimento del riscaldamento) e può assumere valori di 10, 20 o 30 minuti. Durante il funzionamento, all’inizio del periodo di regolazione, lo strumento misura la temperatura ambiente e la confronta con il setpoint impostato;...
- Page 31 Lo strumento effettua una regolazione di emergenza qualora si presenti un errore durante la lettura della sonda o in caso di perdita dell’ora. Nel caso di errore sonda, se la funzione antigelo non è esclusa, lo strumento attiva il carico per 10 minuti ogni 4 ore. A display compare la scritta Err sul campo Nel caso di (causa scarica batterie o blackout di durata superiore alla riserva di carica) lo strumento riparte dal funzionamento spento, regolando...
- Page 32 Se nello stato spento si imposta una temporizzazione, tale stato spento viene mantenuto fi no al termine della temporizzazione, poi si passa al funzionamento che si aveva prima dello spegnimento (automatico o manuale). Qualora venga impostata una temporizzazione, a display compare il simbolo Attenzione: le temporizzazioni possono terminare prima della loro scadenza programmata qualora si verifi...
- Page 33 RESET STRUMENTO Nel caso si voglia eliminare ogni impostazione effettuata e ricaricare i valori di fabbrica, procedere come segue: 1. togliere e ridare alimentazione al cronotermostato (versioni a 230V) oppure scollegare il cronotermostato dalla base a muro e ricollegarlo (versioni a batterie) 2.
-
Page 34: Norme Di Riferimento
NORME DI RIFERIMENTO La conformità alle Direttive Comunitarie 2006/95/CE (Bassa tensione) 2004/108/CE (Compatibilità Elettromagnetica) è dichiarata in riferimento alle seguenti Norme Armonizzate: - 32 - Manuale d’Uso Cronotermostato CHRONOS... - Page 35 setpoint manuale 2.0°C 35.0°C 0.1°C 21°C invernale setpoint manuale 2.0°C 35.0°C 0.1°C 25°C estivo T1 invernale 2.0°C 0.1°C 15.0°C T2 invernale 0.1°C 18.0°C T3 invernale 35.0°C 0.1°C 21.0°C T2 estivo 10.0°C 0.1°C 23.0°C T3 estivo 35.0°C 0.1°C 25.0°C temperatura antigelo 1.0°C 10.0°C 0.1°C...
- Page 36 ■ ■ ■ ■ ■ ■ ■ ■ ■ ■ ■ ■ ■ ■ ■ ■ ■ ■ ■ ■ ■ ■ ■ ■ ■ ■ ■ ■ ■ ■ ■ T1 ■ ■ ■ ■ ■ ■ ■ ■ ■ ■ ■ ■ ■ ■ ■ ■ ■ ■ ■ ■ ■ ■ ■ ■ ■...
- Page 37 PROGRAMMI PREDEFINITI ESTATE ■ ■ ■ ■ ■ ■ ■ ■ ■ ■ ■ ■ ■ ■ ■ ■ ■ ■ ■ ■ ■ ■ ■ ■ ■ ■ ■ ■ ■ ■ ■ ■ ■ ■ ■ ■ ■ ■ ■ ■ ■ T1 ■...
- Page 39 Index ■ Dimensions Page ■ Connection diagram Page ■ ■ Technical specifications Page ■ Display and keyboard Page ■ Installation Page ■ Programming menu Page - Time and date modification Page - Programs modification Page - Temperatures T1, T2, T3 modification Page - Timing setting Page...
- Page 40 colours mode mode - 2 - CHRONOS Programmable Thermostat User Manual...
- Page 41 Chronos 230 Chronos 230 Chronos Chronos Model Bianco Nero Bianco Nero batteries 2 x 1,5V (type AAA) 230Vac 50/60 Hz Display multicolor red/green/blue monocolor (blue) Digital input — telephone dialler Wall Installation (or to coverage three-module in built box) - 3 - CHRONOS Programmable Thermostat User Manual...
- Page 42 DIMENSIONS CONNECTION DIAGRAM - 4 - CHRONOS Programmable Thermostat User Manual...
- Page 43 ■ CHRONOS, thermostat remotely (by telephone). ■ These instruments perform actions of 1B type and are intended for operating in environments Pollution degree 2 and Overvoltage Category III (EN 60730-1). ■ Chronos Nero Touchscreen programmable thermostat batteries black Chronos 230 Nero Touchscreen programmable thermostat 230 V black - 5 - CHRONOS Programmable Thermostat User Manual...
-
Page 44: Technical Specifications
TECHNICAL SPECIFICATIONS – 2 alkaline batteries 1.5 V (AAA type) – battery life: 1 year – battery charge level indication – charge reserve ( for battery replacement): 1 minute – 230Vac (-15% ÷ +10%) 50/60Hz – maximum consumption: 6 VA / 230Vac –... -
Page 45: Display And Keyboard
DISPLAY AND KEYBOARD ① ② Programming menu: : date/time and summer time setting : programs change mode (for automatic operating) : temperatures setting T1, T2. T3 : timing menu : advanced programming menu : not used : not used ③ Time and minutes ④... - Page 46 ■ Keyboard The keys carry out different functions on the basis of the instrument status and they Multipurpose keys are not built into the instrument, that is to say contemporary pressures of 2 or more keys. - brief pressures, During the press of a button, the display is blue. ■...
-
Page 47: Installation
INSTALLATION Alternatively they can be installed to cover three-module in built box. “wiring diagrams”. Attach the programmable thermostat only: insert the batteries into the to the base, at first mating teeth on battery compartment on the back the higher side. of the programmable thermostat, respecting the polarity Attention: it’s not possible to make no programming or modification of the set... - Page 48 seconds (only synchronisation at value 00), minutes, hours, year, month, day. Use the keys to increase and decrease the values and the key confermare e passare al parametro successivo. Seconds synchronisation Minutes setting Time setting Year setting Month setting Day setting Once all values are set, press for a long time (3 seconds) the key to exit the menu of the clock synchronisation.
- Page 49 HOUR TEMPERATURE At this point the programmable (see page 33) displaying the environment temperature and the graphic of the program on. PROGRAM GRAPHIC - 11 - CHRONOS Programmable Thermostat User Manual...
-
Page 50: Programming Menu
PROGRAMMING MENU With this menu it’s possible to modify the - Date and time - Automatic operation programs - Automatic operation temperatures - Timings - Advanced functions. To modify the hour and the date set: 1. From normal operating display, press for a long time the key until the symbol starts flashing on field 2. - Page 51 to Friday and P2 on Saturday and on Sunday (the programs profile is described at the end of this manual on page 34-35). If this programming doesn’t satisfy the user needs it’ s possible to change it. To modify the programming: 1.
- Page 52 Use the keys to change the temperature level and the key to move to the next hour. Set like this the desired level temperature for each hour of the day. 3.2.1.1. For each hour it’ s possible to delay the start of th regulation of 15’, 30’...
- Page 53 3. The value of the flashing T1 temperature is and press the key to move to the modification of T2. 4. The value of the flashing T2 temperature is and press the key to move to the modification ofi T3. 5.
- Page 54 Timing setting hours and days. are” on page 29). are” on page 29). To set a timing: 1. From the normal operation display, press for a long time the key until the symbol starts flashing on field 2. Press for a short time the key until the symbol flashes and press the key...
- Page 55 5. Once all parameters are set, to exit and to go back to the programming menu, press for a short time the key To exit and to go back to the normal operation (automatic, manual) press for a long time the key To interrupt a timing, access again the menu and set the value 00.
- Page 56 ) and summer-cooling ( For further information about the operating mode see the chapter “Regulation types” on page 27. (only for heating mode) Reg 0) or proportional (rEg P). For further information about regulation type see the chapter “Regulation types” on page 27. - 18 - CHRONOS Programmable Thermostat User Manual...
- Page 57 In case of regulation the only parameter to set is the hysteresis (dIF In case of proportional regulation the parameters to set are the regulation band (bnd) e il periodo di regolazione (PEr). “Regulation types” on page 27. “Regulation types” on page 27. But remember that the preset settings are suitable for the most part of the But remember that the preset settings are suitable for the most part of the situations: to change these settings only if it’s really necessary.
- Page 58 bLoc system operation (relais ON) for the current mode (indicated by the icons The hour meter has got 4 digits and it’s resettable pressing for a long time the key until 0000 appears. - 20 - CHRONOS Programmable Thermostat User Manual...
-
Page 59: Manual Operation
MANUAL OPERATION During manual operation the instrument performs as a normal thermostat, adjusting on the basis of the Tm temperature (manual setpoint), independently from the day and on field To move from the automatic operation to the manual one: 1. press for a short time the key . - Page 60 OFF OPERATION In off mode the instrument doesn’t perform any regulation (*) but it continues to display the day, the time and the measured temperature. temperature - Toff antifreeze temperature - to avoid the freezing of the The set default Toff is 6°C but it’s possible to modify this value entering the ADV menu (see “Antifreeze temperature”...
- Page 61 - open normal operation (according to the settings) - closed programmable thermostat in off mode on fi eld differentiate it from the keyboard off statu ( fi xed on fi eld - 23 - CHRONOS Programmable Thermostat User Manual...
-
Page 62: Backlight Management
BACKLIGHT MANAGEMENT only if they are inside any menu of programming or if any key is pressed. In normal operating status the backlight results off. This behaviour is not modifiable. to the preferences’ user. - red, if the measured temperature is higher than the setpoint of at least 0.5°C (or in case of probe error) BLUE GREE... -
Page 63: Summer Time Change
It’s possible to configurate the backlight pressing the key for 3 seconds: in rgb, blu, red, gre, 0ff. It’s possible to display the measured values of minimum and maximum temperature. To display these values press the key (maximum value Hi) or (minimum value L0). - Page 64 To change settings: 1. access the menu of time and date change, pressing for a long time the key until the symbol starts flashing. 2. press the key to access the time and date modification. At this point, during the modification of any parameter (seconds, minutes, hour, year, month or day) press for a long time the key...
-
Page 65: Regulation Type
iii. the month (1…12) iv. the hour 6. Once all parameters are set, to exit and to go back to the programming menu, press for a short time the key To exit and to go back to the normal operation press for a long time the key for the time-out expiration (30 seconds about). - Page 66 environment temperature). (activation time + deactivation time of heating) and it can have values of 10, 20 or 30 minutes. During the operating, at the beginning of the regulation period, the instrument setpoint; on the basis of this difference the activation time is calculated (and consequently the deactivation time).
- Page 67 The instrument performs a regulation of emergency if an error occurs during the reading of the probe or in case of time loss. In case of , if the antifreeze function is not deactivated, the instrument Err on field In case of time loss (because of depleted batteries or blackout of a duration higher than the charge reserve) the instrument restarts from the off mode, adjusting on the basis of the antifreeze temperature, if it hasn’t been deactivated before.
- Page 68 (automatic or manual). Attention: the timings can end before their programmed expiration if one of these actions occur: - time/ date modifi cation (modifi cation of the summer time change included) - manual modifi cation of the operating mode To set a timing, see chapter “Timing setting” at page 16. - 30 - CHRONOS Programmable Thermostat User Manual...
-
Page 69: Instrument Reset
INSTRUMENT RESET reconnect it (battery versions). 2. during the flashing of the keys press the key dEF. Default values are indicated on page 33 of this manual. BATTERY REPLACEMENT The models Chronos Bianco and Chronos Nero signal the status of depleted batteries (field ) and making the display to flash. -
Page 70: Reference Standards
REFERENCE STANDARDS 2004/108/EC (E.M.C.) is declared in reference to the harmonized standard: - 32 - CHRONOS Programmable Thermostat User Manual... - Page 71 Parameter 2.0°C 35.0°C 0.1°C 21°C setpoint summer manual 2.0°C 35.0°C 0.1°C 25°C setpoint 2.0°C 0.1°C 15.0°C 0.1°C 18.0°C 35.0°C 0.1°C 21.0°C T2 summer 10.0°C 0.1°C 23.0°C T3 summer 35.0°C 0.1°C 25.0°C antifreeze temperature 1.0°C 10.0°C 0.1°C 6.0°C operating mode summer regulation type ON/OFF PROP...
- Page 72 ■ ■ ■ ■ ■ ■ ■ ■ ■ ■ ■ ■ ■ ■ ■ ■ ■ ■ ■ ■ ■ ■ ■ ■ ■ ■ ■ ■ ■ ■ ■ T1 ■ ■ ■ ■ ■ ■ ■ ■ ■ ■ ■ ■ ■ ■ ■ ■ ■ ■ ■ ■ ■ ■ ■ ■ ■...
- Page 73 SUMMER PRESET PROGRAMS ■ ■ ■ ■ ■ ■ ■ ■ ■ ■ ■ ■ ■ ■ ■ ■ ■ ■ ■ ■ ■ ■ ■ ■ ■ ■ ■ ■ ■ ■ ■ ■ ■ ■ ■ ■ ■ ■ ■ ■ ■ T1 ■...
- Page 76 Vemer S.p.A. I - 32032 Feltre (BL) Via Camp Lonc, 16 Tel +39 0439 80638 Fax +39 0439 80619 e-mail: info@vemer.it - web site: www.vemer.it...
Need help?
Do you have a question about the CHRONOS Series and is the answer not in the manual?
Questions and answers