
Related Manuals for Vemer Mithos RF


Summary of Contents for Vemer Mithos RF
- Page 1 Cronotermostato Digitale a radiofrequenza Mithos RF Manuale d’Uso User Manual RADIOFREQUENCY DIGITAL CHRONOTHERMOSTAT...
-
Page 3: Table Of Contents
Indice ■ Montaggio Pagina ■ Dimensioni Pagina ■ Funzionamento Pagina ■ Avvertenze di sicurezza Pagina ■ Caratteristiche tecniche Pagina ■ Elementi di controllo / Indicazioni a display Pagina ■ Avviamento iniziale / Reset Pagina ■ Impostazione orologio Pagina ■ Impostazione programmi Pagina 11 ■... - Page 4 Cronotermostato digitale Mithos • Comfort e controllo dei consumi garantiti sia d’inverno che d’estate (riscaldamento/condizionamento) • Alimentazione: 1 batteria 1,5 V tipo AA (Alcalina) • Frontalino intercambiabile colore argento disponibile come accessorio (cod. VE323200) • Installazione a parete o a copertura della scatola 503 (3 moduli) •...
-
Page 5: Montaggio
MONTAGGIO • È consigliabile scegliere per il cronotermostato una collocazione in una zona che rispecchi il più possibile le condizioni di temperatura media di tutto l’ambiente. Va evitata l’installazione nell’immediata vicinanza di porte, finestre, fonti di calore, irraggiamento solare diretto, e posizioni con eccesso o totale mancanza di aerazione. -
Page 6: Dimensioni
DIMENSIONI FUNZIONAMENTO L’attivazione del carico avviene tramite l’attuatore remoto comandato dal cronotermostato per mezzo di un segnale a rediofrequenza. Mithos RF Attuatore remoto Carico a 1 o più canali Per il dettaglio di configurazione degli strumenti, vedere il capitolo CONFIGURAZIONE E TEST ATTUATORE REMOTO - 4 - Manuale d’Uso Cronotermostato Mithos... -
Page 7: Avvertenze Di Sicurezza
■ Mithos RF è un cronotermostato settimanale da parete elettronico, per comando a radio frequenza, adatto ad ambienti con grado d’inquinamento 2. Codice Modello Descrizione VE428900 Set Mithos RF Bianco Mithos RF bianco + attuatore 1 canale VE426300 Set Mithos RF Nero... - Page 8 • Ritardo di accensione impostabile tra 15, 30 o 45 minuti (indipendente per ogni ora) • Scala temperatura misurata: 0°C ÷ +50°C • Risoluzione temperatura misurata e visualizzata: 0,1°C • Campo regolazione temperatura: 2,0°C ÷ +35°C • Aggiornamento della misura: ogni 20 secondi •...
-
Page 9: Elementi Di Controllo / Indicazioni A Display
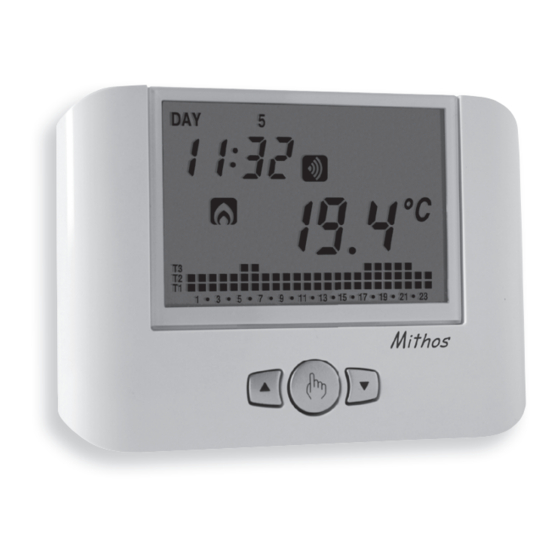
ELEMENTI DI CONTROLLO / INDICAZIONI A DISPLAY Elementi di controllo ■ 1) Tasto “ ”: funzionamento manuale 2) Tasto “ ”: incrementa il campo selezionato o visualizzazione temperatura massima giornaliera 3) Tasto “ ”: decrementa il campo selezionato o visualizzazione temperatura minima giornaliera 4) Tasto “... - Page 10 Indicazioni a display ■ 14) Campo “Giorno” 15) Campo utilizzato per la programmazione 16) Campo “Temperatura ambiente” 17) Campo “Programma impostato” 18) Campo “Attivazione funzionamento manuale” 19) Campo “Temporizzazioni” 20) Campo “Attivazione condizionamento” 21) Campo “Attivazione riscaldamento” 22) Campo “Orologio” 23) Campo non utilizzato 24) Campo “Trasmissione a radiofrequenza”...
-
Page 11: Avviamento Iniziale / Reset
AVVIAMENTO INIZIALE / RESET • Inserire la batteria e premere con una punta il tasto “R”. Vengono accesi tutti i segmenti del display e attivato il relè per un tempo di 3 secondi, dopodichè il campo orologio (22) riparte da 12:00 e rimane lampeggiante fino all’impostazione dell’orologio. - Page 12 A questo punto comincia a lampeggiare la cifra dei minuti. Agire sui tasti “ ” e “ ” per incrementare o decrementare il campo e premere “ ” per confermare. Ripetere la procedura per impostare le ore. Una volta impostato il valore delle ore, sul campo (22) compare lampeggiante il valore dell’anno, sul campo (15) il valore del mese e sul campo (16) il valore del giorno.
-
Page 13: Impostazione Programmi
IMPOSTAZIONE PROGRAMMI • Premendo il tasto “PRG” sul campo (14) compare l’indicazione relativa a lunedì, sul campo (16) compare il programma selezionato lampeggiante (nell’esempio P1), sul campo (15) compare “Pro”, sul campo (17) compare l’andamento grafico del programma relativo e si attiva il simbolo (20) o (21) a seconda del funzionamento impostato (estivo o invernale). - Page 14 Con i tasti T1 , T2 e T3 è possibile modificare la temperatura selezionata per quell’ora e, allo stesso tempo, passare all’ora successiva. Utilizzando i tasti “ ” e “ ” è possibile spostarsi di ora in ora senza modificare la temperatura impostata.
-
Page 15: Impostazione Temperature
IMPOSTAZIONE TEMPERATURE • In uno qualsiasi dei modi di funzionamento, alla pressione dei tasti T1, T2 e T3 sul campo (22) compare la scritta relativa alla temperatura che si sta modificando, sul campo (16) lampeggia il valore della suddetta temperatura. Con i tasti “... -
Page 16: Funzionamento Manuale
FUNZIONAMENTO MANUALE • In funzionamento automatico alla pressione del tasto “ ” il sistema si comporta come un normale termostato con temperatura di funzionamento Tm. Sul campo (22) rimane l’ora corrente. Sul campo (14) rimane il giorno corrente. Sul campo (15) compare la scritta “SEt”. Il simbolo (18) compare. -
Page 17: Funzionamento Estate / Inverno
FUNZIONAMENTO ESTATE / INVERNO Per passare dal funzionamento invernale a funzionamento estivo (o viceversa), premere con una punta il tasto “ ”(12). Sul campo (22) compare la scritta “rISC” (o “Cond”) lampeggiante e il simbolo “ ” (o “ ”). Con i tasti “... -
Page 18: Comando On-Off Da Tastiera
COMANDO ON-OFF DA TASTIERA • Per disattivare il cronotermostato premere il tasto “ ”. Sul display compare il simbolo “ ” Una volta spento, in funzionamento invernale il cronotermostato abilita la funzione di antigelo per far si che la temperatura non scenda sotto una certa soglia. - Page 19 Spegnimento temporizzato Se nello stato spento si imposta una temporizzazione, tale stato spento viene mantenuto fino al termine della temporizzazione, poi si passa al funzionamento che si aveva prima dello spegnimento. Se durante la temporizzazione si accende l’impianto, la temporizzazione termina. In tutti i casi, la condizione di temporizzazione è...
-
Page 20: Programmazione Avanzata
PROGRAMMAZIONE AVANZATA • In programmazione avanzata è possibile accedere ai seguenti parametri di funzionamento: – tipo di regolazione – parametri per il tipo di regolazione – temperatura di antigelo – unità di misura della temperatura – configurazione/test trasmissione RF – password per blocco tastiera –... - Page 21 • Scegliere tramite i tasti “ ” e “ ” il modo di regolazione voluto e premere “ ” per confermare e passare all’impostazione del parametro successivo Parametri per il tipo di regolazione scelta (solo per funzionamento invernale) • Nel caso di regolazione di tipo “ON/OFF” l’unico parametro da impostare è...
- Page 22 Temperatura di antigelo (solo per funzionamento invernale) • E’ possibile impostare un valore di temperatura di sicurezza (temperatura di antigelo) da mantenere anche nel caso in cui il cronotermostato venga spento. Sul campo (22) compare la scritta “OFF=” e sul campo (16) lampeggia il valore di temperatura di antigelo attualmente impostato.
- Page 23 • Alla ricezione della stringa, il canale risulta configurato e l’attuatore riprende il funzionamento normale • Per riconfigurare il canale, ripetere la procedura. Ogni nuova configurazione cancella la configurazione precedente. Configurazione mithos RF • Sul campo (22) compare la scritta “oUt=”, sul campo (16) compare la scritta “CnF” lampeggiante.
- Page 24 per indicare l’attivazione o meno della modalità test • Per attivare (on) la modalità test, premere per alcuni secondi il tasto “PRG” • Se la modalità test è attivata, l’accensione del simbolo “ ” indica che il relè dell’attuatore dovrà essere in posizione ON, mentre l’assenza dei simboli indica relè...
- Page 25 Sul campo (15) compare la scritta “tot=” mentre sui campi (22) e (16) compare il valore della temporizzazione (tale valore è di 5 cifre, 3 sul campo (22) e 2 sul campo (16) e va letto da sinistra a destra. Nell’esempio il valore è 1274 ore). Sono presenti due totalizzatori indipendenti per il funzionamento invernale e per il funzionamento estivo.
-
Page 26: Funzioni Avanzate
FUNZIONI AVANZATE Cambio automatico ora solare/ora legale Il cronotermostato consente di passare automaticamente dall’ora solare all’ora legale e viceversa. Tenendo premuto il tasto “ ” per almeno 3 secondi sul display compare la scritta “Change” e sul campo (15) la scritta lampeggiante “On”... - Page 27 Blocco tastiera Nel caso si voglia installare il cronotermostato in ambienti pubblici è possibile bloccare la tastiera semplicemente tenendo premuto contemporaneamente per 3 secondi i tasti T1, T2 e T3. Sul display comparirà la scritta “BLOC”. Per sbloccare la tastiera, premere nuovamente i tasti T1, T2 e T3 per 3 secondi e immettere tramite i tasti “...
-
Page 28: Tipo Di Regolazione
Regolazione di emergenza In funzionamento invernale, in caso di guasto al sensore, al fine di evitare problemi di congelamento, il cronotermostato pone in ON il relè per 10 minuti ogni 4 ore e sul campo (16) compare il simbolo “---”. Ripristino parametri di default La semplice pressione del tasto “R”... - Page 29 La banda di regolazione rappresenta l’intervallo di temperatura, centrato sul setpoint, in cui si attua la regolazione proporzionale. Nel dispositivo si imposta la metà della banda di regolazione che si desidera. Il range per questo parametro è 0.5 ÷ 5.0°C con risoluzione 0.1°C Il periodo di regolazione rappresenta invece la durata del ciclo di regolazione (periodo di accensione + periodo di spegnimento) Il valore di questo parametro è...
-
Page 30: Sostituzione Batteria
SOSTITUZIONE BATTERIA • Quando la batteria è prossima alla scarica, lampeggia tutto il display pur continuando ad eseguire tutte le funzioni. Per tensioni di batteria inferiori lo strumento si porta nello stato di batteria esaurita che comporta display spento, consumo ridotto e tutte le funzioni vengono sospese ad eccezione dell’orologio. -
Page 31: Programmi Invernali
PROGRAMMI INVERNALI ■ ■ ■ ■ ■ ■ ■ T2 ■ ■ ■ ■ ■ ■ ■ ■ ■ ■ ■ ■ ■ ■ ■ ■ ■ ■ ■ ■ ■ ■ ■ ■ T1 ■ ■ ■ ■ ■ ■ ■ ■ ■ ■ ■ ■ ■ ■ ■ ■ ■ ■ ■ ■ ■ ■ ■ ■ 0 1 2 3 4 5 6 7 8 9 10 11 12 13 14 15 16 17 18 19 20 21 22 23 ■... -
Page 32: Programmi Estivi
PROGRAMMI ESTIVI T3 ■ ■ ■ ■ ■ ■ ■ ■ ■ ■ ■ ■ ■ ■ ■ ■ ■ T2 ■ ■ ■ ■ ■ ■ ■ ■ ■ ■ ■ ■ ■ ■ ■ ■ ■ ■ ■ ■ ■ ■ ■ ■ T1 ■... - Page 33 Index ■ Assembly Page ■ Dimensions Page ■ Functions Page ■ Safety warnings Page ■ Technical characteristics Page ■ Control elements / display indications Page ■ Initial start-up / Reset Page ■ Clock setting Page ■ Programs setting Page ■ Temperatures setting Page ■...
- Page 34 Mithos Digital Chronothermostat • Comfort and control of consumptions are ensured both in winter and in summer (heating/air conditioning) • Power supply: 1x1.5 V battery (AA type) alkaline • Interchangeable silver colored front panel available as accessory (code VE323200) • Installation can be wall or box 503 coverage (3 modules) •...
- Page 35 ASSEMBLY • It is advisable to place the chronothermostat in an area that mirrors, as much as possible, the conditions of average temperature of the entire environment. Avoid installing too close to doors, windows, heat sources, direct sunlight radiation, and positions with excess or total lack of air inlet.
- Page 36 DIMENSIONS FUNCTIONS The remote actuator activates the load after a radiofrequency signal sent by the chronothermostat Mithos RF. Mithos RF Remote actuator Load 1 or more channels For details about the configuration of the devices, see the section CONFIGURATION AND REMOTE ACTUATOR TEST...
-
Page 37: Safety Warnings
■ Mithos RF is an electronic wall-mounting weekly chronothermostat for load control via radio frequency signal. It is suitable for environments with a pollution degree of 2. Code Model Description VE428900 Set Mithos RF Bianco Mithos RF white + remote actuator 1 channel... - Page 38 • Activation delay setting between 15, 30 and 45 minutes (independent for every hour) • Measured temperature scale: 0°C ÷ +50°C • Measured and displayed temperature resolution: 0.1°C • Temperature regulation range: 2.0°C ÷ +35°C • Measurement update: every 20 seconds •...
- Page 39 CONTROL ELEMENTS / DISPLAY INDICATIONS Control elements ■ " " Key: manual operation " " Key: increases the selected field or displays the daily maximum temperature 3) " " Key: decreases the selected field or displays the daily minimum temperature 4) "...
- Page 40 Display indications ■ 14) "Day" Field 15) "Programming mode" Field 16) "Environment temperature" Field 17) "Set program" Field 18) "Manual operation activation" Field 19) "Timer" Field 20) "Air conditioning activation" Field 21) "Heating activation" Field 22) "Clock" Field 23) Not used Field 24) "Radio frequency transmission"...
-
Page 41: Clock Setting
INITIAL START-UP / RESET • Insert the battery and press the "R" key using a point. All the display segments will turn on and the relay will be activated for 3 seconds; after this, the clock field (22) will start at 12:00 and will flash until the clock is set. - Page 42 At this point, the minutes digit will start flashing. Use the " " and " " keys to increase or decrease the field and press " " to confirm. Repeat the procedure to set the hours. Once the value for the hours is set, field (22) will display a flashing value of the year, field (15) the value of the month and field (16) the value of the day.
-
Page 43: Programs Setting
PROGRAMS SETTING • Pressing the "PRG" key on field (14) will display the indication regarding Monday, field (16) will display the selected program flashing (in the example: P1), field (15) will display "Pro", field (17) will display the graphic trend of the corresponding program and will activate symbol (20) or (21) depending on the set operation (summer or winter). - Page 44 With the T1, T2 and T3 keys, it is possible to modify the temperature selected for that hour and, at the same time, move on to the next one. Using the " " and " " keys, it is possible to move from one hour to the next without modifying the set temperature.
-
Page 45: Temperatures Setting
TEMPERATURES SETTING • In any of the operation modes, pressing the T1, T2 and T3 keys will bring field (22) to display the writing corresponding to the temperature that is being modified; on field (16) the value of the aforementioned temperature will flash. -
Page 46: Manual Operation
MANUAL OPERATION • During automatic operation, when pressing the " " key, the system will act as a normal thermostat with operating temperature Tm. Field (22) will show the current time. Field (14) will show the current date. Field (15) will display the writing "SEt". The symbol (18) will appear. - Page 47 SUMMER / WINTER OPERATION To move from winter to summer operation (or vice versa), press the " " key with a point (12). On field (22) the writing "rISC" (or "Cond") will flash and the symbol " " (or " ") will appear. With the "...
- Page 48 KEYPAD ON-OFF COMMAND • To deactivate the chronothermostat press the " " key. The display will show the " " symbol. Once deactivated, during winter operation the chronothermostat will activate the antifreeze function to ensure that the temperature does not decrease below a certain threshold.
- Page 49 Timed deactivation If in off status you set a timing, such off status will be maintained until the end of the timing; operation will then switch to the one active before deactivation. If, during timing, the system is activated, the timing ends. In all cases, the timing condition is signalled by the symbol "...
-
Page 50: Advanced Programming
ADVANCED PROGRAMMING • In advanced programming it is possible to access the following operation parameters: - regulation type - parameters for regulation type - antifreeze temperature - temperature measurement unit - Setting/Test of the remote activator - keypad lock password - system operation hours - battery charge status •... - Page 51 • Using the " " and " " keys, choose the desired regulation mode and press " " to confirm and move to the setting of the next parameter. Parameters for the chosen regulation type (only for winter operation) • In case of "ON/OFF" regulation type, the only parameter to be set is the differential.
- Page 52 Antifreeze temperature (only for winter operation) • It is possible to set a safety temperature value (antifreeze temperature) to be maintained in case the chronothermostat is deactivated. Field (22) will display the writing "OFF=" and on field (16) the antifreeze temperature value currently set will flash.
- Page 53 SETTING/TEST OF REMOTE ACTUATOR The remote actuator activates the load after a radio frequency signal sent by the chronothermostat Mithos RF. Operation • For details about the functional characteristics of the remore actuator, refer to the documentation supplied with the instrument.
- Page 54 ON/OFF commands are alternatively sent every 10 seconds for 10 minutes. • To exit the modality test press the key “ ”. Note. It is possible to switch from test mode to set mode using keys “ ” and “ ”.
- Page 55 Two independent totalizers for winter and summer operation are present. The maximum memorizable value is of 65535 hours. To reset the counter, press the " " key for about 3 seconds when you are in the counter view menu. Battery charge status It is possible to view the battery charge status.
-
Page 56: Advanced Functions
ADVANCED FUNCTIONS Automatic change CET / DST The chronothermostat allows to automatically move from the CET (Central European Time) to DST (Daylight Saving Time) and vice versa. Holding the " " key for at least 3 seconds, the display will show the writing "Change"... - Page 57 Keypad lock In case you want to install the chronothermostat in public environments, it is possible to lock the keypad simply by simultaneously holding the T1, T2 and T3 keys for 3 seconds. The display will show the writing "BLOC". To unlock the keypad, press the T1, T2 and T3 keys again for 3 seconds and input, using the "...
-
Page 58: Regulation Type
Emergency regulation During winter operation, in case of sensor failure, in order to avoid problems regarding freezing, the chronothermostat activates the relay for 10 minutes every 4 hours and field (16) will display the "---" symbol. Restoring default parameters Simply pressing the "R" key will not cause a total reset of the instrument. To do so and allow the loading of the default values, it is necessary to press the "R"... - Page 59 The regulation band represents the temperature interval, centered on the setpoint, in which the proportional regulation is checked. Half the desired regulation band is set in the device. The range for this parameter is 0.5 ÷ 5.0°C with 0.1°C resolution The regulation period represents the duration of the regulation cycle (activation period + deactivation period) The value of this parameter is selectable between 10', 20' and 30'...
-
Page 60: Battery Replacement
BATTERY REPLACEMENT • When the battery is almost flat, the whole display flashes, although it will continue to carry out all functions. For lower battery voltage, the instrument will reach the flat battery status, which causes the display to switch off, a reduced consumption and the suspension of all functions except the clock. - Page 61 WINTER PROGRAMS ■ ■ ■ ■ ■ ■ ■ T2 ■ ■ ■ ■ ■ ■ ■ ■ ■ ■ ■ ■ ■ ■ ■ ■ ■ ■ ■ ■ ■ ■ ■ ■ T1 ■ ■ ■ ■ ■ ■ ■ ■ ■ ■ ■ ■ ■ ■ ■ ■ ■ ■ ■ ■ ■ ■ ■ ■ 0 1 2 3 4 5 6 7 8 9 10 11 12 13 14 15 16 17 18 19 20 21 22 23 ■...
- Page 62 SUMMER PROGRAMS T3 ■ ■ ■ ■ ■ ■ ■ ■ ■ ■ ■ ■ ■ ■ ■ ■ ■ T2 ■ ■ ■ ■ ■ ■ ■ ■ ■ ■ ■ ■ ■ ■ ■ ■ ■ ■ ■ ■ ■ ■ ■ ■ T1 ■...
- Page 64 Vemer S.p.A. I - 32032 Feltre (BL) Via Camp Lonc, 16 Tel +39 0439 80638 Fax +39 0439 80619 e-mail: info@vemer.it - web site: www.vemer.it 10-2016...
Need help?
Do you have a question about the Mithos RF and is the answer not in the manual?
Questions and answers