
Related Manuals for Toro 23102


Summary of Contents for Toro 23102
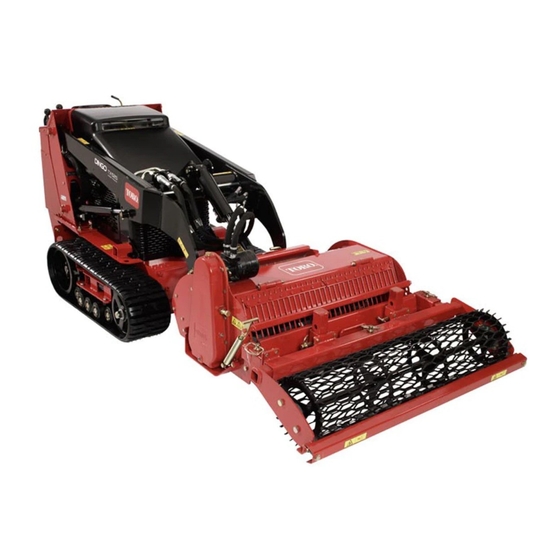
- Page 1 Form No. 3396-721 Rev A Soil Cultivator Compact Utility Loader Model No. 23102—Serial No. 280000001 and Up *3396-721* A Register at www.Toro.com. Original Instructions (EN)
-
Page 2: Table Of Contents
1. Safety alert symbol Introduction This manual uses 2 words to highlight information. This soil cultivator is intended to be used on a Toro compact Important calls attention to special mechanical information utility loader. It is designed primarily for burying stones,... -
Page 3: Safety
To ensure optimum performance and continued safety When going up or down hill, the machine could certification of the machine, use only genuine Toro overturn if the heavy end is toward the downhill replacement parts and accessories. Replacement parts and side. -
Page 4: Stability Ratings
Safety and Instructional CAUTION Decals Hydraulic couplers, hydraulic lines/valves, and hydraulic fluid may be hot and can burn you if you Safety decals and instructions are easily touch them. visible to the operator and are located near • Wear gloves when operating the hydraulic any area of potential danger. -
Page 5: Setup
Setup Installing the Roller 1. Remove the roller from the shipping stand. 2. Install the cultivator on the traction unit and remove it from the shipping stand. Note: Refer to your traction unit Operator’s Manual for more information on installing attachments on your traction unit. -
Page 6: Product Overview
2. Snap-ring clevis pin 4. Roller arm its capabilities. Contact your Authorized Service Dealer or Distributor or go to www.Toro.com for a list of all approved attachments and accessories. 3. Pull the roller off the cultivator (Figure To best protect your investment and maintain optimal 4. -
Page 7: Setting The Digging Depth
Setting the Digging Depth Set the dig depth of the cultivator according to the work you are performing up to 13.9 cm (5.5 inches). The depth of cut is determined by the position of the roller. You can move the roller up and down by changing the mounting location of the arms on the cultivator as follows: 1. -
Page 8: Changing The Horizontal Position Of The Roller
Changing the Horizontal 2. Pull the auxiliary-hydraulics lever to the operator grip to start the cultivator. Position of the Roller 3. Slowly lower the cultivator until the blades dig into the soil and the roller touches the ground. The roller has 3 horizontal positions. To cultivate along the edge of the work area, align the edges of the roller with the 4. -
Page 9: Operating Tips
Operating Tips • Inspect the area where the cultivator is to be used and remove all objects such as large rocks, trash, and branches before cultivating to prevent equipment damage. • Always begin cultivating with the slowest ground speed possible. Increase speed if conditions permit. •... -
Page 10: Maintenance
Maintenance Recommended Maintenance Schedule(s) Maintenance Service Maintenance Procedure Interval • Adjust the drive-chain tension. After the first 5 hours • Grease the cultivator. Every 25 hours • Adjust the drive-chain tension. • Change the drive-chain oil. Every 200 hours • Grease the cultivator. Before storage •... -
Page 11: Adjusting The Drive-Chain Tension
6. Remove the drain plug (Figure 10). 7. When all of the oil has drained from the case, replace and tighten the drain plug. 8. Remove the side plug (Figure 10). 9. Pour oil into the fill hole slowly until oil runs out the side-plug hole. -
Page 12: Storage
Storage 8. Install the roller assembly. 1. Before long-term storage, wash the attachment with mild detergent and water to remove dirt and grime. 2. Grease all fittings. 3. Check and adjust the tension of the drive chain. 4. Check and tighten all bolts, nuts, and screws. Repair or replace any damaged or worn parts. -
Page 13: Troubleshooting
Troubleshooting Problem Possible Cause Corrective Action The cultivator does not operate. 1. A hydraulic coupler is not completely 1. Check and tighten all couplers. connected. 2. A hydraulic coupler is damaged. 2. Check the couplers and replace any that are damaged. 3. - Page 14 The method of transmission shall be electronic transmittal. This machinery shall not be put into service until incorporated into approved Toro models as indicated on the associated Declaration of Conformity and in accordance with all instructions, whereby it can be declared in conformity with all relevant Directives.
- Page 15 The Way Toro Uses Information Toro may use your personal information to process warranty claims, to contact you in the event of a product recall and for any other purpose which we tell you about. Toro may share your information with Toro's affiliates, dealers or other business partners in connection with any of these activities. We will not sell your personal information to any other company.
- Page 16 Toro importer. If all other remedies fail, you may contact us at Toro Warranty Company. Australian Consumer Law: Australian customers will find details relating to the Australian Consumer Law either inside the box or at your local Toro Dealer.