
Related Manuals for Opticum HD X403P


Summary of Contents for Opticum HD X403P
- Page 1 Model ID: Sat HD 220 5/2010 jp...
-
Page 2: Table Of Contents
Contents Safety precautions ..................................1 Environment protection ................................3 Operating notes ................................... 4 3.1. Automatic Power Down ............................... 4 3.2. Working with external USB drive (only for receivers with USB connector) ................4 3.3. Battery installation ................................5 Features ....................................... 6 Remote control .................................... -
Page 3: Safety Precautions
1. Safety precautions CAUTION: lightning flash with Warning: The exclamation point within an arrowhead symbol, within an equilateral triangle is intended to To reduce the risk of electric shock, equilateral triangle, is intended alert the user important don't open cabinet. Refer to alert the user to "dangerous operating... - Page 4 Locating: Slots and openings in the cabinet are provided for ventilation to protect it from overheating. Do not block these openings or allow them to be blocked by placing the STB on a bed, sofa, or other similar surface, nor should it be placed over a radiator or heat register. Power-Cord Protection: Place the power-supply cord out of the way, where it will not be walked on.
-
Page 5: Environment Protection
2. Environment protection Attention! Your product Is marked with this symbol. It means that used electrical and electronic products should not be mixed with general household waste. There is a separate collection system for these products. Information on Disposal for Users (private households) in the European Union Used electrical and electronic equipment must be treated separately and In accordance with legislation that requires proper treatment, recovery and recycling of used electrical and electronic equipment. -
Page 6: Operating Notes
3. Operating notes NOTE! 3.1. Automatic Power Down In accordance with actual European Union requirements, Your receiver is equipped with function "Automatic Power Off". It works by switching the receiver into standby mode after a period of 3 hours after the last active use. In practice this means that if during this time the receiver will not be given any command by using the remote control or keypad on the front panel, the receiver turns off. -
Page 7: Battery Installation
3.3. Battery installation To install the batteries in the remote control, remove flap protecting battery compartment (see Fig.: A – slider type - push and slide, B – latch type - lever the latch and pull the fold). If inside the chamber there are used batteries, they must be removed. -
Page 8: Features
4. Features • MPEG-Fully DVB-S / DVB-S2 HD compliant • Multilingual menu text support • Fast channel switching • Channel list editing • Favorite channel list editing • Electronic Program Guide (EPG) for on screen channel information • Teletext supported by VBI insertion and software emulation •... -
Page 9: Remote Control
5. Remote control You can power on/off the receiver, operate on screen menu, and use a variety of hot key function. Depending on configuration, one of two remote controllers may be attached to receivers set: POWER To switch your receiver on from standby or standby to on. MUTE Used to enable or disable the audio NUMERIC KEYS 0 - 9... - Page 10 Play To play the JPEG or recording file. Stop To stop JPEG player, recording file, Time Shift, or playback. PAUSE Used to select the freeze function. Press once to freeze the screen picture. Record To start recording. Fast Backward To start Fast Backward function Fast Forward To start Fast Forward function.
-
Page 11: Front Panel
6. Front panel POWER: To switch the receiver power on/stand by MENU KEY: To enter into the main menu. ←,→: To adjust volume level, or to move cursor left or right in the menu ↑, ↓: To change channels, or to move cursor up or down in the menu OK KEY: To see TV/Radio channel list, or to confirm in the menu. -
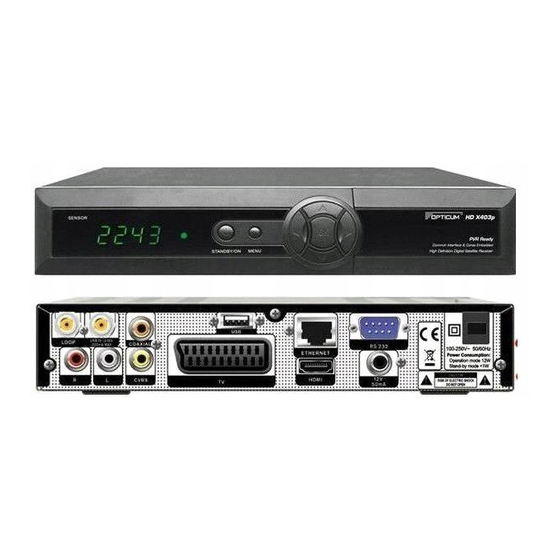
Page 12: Connecting Your System
This is used to connect your TV through SCART cable. HDMI: Audio and Video output socket for TV set with HDMI Input Jack only. 12V 50mA: Used to connect 12V to an external device. (Optionally 0V/12V switch driver.) USB: USB 2.0 Host, connect to USB hard disk, or flash disk RS 232C: This is used to connect your receiver to a computer through a serial cable. -
Page 13: Basic Operations
9.5. Number 9. Basic operations In full screen, use number key and press [OK] on 9.1. Turn on STB the Remote Control Unit to change channel. First, press the [ ] to turn on the unit. 9.6. Mute POWER When the STB is first used, there will play the first 1.Press [ ] key to mute the sound and the MUTE... -
Page 14: Audio
Pressing [P+/P-] keys can implement the “Page parameters of current channel. up/Page down” function 9.12. EPG 3.Press [Exit] key to exit the current window. 1.The STB has an Electronic Program Guide (EPG) Frequently Asked Question to help you navigate channels through all the Q: Why the screen displays “No Favorite possible viewing options. -
Page 15: Tv/Radio
5.Press [YELLOW] key to enable shortcut to channel parameters edition. 6.Press [↑/↓] key to move highlight and press [OK] key to play the highlighted channel. 7.Press [P+/P-] key to page up and page down. 8.Press [EXIT] key to exit the channel list. 9.15. -
Page 16: Subtitle
selected symbol or letter into the dialogue. 2.After input each character, the program list on the left will search the channel according your input, and list the matched channel. 3.Move highlight to “OK” and press [OK] key can close “Find” window and you can select channel from the channels list directly. -
Page 17: Time Shift
this key, system will switch its outputting video resolution by sequence “by source-> by native TV - > 480i-> 480P-> 576i-> 576p-> 720P-> 1080i”. 9.24. Time Shift 1.If you connect the USB HDD, and enable the Time Shift function in the menu "Main Menu/ USB/ PVR Setting/Time Shift", it will start the Time Shift function automatically after you switch the program, and when you press the [Tms]... -
Page 18: Menu "Service
10. Menu “Service” When you press [Menu] key to enter menu, there will display the picture like below: 1.You can move highlight by press [↑/↓] keys to preview the current highlighted program in the right side preview window. 2.You can press [P+/P-] keys to implement the 1.Press [↑/↓] key to select menu pages among Page Up/Page Down function. -
Page 19: Organizing Favourites
10.1.4. Rename 1.You can move highlight by press [↑/↓] keys in the left and right side list window. Mark the service you want to rename, use button to select Rename item and press [OK] 2.You can press [P+/P-] keys to implement the button to display keyboard, and rename it. - Page 20 2.Press [↑/↓] key to select satellite. Press [P+/P-] 11.1.4. Positioner key to page up or page down. Positioner: In “Positioner” item, you can press 11.1.2. LNB Type [←/→] key to switch “None / DiSEqC 1.2 / USALS” functions. In this item, press [←/→] to switch among “Standard”, “User”...
-
Page 21: Auto Installation
When you enter to “Edit TP” menu, there will mode, program type, scan type and NIT Search display the screen like below: on/off. After you set up, press [OK] key to start scanning. 5.In the “TP Scan” item, press [EXIT] key to exit the scanning and save the current parameters. -
Page 22: Language
1.Press [↑/↓] key to select menu items among selected, AC3 audio track will be played even if Language, Parental Control, Time setting, Timer, track language not correspond to selected one in A/V Control, Miscellaneous, OSD Setting. above functions – First and Second Audio. 2.Press [OK] key to enter the selected item. -
Page 23: Time Setting
2.Menu Lock determining that when user wish to 1.GMT Usage: This item is use for open the usage enter “Installation” menu, whether have to input of GMT. You can press [←/→] keys to switch Password or not. If the setting of “Menu Lock” is “On/Off”. - Page 24 Date: Use number keys to input your wakeup date. On Time: Use number keys to input your wakeup time. Once the time’s up, no matter what the system is in standby mode or in playing mode, the system will automatically switch to the channel you want and start to play.
-
Page 25: A/V Control
12.5. A/V Control 4:3 TV, and 4:3 picture source will be too wide in a 16:9 TV but will be good display in a 4:3 TV. When you enter to “A/V Control” menu, you will 3.Video Output: Press [←/→] to select CVBS or see the screen like below: RGB. -
Page 26: Osd Setting
information, it will be showed up while this 20%, 30%, and 40% and “off” (means no function is “On”. If this function is “Off”, there transparency function). won’t show up subtitle information even if the 4.Load OSD Setting Default: If you are not satisfy current channel has subtitle information. -
Page 27: Default Setting
2.When you press [OK] key in the “Delete All 13.2. Default setting Channel” you will see a screen like below: 1.When you enter to “Default setting” menu, you will see a screen like below: If you select “Yes”, all channels will be deleted. In step 1 and step 2, press [EXIT] key can exit the 1.When you press [OK] key in the “Default Value”... -
Page 28: Upgrade By Usb
In this menu you can upgrade the software from 13.3.1. Upgrade by RS232: USB conveniently, press [OK] button to enter. 1.We offer the functions for user to connecting In this menu you can select the Upgrade Mode receiver (Master) to the other receiver (Slave) via among Software (no channel list), Channel list, All serial interface. -
Page 29: Menu "Conditional Access
14. Menu “Conditional the card correctly at any time, a message-box will show on the screen with message about detecting Access” the card, in "card info" menu all available information will be displayed. 1.When you enter to “Conditional Access” menu, you will see a screen like below: 14.2. -
Page 30: File List
2.To Delete the file, please press [BLUE] button. 3.To Rename the file, please press [RED] button. 4.To play the file with small window, please press [ ] button. 5.To play the file with full screen, please press [OK] button. 15.3. Storage Information Press [OK] button to enter the HDD Information menu like the below picture, in this menu you can see the details information about the HDD. -
Page 31: Pvr Setting
16. Menu “Internet” press [BLUE] button. (optional) 15.4. PVR Setting If you enter to the " Internet " Menu, you will see the picture like the below: 1.Time Shift: Enable the Time Shift function. 2.Timeshift to Record: When this function is turned on, when you press the [ ] button to You can get a new software from the network via record the program, it will merge before... -
Page 32: Menu "Game
3.Moving highlight to [Cancel]keys and press [OK]key to draw back from the game. 4.Start on the game: • [←/→] Move shape left or right • [↑] Rotate clockwise • [↓] Faster drop • [OK] Pause/Play the game • [EXIT] Quit game and draw back to “Game” menu. -
Page 33: Trouble Shooting
18. Trouble shooting If you suspect there is a fault with your receiver, please check the following trouble shooting guide before calling authorized service agent. Warning! Under no circumstances attempt to repair the receiver yourself. Tampering with the receiver may result in fatal electric shock and will invalidate your warranty. Symptom Possible cause Settings you made in the menu have not... -
Page 34: Specifications
19. Specifications General System standard MPEG-Fully DVB-S / DVB-S2 HD compliant Signal Level -65dBm to -25dBm LNB power supply Vertical polarization voltage: +13V/+14V Horizontal polarization voltage: +18V/+19V Max. current - 500mA, Overload protection 22KHz Tone Frequency: 22±1KHz DiSEqC Amplitude: 0.6±0.2V Version 1.0, 1.1, 1.2, USALS Demodulation QPSK, 8PSK... -
Page 35: Declaration Of Conformity
20. Declaration of conformity The manufacturer herewith declares the conformity of that product with the following directives and standards: Low Voltage Directive 2006/95/EC EN 60065:2002+A1:2006 EMC Directive 2004/108/EC EN 55 013:2001+A1:2003+A2:2006 EN 55 020:2007 EN 61 000-3-2:2006 EN 61 000-3-3:2008 Model: Digital Satellite Receiver DVB-S...
Need help?
Do you have a question about the HD X403P and is the answer not in the manual?
Questions and answers