
Related Manuals for Leister VARIMAT V2


Summary of Contents for Leister VARIMAT V2
- Page 1 ® VARIMAT V2 Leister Process Technologies Galileo-Strasse 10 CH-6056 Kaegiswil/Switzerland Tel. +41-41662 74 74 +41-41662 74 16 www.leister.com sales@leister.com...
-
Page 2: Table Of Contents
6. Carry out a test weld according to the welding instruction of the material manufacturer and national standards or guidelines. Check test weld. 7. Welding How do I switch off the hot-air welding machine VARIMAT V2 ? 1. Press e-Drive 2. Press «Cool down OK» e-Drive and allow to cool approx. - Page 3 (Translation of the original operating instructions) Please read operating instructions carefully before use and keep for future reference. Leister VARIMAT V2 Hot-Air welding machine Application • Overlap welding of roof sheeting made from PVC, TPO, ECB, EPDM, CSPE for basic weld seams.
- Page 4 Conformity Leister Process Technologies, Galileo-Strasse 10, CH-6056 Kaegiswil/Switzerland confirms that this product, in the version as brought into circulation through us, fulfils the requirements of the following EC directives. Directives : 98/37, 89/336, 73/23 Harmonised standards: EN 292-1, EN 292-2, EN 60204-1, EN 55014-1, EN 55014-2, EN 61000-3-2, EN 61000-3-3, EN 50366, EN 60335-2-45 Kaegiswil, 28.08.2009...
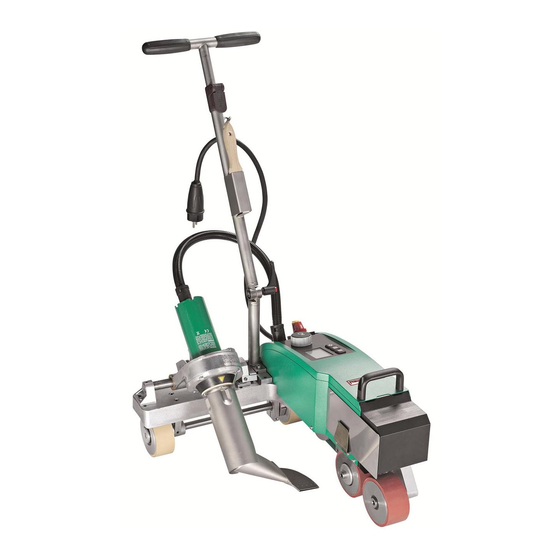
- Page 5 24. Carrying handle Controls (4) Main switch (3) Drive For switching the hot-air Setting the drive speed welding machine VARIMAT V2 on/off Heating e-Drive Setting the welding temperature The e-Drive serves as a navigator. It has two functions Turn left or right, in order to...
-
Page 6: Sensor Setting
– Position the hot air blower (8) by pulling the locking lever (11) and swivel it up until it locks. • Connect VARIMAT V2 to the electrical mains. The mains voltage must correspond to the device voltage. Sensor Setting Automatic starter reason for fault •... - Page 7 Tool positioning • Lift hot-air welding machine with pressure onto guide bar (27) and move to weld position. Take welding plate (34) from holder and position according to Illustration H. WARNING: The welding plate (34) may only be removed from the holder and positioned if the wel- ding nozzle (9) has cooled down.
-
Page 8: Work Mode (Chapter 3)
Startup Combination Main switch ON Work mode Chapter 3 Keys Drive and Heating buttons pressed down at the same time and the main switch ON Profile setup Chapter 4 Keys Heating and Blower buttons pressed down at the same time and the main switch ON Percent mode Chapter 5... -
Page 9: Setpoint Value Display
(230V or 400V), this is displayed with the symbol and the measured undervoltage / overvoltage. • The VARIMAT V2 continues the work. • Depending on the undervoltage/overvoltage, the welding result can be affected. If the blower power is less than 100%, the set blower power changes with the symbol. -
Page 10: Setting The Drive Speed
3. Work Mode 3.3 Setting the Drive Speed • The Drive key can be used to adjust the welding speed or the drive speed. This can be set by turning the e-Drive in 0.1m/min. increments from 0.7m/min. – 12.0m/min. This setting can be carried out with the drive switched on or switched off. -
Page 11: Setting The Air Volume
3. Work Mode 3.5 Setting the Air Volume • Work mode allows the power of the blower to be changed using the Blower key The blower power can be set in 5% increments from 50% – 100% by turning the e-Drive . -
Page 12: Selecting Profiles
3. Work Mode 3.7 Selecting Profiles • If the display at the bottom right of the display (5) is activated, profiles can be loaded by pressing the e-Drive . The display «Select Profile» then appears. A profile can be selected by turning the e-Drive . -
Page 13: Standby
3.10 Error Messages • If a malfunction occurs in the hot-air welding machine VARIMAT V2, a message will appear on the display (5), which is also provided with an error code. This code stands for a more exact definition of the error which can be seen in the lower list. -
Page 14: Creating Profiles
4. Profile Setup (see Startup Combination) 4.1 Creating Profiles • In the Profile Setup, 3 individual profiles can be created in which all three parameters can be freely set and then saved. • The various menu items can be selected using the controls (4) Pressing the e-Drive will take you back to the Profile Setup selection. - Page 15 • Welding plate article no. 132.429 Training • Leister Process Technologies and its authorised Service Centres offer free welding courses and training. Maintenance • The air inlet on the hot-air blower (8) must be cleaned with a brush if soiled.
- Page 16 ® © Copyright by Leister Your authorised Service Centre is: Leister Process Technologies Galileo-Strasse 10 CH-6056 Kaegiswil/Switzerland Tel. +41-41662 74 74 +41-41662 74 16 www.leister.com sales@leister.com...
Need help?
Do you have a question about the VARIMAT V2 and is the answer not in the manual?
Questions and answers