
Related Manuals for Leister ALLIED VARIMAT V2


Summary of Contents for Leister ALLIED VARIMAT V2
- Page 1 VARIMAT V2 Leister Technologies AG Galileo-Strasse 10 CH-6056 Kaegiswil/Switzerland Tel. +41 41 662 74 74 +41 41 662 74 16 www.leister.com sales@leister.com...
-
Page 2: Table Of Contents
Page 2.2 Standby setup Page Page Types of Leister VARIMAT V2, accessories, training, maintenance, service and repair, warranty Page Quick info How do I start the automatic hot-air welding machine VARIMAT V2 ? 1. Connect power supply cord to the line/mains 2. - Page 3 (Translation of the original operating instructions) Please read operating instructions carefully before use and keep for future reference. Leister VARIMAT V2 Automatic hot-air welding machine Application • Overlap welding of roofing membranes made of PVC, TPO, ECB, EPDM, CSPE for basic weld seams.
- Page 4 Disposal Electrical equipment, accessories, and packaging should be recycled in an environmentally friendly way. When you are disposing of our products, please observe the national and local regulations. For EU countries: Do not dispose of electrical equipment with household refuse. Technical data Voltage 200, 230 EU, 400 ...
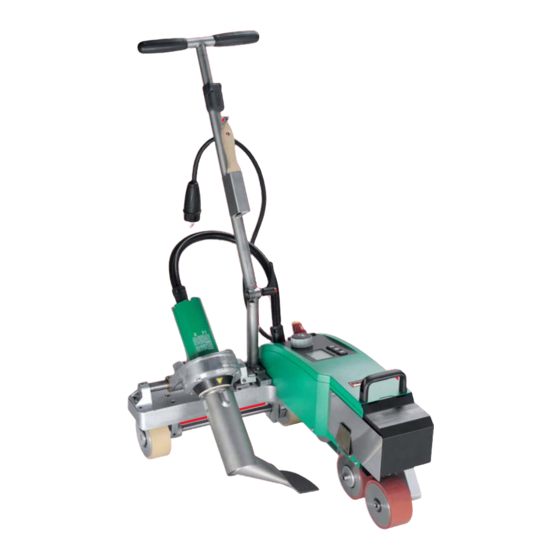
- Page 5 Description of device 30 35 12 32 7 6 1 Power supply cord 13 Adjustment screw for tracking 25 Cheese head screw 2 Housing 14 Track-alignment roller 26 Lower guide bar 3 Main switch 15 Guide roller 27 Upper guide bar 4 Controls 16 Adjustable transport roller 28 Clamping lever,...
- Page 6 Transport Use the storage case included in the scope of delivery as transport protection for the automatic hot-air welding machine VARIMAT V2. The storage case is provided with a handle and transport rollers. VARIMAT V2 may not be lifted with additional weight (22) and end weight (23). Carrying handles on the storage case as well as Carrying handle (24) and guide bar (27) on the hot-air welding machine may not be used as transport help by crane.
- Page 7 Joining force • The welding pressure is transmitted to the pendulum roller (12). 120N 120N 155N 120N 155N 190N 155N 190N • As necessary, the additional weights (22) and the end weight (23) can be put on (see illustration A). Illustration A Operating preparation •...
- Page 8 Device positioning • Lift automatic hot-air welding machine applying pressure onto guide bar (27) and move to weld position • Take welding plate (34) from holder and position according to Illustration E WARNING: The welding plate (34) may only be removed from the holder and positioned if the welding nozzle (9) has cooled down.
-
Page 9: Button Combinations
Button combinations Main switch ON Work mode Chapter 1 Heating and Blower buttons pressed at the same time and the main switch ON Profile setup Chapter 2 1. Work mode 1.1 Setpoint display (after switching on the device) Main switch (3) ON •... -
Page 10: Work Display
1. Work mode 1.2 Work display • Pressing the e-Drive starts the heating and blower, and the Setpoint display changes to the Work display. • When the welding nozzle (9) is heating up, this is indicated on the display (5) with progress bar and arrow (up) together with the actual value of the welding temperature (flashing). -
Page 11: Setting The Drive Speed
1. Work mode 1.3 Setting the drive speed • The drive speed can be adapted with the Drive button . This can be set by tur- ning the e-Drive in 0.1 m/min. increments from 0.7 m/min. to 12.0 m/min. This setting can be carried out with the drive switched on or off. -
Page 12: Setting The Air Volume
1. Work mode 1.5 Setting the air volume • The air volume can be changed with the Blower button . The air volume can be set in 5% increments from 50% to 100% by turning the e-Drive . The setting is accepted after 3 seconds, as long as no button is pressed within these 3 seconds. -
Page 13: Selecting Profiles
1. Work mode 1.7 Selecting profiles • If the display at the bottom right of the display (5) is activated, profiles can be loaded by pressing the e-Drive . The display «Select Profile» then appears. A profile can be selected by turning the e-Drive . -
Page 14: Standby
1. Work mode 1.9 Standby • If the welding nozzle (9) is not in the welding position and no button is pressed during a definite time, the Cool down mode will automatically start after the stand- by time has passed. The cooling down process is initiated. -
Page 15: Standby Setup
2. Profile setup (see button combination) 2.2 Standby setup • The standby time can be set in this setup. – Turning the e-Drive allows the time to be set from 5 to 120 minutes. 40 minutes are set at the factory. •... - Page 16 Article no. 113.600 Grip nozzle 40 mm Article no. 110.714 Maintenance set Training • Leister Technologies AG and its authorised Service Centres offer free welding courses and training. Informationen below www.leister.com. Maintenance • The air inlet on the hot-air blower (8) must be cleaned with a brush if soiled •...
- Page 17 © Copyright by Leister Your authorised Service Centre is: Allied Power Tools 12/ 76 Rushdale St, Knoxfield VIC 3180 Australia T: + 61 3 9764 2911 E: sales@alliedpowertools.com.au W: www.alliedpowertools.com.au Leister Technologies AG Galileo-Strasse 10 CH-6056 Kaegiswil/Switzerland Tel. +41 41 662 74 74 Fax +41 41 662 74 16 www.leister.com...
Need help?
Do you have a question about the ALLIED VARIMAT V2 and is the answer not in the manual?
Questions and answers