Table of Contents
Advertisement
1. Safety Precautions and Warnings........................................1
2. Product Information .............................................................2
2.1
Tool Description ..........................................................2
2.2
Specifications ...............................................................3
2.3
Accessories Included...................................................3
2.4
Navigation Characters................................................3
2.5
Power............................................................................4
2.6
Product Setup ..............................................................4
2.7
Vehicle Coverage.........................................................9
3. Operating Instructions..........................................................9
3.1
Vw/Audi Diagnostics................................................9
3.2
Obdii/Eobd Diagnostics........................................16
3.3
Oil Service..................................................................19
4. Warranty and Service .........................................................34
4.1
Limited One Year Warranty ...................................34
4.2
Service Procedures....................................................34
Table of Contents
Advertisement
Table of Contents

Related Manuals for Autel MaxScan VAG405


Summary of Contents for Autel MaxScan VAG405
- Page 1 Table of Contents 1. Safety Precautions and Warnings........1 2. Product Information .............2 Tool Description ............2 Specifications ...............3 Accessories Included...........3 Navigation Characters..........3 Power................4 Product Setup ..............4 Vehicle Coverage............9 3. Operating Instructions............9 VW/AUDI Diagnostics..........9 OBDII/EOBD Diagnostics........16 Oil Service..............19 4. Warranty and Service ............34 Limited One Year Warranty ........34 Service Procedures............34...
-
Page 2: Safety Precautions And Warnings
1. Safety Precautions and Warnings To prevent personal injury or damage to vehicles and/or the scan tool, read this instruction manual first and observe the following safety precautions at a minimum whenever working on a vehicle: Always perform automotive testing in a safe environment. Wear safety eye protection that meets ANSI standards. -
Page 3: Product Information
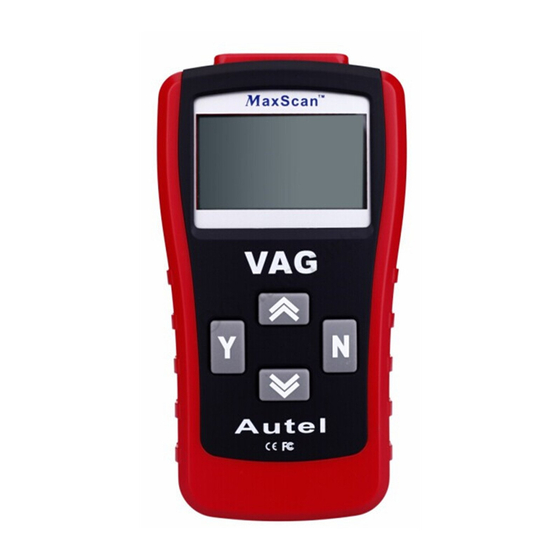
2. Product Information 2.1 Tool Description ① LCD DISPLAY -- Indicates test results. Backlit, 128 x 64 pixel display with contrast adjustment. ② Y BUTTON -- Confirms a selection (or action) from a menu. When a DTC’s definition covers more than one screen, it is used to move down to the next screen for additional data. -
Page 4: Specifications
UP SCROLL BUTTON -- Moves up through menu and ④ submenu items in menu mode. When more than one DTC is retrieved, moves up through the current screen to the previous screens for additional DTCs and definitions. DOWN SCROLL BUTTON -- Moves down through menu ⑤... -
Page 5: Power
3) “↑” -- A flashing up arrow indicates additional information is available on the previous screen. 4) “pd” -- Identifies a pending DTC when viewing DTCs. 2.5 Power The external power of the scan tool is provided via the vehicle Data Link Connector (DLC). - Page 6 2) From the Main Menu: Use the UP/DOWN Scroll Buttons to select System Setup and then press the Y button. Follow the instructions to make adjustments and settings as described in the following setup options. Main Menu 1) VW/Audi 2) OBDII/EOBD 3) Oil Service ►4) System Setup Contrast...
- Page 7 Contrast Contrast (45%) to change 3) Press the Y button to save your selection and return to previous menu. 4) Press the N button to return to previous menus. Display Test The Display Test is used to check the LCD display. 1) From the System Setup menu, use the UP/DOWN scroll buttons to select Display Test and press the Y button.
- Page 8 Display Test Press [Y] to test. Look for missing spots in characters. Press <N> to return. 3) When completed, press the N button to return. Keyboard Test The Keyboard Test is used to verify that the keys are functioning properly. 1) Use the UP/DOWN scroll buttons to select Keyboard Test from System Setup menu, and then press Y button.
- Page 9 Keyboard Test Press any key to Start test to display name. Key: Double [N] to Return 3) Double press N to return to the previous menu. Unit of Measure The Unit of Measure is used to change measurement unit between English and metric.
-
Page 10: Vehicle Coverage
►01) English 02) Metric 2.7 Vehicle Coverage The MaxScan VAG405 VW/AUDI Code Scanner is specially designed to work with most Volkswagen and Audis sold worldwide of 1990 or newer models. If a VW/AUDI has a 16-pin "OBD-II style" Data Link Connector (DTC), the code reader will certainly work. If it has an old-style 2x2 Data Link Connector (DTC), then it depends on whether there are 4 or 3 wires connecting to the pins. - Page 11 Use the UP/DOWN scroll buttons to select VW/AUDI from the menu and press the Y button. Main Menu ►1) VW/Audi 2) OBDII/EOBD 3) Oil Service 4) System Setup Use the UP/DOWN scroll buttons to select the system from the Select System menu and press the Y button. Select System ►01) Engine 02) Auto Trans...
- Page 12 with the module being tested. The most common cause is that the scanned module is not supported on the vehicle. The numbers (01, 02, 15, 03, 08, etc) in front of the system names refer to the physical addresses assigned to the systems, not the sequence of the systems to be arranged.
- Page 13 16627 --100 01/10 CAN BUS ↓ Solenoid Valve (A) For Boost Pressure Control (N75): Malfunction: P0243 Erasing Codes CAUTION: Erasing the Diagnostic Trouble Codes may allow the scan tool to delete not only the codes from the vehicle’s on-board computer, but also “Freeze Frame” data and manufacturer specific enhanced data.
- Page 14 Erase Codes Erase Trouble Codes! Are you sure? <YES> If you do not want to proceed with erasing the codes, press the N button to exit. A message of “command cancelled” will show up. If you do wish to proceed to erase the codes, then press the Y button.
- Page 15 If the scan tool is not connected or no communication is established with the vehicle yet, then refer to Reading Codes from 1 to 7 at Paragraph 3.1. ECU Information VAG No.: 06A906032TF Component: Bosch 1.815VT 0020 Coding: 0008570 Imp: 0000 WSC: 000078 If there is no ECU Information available, a warning message shows on the display.
- Page 16 Select Function 1) Read Code 2) Erase Code 3) ECU Information ►4) Readiness Test If the scan tool is not connected yet, then refer to Reading Codes from 1 to 7 at Paragraph 3.1. 2) Use the UP/DOWN scroll buttons, as necessary, to view the status of the following monitors: EGR Sys.-- EGR System Monitor O2 Sensor(s) -- O2 Sensors Monitor...
-
Page 17: Obdii/Eobd Diagnostics
3.2 OBDII/EOBD Diagnostics Reading Codes CAUTION: Don’t connect or disconnect any test equipment with ignition on or engine running. 1) Turn the ignition off. 2) Locate the vehicle’s 16-pin Data Link Connector (DLC). 3) Plug the OBDII connector to the vehicle’s DLC. 4) Turn the ignition on. - Page 18 If the “LINK ERROR” message does not go away, then there might be problems for the scan tool to communicate with the vehicle. Contact your local distributor or the manufacturer’s customer service department for assistance. 8) After the vehicle protocol is displayed on the screen, press any key or wait about 2 seconds for the OBDII/EOBD DIAG.
- Page 19 ID will be observed on the upper right hand corner of the display. If the code being displayed is a pending code, the Pd icon will be observed next to the DTC number on the upper right hand corner of the display. When a DTC’s definition covers more than one display screen, use the Y button, as necessary, to view any additional information.
-
Page 20: Oil Service
Erase Codes Erase Trouble Codes! Are you sure? <YES> NO 3) If you do not want to proceed with erasing the codes, press the N button to exit. A message of “command cancelled” will show up. 4) If you do wish to proceed to erase the codes, then press the Y button. - Page 21 Main Menu 1) VW/Audi 2) OBDII/EOBD ►3) Oil Service 4) System Setup If the scan tool fails to communicate with the vehicle, a “LINK ERROR!” message shows up on the display. Verify that the ignition is ON; Check if the scan tool’s OBD II connector is securely connected to the vehicle’s DLC;...
- Page 22 Automatic Services Detect The Auto Detect function is used to detect services automatically. Use UP/DOWN scroll button to select Auto Detect and press Y button to confirm. Oil Service ►1) Auto Detect 2) Longlife Oil 3) Non Longlife Oil 4) Set Insp. Interval Wait a few seconds till the following screen shows.
- Page 23 Select Function ►01) Oil Insp. Light 02) Set Insp. 1 03) Set Insp. 2 Different vehicle supports different oil service functions, so the displayed functions vary from one vehicle to another. Select the oil service function that your vehicle supports and press Y button.
- Page 24 If the vehicle can not be detected automatically, following screen shows. You need to perform oil service setup manually. Oil Service Can’t Auto Detect! Please try others! Press any key to con. Wait a few seconds or press any key to start reading channel data. Manual Reading Channel Data…...
- Page 25 x/x to the upper right part of the screen indicates total number of supported service channels and the sequence of current channel. 10) Use N button to move to next setup screen. Mil. Since Service Channel No (Mil) Current Value Set Value [N] = Next, [Y] = Save/Exit ] = Change Setup...
- Page 26 button to select Exit and press Y button, or simply press N button to exit. 12) Wait a few seconds till the “RESET OK!” message comes up. Press any key to return to Main Menu. Manual Setup RESET OK! Press any key to con. Resetting Longlife Oil Service The Longlife Oil function is used to reset long life oil service.
- Page 27 Longlife Oil ►1) Service Reset 2) Set Oil Type 3) View Oil Type Press any key to return to Longlife Oil menu. Service Reset RESET OK! Press any key to con. To set oil type, use UP/DOWN scroll button to select Set Oil Type from Longlife Oil menu, and press Y button.
- Page 28 Oil Type Reset RESET OK! Press any key to con. To view oil type, use UP/DOWN scroll button to select View Oil Type from Longlife Oil menu, and press Y button. Longlife Oil 1) Service Reset 2) Set Oil Type ►3) View Oil Type View oil type on screen and press any key to return to Longlife Oil menu.
- Page 29 To reset non longlife oil service, use UP/DOWN scroll button to select Non Longlife Oil from the Oil Service menu, and press Y button. Oil Service 1) Auto Detect ►2) Longlife Oil 3) Non Longlife Oil 4) Set Insp. Interval Use UP/DOWN scroll button to select Service Reset from Non Longlife Oil menu, and press Y button.
- Page 30 Setting Inspection Interval The Set Insp. Interval function is used to set oil service interval of different channels. Use UP/DOWN scroll button to select Set Insp. Interval, and press Y button. Oil Service 1) Auto Detect ►2) Longlife Oil 3) Non Longlife Oil 4) Set Insp.
- Page 31 Manual Reading Channel Data… -Please Wait- Use UP/DOWN scroll button to change set value. Min Mil. to Service Channel No (Mil) Current Value 9000 Set Value 9000 [N] = Next, [Y] = Save/Exit ] = Change Setup ︽ ︾ Use N button to move to next setup screen. Mil.
- Page 32 Oil Service Back Save Exit [Back] = Cont. to Set [Save] = Save Setup [Exit] = Cancel Setup Press any key to return to Main Menu. Manual Setup RESET OK! Press any key to con. If you want to continue to set values, use UP/DOWN scroll button to select Back and press Y button to continue to change set values.
- Page 33 Main Menu 1) VW/Audi 2) OBDII/EOBD ►3) Oil Service 4) System Setup Use UP/DOWN scroll button to select vehicle make, and press Y button to confirm. Oil Service 1) All ►2) Audi(up to 2000) 3) VW(up to 2000) 4) Seat(up to 2000) 5) Skoda(up to 2000) Use UP/DOWN scroll button to select vehicle model year, and press Y button to confirm.
- Page 34 Select Function ►01) Oil Insp. Light 02) Set Insp. 1 03) Set Insp. 2 Wait a few seconds till the following screen appears. Oil Service RESET OK! Press any key to con. If a message “Service reset failed!” comes up, repeat the procedure from Step 3 or use Auto Detect to detect service automatically.
-
Page 35: Warranty And Service
4. Warranty and Service 4.1 Limited One Year Warranty Autel warrants to its customers that this product will be free from all defects in materials and workmanship for a period of one (1) year from the date of the original purchase, subject to the following terms and...
Need help?
Do you have a question about the MaxScan VAG405 and is the answer not in the manual?
Questions and answers