Table of Contents
Advertisement
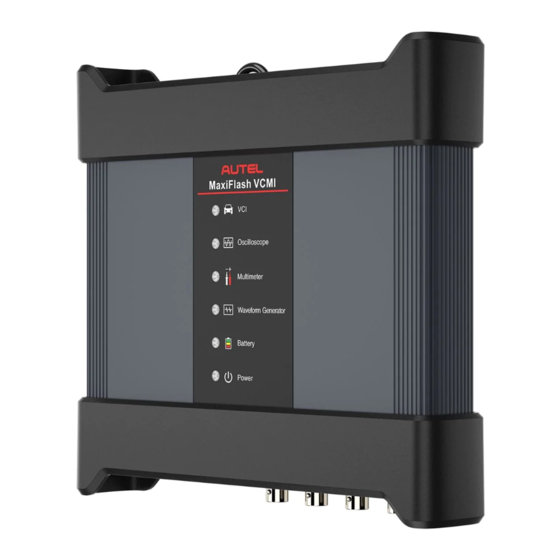
1
Measurement
The Measurement application can provide all the features needed for performing
electrical and electronic circuit tests as well as monitoring signal activities on today's
vehicles.
After properly connecting with a test vehicle and communicating with MaxiSys Ultra,
the VCMI (Vehicle Communication and Measurement Interface) is used as an
integrated device that functions as an oscilloscope, a waveform generator, a
multimeter and a digital OBDII breakout box.
1.1 Oscilloscope
An oscilloscope is a measuring instrument that shows how a signal varies with time
in a graphical way. Various signal activities can be displayed and monitored on a
two-dimensional grid. The graphical form created by a signal is called a waveform.
The voltage-time characteristic of the signal or waveform is drawn as a visual line
called the trace.
1.1.1 Safety Information
Follow these instructions below to reduce the risk of injury from electric shock and
prevent equipment damage.
A.
Maximum input ranges
Observe all terminal ratings and warnings marked on the product.
DANGER:
To prevent electric shock, take all necessary safety precautions when
working on equipment where voltages beyond the specified input range may
exists. Contact with voltages outside of the specified measuring range
presents a risk of electric shock.
To prevent injury or death, the oscilloscope must not be directly connected to
the battery. To measure battery voltages, use a differential isolating probe
1
Advertisement
Table of Contents
Troubleshooting

Related Manuals for Autel MaxiFlash VCMI


Summary of Contents for Autel MaxiFlash VCMI
- Page 1 Measurement The Measurement application can provide all the features needed for performing electrical and electronic circuit tests as well as monitoring signal activities on today’s vehicles. After properly connecting with a test vehicle and communicating with MaxiSys Ultra, the VCMI (Vehicle Communication and Measurement Interface) is used as an integrated device that functions as an oscilloscope, a waveform generator, a multimeter and a digital OBDII breakout box.
- Page 2 specifically rated for battery use. WARNING: Operation outside of the safe input range is likely to cause permanent damage to the oscilloscope and other connected equipment. Grounding DANGER: The scope’s ground connection through the USB cable is for measurement purposes only.
-
Page 3: General Introduction
The product contains no user-repairable parts. Repair, servicing and calibration require specialized test equipment and must be performed by Autel Tech Support or an approved service provider. DANGER: To prevent injury or death, do not use the product if it appears to be damaged in any way. - Page 4 Input Channel C Input Channel D The oscilloscope LED is located on the front panel of the VCMI device. When the VCMI is properly connected and powered on, the oscilloscope LED flashes green when operating in the oscilloscope mode. VCMI Front View Power LED Battery LED Waveform Generator LED...
- Page 5 Distance DC Accuracy ± 1% of full scale Storage Humidity Range 5 to 95%RH, non-condensing 1.1.2.3 Accessories Autel USB Cable V2 (the V2 icon can be seen on the cable) (SA001) Connects the oscilloscope to the tablet to ensure reliable...
- Page 6 signal transmission. Secondary Ignition Pickup (SA273) The BNC connector is connected to the oscilloscope to measure the secondary ignition voltage of conventional ignition systems and most HEI (High Energy Ignition) and DIS (Distributorless Ignition) systems. Scope Test Lead (Red: SA005, Green: SA006, Blue: SA007, Yellow: SA008) The BNC connector is connected to the oscilloscope, and the 4mm banana plug is connected to various probes.
- Page 7 Small Crocodile Clips (Red: SA057, Black: SA058) Used to connect exposed wires or terminals. SA059 (red) and SA060 (black) for larger terminals. Large Dolphin Clips (Red: SA059, Black: SA060) Used to connect exposed wires or terminals, including battery terminals. SA057 (red) and SA058 (black) for smaller terminals.
-
Page 8: Getting Started
HT Extension Lead (Optional) (SA275) Fit the HT extension leads between the coil pack and the plugs of the independent ignition system (COP), and then place the (SA273) secondary ignition pickup on each lead to obtain the secondary ignition voltage. 1.1.3 Getting Started Before opening the Oscilloscope application, the VCMI device must be connected to the tablet via the provided USB cable or Wi-Fi network. - Page 9 NOTE Please check the oscilloscope LED status indicator on the front panel of VCMI device. The oscilloscope LED flashes green when operating in the oscilloscope mode. Message Prompt A message showing “Are you sure to open the waveform of Demo mode?” displays after tapping the Oscilloscope icon and opening the oscilloscope menu.
- Page 10 Figure 1-2 Sample Help Screen Tap the Update the APK in the dropdown menu. A confirmation message displays. Figure 1-3 Sample Update Confirmation Screen Tap OK to update the software or tap Cancel to exit. 1.1.4.2 Firmware Update To update the firmware...
- Page 11 Tap the Help button on the upper half of the screen. A dropdown menu displays. (Figure 1-2) Tap Update Firmware in the dropdown list. The screen will switch to the Update section in the VCMI Management application. NOTE Please DISCONNECT the MaxiScope from VCMI before updating. A message displays and tap “OK”...
- Page 12 Figure 1-5 Sample Firmware Update Screen 2 1.1.5 Screen Layout and Operations The Oscilloscope application measures changing voltages of an electrical system over a period of time. This signal is depicted as a shape. The grid on the screen shows divisions of voltage and time to enable measurements to be made. Tap the Measurement icon on the home screen then select Oscilloscope in the menu, the oscilloscope page displays.
- Page 13 Figure 1-6 Sample Oscilloscope Menu Screen 1. Upper Toolbar Buttons - see Upper Toolbar Buttons on page 13 for details. 2. Main View Section – see Main View Section on page 41 for details. 3. Lower Toolbar Buttons - see Lower Toolbar Buttons on page 49 for details.
-
Page 14: Start/Stop Button
Name Button Description Search, upload, share and follow the waveforms in Waveform the waveform library. See Waveform Library Library page 18 for more information. Configurations of mode setting, math channels, waveform generator, decoding setting, startup Settings setting and demo setting. See Settings Menu page 22 for more information. -
Page 15: Presets Menu
Name Button Description Tap to stop the oscilloscope and terminate Stop sampling. Presets Menu Tap the vehicle icon button in the top navigation bar to enter the Presets Menu. This menu offers a wide variety of preset guided information for you to view. The frequently used test components and options are listed in the presets menu: ... - Page 16 Figure 1-7 Sample Presets Menu Screen 1 Tap the appropriate sub-options from the column that displays. Tap the icon to download the preset guided information. Figure 1-8 Sample Presets Menu Screen 2 View the preset guided information. A reference signal waveform displays (an injector selection is used here as an example) on the Main Screen and the preset guided information on the right side of the screen.
- Page 17 Figure 1-9 Sample Presets Display Screen Tap the arrow button to hide the preset guided information and display the waveform. Figure 1-10 Sample Reference Signal Waveform Display NOTE Parameter values such as the ranges of voltage and time divisions are automatically set for presets.
- Page 18 Online Waveform Library The waveforms in the online waveform library are picked and uploaded by Autel users during repair and test process using an oscilloscope. It allows you to search for the waveforms from the vehicle and component you want to test, or upload and...
- Page 19 The search result displays the information such as the waveform picture, waveform code, VIN code, vehicle code, etc. The waveform in the online library can also be loaded as reference waveform for better waveform analysis. There are two methods to search for waveforms: Condition-based search and keyword-based search.
- Page 20 bad. (3) Search result The search result will automatically display in the lower section of the page after selecting the model and conditions, showing the image of waveform, waveform ID (waveform code), VIN or the screening conditions. Tap the corresponding buttons on the lower right side to share, follow or open the waveform.
- Page 21 Figure 1-13 Sample Keyword-based Search Screen My Upload Your own waveforms can be saved and uploaded to the online server. The uploaded waveforms can be searched from “My Upload” tab. Please input the waveform code, VIN, vehicle code, or screening conditions and then tap the “Search”...
-
Page 22: Settings Menu
Figure 1-14 Sample Local Waveform Library Screen Settings Menu Tap the gear icon button in the top navigation bar to open the Setting Menu. The Mode, Math Channels, Waveform Generator, Decoding Settings, Startup Settings and Demo Settings can be manually configured in the menu. Mode Settings Two modes and three display views are available: normal mode, demo mode, oscilloscope view, XY view and spectrum view. - Page 23 Figure 1-15 Sample Mode Setting Screen In Normal Mode, the actual waveform is displayed on the screen when a test component is connected to the oscilloscope. You can real-time monitor the signal waveform of sensors in the normal mode. NOTE The oscilloscope is required to be connected in the normal mode.
- Page 24 Figure 1-16 Sample XY View Setting Screen In the Spectrum View, the waveform shows the signal level on a vertical axis against frequency on the horizontal axis in a graphical way. One or more spectra with a common frequency axis can be displayed in the spectrum view. NOTE The Wi-Fi connection does not support the XY View and Spectrum View.
- Page 25 Figure 1-17 Sample Spectrum View Setting Screen 1 Spectrum Bins: It allows you to set the number of frequency bins into which the spectrum is divided. Window function: It allows you to select one of the standard window functions to reduce the impact of running on a time-limited waveform.
- Page 26 Window Main peak Highest Side lobe Description width side lobe roll-off (bins @ (dB) (dB/octave) -3dB) Hann 1.20 -23 to -47 12 to 30 Used for audio and vibration 1.86 work Hamming 1.30 -41.9 Also called raised sine-squared; used speech analysis Triangle 1.28 Also called Bartlett window...
- Page 27 Figure 1-18 Sample Spectrum View Setting Screen 2 Math Channels A math channel is a virtual channel generated by a mathematical function of the input channel. It can be displayed in an oscilloscope in the same way as an input signal, and like an input signal it has its own measure axis, scale and color.
- Page 28 To set the math channel Using Invert A as an example. Tap Settings button in the top navigation bar. A dialog box opens. Select the Math Channels option in the dialog box. To select the Invert A, tap the check box. Figure 1-19 Sample Math Channel Setting Screen 1 Close the dialog box, the waveforms are displayed on the screen.
- Page 29 Waveform Generator Settings The waveform generator operates simultaneously with the oscilloscope. Use the waveform generator to simulate the DC voltage, square wave, square wave (X+Y), triangle wave, and actuators drive. Figure 1-21 Sample Waveform Generator Setting Screen To set the waveform generator Tap the Settings button in the top navigation bar.
- Page 30 Figure 1-22 Sample Waveform generator Settings Screen Close the dialog box. The waveform generator settings are displayed on the screen. Figure 1-23 Sample Waveform generator Display Screen Decoding Settings When the oscilloscope mode is selected, the decoding settings are available. Up to 8 different protocols are supported in the decoding settings.
- Page 31 Figure 1-24 Sample Decoding Settings Screen 1 8 protocols are available: CAN High, CAN Low, LIN, FlexRay, RS232/UART, I2S, I2C, and USB (1.0/1.1). The detailed setting options vary by each protocol. CAN High / CAN Low: Controller Area Network (CAN) is a serial protocol used in automotive to allow microcontrollers to communicate with each other.
- Page 32 I2S: Inter-IC Sound (I2S) is a serial protocol used in digital audio devices for communications between circuits such as CD transports and audio DACs. I2C: Inter-Integrated Circuit (I2C) is a way to connect peripheral chips in consumer electronics products and is widely used in embedded systems. ...
- Page 33 Figure 1-25 Sample Decoding Settings Screen 2 Startup Settings This function allows the user to choose the startup configuration when launching the oscilloscope application. On the Startup Settings screen, there are three options: Load the user default configuration at startup, Load the previous session configuration at startup, and Load the factory configuration at startup.
- Page 34 Demo Settings This function allows the user select the demo waveform for each channel in Demo mode. Select one demo waveform from Nozzle voltage, Nozzle current, Ignition signal, Sinusoidal signal, Square signal and signal of the crankshaft. The rotating speed can be set by tapping the “-” or “+” icon to adjust the value. Tap “OK” to confirm the settings.
- Page 35 Figure 1-28 Sample Single Window Screen Double Window – displays two separate traces horizontally, one below the other. Figure 1-29 Sample Double Window Screen Triple Window – displays three separate traces horizontally, one below the other.
- Page 36 Figure 1-30 Sample Triple Window Screen Quadruple Window – displays four separate traces, two horizontally, two vertically. Figure 1-31 Sample Quadruple Windows Screen To set the display mode Tap the Window Display button in the top navigation bar. A dialog box opens. Select the Display Mode in the dialog box.
- Page 37 traces onscreen. Figure 1-32 Sample Display Mode Selection Screen Close the dialog box. The window is displayed as selected. Channel Settings The channel settings allow you to arrange the display position of the activated channels. Select which channels are visible in the display window. The display status is set to ON, the input channels are enabled, otherwise, the input channels (set to OFF status) are not available for viewing.
- Page 38 Figure 1-33 Sample Channel Setting Screen Close the dialog box and the activated channel is displayed in the selected window. Figure 1-34 Sample Channel Display Screen File Menu The File button allows you to print, open, save, and delete the waveform data. The File Menu supports the following functions.
- Page 39 Figure 1-35 Sample File Menu Screen Print – Tap to create and print a temporary PNG picture of the current waveforms. NOTE Make sure the tablet is properly setup to print and is connected to the printer. Make sure the network is available. ...
- Page 40 Figure 1-36 Sample Help Menu Screen User Manual – displays instruction for the prosper use of the oscilloscope. Update the APK – connects to the Autel server and to check for latest application software. Update Firmware – connects to the Autel server and to check for latest firmware...
-
Page 41: Number Of Samples
About – displays the model number of the oscilloscope and the installed versions of the software and firmware. Number of Samples This button allows you to set the maximum number of samples that will be captured by each channel. The sampling rate of current time base can be adjusted by changing the number of samples. -
Page 42: Channel Selection
Figure 1-37 Sample Overrange Indicator Screen Select an appropriate scale setting for the signal being sampled to avoid an overrange condition. IMPORTANT To prevent electric shock, do not exceed voltage limits between inputs. Channel Selection In the main view section, a channel has two conditions: selected and unselected. A channel must be selected in order for the waveform to be movement, to use the zoom-in or to add voltage rulers. - Page 43 Figure 1-38 Sample Channel Selection 1 (Selected) Tap the zero baseline marker or the Y-axis again to exit the channel selection. Figure 1-39 Sample Channel Selection 1 (Unselected) Waveform Zooming The zooming function allows you to change the size and position of a signal during or after capturing a waveform to examine it in greater details.
- Page 44 The X-axis and Y-axis can be zoomed using your fingertips. The waveform can be zoomed during or after capturing the signal. Measurement Rulers The coordinate Rulers allow the voltage and time duration of a waveform to be measured precisely. They are useful when determining signal characteristics such as amplitude at specific points, the cycle time (duration) and frequency.
- Page 45 Figure 1-40 Sample Rulers Display Screen To configure angle settings Drag Angle Activator to generate the angle rulers. Tap the start or end angle value to open the Phase Setting box. Input the desired phase value and the ruler value in the field. Figure 1-41 Sample Phase Setting Screen Tap Confirm in the upper right corner to save the settings, or tap Cancel to exit without saving.
- Page 46 Zero Baseline The zero baseline is marked the 0 value in the Y-axis, showing the ground level of each channel waveform. After the channel is selected, the Zero Baseline can be adjusted by dragging the zero baseline marker up/down along the Y-axis, or dragging the waveform up/down, or moving the screen up/down in the grid.
- Page 47 NOTE To reposition waveform or to move the screen, tap the zero baseline marker to select. The line will display thicker when selected. Parameter and Help Tap the arrow button in the lower right corner of the screen to open the Parameter and Help windows.
- Page 48 Figure 1-45 Arrow Button Position Screen The parameter and help window displays. To close, tap the arrow button again or tap any space outside of the window. Note The preset guided information is also displayed on the right side of the screen when the specific options and test components have been selected from the Presets menu.
- Page 49 Figure 1-46 Sample Real-time Help Screen 1 View the information by dragging it up and down using your fingertips. The real-time help information can be displayed in a full screen by tapping the four-directional arrow icon in the lower right corner. Tap it again to recover the half-screen display.
-
Page 50: Channel Control
The buttons in the lower toolbar include the channel control buttons, trigger setting buttons, buffer button, time base button and measurement button. The following table provides brief description of each button. Table 1-4 Lower Toolbar Buttons Name Button Description Tap to configure the settings of each channel. Channel Active channel icons display in color;... - Page 51 Tap the right column of the channel control button to open the settings dialog box. Figure 1-48 Sample Activate Channel Screen Tap the left column of channel control button again to close the channel. The closed channel button displays gray. Channel Color Identify each channel waveform by color.
- Page 52 indicator will be displayed. Select Auto to enable the device to adjust the vertical scale automatically. It only changes the vertical scale, while the horizontal scale is not changed. AC and DC voltage can be toggled to set up the input circuitry. Note The vertical scale is ALWAYS divided into 10 major divisions, and all scale settings reflect in these 10 divisions.
- Page 53 Figure 1-50 Sample Amplitude Setting Screen (DC 5V) Mode 2: Select the ## /div button to adjust value incremented by each division. For example, selecting DC 1.0V/div, sets the channel amplitude to 1.0V/div DC (seen at the right side of the channel control button). Each segment increases by 1V. As the vertical scale is divided into 10 segments, the entire vertical scale range is from -5V to +5V.
- Page 54 Figure 1-52 Sample Amplitude Setting Screen (DC 1.0V/div) Probe Settings A probe is an accessory that connects to your oscilloscope and to detect signals to be measured. It can pick up different forms of signal, but generally delivers a voltage signal. This oscilloscope has built-in definitions of standard probes.
- Page 55 Coil-On-Plug Ignition Probe [COP]: select when using the COP ignition probe (SA271) Secondary Ignition Probe [ignition]: select when using the secondary ignition probe (SA273) Secondary Ignition Probe (inverted) [R_ignition]: select when using the secondary ignition probe (SA273) and inverting the secondary ignition signal You can select the inner standard probes in the probe settings.
- Page 56 Figure 1-54 Sample Probe Edit Screen 1 To add custom probes Add a 20∶1 Attenuator as an example: Tap the right column of the channel control button at the bottom of the screen to open the setting dialog box. Select the Probe Edit option in the left column of the dialog box.
- Page 57 Tap Add to save the settings, or tap Clear to exit without saving. The added probe will be listed in the Probe Settings window. Figure 1-56 Sample Probe Edit Screen 3 LPF (Low-pass Filtering) The low-pass filtering (LPF) is an independent digital low-pass filter for each input channel used to remove noise from the signal.
- Page 58 Figure 1-57 Before Setting Low-pass Filtering Screen Figure 1-58 After Setting Low-pass Filtering Screen To configure the low-pass filtering settings Tap the right column of the channel control button to open the setting dialog box. Select the Low-pass Filtering option from the left column of the dialog box. Tap the checkbox of the appropriate channel and adjust frequency by tapping the minus or plus.
- Page 59 Figure 1-59 Sample Low-pass Filtering Screen Tap Yes to save the settings or close the dialog box directly to exit without saving. DLC Channel The DLC (Data Link Connector) channel enables data to be collected from the vehicle's OBDII pins for analysis of vehicle communications. The DLC channel icon displays on the input channel D button.
- Page 60 To open and set the DLC channel Tap the right column of the channel D button at the bottom of the screen to open the setting dialog box. Select the DLC Channel in the left column of the dialog box. Swipe the Enable DLC channel to ON.
- Page 61 Figure 1-62 Sample DLC Channel Setting Screen 2 Swipe the Enable DLC channel to OFF to close the DLC channel and switch to the oscilloscope function. Figure 1-63 Sample DLC Channel Setting Screen 3 Trigger The trigger feature is used to stabilize repetitive waveforms to obtain a clear signal characterization.
- Page 62 A trigger is activated when a signal crosses set thresholds. Trigger points can also be set manually as the user views a waveform. When the oscilloscope is capturing the signal, tap the left column of the Trigger button to activate the trigger function. A trigger point displays as a blue point. Figure 1-64 Sample Trigger Point Screen When the oscilloscope is capturing the signal, tap the right column of the Trigger button to open the trigger settings dialog box.
- Page 63 Edge Triggering The edge trigger is one of the most common trigger modes and is activated when voltage rises above or falls below a preset threshold. This trigger type allows you to configure the trigger mode, threshold, trigger channel and pulse direction settings. Tap Done to save the settings or tap Cancel to exit without saving.
- Page 64 Trigger Mode Description In this trigger mode, the oscilloscope waits until a trigger event Repeat occurs. If there is no trigger event, nothing will be displayed on the screen. In this trigger mode, the oscilloscope stops capturing data once Single a trigger event occurs.
- Page 65 Figure 1-68 Sample Pulse Direction Screen Rise Edge Trigger - Indicates trigger is turned on to start the trace on the rising edge of the waveform. Fall Edge Trigger – Indicates trigger is turned on to start the trace on the falling edge of the waveform ...
- Page 66 Rising or Falling option in the dropdown menu of the pulse direction: Dual edges of a waveform can be triggered. This mode is especially useful for monitoring pulses of both polarities at once. Hysteresis option: It is used to reduce false triggering on noisy signals. When hysteresis is enabled, a second trigger threshold voltage is used in addition to the main trigger threshold.
- Page 67 Figure 1-70 Sample Window Settings Screen Pulse Width This trigger type allows you to monitor pulses of a specified width. Figure 1-71 Sample Pulse Width Settings Screen To set the pulse width Tap the Trigger button at the bottom of the screen to open the Trigger Settings dialog box.
- Page 68 Select the Pulse Width in the left column of the dialog box. Select the desired trigger mode and channel mode. Set the pulse direction to either Positive pulse or Negative pulse according to the polarity of the pulse. Select one of the four Conditions: ...
- Page 69 Window Pulse Width This trigger type combines with the window trigger and the pulse width trigger. It detects when a signal enters or exits an input range and stays for a specified period of time. Two Region options can be selected: In range and Out of range. Figure 1-73 Sample Window Pulse Width Settings Screen Horizontal Distortion This trigger type helps to monitor an edge that occurs after a specified time with on...
- Page 70 Figure 1-74 Sample Horizontal Distortion Settings Screen Window Distortion This trigger type monitors when a signal enters a specified voltage range and stays within that range for a specified period of time. Figure 1-75 Sample Window Distortion Settings Screen...
- Page 71 Underthrow This trigger type monitors a pulse that exceeds one threshold and then drops below the same threshold without exceeding the second threshold. This type of trigger is typically used to find pulses that do not reach a valid logic level. Figure 1-76 Sample Underthrow Settings Screen Buffer The waveform buffer shows which signal waveform is displayed on the current...
- Page 72 Figure 1-77 Sample Buffer Screen Name Button Description Tap to display the previous waveform in the buffer. Previous Displays the number of the waveform currently Buffer displayed onscreen out of the total number of Index buffered waveforms. Next Tap to display the next waveform in the buffer. Time Base The time base controls the time interval across the oscilloscope display.
- Page 73 Figure 1-78 Sample Time Base Screen 1 (Normal Mode) Continuous Mode: if the time base is set to more than or equal to 200ms/div, the oscilloscope switches to the continuous mode. In this mode, the oscilloscope updates the trace continuously as each capture progresses, rather than waiting for a complete capture before updating the trace.
- Page 74 Measurement The available measurements for each channel are (from left to right): Figure 1-80 Sample Measurement Screen 1 Maximum – the highest level that the signal reaches Minimum – the lowest level that the signal reaches Peak To Peak – the difference between maximum and minimum ...
- Page 75 Rising Rate – the rate at which the signal level rises Falling Rate – the rate at which the signal level falls Rise Time – the time the signal takes to rise from the lower threshold to the upper threshold ...
- Page 76 Figure 1-81 Sample Measurement Screen 2 (Spectrum View) Frequency Peak Value – the frequency of the peak signal value Amplitude Peak Value – the amplitude of the peak signal value Average Amplitude Peak Value – the amplitude of the peak signal value ...
- Page 77 THD + N THD + N = 10log Spurious-free Dynamic Range (SFDR) - the ratio of the amplitude of the highest peak in the spectrum to that of the second highest peak SINAD – signal to noise and distortion ratio. The ratio (in decibels) of the signal-plus-noise-plus-distortion to noise-plus-distortion Signal SINAD = 10log...
- Page 78 Figure 1-82 Sample Measurement Setting Screen Close the dialog box, and the corresponding measurement readings are displayed on the right-hand side of the screen. Adjust the whole track or ruler track on the displayed screen or delete the measurement directly by tapping the X button.
- Page 79 Figure 1-84 Sample Spectrum View Selection Screen Tap the Measurement button at the bottom of the screen to open the measurement dialog box. Select the channel to be measured. Select the appropriate measurement options. Figure 1-85 Sample Measurement Setting Screen (Spectrum View) Close the dialog box, and the corresponding measurement readings are displayed on the right-hand side of the screen.
-
Page 80: Troubleshooting
directly by tapping the X button. Figure 1-86 Sample Measurement Display Screen (Spectrum View) 1.1.6 Troubleshooting A. If the oscilloscope cannot communicate with the MaxiSys Tablet: Ensure the VCMI device is properly connected to the MaxiSys Tablet via Wi-Fi or with the supplied USB cable. - Page 81 1.1.7 Glossary AC/DC Control Each channel can be set to either AC coupling or DC coupling. With DC coupling, the voltage displayed onscreen is equal to the true voltage of the signal with respect to ground. With AC coupling, any DC component of the signal is filtered out, leaving only the variations in the signal for the AC component.
- Page 82 Voltage Range The range between the maximum and minimum voltages that can be accurately captured by the oscilloscope. Sampling Rate The number of samples per second captured by the oscilloscope. The faster the sampling rate of the scope, the more frequently it measures the signal voltage, and so the more detailed will be the trace that appears on the scope screen.
-
Page 83: Safety Information
1.2 Multimeter A multimeter is an electronic measuring instrument that is used to measure voltage, resistance, frequency, diode, duty cycle and pulse width and continuity test. The VCMI (Vehicle Communication and Measurement Interface) working with MaxiSys Ultra can function as a multimeter to provide precise measurements. 1.2.1 Safety Information Follow the instructions below to reduce the risk of injury from electric shock and prevent equipment damage. -
Page 84: General Introduction
Do not add voltage to the input terminal when measuring resistance. To avoid electric shock, turn off the power to the component before connecting. To prevent damage, always use and store your multimeter in appropriate environments. Do not use in wet or damp conditions, or around explosive gas or vapor. - Page 85 The multimeter LED is located on the front panel of the VCMI device. When the VCMI is properly connected and powered on, the multimeter LED lights green when operating in the multimeter mode. VCMI Front View Power LED Battery LED Waveform Generator LED Multimeter LED Oscilloscope LED...
- Page 86 Item Description 0 to 65A (65A current clamp) Current Range 0 to 650A (650A current clamp) 1.2.2.3 Accessories The following accessories are compatible with the multimeter and oscilloscope. Please refer to Accessories on page 5 for details. 65A current 650A current Large Dolphin Small Crocodile...
-
Page 87: Getting Started
1.2.3 Getting Started Before opening the Multimeter application, ensure the VCMI device is connected to the tablet via Wi-Fi network or with the supplied USB cable. Figure 1-1 Sample Connection Diagram To open the multimeter application Insert the applicable test leads or probe terminal ends into the multimeter jacks to complete the connection. - Page 88 1.2.4.1 APK Update NOTE The acronym APK (Android Package Kit) is used on the tablet and in this manual. This file contains all the assets of a particular app. To update the APK, is to install the latest version of the app on your tablet. ...
- Page 89 Figure 1-3 Sample Update Confirmation Screen Tap OK to update the software or tap Cancel to exit. 1.2.5 Screen Layout and Operations Tap the Measurement icon on the home screen then tap the Multimeter icon in the menu, the multimeter page displays. The screen typically includes the following button sections.
- Page 90 Figure 1-4 Sample Multimeter Menu Screen 1. Upper Toolbar Buttons - see Upper Toolbar Buttons on page 90 for details. 2. Main View Section – see Main View Section on page 94 for details. 3. Lower Toolbar Buttons - see Lower Toolbar Buttons on page 100 for details.
-
Page 91: Start/Stop Button
Name Button Description View the user manual, update the APK and Help firmware. See Help Menu on page 94 for more information. Reset the digital readouts displayed in the figure Reset mode. Multimeter Button This Multimeter status button displays the multimeter connection status. A green check mark means the tablet and the Multimeter are connected;... - Page 92 Figure 1-5 Sample Display Mode Menu Screen Select one of the three display modes. The corresponding display mode will be shown on the screen. Table 1-2 Display Mode Table Icon Mode Description Digital Mode Displays the digital readouts only. Displays the waveform only. Waveform Mode Digital Displays both the digital readouts and waveform.
- Page 93 Figure 1-6 Sample File Menu Screen Print – Tap to create and print a temporary PNG picture of the current waveforms. NOTE Ensure the tablet is configure to print (see Printer setup instructions) and is connected to the printer. Ensure the tablet and printer share the same network. ...
- Page 94 Figure 1-7 Sample Help Menu Screen User Manual – displays instruction for the prosper use of the multimeter. Update the APK – connects to the Autel server to check for latest application software. About – displays the model number of the multimeter and version numbers of the installed software and firmware.
-
Page 95: Digital Mode
Digital Mode The main view section in the digital mode displays only the digital readouts such as values of current measurement, maximum measurement, minimum measurement, peak to peak measurement and average measurement. Figure 1-8 Sample Main View Section Screen (Digital Mode) ... - Page 96 Figure 1-9 Sample Main View Section Screen (Waveform Mode) The main view section features a coordinate grid with the X-axis representing the time duration and the Y-axis representing the voltage level. The voltage level on the Y-axis can be configured in the Amplitude Settings while the time duration on the X-axis can be set in the Time Base Settings.
- Page 97 The X-axis and Y-axis can be zoomed using your fingertips. The waveform can be zoomed during or after capturing the signal. Measurement Rulers In the coordinate grid, there are two kinds of measurement rulers, which allow the voltage and time duration of a waveform to be measured precisely. They are useful when determining signal characteristics such as amplitude at specific points, the cycle time (duration) and frequency.
- Page 98 Zero Baseline The zero baseline is marked the 0 value in the Y-axis, showing the ground level of each channel waveform. After the channel is selected, the zero baseline can be adjusted by dragging the baseline marker up/down along the Y-axis, or dragging the waveform up/down or moving the screen up/down in the grid.
- Page 99 Figure 1-12 Sample Wiring Diagram and Help Screen To open and close the Wiring Diagram and Help window Tap the arrow button on the right-hand side of the screen. Figure 1-13 Arrow Button Position Screen The Wiring Diagram and Help window displays. Tap the arrow button again or tap any space outside of the window.
- Page 100 Digital + Waveform Mode In this mode, the main view section displays the digital readouts on the top and the waveform in the grid. Figure 1-14 Sample Main View Section Screen (Digital + Waveform Mode) 1.2.5.3 Lower Toolbar Buttons The measurement, buffer and time base can be configured in the lower toolbar. Table 1-3 Lower Toolbar Buttons Name Button...
-
Page 101: Measurement Setting
Measurement Setting This multimeter can be used to measure or test AC voltage, DC voltage, resistance, AC electricity, DC electricity, diode, frequency, duty cycle, pulse width, continuity and period. The measurement types include: AC/DC voltage: measures the voltage in the electrical circuit ... - Page 102 Figure 1-15 Sample Measurement Setting Position Screen Select the measurement type you want to measure or test in the right column of the dialog box. The blue color indicates the option is selected. Figure 1-16 Sample Measurement Setting Screen Close the dialog box, the measurement type you set displays on the screen. Amplitude Setting Amplitude value can be configured for the selected measurement type excluding resistance measurement.
- Page 103 The amplitude settings allow you to set up the multimeter to capture signals within the specified range. If the input signal exceeds the selected range, an over-range indicator will be displayed. Select Auto to enable the device to adjust the vertical scale automatically.
-
Page 104: Testing Procedures
Figure 1-18 Sample Amplitude Setting Screen (DC 2.0V/div) Testing Procedures The following section describes how to use the multimeter. The testing procedures are the same for each measurement type. The following directions are for measuring AC voltage. To measure AC voltage Insert the supplied multimeter probes into the VCMI multimeter jacks. - Page 105 Figure 1-19 Sample Probe Edit Screen 1 To add custom probes Tap the Measurement Setting button in the lower left corner of the screen to open the setting dialog box. Select the Probe Edit option in the left column of the dialog box. Tap each field to open the virtual keyboard and input the required information.
- Page 106 The added probe will be listed in the Measurement Settings window. Figure 1-21 Sample Probe Edit Screen 3 Buffer The waveform buffer displays the number of the waveform currently displayed on-screen out of the total number of stored waveforms. The multimeter can capture and store up to 32 waveforms. Tap the Previous or Next button to review waveforms.
-
Page 107: Troubleshooting
Name Button Description Previous Tap to display the previous waveform in the buffer. Displays the number of the waveform currently Buffer Index displayed onscreen out of the total number of buffered waveforms. Next Tap to display the next waveform in the buffer. 1.2.6 Troubleshooting If the multimeter cannot communicate with the MaxiSys Tablet: ... - Page 108 Frequency The number of signal occurrences per second. Frequency is measured in Hz (hertz). Duty Cycle The length of a signals on time. Specified as a percentage (ratio), of the total cycle time. Peak to Peak The difference between maximum and minimum value. Cursor The onscreen markers used to measure time and amplitude.
-
Page 109: Waveform Generator
1.3 Waveform Generator The VCMI (Vehicle Communication and Measurement Interface) working with MaxiSys Ultra can function as a waveform generator to send out electric signals to the vehicle’s sensor or actuator for testing or measuring. 1.3.1 Safety Information Follow the instructions below to reduce the risk of injury from electric shock and prevent equipment damage. -
Page 110: General Introduction
1.3.2 General Introduction 1.3.2.1 Component Locations The multimeter jacks are used when operating the waveform generator. The two multimeter jacks are located on the top of the VCMI device. VCMI Top View Multimeter Jacks – for ground and signal cables USB Port Hook DC Power Supply Input Port... - Page 111 Power LED Battery LED Waveform Generator LED Multimeter LED Oscilloscope LED Vehicle LED 1.3.2.2 Technical Specifications Item Description Voltage Range 0.1 to 12V Frequency Output 1Hz to 30KHz Duty Cycle Range 1% to 99% (1Hz to 30KHz) 1.3.2.3 Accessories The following accessories are compatible with the waveform generator and oscilloscope.
-
Page 112: Getting Started
Multimeter Test Lead Used to connect the waveform generator and the probe. 1.3.3 Getting Started Before opening the waveform generator application, the VCMI device must be connected to the Tablet via the provided USB cable or Wi-Fi network. For more information, see Establish Vehicle Communication. - Page 113 NOTE Please check the waveform generator LED status indicator on the front panel of VCMI device. The waveform generator LED lights green when operating in the waveform generator mode. 1.3.4 Waveform Generator Update The operating software of the waveform generator is continually optimized. Tap the Help button in the upper half of the screen to update.
- Page 114 Figure 1-3 Sample Update Confirmation Screen Tap OK to update the software or tap Cancel to exit. 1.3.5 Screen Layout and Operations Tap the Measurement icon on the home screen and select Waveform generator from the menu, the waveform generator page displays. The screen typically includes the following button sections.
- Page 115 Figure 1-4 Sample Waveform Generator Menu Screen 1. Upper Toolbar Buttons - see Upper Toolbar Buttons on page 115 for details. 2. Main View Section – see Main View Section on page 118 for details. 3. Lower Toolbar Buttons - see Lower Toolbar Buttons on page 121 for details.
-
Page 116: Start/Stop Button
Name Button Description View the user manual, update the software and Help view version numbers. See Help on page 117 for more information. Reset Reset the configurations and refresh the screen. Waveform generator Button This Waveform generator Icon displays the waveform generator connection status. A green check mark means the tablet and the waveform generator are connected;... - Page 117 Figure 1-5 Sample File Menu Screen Print – Tap to create and print a temporary PNG picture of the current waveforms. NOTE Ensure the tablet is configure to print (see Printer setup instructions) and is connected to the printer. Ensure the tablet and printer share the same network. ...
- Page 118 Figure 1-6 Sample Help Menu Screen User Manual – displays instruction for the prosper use of the waveform generator. Update the APK – connects to the Autel server and check for latest application software. About – displays the model numbers of the waveform generator and the installed versions of the software and firmware.
- Page 119 Waveform Zooming The zooming function allows you to change the size and position of a signal during or after capturing a waveform to examine it in greater details. It does not change the stored data, only the way it displays. The X-axis and Y-axis can be zoomed using your fingertips.
- Page 120 Zero Baseline The zero baseline is marked as the 0 value in the Y-axis, showing the ground level of each channel waveform. After the channel is selected, the Zero Baseline can be adjusted by dragging the zero baseline marker up/down along the Y-axis. Wiring Diagram and Help Tap the arrow button in the lower right corner of the screen to open the Wiring Diagram and Help window.
- Page 121 Figure 1-9 Arrow Button Position Screen The Wiring Diagram and Help window displays. Tap the arrow button again or tap any space outside of the window. 1.3.5.3 Lower Toolbar Buttons The signal mode, voltage, frequency and duty cycle can be configured via the lower toolbar buttons.
- Page 122 Signal Mode Setting The waveform generator supports numerous signal modes including the DC voltage, square wave, square wave (X+Y), triangle wave, and actuators drive, and arbitrary waveform. Figure 1-10 Signal Mode Setting Screen DC Voltage Figure 1-11 Sample DC Voltage Connection Diagram...
- Page 123 Set the DC voltage in the waveform generator interface. The waveform generator can simulate the signals of numerous sensors including the water temperature sensor, oil pressure sensor and position sensor and then feed back to the engine ECU. Actuator Drive Figure 1-12 Sample Actuator Drive Connection Diagram This function can drive 2-wire solenoid valve, solenoid coil and low-power motor, including the canister solenoid valve, injector solenoid valve, transmission hydraulic...
- Page 124 NOTE The maximum current supported by Actuator Drive cannot exceed 2A. Square Wave Figure 1-13 Sample Square Wave Connection Diagram Once the voltage and frequency are set in the waveform generator interface, the square wave signals simulate the signals of various Hall sensors. Square Wave (X+Y) Figure 1-14 Sample Square Wave (X+Y) Connection Diagram...
- Page 125 This function is mainly used to simulate the missing tooth signals of Hall-type crankshafts and camshafts. The X value represents the normal tooth signal and the Y represents the missing tooth signal. The default setting is 58+2, which can be adjusted as needed.
-
Page 126: Voltage Setting
Arbitrary Waveform Figure 1-16 Sample Arbitrary Waveform Connection Diagram Any type of the mentioned waveforms can be loaded again after the waveform and parameter settings are saved. Voltage Setting After you select the waveform mode, you can also set the amplitude value for that mode. - Page 127 Figure 1-17 Sample Voltage Setting Screen 1 Range Button Description Raises the voltage by 0.1V 0.1V to 0.9V Lowers the voltage by 0.1V Raises the voltage by 1V 1V to 12V Lowers the voltage by 1V Method 2: Tap the Voltage Setting button at the bottom of the screen to open a dialog box.
- Page 128 Figure 1-18 Sample Voltage Setting Screen 2 Value Description +0.1V Raises the voltage by 0.1V -0.1V Lowers the voltage by 0.1V +1.0V Raises the voltage by 1V -1.0V Lowers the voltage by 1V Method 3: Input the voltage value using the virtual keyboard. Tap the voltage field to clear the current value and input the new value.
-
Page 129: Frequency Setting
Figure 1-19 Sample Voltage Setting Screen 3 Frequency Setting When the waveform mode is selected and the waveform generator is operating, you can also set the frequency value for that mode. There are also three methods to adjust the frequency value: Method 1: Tap the “+”... - Page 130 Range Button Description Raises the frequency by 1Hz 1Hz to 10Hz Lowers the frequency by 1Hz Raises the frequency by 10Hz 10Hz to 100Hz Lowers the frequency by 10Hz Raises the frequency by 100Hz 100Hz to 1000Hz Lowers the frequency by 100Hz Raises the frequency by 1KHz 1.0KHz to 30.0KHz Lowers the frequency by 1KHz...
- Page 131 Value Description +1.0Hz Raises the frequency by 1Hz -1.0Hz Lowers the frequency by 1Hz +10.0Hz Raises the frequency by 10Hz -10.0Hz Lowers the frequency by 10Hz +1.0KHz Raises the frequency by 1KHz -1.0KHz Lowers the frequency by 1KHz +10.0KHz Raises the frequency by 10KHz -10.0KHz Lowers the frequency by 10KHz Method 3: Input the frequency value using the virtual keyboard.
- Page 132 There are three methods to adjust the duty cycle ratio: Method 1: Tap the “+” and “-” buttons at the bottom of the screen in the Duty Cycle Setting. Figure 1-23 Sample Duty Cycle Setting Screen 1 Range Button Description Raises the duty cycle ratio by 1% 1% to 99% Lowers the duty cycle ratio by 1%...
- Page 133 Figure 1-24 Sample Duty Cycle Setting Screen 2 Value Description +1.0% Raises the duty cycle ratio by 1.0% -1.0% Lowers the duty cycle ratio by 1.0% +10.0% Raises the duty cycle ratio by 10% -10.0% Lowers the duty cycle ratio by 10% Method 3: Input the duty cycle ratio using the virtual keyboard.
-
Page 134: Troubleshooting
Figure 1-25 Sample Duty Cycle Setting Screen 3 1.3.6 Troubleshooting If the waveform generator cannot communicate with the MaxiSys Tablet: Check if the VCMI device is properly connected to the MaxiSys Tablet through the supplied USB cable. IMPORTANT To avoid damaging the vehicle and/or the equipment, all vehicle communications must be terminated before resetting the connection. - Page 135 Waveform Description Sample Waveform Type non-sinusoidal periodic Square waveform with the duty cycle Wave of 50% A special square waveform Square Wave (X+Y) with normal and missing teeth signals Triangle asymmetrical triangular Wave waveform...
- Page 136 1.4 OBDII CAN Bus Check The VCMI (Vehicle Communication and Measurement Interface) working with MaxiSys Ultra is designed with the OBDII CAN Bus Check function by checking the indicator light illumination status on the tablet screen. The indicator light flashes if the signals are detected.
- Page 137 1.4.2 General Introduction 1.4.2.1 Component Locations The main connectors are located at the bottom of the VCMI device. Ethernet Connector Vehicle Data Connector Input Channel A Input Channel B Input Channel C Input Channel D 1.4.3 Getting Started Before opening the OBDII CAN Bus Check application, you have to complete three steps below: Connect the VCMI device to the Tablet via Wi-Fi or the supplied USB.
- Page 138 Figure 1-1 Sample Connection Diagram To open the OBDII CAN Bus Check application Please refer to Figure 1-1 Sample Connection Diagram to complete the connection. Place the ignition in the key on position. Tap the Measurement icon on the Home screen of the MaxiSys Ultra Tablet. The Measurement screen opens.
- Page 139 Figure 1-2 Sample Help Screen Tap Update the APK in the dropdown menu. A confirmation message displays. Figure 1-3 Sample Update Confirmation Screen Tap OK to update the software or tap Cancel to exit. 1.4.5 Screen Layout and Operations The OBDII CAN Bus Check application allows you to select the communication protocols, the signal pins and voltage value for testing.
- Page 140 Tap the Measurement icon on the home screen and select OBD in the menu, the OBDII CAN Bus Check window displays. The screen typically includes the following button sections. NOTE The OBDII CAN Bus Check application can also be opened via the Android home screen.
- Page 141 Table 1-1 Upper Toolbar Buttons Name Button Description Displays the device connection status. See OBD Icon Button on page 141 for more information. Start or stop the device. See Start/Stop Button Start/Stop page 141 for more information. Set the communication protocol manually. See Settings Settings Menu on page 141 for more information.
- Page 142 Figure 1-5 Sample Settings Menu Screen 1 At the bottom of the settings menu screen, the Protocol, Reset, Save and Close buttons are displayed. The protocol varies according to the protocol you set. Take CAN protocol as an example. CAN-H: select the pin assigned for high speed CAN-bus communication line CAN-L: select the pin assigned for low speed CAN-bus communication line Reset: restore the default settings Save: save the changes when custom pin assignment is set...
- Page 143 Figure 1-6 Sample Settings Menu Screen 2 Tap the correct pin number in the OBDII Connector Assignment image to match the test vehicle’s actual communication signal pins. Figure 1-7 Sample Settings Menu Screen 3 Tap Save to save changes or tap Close to exit without saving. File Menu The File button allows you to print, open and save the waveform data.
- Page 144 Figure 1-8 Sample File Menu Screen Print – Tap to create and print a temporary PNG picture of the current waveforms. NOTE Ensure the tablet is configure to print (see Printer setup instructions) and is connected to the printer. Ensure the tablet and printer share the same network. Save Waveform –...
- Page 145 User Manual – displays instruction for the prosper use of the OBDII CAN Bus Check application and the Ultra tablet. Update the APK – connects to the Autel server and check for latest application software. About – displays the model number of the OBDII CAN Bus Check application and the installed versions of the software and firmware.
- Page 146 Figure 1-10 Sample Indicator Mode Screen Main View Section The CAN-High line is assigned to Pin 6 and the CAN-Low line is assigned to Pin 14 of the OBDII adapter by default according to the CAN-Bus standard protocol. If the test vehicle’s actual communication signal pins are assigned differently, you can select OBDII connector’s signal pins manually in the Settings Menu.
- Page 147 Figure 1-11 Sample Protocol Button Screen The following protocols are included: High Speed CAN - offers baud rates from 40 Kbit/s to 1 Mbit/sec, depending on cable length. This is the most popular standard for the physical layer, since it allows for simple cable connection between devices.
- Page 148 In the right lower corner of the screen, you can enter to the Waveform Mode by tapping the View Waveform button. Figure 1-12 Sample View Waveform Button Screen Test Procedure The test procedure is the same for all the protocols. ...
- Page 149 The screen is displayed in the Indicator mode by default. Tap the View Waveform button in the lower corner of the Indicator Mode screen to switch to the Waveform Mode. The screen is shown as below. Figure 1-13 Sample Waveform Mode Screen Main View Section The main view section features as a coordinate grid with X-axis and Y-axis, representing the time duration and voltage level respectively.
- Page 150 The zooming function allows you to change the size and position of a signal during or after capturing a waveform to examine. It does not change the stored data, only the way it displays. The X-axis and Y-axis can be zoomed using your fingertips. The waveform can be zoomed during or after capturing the signal.
- Page 151 The zero baseline is marked as the 0 value in the Y-axis, showing the base level of each channel waveform. After the channel is selected, the zero baseline can be adjusted by dragging the baseline marker up/down along the Y-axis, or dragging the waveform up/down or moving the screen up/down in the grid.
- Page 152 Name Button Description Tap to open the trigger setting menu. See Trigger Trigger on page 154 for more information. Tap the Previous or Next button to switch to Buffer the previous or the next waveform. See Buffer on page 158 for more information. Tap to select an appropriate time per Time Base division.
- Page 153 Figure 1-17 Sample Protocol Setting Screen Tap the X icon to close the dialog box. Communication Line The communication line selection varies according to the protocol selected. Tap the appropriate communication line at the bottom of the screen. Figure 1-18 Sample Communication Line Button Screen ...
- Page 154 To set the amplitude Tap the Amplitude button at the bottom of the screen. A dialog box displays. Figure 1-19 Sample Amplitude Button Screen Select the appropriate amplitude for the protocol. Figure 1-20 Sample Amplitude Setting Screen Tap the X icon to close the dialog box. ...
- Page 155 The trigger feature is used to stabilize repetitive waveforms to obtain clear signal characterization. The device is triggered when the signal crosses a threshold or meets set conditions. When the device is capturing the signal, tap the left column of the Trigger button to activate the trigger function.
- Page 156 Figure 1-22 Sample Trigger Settings Screen Trigger Mode Three trigger modes are available: None, Auto and Repeat. Figure 1-23 Sample Trigger Mode Screen The table below offers brief description of each trigger mode.
- Page 157 Table 1-3 Trigger Mode Table Trigger Mode Description The device can continuously capture data, without waiting for a None trigger event. The device will wait for a trigger before capturing data. It can Auto automatically update after a short period, even if the signal does not cross the trigger point.
- Page 158 Threshold The Threshold allows you to set the voltage threshold for the trigger. To precisely position the trigger point, input the value in the Threshold field in the trigger settings dialog box. To roughly position the trigger point, drag the trigger point to a desired position. ...
- Page 159 Name Button Description Shows which waveform currently being Buffer Index displayed and how many waveforms are in the buffer. Tap to display the next waveform in the buffer. Next Time Base The time base controls the time interval across the device display. Tap the Time Base button at the bottom to open the setting dialog box.
- Page 160 Continuous Mode: if the time base is set to more than or equal to 200ms/div, the device switches to the continuous mode. In this mode, the device updates the trace continuously as each capture progresses, rather than waiting for a complete capture before updating the trace.
- Page 161 vehicle, ship, or aircraft). Protocols include Controller Area Network (CAN), Local Interconnect Network (LIN) and others. CAN Bus A Controller Area Network (CAN bus) is a robust vehicle bus standard designed to allow microcontrollers and devices to communicate with each other in applications without a host computer.
- Page 162 OBD-II diagnostic connector The OBD-II DLC (post-1996 vehicles) is usually located under the instrument panel on the driver side, though there are several exceptions. The SAE J1962 specification provides for two standardized hardware interfaces, called type A and type B. Both are female, 9-pin (2x8), D-shaped connectors, and both have a groove between the two rows of pins.
Need help?
Do you have a question about the MaxiFlash VCMI and is the answer not in the manual?
Questions and answers