Table of Contents
Advertisement
Advertisement
Table of Contents

Related Manuals for Fagor CNC 8055 TC


Summary of Contents for Fagor CNC 8055 TC
- Page 1 8055 TC Self-teaching manual . 1010...
- Page 2 V2.9; linux-ftpd V0.17; ppp V2.4.0; utelnet V0.1.1. The librarygrx V2.4.4. The linux kernel V2.4.4. The linux boot ppcboot V1.1.3. If you would like to have a CD copy of this source code sent to you, send 10 Euros to Fagor Automation...
-
Page 3: Table Of Contents
Self-teaching manual I N D E X CHAPTER 1 THEORY ON CNC MACHINES. Machine axes......................7 Machine reference zero and part zero............... 8 Home search......................9 Travel limits......................10 Setting the part zero....................11 Work units........................ - Page 4 Self-teaching manual CHAPTER 6 CONVERSATIONAL PART PROGRAMS. What is a conversational part-program?..............91 Editing a part-program..................... 92 Modifying a part-program..................95 Simulating/executing an operation................99 Simulating/executing a part-program..............100 Simulating/executing a part-program starting with an operation......101 Copying a part-program into another one..............
-
Page 5: Theory On Cnc Machines
THEORY ON CNC MACHINES. How are the machine axes named?. What do machine reference zero and part zero mean?. What is "home search"?. What are travel limits?. How is a part zero preset?. Which are the work units?. Ways to work with the spindle. -
Page 7: Machine Axes
·TC· Option THEORY ON CNC MACHINES. 1.1 Machine axes. Z axis: Longitudinal axis of the machine. X axis: Cross axis of the machine. SELF-TEACHING MANUAL... -
Page 8: Machine Reference Zero And Part Zero
·TC· Option THEORY ON CNC MACHINES. 1.2 Machine reference zero and part zero. They are the references that the machine needs to work. Machine reference zero (O Part zero (O It is set by the manufacturer and it is the origin point of the axes. It is set by the operator. -
Page 9: Home Search
·TC· Option THEORY ON CNC MACHINES. 1.3 Home search. When the CNC is off, the axes may be moved manually or unintentionally. When that happens, the CNC loses the actual position of the axes, that's why it is recommended (although not necessary) to do a "home search" when the turning the CNC on. With this operation, the tool moves to a point set by the manufacturer and the CNC synchronizes its position assuming the coordinates set by the manufacturer for that point, referred to machine reference zero. -
Page 10: Travel Limits
·TC· Option THEORY ON CNC MACHINES. 1.4 Travel limits. This type of machines have two types of travel limits: • Physical limits. They are set by the machine to prevent the carriages from going off its ways (cams and mechanical stops). •... -
Page 11: Setting The Part Zero
·TC· Option THEORY ON CNC MACHINES. 1.5 Setting the part zero. The part zero is set on the Z axis. When machining several parts, the distance from machine Programming gets complicated when done from the reference zero (O ) to the part is different for each of them. machine reference zero (O ) and it is only good for that part It would require running a program for each part. -
Page 12: Work Units
·TC· Option THEORY ON CNC MACHINES. 1.6 Work units. Programming units. Programming units. Feedrate of the axes. The units are set by the manufacturer and may be The units are set by the manufacturer and may be The units are set by the manufacturer and may be: in mm or inches. -
Page 13: Spindle Speed
·TC· Option THEORY ON CNC MACHINES. 1.7 Spindle speed. There are two types of speeds; cutting (surface) speed and turning speed. • Cutting (surface) speed (V). The relationship between the two is: It is the linear speed of the contact points between the part and the tool. - Page 14 ·TC· Option THEORY ON CNC MACHINES. ABOUT CONSTANT SURFACE SPEED To work at constant surface speed (CSS), consider these two aspects. Part zero must be in the part rotation axis so that the calculated turning speed is the same as the best cutting speed. A maximum turning speed must be calculated because the turning speed increases as the diameter decreases and a certain speed should not be exceeded on part with a large diameter.
-
Page 15: Theory On Tools
THEORY ON TOOLS. How is the tool change managed?. What is the tool table and what data does it contain? What is tool calibration?. Defects due to errors in the tool table. -
Page 17: The Tool Change
·TC· Option THEORY ON TOOLS. 2.1 The tool change. The tools that the CNC can use are located in the tool holding turret. This turret may have either a manual tool changer or an automatic tool changer. • When the turret has manual tool change, it is done like on a conventional machine. •... -
Page 18: The Tool Table
·TC· Option THEORY ON TOOLS. 2.2 The tool table. This table keeps the data related to the tools. When changing a tool, the CNC assumes the data defined in the table for that tool. The data included in the table is: •... - Page 19 ·TC· Option THEORY ON TOOLS. • ·X· Tool length along the X axis (in radius). • ·A· Cutter angle. • ·Z· Tool length along the Z axis. • ·B· Cutter width. • ·C· Cutting angle. Turret reference. • ·I· Y axis wear offset. •...
- Page 20 ·TC· Option THEORY ON TOOLS. • ·F· Location code or the way the tool has been calibrated. Once the tool dimensions are known; The CNC must know the location code or calibration point of that tool in order to apply tool radius compensation.
- Page 21 ·TC· Option THEORY ON TOOLS. MOST USUAL TOOL LOCATION CODES (TOOL TYPES). SELF-TEACHING MANUAL...
- Page 22 ·TC· Option THEORY ON TOOLS. Self-teaching manual...
- Page 23 ·TC· Option THEORY ON TOOLS. MOST USUAL TOOL LOCATION CODES (TOOL TYPES). SELF-TEACHING MANUAL...
- Page 24 ·TC· Option THEORY ON TOOLS. Self-teaching manual...
-
Page 25: Tool Calibration
·TC· Option THEORY ON TOOLS. 2.3 Tool calibration. Tool calibration is the operation the CNC uses to define the dimensions of the tool. It is very important to carry out this operation properly so the parts are made with the right dimensions and so when changing the tool the CNC keeps controlling the same point. - Page 26 ·TC· Option THEORY ON TOOLS. DEFECTS DUE TO WRONG TOOL LENGTH CALIBRATION. Part to be machined. Tools. ·X1· Actual (real) length. Part with the right dimensions. ·Z1· Actual (real) length. ·X2· Wrong length. Part with the wrong dimensions. Wrong machining. Correct machining.
- Page 27 ·TC· Option THEORY ON TOOLS. DEFECTS DUE TO WRONG LOCATION CODE DEFINITION. To work with the theoretical tool tip, the CNC must know the calibration point Real tool tip. of that tool (location code) in order to be able to apply tool radius compensation.
- Page 28 ·TC· Option THEORY ON TOOLS. DEFECTS DUE TO WRONG TOOL RADIUS CALIBRATION. Actual radius. Wrong radius. Machining ridges. Actual radius. Wrong radius. The residual stock is due to the difference between the two radii. Self-teaching manual...
-
Page 29: Manual Practice
MANUAL PRACTICE. Description of the screen and the keyboard. How to do a home search. Working with the spindle. Ways to jog the axes (handwheels, continuous jog, incremental jog). Tools. -
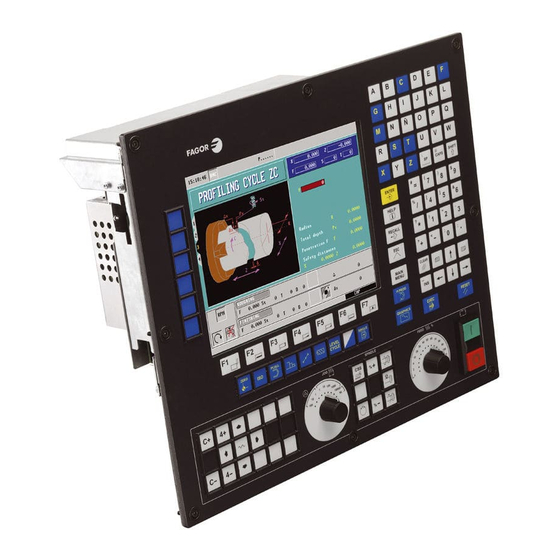
Page 31: Description Of The Screen And The Keyboard
·TC· Option MANUAL PRACTICE. 3.1 Description of the screen and the keyboard. On power-up, the CNC shows the following screen. If the CNC does not show this screen, the CNC may be in ·T· mode. To go into ·MC· mode, press the following keys. SELF-TEACHING MANUAL... -
Page 32: Keyboard Description
·TC· Option MANUAL PRACTICE. 3.1.1 Keyboard description. 1· Keys to define the machining operations. 2· Keys for external devices, live tool and spindle work mode (RPM/CSS). 3· Alphanumeric keys and command keys. 4· Operator panel. Operator panel description. Self-teaching manual... - Page 33 ·TC· Option MANUAL PRACTICE. Jog keyboard for manual movement of Selecting the turning direction of the spindle axes. and starting it. Percentage variation of the spindle speed. Percentage variation of the feedrate. [START] key. Work mode selector. [STOP] key. Continuous jog. Incremental jog.
-
Page 34: Description Of The Standard Screen
·TC· Option MANUAL PRACTICE. 3.1.2 Description of the standard screen. 1· Time, type of execution ("single block"/continuous), program number, execution status (in position, execution, interrupted or reset) and PLC messages. 2· CNC messages. 3· Tool position referred to the part zero and to home. Real spindle rpm. 4·... -
Page 35: Description Of The Auxiliary Screen
·TC· Option MANUAL PRACTICE. 3.1.3 Description of the auxiliary screen. 1· Time, type of execution ("single block"/continuous), program number, execution Changing the screen. status (in position, execution, interrupted or reset) and PLC messages. 2· CNC messages. 3· Blocks of the program currently selected. 4·... -
Page 36: Home Search
·TC· Option MANUAL PRACTICE. 3.2 Home search. After powering the machine up, it is recommended to home the axes just in case they have been moved while the machine was turned off. There are two ways to do a home search. Automatic home search. -
Page 37: Spindle
·TC· Option MANUAL PRACTICE. 3.3 Spindle. The spindle of a CNC machine can work in two modes. The constant surface speed mode is selected with the [CSS] key. • Working in RPM mode (revolutions per minute). • Working in CSS (constant surface speed) mode. In CSS mode, the turning speed changes depending on the position of the X axis. - Page 38 ·TC· Option MANUAL PRACTICE. Working in RPM mode (revolutions per minute). Working in CSS (constant surface speed) mode. To select the turning speed, press: To select the cutting (surface) speed, press: + Speed + + Cutting (surface) speed The CNC displays the following information. To select the maximum turning speed, press: + Cutting (surface) speed Selected speed.
-
Page 39: Speed Ranges (Gears)
·TC· Option MANUAL PRACTICE. 3.3.1 Speed ranges (gears). The machine may use a gear box. Use these gears to select the best motor torque for the programmed speed. It is recommended to always work at constant power to extend tool life. Power. -
Page 40: Jogging The Axes
·TC· Option MANUAL PRACTICE. 3.4 Jogging the axes. The axes may be jogged using the jog keyboard or handwheels. Each key can move an axis in one direction, It may have one, two or three handwheels. It follows according to the axes of the machine. the turning direction of the handwheel. -
Page 41: Handwheels
·TC· Option MANUAL PRACTICE. 3.4.1 Handwheels. • Use the selector switch to select the type of feed. Movement: 1 micron. (10) Movement: 10 microns. (100) Movement: 100 microns. • If the machine has 1 handwheel. Select an axis using the JOG keys. The machine moves the axis as the handwheel is being turned. •... -
Page 42: Jogging
·TC· Option MANUAL PRACTICE. 3.4.2 Jogging. Incremental jog. Continuous jog. Feedrate in millimeters per minute. Every time a jog key is pressed, the axes move the selected While a jog key is kept pressed, the axes move at the increment and at the programmed feedrate (in rapid if F=0). selected feedrate, considering the selected percentage (0% to 120%). - Page 43 ·TC· Option MANUAL PRACTICE. Continuous jog. Feedrate in millimeters per turn. • Spindle status. If the spindle is turning, the CNC moves the axes at the In this mode, the feedrate depends on the status of the selected feedrate. spindle (stopped or turning). If the spindle is stopped, but at the selected turning speed •...
-
Page 44: Moving An Axis To A Coordinate
·TC· Option MANUAL PRACTICE. 3.4.3 Moving an axis to a coordinate. The [START] key may be used to move an axis to a particular coordinate. Proceed as follows: On the standard screen, select the axis to be moved. Enter the target coordinate for the axis. Enter the target coordinate for the axis. -
Page 45: Tool Change
·TC· Option MANUAL PRACTICE. 3.5 Tool change. Machine with manual tool changer. Machine with automatic tool changer. The change is done like on a conventional machine. The CNC manages the tool change. 1· Change the tool on the machine. 1· Press the [T] key. 2·... -
Page 46: Tool Change Position
·TC· Option MANUAL PRACTICE. 3.5.1 Tool change position. The manufacturer may let the operator select a point where the tool change will take place. Tool change position referred to machine reference zero. Enter in X, and Z, the values of the point where the tool change will take place. + (X value) + (Z value). -
Page 47: Tool Calibration
·TC· Option MANUAL PRACTICE. 3.5.2 Tool calibration. • The machine must be homed before calibrating the tools. Homing the X axis. Homing the Z axis. Machine Ref. Machine Ref. Press: Press: • The calibration requires a smooth surface. Use continuous JOG or handwheels to mill the surface. SELF-TEACHING MANUAL... - Page 48 ·TC· Option MANUAL PRACTICE. • Go into tool calibration mode. The CNC shows the screen for tool calibration. Real position of the axes and cutting conditions. Work mode. Tool number and tool offset number, location code (shape) H e l p g r a p h i c s a n d p a r t...
- Page 49 ·TC· Option MANUAL PRACTICE. • Calibrate the tool as follows. 1· Measure the part. • Go to the window for tool calibration. • Enter the X value. • Enter the Z value. Part dimensions. 2· Start the spindle. 3· Select the tool to be calibrated. The CNC will assign the same offset number (D) to it. + (Tool number) 4·...
-
Page 50: How To Change Any Data Of The Tool Table
·TC· Option MANUAL PRACTICE. 3.5.3 How to change any data of the tool table. To change the tool data (T, D, A, B, C, R, location code, I, K) get into tool calibration mode and display the tool data. + (Tool number) The CNC shows the data for that tool. -
Page 51: Checking For Proper Calibration
·TC· Option MANUAL PRACTICE. 3.5.4 Checking for proper calibration. • Presetting the part zero. Select a tool; for example with location Approach the tool in Z. Withdraw the tool. The part zero is set. code 3. Press: • Start the spindle and touch the diameter of the part with several tools and check the value on the screen. Although the tools are different, the value on the screen must be the same. - Page 52 ·TC· Option MANUAL PRACTICE. Self-teaching manual...
-
Page 53: Operations Or Cycles
OPERATIONS OR CYCLES. Keys associated with automatic operations. Different work modes. Editing the parameters of an operation. Simulating an operation. Executing an operation. -
Page 55: Description Of The Screen And The Keyboard
·TC· Option OPERATIONS OR CYCLES. 4.1 Description of the screen and the keyboard. Position of the automatic function keys. SELF-TEACHING MANUAL... - Page 56 ·TC· Option OPERATIONS OR CYCLES. Operation keys. Grooving cycle. Threading cycle. Rounding cycle. Taper turning cycle. Facing cycle. Turning cycle. Positioning cycle. Drilling and tapping cycles. Profiling cycle. Selecting the cycle level. Self-teaching manual...
-
Page 57: Work Modes
·TC· Option OPERATIONS OR CYCLES. 4.2 Work modes. There are two work modes. Editing mode. Execution mode. Editing the parameters of the operation or Simulating an operation or cycle. cycle. Simulating an operation or cycle. Executing an operation or cycle. SELF-TEACHING MANUAL... -
Page 58: Operations Or Cycles
·TC· Option OPERATIONS OR CYCLES. 4.3 Operations or cycles. All the cycles have several editing levels. Each level has its own screen and the main window of the cycle indicates, with tabs, the available levels and which one is selected. To change levels, use the [LEVEL CYCLE] key or the [page up] and [page down] keys to scroll up and down through the various levels. -
Page 59: Editing An Operation Or Cycle
·TC· Option OPERATIONS OR CYCLES. 4.3.1 Editing an operation or cycle. As an example, select the taper turning cycle. Real position of the axes and Work cycle. cutting conditions. Help graphics. Defining the geometry of the cycle. M a c h i n i n g c o n d i t i o n s fo r roughing. - Page 60 ·TC· Option OPERATIONS OR CYCLES. DEFINING THE DATA OF THE OPERATION OR CYCLE. To select an icon, data or coordinate: Move the cursor through the data or icons. The CNC selects the first coordinate for that axis. Pressing it again selects the second coordinate. The CNC selects the roughing feedrate.
- Page 61 ·TC· Option OPERATIONS OR CYCLES. The icons show the following data: When selecting an icon, the CNC shows its meaning at the bottom of the screen. • Type of taper. Outside taper. Inside taper. • Type of section before and after the taper. SELF-TEACHING MANUAL...
- Page 62 ·TC· Option OPERATIONS OR CYCLES. • Work quadrant. This icon indicates the type of corner to be machined. • Machining direction. Self-teaching manual...
-
Page 63: Simulating An Operation Or Cycle
·TC· Option OPERATIONS OR CYCLES. 4.3.2 Simulating an operation or cycle. Simulation may be used to check the tool paths on the screen. The CNC shows the graphic simulation window and its associated softkey menu. To access the various functions, use the keys [F1] through [F7]. - Page 64 ·TC· Option OPERATIONS OR CYCLES. GRAPHIC OPTIONS. TYPE OF GRAPHIC. • "3D" graphics. It uses color lines to draw the tool path. When selecting this type of graphics, the screen only shows half of the part. This is because it only shows the path of the tool tip (not the part itself). To later check the part dimensions later on the simulation screen, it must be done with a tool whose tip (nose) radius R=0.
- Page 65 ·TC· Option OPERATIONS OR CYCLES. GRAPHIC OPTIONS. DISPLAY AREA. With this option it is possible to define the display area by defining the maximum and minimum values for each axis. Selecting the coordinates. Validating the new values. GRAPHIC OPTIONS. ZOOM. It may be used to enlarge or shrink the drawing or part of it.
- Page 66 ·TC· Option OPERATIONS OR CYCLES. GRAPHIC OPTIONS. GRAPHIC PARAMETERS. Simulation speed: To select the percentage of simulation speed to apply. Tool path colors: To change the colors of the tool paths in XZ graphics. Colors of the solid graphics: To change the colors of the tool and the part in "Solid" graphics. GRAPHIC OPTIONS.
-
Page 67: Executing An Operation Or Cycle
·TC· Option OPERATIONS OR CYCLES. 4.3.3 Executing an operation or cycle. Once all the data has been defined, press [ESC]. The CNC screen shows the "cycle start" symbol indicating that the operation may be executed. This key may be used to choose whether the operations may be executed from beginning to end or one pass at a time. It starts the execution of the operation or cycle. - Page 68 ·TC· Option OPERATIONS OR CYCLES. TOOL INSPECTION. With this option, it is possible to interrupt the execution of an operation to inspect the tool, change its wear, replace it, etc. • Interrupt the execution. • Depending on the manufacturer, accessing tool inspection on some machines may require pressing also the [T] key. •...
- Page 69 ·TC· Option OPERATIONS OR CYCLES. MODIFYING TOOL WEAR. This option may be used to change the I, K values. The values entered are incremental and are added to the ones stored earlier. This option may be executed during tool inspection or while the machine is running. •...
- Page 70 ·TC· Option OPERATIONS OR CYCLES. Self-teaching manual...
-
Page 71: Summary Of Work Cycles
SUMMARY OF WORK CYCLES. -
Page 73: Positioning Cycle
·TC· Option SUMMARY OF WORK CYCLES. 5.1 Positioning cycle. At this cycle level, it is possible to define the auxiliary functions that will be executed before or after the movement. SELF-TEACHING MANUAL... -
Page 74: Turning Cycle
·TC· Option SUMMARY OF WORK CYCLES. 5.2 Turning cycle. Self-teaching manual... -
Page 75: Facing Cycle
·TC· Option SUMMARY OF WORK CYCLES. 5.3 Facing cycle. SELF-TEACHING MANUAL... -
Page 76: Taper Turning Cycle
·TC· Option SUMMARY OF WORK CYCLES. 5.4 Taper turning cycle. In this level, it is necessary to define the coordinates of the In this level, it is necessary to define the coordinates of the starting theoretical corner, the angle of the taper and the final diameter. and final points. - Page 77 ·TC· Option SUMMARY OF WORK CYCLES. In this level, it is necessary to define the coordinates of the theoretical corner, the angle of the taper and the distance in Z. SELF-TEACHING MANUAL...
-
Page 78: Rounding Cycle
·TC· Option SUMMARY OF WORK CYCLES. 5.5 Rounding cycle. In this level, it is necessary to define the coordinates of the theoretical In this level, it is necessary to define the coordinates of the starting corner and the rounding radius. and final points and the rounding radius. -
Page 79: Threading Cycle
·TC· Option SUMMARY OF WORK CYCLES. 5.6 Threading cycle. Longitudinal threadcutting. Taper thread. SELF-TEACHING MANUAL... - Page 80 ·TC· Option SUMMARY OF WORK CYCLES. Face tapping. Thread repair. This level is only available when using spindle orientation. Self-teaching manual...
- Page 81 ·TC· Option SUMMARY OF WORK CYCLES. Threads with several entries. This level is only available when using spindle orientation. SELF-TEACHING MANUAL...
-
Page 82: Grooving Cycle
·TC· Option SUMMARY OF WORK CYCLES. 5.7 Grooving cycle. Grooving on the cylindrical side. Face grooving. Self-teaching manual... - Page 83 ·TC· Option SUMMARY OF WORK CYCLES. Grooving on the cylindrical side with incline walls. Grooving on the face with incline walls. SELF-TEACHING MANUAL...
- Page 84 ·TC· Option SUMMARY OF WORK CYCLES. Cut-off. Self-teaching manual...
-
Page 85: Drilling And Tapping Cycles
·TC· Option SUMMARY OF WORK CYCLES. 5.8 Drilling and tapping cycles. Drilling cycle. Tapping cycle. NOTE: When having an orienting spindle, it will also show the cycles described in appendix A. SELF-TEACHING MANUAL... -
Page 86: Profiling Cycle
·TC· Option SUMMARY OF WORK CYCLES. 5.9 Profiling cycle. In this level, it is necessary to define all the points of the profile. In this level, the profile is defined in a part-program. Self-teaching manual... - Page 87 ·TC· Option SUMMARY OF WORK CYCLES. ZC profile. XC profile. This level is only available when using the C axis. This level is only available when using the C axis. SELF-TEACHING MANUAL...
- Page 88 ·TC· Option SUMMARY OF WORK CYCLES. Self-teaching manual...
-
Page 89: Conversational Part Programs
CONVERSATIONAL PART PROGRAMS. What is a conversational part-program?. How to edit a conversational part-program. How to modify a conversational part-program (insert or delete operations). Simulating/executing an operation. Simulating/executing a part-program starting with an operation. Simulating/executing a part-program. Copying a part-program. Deleting a new part program. -
Page 91: What Is A Conversational Part-Program
·TC· Option CONVERSATIONAL PART PROGRAMS. 6.1 What is a conversational part-program? A conversational part-program consists in a set of operations ordered sequentially. Each operation is defined separately and they are then saved one after another in a program. The name of the part-program may be a number between 1 and 899999. Profiling cycle 1. -
Page 92: Editing A Part-Program
·TC· Option CONVERSATIONAL PART PROGRAMS. 6.2 Editing a part-program. To edit the part-program, first select the operations required to execute the part and the order (sequence) in which they will be executed. A part may be executed in different ways. Turning cycle. - Page 93 ·TC· Option CONVERSATIONAL PART PROGRAMS. STANDARD SCREEN PART - PROGRAMS CYCLES PART - PROGRAMS CYCLES - - CREATING A NEW PART - - - - CREATING A NEW PART - - 111 - THREADED AXIS 111 - THREADED AXIS 122 - TAPER AXIS 122 - TAPER AXIS 333 - 333 -...
- Page 94 ·TC· Option CONVERSATIONAL PART PROGRAMS. PART - PROGRAMS CYCLES PART - PROGRAMS CYCLES - - CREATING A NEW PART - - - - CREATING A NEW PART - - 1 - TAPER TURNING CYCLE 1 Select an operation and define i t s p a ra m e t e r s.
-
Page 95: Modifying A Part-Program
·TC· Option CONVERSATIONAL PART PROGRAMS. 6.3 Modifying a part-program. Replacing an operation. PART - PROGRAMS CYCLES 1 - TAPER TURNING CYCLE 1 - - CREATING A NEW PART - - The CNC shows the operation 2 - ROUNDING CYCLE 1 with all the data. - Page 96 ·TC· Option CONVERSATIONAL PART PROGRAMS. New operations can also be inserted into a part-program. Inserting an operation. PART - PROGRAMS CYCLES 1 - TAPER TURNING CYCLE 1 - - CREATING A NEW PART - - Define the parameters of the 2 - ROUNDING CYCLE 1 Select an operation.
- Page 97 ·TC· Option CONVERSATIONAL PART PROGRAMS. Operations can also be deleted from a part-program. To delete an operation. PART - PROGRAMS CYCLES 1 - TAPER TURNING CYCLE 1 Select the operation and press - - CREATING A NEW PART - - T h e C N C w i l l...
- Page 98 ·TC· Option CONVERSATIONAL PART PROGRAMS. The position of an operation can also be changed. Changing the position of an operation. Select the operation to be Select the new position for the PART - PROGRAMS CYCLES relocated and press the two- operation and press [ENTER].
-
Page 99: Simulating/Executing An Operation
·TC· Option CONVERSATIONAL PART PROGRAMS. 6.4 Simulating/executing an operation. Select the operation to be simulated and press [ENTER]. PART - PROGRAMS CYCLES 1 - TAPER TURNING CYCLE 1 - - CREATING A NEW PART - - 2 - ROUNDING CYCLE 1 Graphic screen. -
Page 100: Simulating/Executing A Part-Program
·TC· Option CONVERSATIONAL PART PROGRAMS. 6.5 Simulating/executing a part-program. Select the part-program to be simulated and press [GRAPHICS]. PART - PROGRAMS CYCLES 1 - TAPER TURNING CYCLE 1 - - CREATING A NEW PART - - 2 - ROUNDING CYCLE 1 Graphic screen. -
Page 101: Simulating/Executing A Part-Program Starting With An Operation
·TC· Option CONVERSATIONAL PART PROGRAMS. 6.6 Simulating/executing a part-program starting with an operation. Select the first operation to start simulating and press [GRAPHICS]. PART - PROGRAMS CYCLES 1 - TAPER TURNING CYCLE 1 - - CREATING A NEW PART - - 2 - ROUNDING CYCLE 1 Graphic screen. -
Page 102: Copying A Part-Program Into Another One
·TC· Option CONVERSATIONAL PART PROGRAMS. 6.7 Copying a part-program into another one. PART - PROGRAMS CYCLES PART - PROGRAMS CYCLES 1 - TAPER TURNING CYCLE 1 - - CREATING A NEW PART - - 1 - TAPER TURNING CYCLE 1 - - CREATING A NEW PART - - 2 - ROUNDING CYCLE 1 2 - ROUNDING CYCLE 1... -
Page 103: Deleting A New Part Program
·TC· Option CONVERSATIONAL PART PROGRAMS. 6.8 Deleting a new part program. PART - PROGRAMS CYCLES 1 - TAPER TURNING CYCLE 1 - - CREATING A NEW PART - - T h e C N C w i l l r e q u e s t 2 - ROUNDING CYCLE 1 confirmation. - Page 104 ·TC· Option CONVERSATIONAL PART PROGRAMS. Self-teaching manual...
-
Page 105: Other Lathe Type Machining Operations
OTHER LATHE TYPE MACHINING OPERATIONS. Orienting spindle and live tool. Multiple drilling. Multiple tapping. Slot milling. -
Page 107: Introduction
·TC· Option A.1 Introduction For these machining operations, the machine must have an orienting spindle and a live tool. If the machine has these features, the CNC will show the options for "multiple drilling" and "slot milling" when accessing the drilling cycle. Multiple drilling. -
Page 108: Orienting Spindle And Live Tool
·TC· Option A.2 Orienting spindle and live tool. With this feature, it is possible to orient the spindle at the desired angular position to make holes and slots on the cylindrical side of the part or on its face. Orienting spindle. Live tool. -
Page 109: Multiple Drilling
·TC· Option A.3 Multiple drilling. Multiple drilling on the cylindrical side of the part. Multiple drilling on the face of the part. SELF-TEACHING MANUAL... -
Page 110: Multiple Tapping
·TC· Option A.4 Multiple tapping. Multiple tapping on the cylindrical side of the part. Multiple tapping on the face of the part. Self-teaching manual... -
Page 111: Slots
·TC· Option A.5 Slots. Slots on the cylindrical side of the part. Slots on the face of the part. SELF-TEACHING MANUAL... - Page 112 ·TC· Option Self-teaching manual...
Need help?
Do you have a question about the CNC 8055 TC and is the answer not in the manual?
Questions and answers