
Related Manuals for Unify OpenScape SL5


Summary of Contents for Unify OpenScape SL5
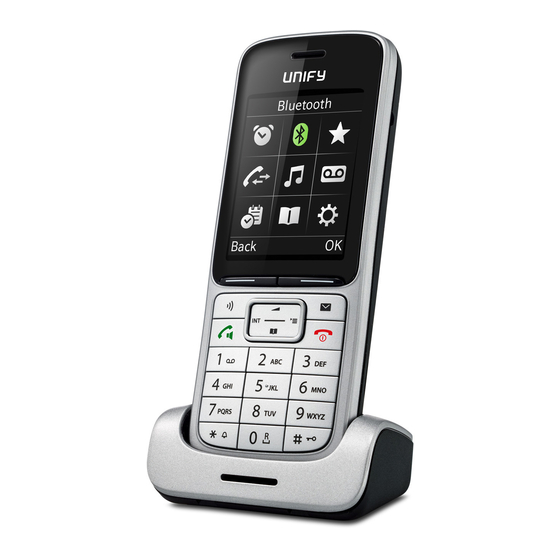
- Page 1 OpenScape DECT Phone SL5 on HiPath Cordless Office User Manual A31003-D1000-U106-1-7619...
- Page 2 Our Quality and Environmental Management Systems are implemented according to the requirements of the ISO9001 and ISO14001 standards and are certified by an external certification company. © Unify Software and Solutions GmbH & Co. KG 12/2015 Mies-van-der-Rohe-Str. 6, 80807 Munich/Germany All rights reserved. Reference No.: A31003-D1000-U106-1-7619...
-
Page 3: Table Of Contents
Contents Contents Overview ......... . 7 Using the user guide effectively . - Page 4 Contents Protecting against unwanted calls ..... . 25 Time control for external calls ..........25 Switching off the ringtone when in the charging cradle.
- Page 5 Contents Display icons ........42 Menu overview.
- Page 6 Contents Answering a message or voicemail message ........77 More features.
-
Page 7: Overview
Overview Overview 1 Display 2 Status bar ( S. 42) Icons display current settings and operating status of the phone 3 Display keys ( S. 13) 4 Message key ( S. 20) Access to calls and message lists; Flashes: new message or new call 5 End call key, On/Off key End call;... -
Page 8: Using The User Guide Effectively
Using the user guide effectively Using the user guide effectively The features described in this user guide depend on how your handset is configured and the communication platform. Deviations to the range of functions described are therefore possible. Icons Warnings that if not heeded can result in injury to persons or damage to devices. Important information regarding operation and proper handling or in relation to features that may incur costs. -
Page 9: Safety Notes
Safety notes Safety notes Be sure to read this user guide and the safety precautions before using your telephone. Explain their content and the potential hazards associated with using the device to your children. The device cannot be used in the event of a power failure. It is not possible either to make emer- gency calls. -
Page 10: Getting Started
Getting started Getting started Contents of the package • One handset, • One battery cover (rear cover of handset), • One battery, • One belt clip, • One user guide. Installing the charging cradle The charging cradle is designed for operation in closed, dry rooms within a temperature range of +5 °C to +45 °C. -
Page 11: Starting Up The Telephone
Getting started Re-opening the battery cover ¤ ¤ Remove the belt clip (if attached). To change the battery, insert your fin- ¤ gernail into the notch in the casing and Insert your fingernail into the notch at the bot- pull the battery upwards tom of the casing and pull the battery cover upwards Charging the batteries... -
Page 12: Setting The Date And Time
¤ Connect a headset with a 2.5 mm jack to the left side of the handset You will find headset recommendations on the product page at wiki.unify.com/ wiki/OpenScape_DECT_Phone_SL5. The headset volume corresponds to the setting for the earpiece volume ( S. -
Page 13: Getting To Know Your Telephone
Getting to know your telephone Getting to know your telephone Switching the handset on/off ¤ Switch on: When the handset is switched off, press the End call key and hold ¤ Switch off: When the telephone is in idle status, press the End call key and hold Locking/unlocking the keypad The keypad lock prevents any accidental use of the telephone. -
Page 14: Entering Text
Getting to know your telephone Main menu In idle status: press the center of the control key . . . select the Example submenu using the control key Audio Settings The main menu functions are shown in the display as icons. The icon for the selected function is highlighted in color and the name of the associ- ated function appears in the display header. - Page 15 Making calls Making calls Making calls ¤ . . . use to enter a number press the Talk key briefly ¤ Press the Talk key and hold . . . use to enter a number The connection is established using the send line configured for the handset. Cancel dialing: Press the End call key When the display backlight is disabled, the display lights up again the next time any key is...
-
Page 16: Incoming Calls
Making calls Dialing from a call list The call lists ( S. 20) contain the last answered, outgoing and missed calls (assuming this is configured in the telephone system, consult your administrator). ¤ . . . use to select Call Lists . -
Page 17: Adjusting The Microphone Sensitivity
Making calls During calls Handsfree mode Activating/deactivating handsfree mode during a call and when establishing a connection: Activating/deactivating handsfree mode during a call, when establishing a connection and when listening to the answering machine: ¤ Press the Talk/handsfree key Placing the handset in the charging cradle during a call: ¤... - Page 18 Making calls...
-
Page 19: Message Lists
Message lists Message lists Notifications of missed calls, messages on the network mailbox and missed appointments are saved in the message lists. An advisory tone sounds as soon as a new message arrives. The message key Example also flashes. Icons for the message type and the number of new mes- sages are displayed in idle mode. -
Page 20: Call Lists
Call lists Call lists The phone saves a number of different call types (missed, accepted and outgoing calls) in lists (assuming they are set up in the telephone system, consult your administrator). Activating/deactivating the local call lists ¤ . . . then to . . . ¤... -
Page 21: Handset Directory
Handset directory Handset directory The local directory is unique to the handset. Opening the directory ¤ Press briefly in idle status ¤ to select . . . use Directory Directory entries Number of entries: up to 500 Information: First name and surname, up to three telephone numbers, e-mail address, anniver- sary with alert, VIP ringtone with VIP icon, , CLIP picture Length of the entries: Numbers: max. -
Page 22: Vcard
The Gigaset QuickSync program has been installed on the computer. The handset is connected to the computer via Bluetooth or via a USB data cable. Free to download at wiki.unify.com/wiki/OpenScape_DECT_Phone_SL5 vCard Copying a vCard using Bluetooth Copy directory entries in vCard format, for example to exchange entries with a mobile phone. -
Page 23: Acoustic Profile
Acoustic profile Acoustic profile The phone has three acoustic profiles for adapting the handset to the environmental conditions: Profile Loud, Profile Silent, Profile Personal ¤ Press the key briefly in idle mode to switch between the profiles. The profile is switched immedi- ately without prompting. -
Page 24: Notification Of Appointments/Anniversaries
Alarm clock ¤ . . . use to select Date, Time, Text and Signal in succession . . . adjust the value in each case with Save ¤ Save appointment: Save If an appointment has already been entered: <New Entry> . -
Page 25: Alarm
Protecting against unwanted calls ¤ Set days: Occurrence . . . use to switch between Monday-Friday and Daily ¤ Set volume: Volume . . . use to set the volume in 5 increments or select cre- scendo (increasing volume) ¤ Set alarm: Melody . -
Page 26: Resource Directory
Resource Directory Resource Directory Sounds for ringtones and images that can be used as caller images (CLIP pictures) or as screensavers are saved in the handset's resource directory. A range of monophonic and polyphonic sounds and pictures have been pre-set but further images and sounds can be downloaded using a PC ( Gigaset QuickSync). - Page 27 Bluetooth To use the phone numbers, dialing codes (international and local area code) must be saved to the tele- phone. Operating Bluetooth devices User guides for devices Activating/deactivating Bluetooth mode ¤ . . . use to select Bluetooth Activation Change ( = activated) If the local area code is still not saved: .
-
Page 28: Additional Functions Using The Pc Interface
Additional functions using the PC interface Changing the Bluetooth name of the handset The handset is shown by this name on another Bluetooth device. ¤ . . . use to select Bluetooth Own Device OK . . . the name and the device address are shown Change . - Page 29 Additional functions using the PC interface ¤ Carry out the firmware update again as described above If the update procedure fails several times or you can no longer connect to the PC, consult your administrator:...
-
Page 30: Adjusting The Handset Settings
Adjusting the handset settings Adjusting the handset settings Display and keypad Screensaver A dialog or analog clock, Info Services and a range of pictures can be selected to be displayed as a screen- saver when in idle status. ¤ to select . -
Page 31: Activating/Deactivating Automatic Call Answering
Adjusting the handset settings Display backlight The display backlight always illuminates when the handset is taken out of the base station/charging cradle or a key is pressed. Any digit keys that are pressed appear on the display for pre-dialing. Switch the display backlight on/off when in idle status: ¤... -
Page 32: Adjusting The Microphone Sensitivity
Adjusting the handset settings Adjusting the microphone sensitivity The microphone sensitivity can be adjusted in four increments in order to Microphone ensure better acoustics in loud environments and in case of echo. ¤ Press and hold the to adjust the microphone sensitivity Save Sensitivity:... - Page 33 Adjusting the handset settings Confirmation/error tone after making entries, advisory tone when a new message has been received: ¤ Confirmation . . . use to select On or Off Warning tone when there are fewer than 10 minutes of talktime remaining (every 60 sec- onds): ¤...
-
Page 34: Assigning A Number To Digit Keys (Quick Dial)
Adjusting the handset settings Fast access to numbers and functions Number keys: The keys can each be assigned a number from the directory. Display keys: The left and right display keys have a function preset by default, but the keys can be re- assigned. -
Page 35: Own Area Code
Adjusting the handset settings Changing the handset PIN The handset is PIN-protected to prevent unauthorized use (default setting: 0000). The PIN is requested each time you turn on the handset, assuming it has been changed and does not correspond to the default state 0000. -
Page 36: Extending The Handset
Extending the handset Extending the handset Registering a handset to multiple base stations The handset can be registered to up to four base stations. The active base station is the base station to which the handset was last registered. The other base stations remain saved in the list of available base sta- tions. -
Page 37: Network Mailbox
Network mailbox Network mailbox Activating and deactivating the network mailbox Every handset can manage the network mailboxes belonging to one of its receiving lines. ¤ . . . use to select the Answer Machine Network Mailbox . . . use if appropriate to select the connection OK . -
Page 38: Questions And Answers
Manufacturer's advice Authorization We, Unify Software and Solutions GmbH & Co. KG, declare that this device meets the essential requirements and other rele ulations laid down in Directive 1999/5/EC. The EU declaration of conformity under 1999/5/EC can be found at:... -
Page 39: Protecting Our Environment
Manufacturer's advice Protecting our environment Disposal Batteries should not be disposed of in general household waste. Observe the local waste disposal regulations, details of which can be obtained from your local authority. Dispose of batteries in the green boxes designated as "common collec- tion system for batteries"... -
Page 40: Technical Data
Technical data Technical data Batteries Technology: Lithium ion (Li-Ion) Voltage: 3.7 V Capacity: 750 mAh Handset operating times/charging times The operating time of your handset depends on the capacity and age of the battery and the way it is used. (All times are maximum possible times). -
Page 41: Central Europe
Technical data Central Europe 9x 10x ¤ Press the relevant key the indi- ą ä á â ć ç cated number of times. ď ę ë é ě í î ł ń ň ó ö ő ô ř ß ś š... -
Page 42: Display Icons
Display icons Display icons The following icons are displayed dependent on the settings and the operating status of your telephone. Icons in the status bar Signal strength 1 % -100 % white if Maximum Range is on; green if Maximum Range is off Red: no connection to the base station white if Maximum Range is on;... - Page 43 Display icons Action complete (green) Action failed (red) Information (Confirmation) prompt Please wait...
-
Page 44: Menu Overview
Menu overview Menu overview Not all of the functions described in this user guide are available in all countries or from all net- work providers. Open the main menu: press this key when the handset is in idle mode Audio Settings Handset Volume p. - Page 45 Menu overview Settings Date/Time p. 12 Display & Keypad Screensaver p. 30 Large Font p. 30 Colour Schemes p. 30 Display Backlight p. 31 Key Illumination p. 31 Auto Keypadlock p. 31 Language p. 11 Registration Register Handset p. 36 Select Base p.
-
Page 46: System Functions
System functions System functions The system functions can be called up via the menu or directly by entering codes. Calling functions via the menu Using the Service menu The Service menu can be used both by means of the control key and the display keys. -
Page 47: Calling Functions Via Codes
System functions Calling functions via codes Press and hold down the Talk key. Either: Enter code according to table page 48. Enter code according to table page 48. then: Press the End call key to end the operation. -
Page 48: Functions And Codes
System functions Functions and codes Note: The following functions and codes are standard on the HiPath 3000 / OpenScape Business. However, they could also be changed in your sys- tem. Please consult your system administrator. Functions Codes * 490 Automatic call wait.term.on # 490 Automatic call wait.trm.off * 87... - Page 49 System functions Functions Codes Park: * 56 - Parking a call # 56 - Retrieve call * 60 Account code * 58 Callback # 58 View callbacks * 86 Suppress phone number * 41 Temporary phone number (MSN) # 86 Restore phone number * 81 Ringing group on...
-
Page 50: Making Calls To Multiple Parties
Making calls to multiple parties Making calls to multiple parties Consultation You interrupt your call to consult with a user (including external users) and then resume the original call. You are conducting a call. Activating and conducting an inquiry/consultation call S or Activate inquiry. -
Page 51: Call Waiting
Making calls to multiple parties Call waiting You need to speak to a user in your communications system urgently, even though this user's line is busy. You can send a call waiting signal during the call to let the user know you want to talk to him or her. The user either answers im- mediately or you will be automatically connected when he or she has finished his call. -
Page 52: Call Waiting Tone Off/On
Making calls to multiple parties Call waiting tone off/on You can suppress the call waiting tone for external calls. Deactivating the call waiting tone Press and hold down the Talk key. Open the system menu. Menu Waiting tone off? Select the menu item and confirm. Press the End call key to end the operation. -
Page 53: Disabling/Enabling Automatic Call Waiting
Making calls to multiple parties Disabling/enabling automatic call waiting You can disable/ enable automatic call waiting signaling for a second call during a telephone conversation. Note: This function is only available if call waiting is activated for you in the sys- tem (consult your administrator). -
Page 54: Override
Making calls to multiple parties Override You need to speak to an internal user urgently, even though his or her line is busy. The "Override" function allows you to interrupt the ongoing call to pass on a message. This function is only available when the code has been input and if it has been configured by the service engineer. -
Page 55: Transferring A Call
Making calls to multiple parties Transferring a call Transferring a call means that you wish to hand over a call you are conducting on your handset to another user. Transfer (without announcing the transfer) You can use this function to forward a call you answered to another user. Open the system menu. -
Page 56: Toggling (Switching Between Calls)
Making calls to multiple parties Transfer (announcing the transfer) You can use this function to forward a call you answered to another user. Open the system menu. Menu Start transfer? Select the menu item and confirm. Press the key shown. The current call is placed "on hold", so that the first user waits. -
Page 57: Conducting A Conference
Making calls to multiple parties Conducting a conference You can connect up to 5 internal or external partners with each other in a tele- phone conference. You can include up to 4 external users in the conference. For information purposes, you will hear an alerting tone every 30 seconds during a conference call (can be disabled - ask your service engineer). -
Page 58: Leaving A Conference
Making calls to multiple parties Ending a conference You are connected with two or more partners in a conference call. Open the system menu. Menu End conference? Select the menu item and confirm. The conference is ended. Leaving a conference Press the End call key. -
Page 59: Using The Second Call Feature
Making calls to multiple parties Connecting parties As the conference convener, you can leave the conference and thereby connect the other parties with each other. If you were previously connected with two or more parties, the other parties remain in a conference. Otherwise, the remaining two users conduct a one-to-one call. -
Page 60: Central Directories (Group Directory)
Central directories (group directory) Central directories (group directory) System phonebook If the system administrator has entered a name for at least one internal user or system speed dialing destination, then you can use the system phonebook for dialing. Opening the system phonebook Press and hold down the Talk key. -
Page 61: Telephone Database (Ldap)
Central directories (group directory) Telephone database (LDAP) If your company has an LDAP telephone database and access to it is configured in your communications system, you can query it with your handset. This LDAP telephone database can contain far more entries than the phonebook on your communications system or your handset. - Page 62 Central directories (group directory) Selecting an entry Either: If a single entry is found, it is displayed. Select the menu item and confirm. The user is called. Call? If more than one entry is found, the first entry is displayed. A maximum of 50 hits can be displayed.
- Page 63 Central directories (group directory) Sending a list/entry Open the phonebook. Select the entry you want. Press the display key. Options Either: Select the menu item and confirm. Copy All Select the menu item and confirm. Copy Entry Either: Select the menu item and confirm. to Internal Select the menu item and confirm.
-
Page 64: System Speed Dialing
Central directories (group directory) Deleting a list or entry in the communication system Prerequisite: A currently unused list or entry is saved on the communications system. If the handset with phone number 00 was used to send the list or entry to the communications system, any handset can be used to delete this list or entry. -
Page 65: System Speed Dialing, Individual
Central directories (group directory) Dialing a system speed dialing destination with suffix-dialing or a DID number System speed dialing destinations can be saved in your communications sys- tem and then dialed by means of suffix-dialing or DDIA. These speed dialing destinations let you enter an additional suffix-dialing or DID number up to five seconds after entering the three-digit service code. - Page 66 Central directories (group directory) Dialing an individual speed dialing destination Press and hold down the Talk key. Open the system menu. Menu Service? Select the menu item and confirm. 7=Use speed Select the menu item and confirm. dialing? Abb. dial no: Enter the code for the speed dialing destination (*0 - *9).
-
Page 67: Team Functions
Team functions Team functions Activating/deactivating group calls If this has been configured by the service engineer, you belong to one or more groups of internal users that can be reached at a hunt group or group call phone number. Calls are signaled on all telephones in the group either in succession (=hunt group) or simultaneously (=group call), until a member of the group an- swers the call. - Page 68 Team functions You belong to multiple groups Leaving and re-joining individual groups Press and hold down the Talk key. Open the system menu. Menu Either: Leave hunt group? Select the menu item and confirm. Select the menu item and confirm. Join hunt group? then: >...
-
Page 69: Group Ringing
Team functions Group ringing You can have calls to your handset signaled acoustically on up to five other telephones. The call is received by the person who answers the call first. Adding users to a group First user Press and hold down the Talk key. Open the system menu. -
Page 70: Ucd (Universal Call Distribution)
Team functions UCD (Universal Call Distribution) This function enables calls to be distributed in a team. An incoming call is always delivered to the team member who has been idle longest. Team members can also work in separate rooms, for example, on the company's premises and at a teleworking station. - Page 71 Team functions Logging on (available) Press and hold down the Talk key. Open the system menu. Menu Service? Select the menu item and confirm. Select the menu item and confirm. UCD Menu? 402=Available? Select the menu item and confirm. Press the End call key to end the operation. Wrap-up time If you need more time than the actual call lasts, you can request/activate a wrap- up time for the last call.
- Page 72 Team functions UCD night service UCD night service is a separate night service for call distribution. It is not affect- ed by the system night service. All incoming calls are forwarded to a special call distribution destination. Night destination on Press and hold down the Talk key.
-
Page 73: Mulap Group (Multiple Line Application)
Team functions Mulap group (Multiple Line Application) If your handset's line belongs to a Mulap group (Multiple Line Application), then you can • answer calls for the group (press the Talk key in group calls) • make external telephone calls under the group phone number (the group phone num- ber is stored in the called party's caller list, for example) •... - Page 74 Team functions Forwarding on Press and hold down the Talk key. Open the system menu. Menu Service? Select the menu item and confirm. 501=Forward Line: ON? Select the menu item and confirm. Enter the trunk number. Either: Select the menu item and confirm. 1=all calls? 2=external calls only? Select the menu item and confirm.
-
Page 75: Message Functions
Message functions Message functions The message functions enable you to react to voicemail/callback services of the communication system or of other users or to initiate information features your- self. Leaving a message/advisory message A number of advisory messages are stored in your communication system that can be automatically sent to the caller when an internal call is not answered (in the case of handsets and telephones with display). -
Page 76: Sending/Calling Text Messages
Message functions Deactivating an advisory message Press and hold down the Talk key. Open the system menu. Menu Select the menu item and confirm. Absence Text OFF? Press the End call key to end the operation. Sending/calling text messages You can send short messages to individual internal users or to groups of internal users. -
Page 77: Answering A Message Or Voicemail Message
Message functions then: Press the display key. Send Press the End call key to end the operation. Opening an incoming text message An advisory message appears and the message key flashes when one or more text messages have been received for you. The date and time of incoming text messages are based on your communication system's clock. - Page 78 Message functions Either: Open the additional menu. Call Sender? Select the menu item and confirm. You call back the sender. Delete? Select the menu item and confirm. The entry is deleted. then: Press the End call key to end the operation. Checking for a new voicemail message Either: Press the message key.
-
Page 79: More Features
More features More features Callback This function enables you to call a user who does not answer or whose line is busy. The Callback function enables you to contact this user as soon as he or she hangs up or re-uses his or her telephone. Please note that a line is signaled as busy when it is being called by another user. -
Page 80: Answering Or Rejecting A Call
More features Answering or rejecting a call Accepting a call Your handset rings. The caller information appears on the display. The name and/or telephone number of the caller can be displayed. You have the following options for answering a call: The handset is in the charging shell: Remove the handset from the charging cra- dle (only works if "Auto Answer"... -
Page 81: Forwarding Calls
More features Forwarding calls This function is for when you leave your desk for a while and want certain calls to be forwarded to your new location. The forwarding destination for internal calls can be any internal or external phone number. The destination number is usually an external phone number because you can be reached internally any- time by means of your handset. -
Page 82: Directed Assignment Of An Msn (Multiple Subscriber Number)
More features Directed assignment of an MSN (multiple subscriber number) Multiple subscriber numbers are phone numbers belonging to an ISDN multiple device line. They are used for the directed addressing of terminals, for example when a fax machine has a separate number. Before selecting an external con- nection, you can directly assign a configured multiple subscriber number. -
Page 83: Deactivating The Phone Number Display
More features This function can also be called directly by entering the code page 46. Press and hold down the Talk key. Open the system menu. Menu Select the menu item and confirm. Service? Select the menu item and confirm. 508=Temporary Phone? Home Extn. -
Page 84: Directed Call Transfer
More features Directed call transfer You can transfer calls to other telephones to your handset. This is also possible when you are conducting a call. This function can also be called directly by entering the code page 46. Another telephone rings. Press and hold down the Talk key. -
Page 85: Call Charge Display
More features Deactivating do not disturb Press and hold down the Talk key. Open the system menu. Menu Select the menu item and confirm. Do Not Disturb OFF? Press the End call key to end the operation. Call charge display After a call has ended, the display shows the connection charges for the current call as standard. -
Page 86: Tracing A Call
More features Tracing a call You can apply to your carrier for "call tracing" on malicious calls. An authorized extension is then in a position to request the identification of the phone number. This also works for 30 seconds after the malicious caller has hung up. However, you should not hang up. -
Page 87: Activating Control Relays
More features Using the handset to open the door opener during a call Open door? Select the menu item and confirm. Using the handset to open the door opener without holding a con- versation Press and hold down the Talk key. Open the system menu. - Page 88 More features The service engineer can set up a maximum of 4 control relays that enable var- ious equipment (for example, door opener) to be activated and deactivated. It is possible to access a specific control relay. Depending on the configuration, the control relays can be •...
- Page 89 More features Deactivating a control relay Press and hold down the Talk key. Open the system menu. Menu Select the menu item and confirm. Service? #90=Control Relay Select the menu item and confirm. Off? Follow the user guidance system from this point onwards. Enter the required switch code (1...
-
Page 90: External Call Forwarding With A Multiple Subscriber Number
More features External call forwarding with a multiple subscriber number If your communications system is connected to an ISDN multiple device line, then you can forward all incoming calls from the public network through your multiple subscriber number (MSN) to an external destination. There are three types of forwarding: •... -
Page 91: Using Night Service
More features Using night service In night service mode, for example, during lunch breaks or after office hours, all external calls are forwarded to a particular internal telephone (night station). The night station can be defined by the service engineer (= standard night service) or by you (= temporary night service). -
Page 92: Using Dtmf Dialing
More features Using DTMF dialing Your handset operates on the basis of digital information transmission. However, certain applications, for example answering machines, can only be operated us- ing analogue technology. For this you have to send signals using the dual-tone multifrequency signaling (DTMF) process. -
Page 93: Parking/Activating Calls
More features Parking/activating calls You can park up to ten calls (i.e. place them on hold) and then reactivate them at other telephones in your communication system. Parking a call You are on a call you wish to park. Open the system menu. Menu Select the menu item and confirm. -
Page 94: System Appointment Function
More features System appointment function You can use your handset to enter a single appointment for the next 24 hours or an appointment that recurs on a daily basis. When the appointment is due, your handset rings for approx. 20 seconds to re- mind you of your appointment. -
Page 95: Telephone Lock Code Programming
More features Deleting/checking entered appointments Press and hold down the Talk key. Open the system menu. Menu Select the menu item and confirm. Service? Select the menu item and confirm. #46=Timed reminder off? Open the additional menu. Reminder at ... Either: Delete? Select the menu item and confirm. - Page 96 More features You can lock your handset to prevent external dialing and programming, thereby preventing unauthorized use in your absence, for example. Prerequisite: You have defined a personal code or use the default code "00000". Locking the handset Press and hold down the Talk key. Open the system menu.
-
Page 97: Index
Index Index Bluetooth ..............26 activating ............... 27 changing device name .......... 28 copying directory (vCard) ........22 de-registering devices ........... 27 list of known devices ..........27 Absence text ............75 registering devices ..........27 Account code ............82 Acoustic profile ............ - Page 98 Index Charging cradle (handset) Display connecting ............. 10 backlight ............30, 31 installing ..............10 changing display language ........30 CLIP picture color scheme ............30 viewing in resource directory ........ 26 memory in the directory ........22 CLIP picture, in directory .......... 21 missed appointment/anniversary ......
- Page 99 Index Handset Key 1 (fast access) ............ 7 automatic keypad lock .......... 31 Key, assigning ............34 changing the PIN ..........35 Keypad illumination ..........31 changing to a different base station ...... 36 Keypad lock, automatic ..........31 changing to best reception ........36 Keys color scheme ............
- Page 100 Index Message lists ............19 Messages ............75, 76 Questions and answers ........... 38 Microphone QuickSync ............22, 28 switching on/off ............. 17 Missed appointments/anniversaries ......24 MSN ..............82, 90 Mulap group activating/deactivating group calls ......73 R key ................7 forwarding Recall ..............
- Page 101 Index Status bar ..............7 icons ..............42 Suffix-dialing with speed dialing ....... 65 Switching between calling partners ......56 System speed dialing ..........64 System speed dialing, individual ......65 Talk key ..............7 Team functions ............67 Technical data ............40 Telephone blocking ..........
Need help?
Do you have a question about the OpenScape SL5 and is the answer not in the manual?
Questions and answers