
Related Manuals for Unify OpenScape SL5


Summary of Contents for Unify OpenScape SL5
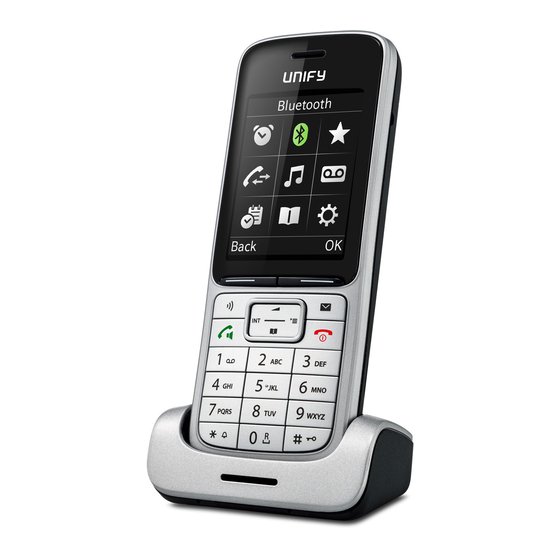
- Page 1 OpenScape DECT Phone SL5 on OpenScape Cordless Enterprise User Manual A31003-D1000-U105-1-7619...
- Page 2 Availability and technical specifications are subject to change without notice. Unify, OpenScape, OpenStage and HiPath are registered trademarks of Unify GmbH & Co. KG. All other company, brand, product and service names are trademarks or registered trademarks of their respective holders.
-
Page 3: Table Of Contents
Contents Contents Overview ......... . 6 Using the user guide effectively . - Page 4 Contents Resource Directory ....... . . 24 Bluetooth ......... 24 Additional functions using the PC interface .
- Page 5 Contents Making calls to multiple parties ......45 Consultation ..............45 Call waiting .
-
Page 6: Overview
Overview Overview 1 Display 2 Status bar ( S. 40) Icons display current settings and operating status of the phone 3 Display keys ( S. 12) 4 Message key ( S. 18) Access to calls and message lists; Flashes: new message or new call 5 End call key, On/Off key End call;... -
Page 7: Using The User Guide Effectively
Using the user guide effectively Using the user guide effectively The features described in this user guide depend on how your handset is configured and the communication platform. Deviations to the range of functions described are therefore possible. Icons Warnings that if not heeded can result in injury to persons or damage to devices. Important information regarding operation and proper handling or in relation to features that may incur costs. -
Page 8: Safety Notes
Safety notes Safety notes Be sure to read this user guide and the safety precautions before using your telephone. Explain their content and the potential hazards associated with using the device to your children. The device cannot be used in the event of a power failure. It is not possible either to make emer- gency calls. -
Page 9: Getting Started
Getting started Getting started Contents of the package • One handset, • One battery cover (rear cover of handset), • One battery, • One belt clip, • One user guide. Installing the charging cradle The charging cradle is designed for operation in closed, dry rooms within a temperature range of +5 °C to +45 °C. -
Page 10: Starting Up The Telephone
Getting started Re-opening the battery cover ¤ ¤ Remove the belt clip (if attached). To change the battery, insert your fin- ¤ gernail into the notch in the casing and Insert your fingernail into the notch at the bot- pull the battery upwards tom of the casing and pull the battery cover upwards Charging the batteries... -
Page 11: Adjusting The Handset Settings
¤ Connect a headset with a 2.5 mm jack to the left side of the handset You will find headset recommendations on the product page at wiki.unify.com/ wiki/OpenScape_DECT_Phone_SL5. The headset volume corresponds to the setting for the earpiece volume ( S. -
Page 12: Getting To Know Your Telephone
Getting to know your telephone Getting to know your telephone Switching the handset on/off ¤ Switch on: When the handset is switched off, press the End call key and hold ¤ Switch off: When the telephone is in idle status, press the End call key and hold Locking/unlocking the keypad The keypad lock prevents any accidental use of the telephone. -
Page 13: Entering Text
Getting to know your telephone Main menu In idle status: press the center of the control key . . . select the Example submenu using the control key Audio Settings The main menu functions are shown in the display as icons. The icon for the selected function is highlighted in color and the name of the associ- ated function appears in the display header. - Page 14 Making calls Making calls Making calls ¤ . . . use to enter a number press the Talk key briefly ¤ Press the Talk key and hold . . . use to enter a number The connection is established using the send line configured for the handset. Cancel dialing: Press the End call key When the display backlight is disabled, the display lights up again the next time any key is...
-
Page 15: Incoming Calls
Making calls Dialing from a call list The call lists ( S. 18) contain the last answered, outgoing and missed calls (assuming this is configured in the telephone system, consult your administrator). ¤ . . . use to select Call Lists . -
Page 16: During Calls
Making calls During calls Handsfree mode Activating/deactivating handsfree mode during a call and when establishing a connection: Activating/deactivating handsfree mode during a call, when establishing a connection and when listening to the answering machine: ¤ Press the Talk/handsfree key Placing the handset in the charging cradle during a call: ¤... -
Page 17: Message Lists
Message lists Message lists Notifications of missed calls, messages on the network mailbox and missed appointments are saved in the message lists. An advisory tone sounds as soon as a new message arrives. The message key Example also flashes. Icons for the message type and the number of new mes- sages are displayed in idle mode. -
Page 18: Call Lists
Call lists Call lists The phone saves a number of different call types (missed, accepted and outgoing calls) in lists (assuming they are set up in the telephone system, consult your administrator). Activating/deactivating the local call lists ¤ . . . then to . . . ¤... -
Page 19: Handset Directory
Handset directory Handset directory The local directory is unique to the handset. Opening the directory ¤ Press briefly in idle status ¤ to select . . . use Directory Directory entries Number of entries: up to 500 Information: First name and surname, up to three telephone numbers, e-mail address, anniver- sary with alert, VIP ringtone with VIP icon, , CLIP picture Length of the entries: Numbers: max. -
Page 20: Vcard
The Gigaset QuickSync program has been installed on the computer. The handset is connected to the computer via Bluetooth or via a USB data cable. Free to download at wiki.unify.com/wiki/OpenScape_DECT_Phone_SL5 vCard Copying a vCard using Bluetooth Copy directory entries in vCard format, for example to exchange entries with a mobile phone. -
Page 21: Acoustic Profile
Acoustic profile Acoustic profile The phone has three acoustic profiles for adapting the handset to the environmental conditions: Profile Loud, Profile Silent, Profile Personal ¤ Press the key briefly in idle mode to switch between the profiles. The profile is switched immedi- ately without prompting. -
Page 22: Notification Of Appointments/Anniversaries
Alarm clock ¤ . . . use to select Date, Time, Text and Signal in succession . . . adjust the value in each case with Save ¤ Save appointment: Save If an appointment has already been entered: <New Entry> . -
Page 23: Alarm
Protecting against unwanted calls ¤ Set days: Occurrence . . . use to switch between Monday-Friday and Daily ¤ Set volume: Volume . . . use to set the volume in 5 increments or select cre- scendo (increasing volume) ¤ Set alarm: Melody . -
Page 24: Resource Directory
Resource Directory Resource Directory Sounds for ringtones and images that can be used as caller images (CLIP pictures) or as screensavers are saved in the handset's resource directory. A range of monophonic and polyphonic sounds and pictures have been pre-set but further images and sounds can be downloaded using a PC ( Gigaset QuickSync). - Page 25 Bluetooth To use the phone numbers, dialing codes (international and local area code) must be saved to the tele- phone. Operating Bluetooth devices User guides for devices Activating/deactivating Bluetooth mode ¤ . . . use to select Bluetooth Activation Change ( = activated) If the local area code is still not saved: .
-
Page 26: Additional Functions Using The Pc Interface
Additional functions using the PC interface Changing the Bluetooth name of the handset The handset is shown by this name on another Bluetooth device. ¤ . . . use to select Bluetooth Own Device OK . . . the name and the device address are shown Change . - Page 27 Additional functions using the PC interface ¤ Carry out the firmware update again as described above If the update procedure fails several times or you can no longer connect to the PC, consult your administrator:...
-
Page 28: Adjusting The Handset Settings
Adjusting the handset settings Adjusting the handset settings Display and keypad Screensaver A dialog or analog clock, Info Services and a range of pictures can be selected to be displayed as a screen- saver when in idle status. ¤ to select . -
Page 29: Activating/Deactivating Automatic Call Answering
Adjusting the handset settings Display backlight The display backlight always illuminates when the handset is taken out of the base station/charging cradle or a key is pressed. Any digit keys that are pressed appear on the display for pre-dialing. Switch the display backlight on/off when in idle status: ¤... -
Page 30: Adjusting The Microphone Sensitivity
Adjusting the handset settings Adjusting the microphone sensitivity The microphone sensitivity can be adjusted in four increments in order to Microphone ensure better acoustics in loud environments and in case of echo. ¤ Press and hold the to adjust the microphone sensitivity Save Sensitivity:... - Page 31 Adjusting the handset settings Confirmation/error tone after making entries, advisory tone when a new message has been received: ¤ Confirmation . . . use to select On or Off Warning tone when there are fewer than 10 minutes of talktime remaining (every 60 sec- onds): ¤...
- Page 32 Adjusting the handset settings Fast access to numbers and functions Number keys: The keys can each be assigned a number from the directory. Display keys: The left and right display keys have a function preset by default, but the keys can be re- assigned.
-
Page 33: Own Area Code
Adjusting the handset settings Changing the handset PIN The handset is PIN-protected to prevent unauthorized use (default setting: 0000). The PIN is requested each time you turn on the handset, assuming it has been changed and does not correspond to the default state 0000. -
Page 34: Extending The Handset
Extending the handset Extending the handset Registering a handset to multiple base stations The handset can be registered to up to four base stations. The active base station is the base station to which the handset was last registered. The other base stations remain saved in the list of available base sta- tions. -
Page 35: Network Mailbox
Network mailbox Network mailbox Activating and deactivating the network mailbox Every handset can manage the network mailboxes belonging to one of its receiving lines. ¤ . . . use to select the Answer Machine Network Mailbox . . . use if appropriate to select the connection OK . -
Page 36: Questions And Answers
Traces of usage on the display and housing are excluded from the warranty. Manufacturer's advice Authorization We, Unify GmbH & Co. KG, declare that this device meets the essential requirements and other relevant reg- ulations laid down in Directive 1999/5/EC. The EU declaration of conformity under 1999/5/EC can be found at:... -
Page 37: Protecting Our Environment
Manufacturer's advice Protecting our environment Disposal Batteries should not be disposed of in general household waste. Observe the local waste disposal regulations, details of which can be obtained from your local authority. Dispose of batteries in the green boxes designated as "common collec- tion system for batteries"... -
Page 38: Technical Data
Technical data Technical data Batteries Technology: Lithium ion (Li-Ion) Voltage: 3.7 V Capacity: 750 mAh Handset operating times/charging times The operating time of your handset depends on the capacity and age of the battery and the way it is used. (All times are maximum possible times). - Page 39 Technical data Central Europe 9x 10x ¤ Press the relevant key the indi- ą ä á â ć ç cated number of times. ď ę ë é ě í î ł ń ň ó ö ő ô ř ß ś š...
-
Page 40: Display Icons
Display icons Display icons The following icons are displayed dependent on the settings and the operating status of your telephone. Icons in the status bar Signal strength 1 % -100 % white if Maximum Range is on; green if Maximum Range is off Red: no connection to the base station white if Maximum Range is on;... - Page 41 Display icons Action complete (green) Action failed (red) Information (Confirmation) prompt Please wait...
-
Page 42: Menu Overview
Menu overview Menu overview Not all of the functions described in this user guide are available in all countries or from all net- work providers. Open the main menu: press this key when the handset is in idle mode Audio Settings Handset Volume p. - Page 43 Menu overview Settings Date/Time p. 11 Display & Keypad Screensaver p. 28 Large Font p. 28 Colour Schemes p. 28 Display Backlight p. 29 Key Illumination p. 29 Auto Keypadlock p. 29 Language p. 10 Registration Register Handset p. 34 Select Base p.
-
Page 44: Accessing System Functions
Accessing system functions Accessing system functions The system functions can be accessed via the Service menu. Structure of the Service menu Note: Not all menu options are displayed depending on the system configuration. Destinations Set up call forwarding Variable call forwarding Fixed call forwarding Forwarding for intnl Forwarding for extnl... -
Page 45: Making Calls To Multiple Parties
Making calls to multiple parties Making calls to multiple parties Consultation You interrupt your call to consult with a user (including external users) and then resume the original call. You are conducting a call. Activating and conducting an inquiry/consultation call CONSULT Activate inquiry. -
Page 46: Call Waiting
Making calls to multiple parties Call waiting You need to speak to a user in your communications system urgently, even though this user's line is busy. You can send a call waiting signal during the call to let the user know you want to talk to him or her. The user either answers im- mediately or you will be automatically connected when he or she has finished his call. -
Page 47: Override
Making calls to multiple parties Override You need to speak to an internal user urgently, even though his or her line is busy. The "Override" function allows you to interrupt the ongoing call to pass on a message. The user is busy. Select the menu item and confirm. -
Page 48: Transferring A Call
Making calls to multiple parties Transferring a call If the person you are speaking to wishes to be forwarded to one of your col- leagues, you can transfer the call. Transferring the call with prior announcement: CONSULT Select the menu item and confirm. Enter the number of the party to whom you want to transfer the call.... -
Page 49: Toggling (Switching Between Calls)
Making calls to multiple parties Toggling (switching between calls) The Toggle function allows you to switch between two users without allowing them to speak to each other directly. The two users can be either external or in- ternal users. You can also start a conference. You are conducting a call. -
Page 50: Conducting A Conference
Making calls to multiple parties Conducting a conference In a system-assisted conference you can include up to 8 internal and external users. Users with system telephones can perform or use all the following func- tions simultaneously. ISDN telephones and external stations are passive users –... - Page 51 Making calls to multiple parties Call another user. The second user answers, you announce the conference. Select the menu item and confirm. You will briefly see the message: "1 is your CONFERENCE position". Setting up a conference from a second call You are connected to one user and receive a second call, which is signaled by an alerting tone.
- Page 52 Making calls to multiple parties Expanding the conference from a consultation call You wish to make a consultation call during the conference. CONSULT Select the menu item and confirm. The conference is placed on hold. Call a party. Make the consultation call. Either: Select the menu item and confirm to add the user from the consultation call to CONFERENCE...
-
Page 53: During The Conference
Making calls to multiple parties Announce that you are transferring the conference CONF. TRANSFER Select and confirm the option shown. You are disconnected from the conference. Press the End call key. During the conference You are taking part in a conference with 3 to 8 members and you wish to know about the other members or to disconnect a certain member or to disconnect the last member added to the conference. -
Page 54: Using The Second Call Feature
Making calls to multiple parties Using the second call feature If you are expecting an important call, you should activate the camp-on function. A second call will then be signaled while a call is in progress. You can accept or ignore the second call. -
Page 55: Caller List
Caller list Caller list Callers who have tried to reach you during your absence are saved in the "Caller list". Callback requests page 72 are also recorded here. Note: If the "local call list" was allocated to the handset in the system, then please use the description on Seite 17. -
Page 56: Central Directories (Group Directory)
Central directories (group directory) Central directories (group directory) You can save your private phonebook that is saved on your handset to a central server and add group phonebooks that are saved on this server to your private phonebook. To protect phone numbers in your private phonebook from being modified when a group phonebook is added, we recommend first saving your private phone- book using the function "Send List"... -
Page 57: Sending And Receiving An Entry Or List Of Entries
Central directories (group directory) Sending and receiving an entry or list of entries You can send either an individual entry or the entire list to the communications system. This list can be received by the communications system and returned. Furthermore, it is also possible to load group directories. Restrictions when copying using the communications system The entries in the handset's phonebook are stored in vCard format . - Page 58 Central directories (group directory) If the handset with phone number 00 was used to send the list or entry to the communications system, any handset can be used to delete this list or entry. Press the INT key. Directory Select the menu item and confirm. Delete priv.
-
Page 59: Call Forwarding
Call forwarding Call forwarding Using call forwarding You can program two types of call forwarding: • Fixed call forwarding and • Variable call forwarding. For fixed call forwarding, you program a forwarding destination that will remain valid until you change or delete it. You can activate and deactivate this forward- ing function. - Page 60 Call forwarding Fixed forwarding If you have programmed a forwarding destination for fixed forwarding, you can activate and deactivate the forwarding facility in the Service menu. The pro- grammed forwarding destination remains valid until you change or delete it. Programming and activating a forwarding destination Open the system menu.
- Page 61 Call forwarding Deleting the destination for fixed forwarding You can delete the destination for fixed forwarding. Open the system menu. BASIC SERVICE Select and confirm the basic service. DESTINATIONS Select the menu item and confirm. FORWARD Confirm the option shown. "Variable forwarding" is displayed. NEXT Confirm the option shown.
- Page 62 Call forwarding Variable forwarding For variable forwarding you can choose between six different call forwarding types: • Variable forwarding (unconditional forwarding) • Forwarding for internal • Forwarding for external • Forwarding on busy • Call forwarding no reply • Forwarding on busy/after timeout Remark: The various forwarding types must be configured for the user.
- Page 63 Call forwarding Programming a forwarding destination Open the System Menu. BASIC SERVICE Select and confirm the basic service. DESTINATIONS Select the menu item and confirm. FORWARD Confirm the option shown. "Variable forwarding" is displayed. NEXT Confirm the option shown. "Fixed forwarding" is displayed. NEXT Confirm the option shown.
- Page 64 Call forwarding Checking forwarding To check the status of the forwarding types, proceed as described on page 62. The forwarding destination is shown in the second line if this vari- able forwarding type is activated. Activating and deactivating forwarding by means of an option If a forwarding destination has been programmed for fixed forwarding, you can use the option to activate and deactivate the forwarding facility.
- Page 65 Call forwarding Call forwarding with codes Note: The codes are dependent on the configuration in your communication system. Please consult your administrator. You can use codes to set up the following forwarding types: Forwarding type Code (example) * 51 Program and activate fixed forwarding * 41 Activate fixed forwarding # 51...
- Page 66 Call forwarding Programming and activating call forwarding Hold down the Talk key. Enter the code, for example *51 (ask your administrator). You will hear the dial tone. Enter the destination number. Enter the termination character. You will hear a confirmation beep and call for- warding is activated.
-
Page 67: Delayed Call Forwarding
Call forwarding Delayed call forwarding Note: This is configured for the entire system by your administrator. Prerequisite: The second call function must be activated page 54. If "Forwarding on busy / after timeout" or "Forwarding after timeout" is activated on your handset page 62 and a second call comes in, you will automatically ... - Page 68 Call forwarding Deactivating/checking call forwarding for another telephone Open the system menu. BASIC SERVICE Select and confirm the basic service. Feature settings Select the menu item and confirm. FORWARD NUM- Select the menu item and confirm. VARY FORWARD Confirm the option shown. Enter the number of the other telephone.
-
Page 69: Mailbox
Mailbox Mailbox Callers who have tried to reach you during your absence can leave a callback request in your mailbox. In the mailbox you will also find voice or fax messages from the mail server (if this has been set up). Viewing the mailbox/selecting a mailbox entry An advisory message appears and the message key flashes when one or more information messages or voicemails have been received for you. -
Page 70: Using The Openscape Xpressions Mailbox Function (Optional)
Mailbox Using the OpenScape Xpressions mailbox function (optional) Users with a mailbox (OpenScape Xpressions) can dial the messaging phone number to use this system's features and thus configure call forwarding types or listen to available messages. User voice prompts explain how to obtain all the available functions. -
Page 71: More Features
More features More features Making calls using project assignment (cost billing) You can assign external calls to certain projects. Prerequisite: Project numbers (from 1 to 5) have been configured for certain projects and you have an account code (ACCT) for the project. Note: The function must be approved for your communications system. -
Page 72: Callback
More features Callback This function enables you to call a user who does not answer or whose line is busy. The Callback function enables you to contact this user as soon as he or she hangs up or re-uses his or her telephone. Please note that a line is signaled as busy when it is being called by another user. -
Page 73: Using A Different Telephone In The Same Way As Your Own
More features Using a different telephone in the same way as your own You can log on to another telephone belonging to the HiPath 4000 system using a personal identification number (PIN). This also applies to telephones in net- worked HiPath 4000 systems, for example at other company locations. At the other telephone you can then •... - Page 74 More features Enter a phone number.
-
Page 75: Caller Id Suppression
More features Call forwarding - follow me after successful identification: VARY FORWARD Select the menu item and confirm. SAVE Confirm the option shown. Call forwarding is activated immediately. Caller ID suppression The caller ID display can only be suppressed for one subsequent call and the setting is not saved if the number is redialed. -
Page 76: Activating/Deactivating Do Not Disturb
More features Activating/deactivating do not disturb If you do not wish to take calls, you can activate do not disturb. Internal callers will hear the ringing tone and the announcement "Do Not Disturb"; external calls will be diverted to the attendant. Your administrator can also set up call forward- ing destinations for the "Do not disturb"... -
Page 77: Tracing A Call
More features Tracing a call You can identify malicious external callers. You can record the caller's phone number during a call or for up to 30 seconds after a call. You should not hang up in the process. Note: The function must be approved for your communications system. During the call. -
Page 78: Entering Commands Via Tone Dialing (Dtmf Suffix Dialing)
More features Entering commands via tone dialing (DTMF suffix dialing) After dialing a phone number, you can activate DTMF tone dialing (dual-tone multifrequency signaling) in order to operate devices, such as answering ma- chines or automatic directory inquiry or switching systems, by means of com- mand inputs. -
Page 79: Parking/Activating Calls
More features Parking/activating calls You can park up to 10 internal and/or external calls and resume them at another telephone. Calls cannot be parked if: • All parking positions are busy. • The parking position you have selected is busy. •... -
Page 80: System-Wide Speaker Call
More features System-wide speaker call You can place a speaker call to an internal party on HiPath 4000 using the loud- speaker on their telephone to establish a connection. You can also initiate a speaker call from a consultation call. To cancel a speaker call, replace the handset or - during an inquiry - resume the call that was in progress. - Page 81 More features Activating/deactivating "Speaker call protect" You can protect yourself against being addressed directly with a speaker call. At- tempts to address you directly over the speakerphone will then become normal calls. Open the system menu. BASIC SERVICE Select and confirm the basic service. Feature settings Select the menu item and confirm.
-
Page 82: System Appointment Function
More features System appointment function You can arrange for the communications system to remind you of an appoint- ment. For this to happen, you need to save the times at which you wish to be reminded. This is possible for a period of up to 24 hours in advance. Saving an appointment Open the system menu. -
Page 83: Locking The Telephone Line To Prevent Misuse
More features Locking the telephone line to prevent misuse You can prevent unauthorized persons from using your telephone (and the sys- tem directory) during your absence. Prerequisite: You have been assigned a personal identification number (PIN) by the administrator responsible for your communications system. Note: As an alternative, however, you can lock your handset against misuse (see local functions). -
Page 84: Index
Index Index Calendar ..............21 Call accepting .............. 15 anonymous ~ ............75 Acoustic profile ............21 external ..............14 Advisory tones ............30 holding ..............45 Alarm ................ 23 parking ..............79 Alarm clock .............. 22 Transferring ............48 switching on/off ............. - Page 85 Index Control key ............6, 12 Entering numbers ............ 13 Copying Entering special characters ........13 all ................57 Entering special letters ..........13 entry ..............57 Entering text ............. 13 Copying all ............... 57 Entering umlauts ............13 Copying entry ............57 Environment .............
- Page 86 Index Handset charging time ..........38 Handset operating time ..........38 Language, display ............ 10 Handsfree key ............16 Large font ..............28 Handsfree mode ............16 Liquids ..............37 Hash key ..............6 List Headset (Bluetooth) ..........24 known devices (Bluetooth) ........25 Headset port ..........
- Page 87 Index Signal strength ............40 Snooze mode (alarm clock) ........23 Package contents ............9 Sound Parking a call ............79 deleting ..............24 PC interface ............. 26 format ..............24 Picture playback ..............24 as CLIP image ............24 renaming ...............
Need help?
Do you have a question about the OpenScape SL5 and is the answer not in the manual?
Questions and answers