
Related Manuals for X-TREME XB-420M


Summary of Contents for X-TREME XB-420M
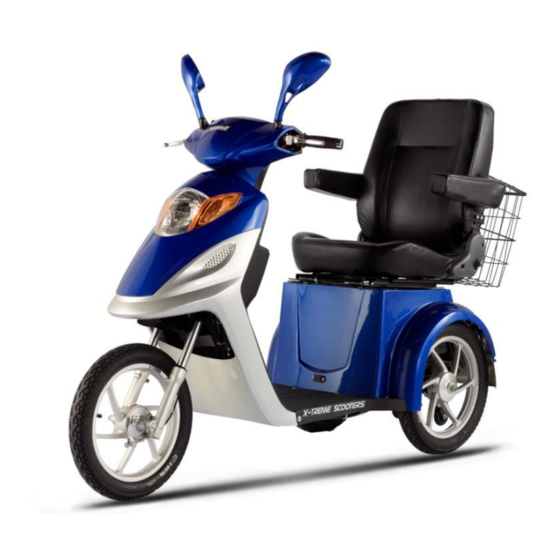
- Page 1 X-Treme™ Electric Scooters XB-420M Electric Mobility Scooter Read this manual completely before riding.
- Page 2 IMPORTANT! BATTERY MAINTENANCE and CHARGING INSTRUCTIONS You MUST charge completely prior to initial use. (Follow charging instructions in your Product Handbook) Charge immediately after each use. Charge before storage. You must charge every 30 days if not in use. Charge the unit for 6-8 hours or until the light on the charger turns red &...
- Page 3 IMPORTANT PLEASE READ THIS BEFORE USING THIS PRODUCT READ THIS FIRST! WARNING This product does not conform to Federal Motor Vehicle Standards and is not intended for operation on public streets, roads or highways. Serious injury can result from the unsafe operations of this product.
- Page 4 QUICK REFERENCE SAFETY GUIDE SAFETY GUIDE The recommended minimum age for riding this scooter is 16 years old. To avoid damage to the motor and footplate, do not overload the scooter. Never ride with more than one person. ...
-
Page 5: Table Of Contents
DO NOT RETURN TO STORE! Do not use this vehicle for the first time until you have inflated the tires to the correct PSI and completely charged the battery. Failure to follow these instructions may damage your vehicle and void your warranty. CALL OR GO ONLINE 1-253-777-0690 www.x-tremescooters.com/support/... -
Page 6: Table Of Contents
How To Remove Batteries……………………………………………….. 25 How To Adjust Brakes…………………………………………………….. 25 How To Check Motor Armature Contracts………………………….. 25-26 How To Remove Rear Brake Assembly……………………………… 26 How To Install Bearings…………………………………………………… 27 How To Adjust Chain Tension………………………………………….. 27 How To Check Throttle Voltage………………………………………… 27-28 How To Check Charger Output…………………………………………. -
Page 7: Riding Safety
Use caution! Like any sport, cycling carries the risk of injury and damage. By choosing to ride the XB-420M, you assume all responsibility for these risks. Thus, you need to know and practice the rules of safe and responsible riding. - Page 8 Wear bright, visible clothing that is not so loose that it can catch on moving parts of the XB-420M or objects at the side of the road or trail. Think about your speed, and keep your speed consistent with safe operating conditions.
-
Page 9: Wet Weather & Night Riding
Operating Reminders and Suggestions Review all instructions carefully before riding the XB-420M. Follow all rules and regulations in your area for operating a motorized scooter. Obey the same road laws as all other road vehicles, including yielding the right-of-way to pedestrians, and stopping at red lights and stop signs. -
Page 10: Other Reminders
The XB-420M has an electrical brake cutoff system. When you engage either brake, the throttle becomes inoperative. Release the throttle before braking. Do not “ride” the brakes. The battery does NOT require deep discharging. If your XB-420M is put into storage, re-charge its battery at least once every 90 days. - Page 11 Do not store your XB-420M in direct sunlight for an extended time. Store your XB-420M in a dry place. Exposing your XB-420M to rain, snow, or other precipitation may result in damage.
-
Page 12: Specifications
SPECIFICATIONS SPECIFICATIONS 64” x 28” x 40” Product size (L x W x H): 64” x 28” x 40” Net Weight: 195 lbs Product size (L x W x H): Carrying capacity: 350 lbs Net Weight: 195 lbs Maximum range: Carrying capacity: 350 lbs ~40 miles... -
Page 13: Components
COMPONENTS Battery Storage Access (Tilt Seat Forward) – 4 Batteries Total Seat Recline Adjuster Drop Down Arm Rests Forward/Reverse Switch Instrument Panel Throttle Brake Lever Ignition Switch... - Page 14 Brake lever Headlight switch Rearview mirror Instrument Panel Rearview mirror Headlight switch Throttle Ignition switch Forward/Reverse switch Turn Signal...
-
Page 15: Assembly And Setup
1) With the cardboard, steel frame top & sides, and packing material removed you are ready to begin assembly. The tools needed for setup are included in the XB-420M tool kit (located in the compartment under the seat). 2) Attach the front wheel: a. -
Page 16: Routine Operation
Locate the circuit breaker and switch it from off to on 8) Your XB-420M has been in transit and storage. You must charge the batteries before riding it. See page 21 for battery charging instructions. - Page 17 4) Make sure the XB-420M is in good mechanical order. Visually inspect and hand-check the vehicle, and snug any loose bolts, screws, and electrical terminals. B) Steps to Startup 1) Confirm adjustment of the Rear View Mirrors so that you can see clearly behind you.
-
Page 18: Battery Care And Maintenance
Always try to recharge the Battery Pack within 24 hours after use to maximize battery cycle life and prevent damage. What’s Inside Your XB-420M Battery The Battery is composed of four 12 Volt, 20 Amp-hour capacity batteries, in series, for a total capacity of 48 V, 20 Ah. - Page 19 When the air temperature is under 0 ºF, the battery power will decline more than one third. So it is natural that the XB-420M will not reach its normal mileage in winter or in cold weather. When the air temperature is up to 68 ºF, the XB-420M will achieve its normal range capability.
-
Page 20: Battery Charging
No headwind, smooth, level road, infrequent braking and steady speed. Under these conditions, the XB-420M’s maximum range is up to 35 miles. Frequent braking and acceleration, driving into headwinds, up hills or with cargo will all cost a lot of battery energy. In these conditions, the XB-420M will not reach its normal range. - Page 21 48 volts of potential. All batteries charge simultaneously. You should charge your XB-420M after each ride. You should charge your XB-420M if it has not been used for 30 days or more. WARNING Do not place the battery near heat or fire. Do not expose the chargers to...
-
Page 22: Other Maintenance
OTHER MAINTENANCE Your XB-420M should be checked once a year for a thorough inspection and adjustment. This can guarantee the comfort, safety and the normal operating life of the XB-420M. Front and Rear Brakes The adjustment of the front brake is the same as in a common motorcycle. -
Page 23: Cleaning
Lubricate the brake cables with silicone or graphite lubricant. Maintenance period: one month. Lubricate the fork Shock Absorber tube, axle rim, and the axle ball bearing with SH/T0386 lubricant, scooter or lithium grease. Maintenance period: one year. Cleaning 1) Never wash the scooter using high-pressure water, as it will cause damage to the electric bike. -
Page 24: Scheduled Maintenance
Scheduled Maintenance XB-420M should be checked from time to time. Refer to the maintenance schedule in the following chart: Check ● adjust ◆ change ▲ lubricate ■ Parts daily days days ● ● ■ ● ◆ Bolts, nuts, screws, etc-to ensure that nothing is loose. -
Page 25: Troubleshooting Guide
TROUBLESHOOTING GUIDE Problem Cause Solution 1. Loose connection near Battery gauge 1. Check the connections, the power switch or does not register reconnecting any that are battery pack. anything when loose. 2. Battery is completely vehicle is on. 2. Charge the battery. discharged. -
Page 26: How To Guide
How To Guide How To Remove Batteries Unlock the rear seat latch and lift seat forward. Remove the 5 screws, holding the seat barrel in place. Remove the wires on the breaker and remove the seat with the seat barrel. Place tape on the exposed wires from the breaker. Locate where the battery wires plug into the controller (metal box with several wires going into it). -
Page 27: How To Remove Rear Brake Assembly
You will see the controller with wire connectors and trans-axle with motor mounted on top side of it. On the Motor where the two motor wires goes in you will see a round rubber cover a little bigger than quarter that pops off, and the see a plastic screw under it. Remove screw and the spring loader armature slides out. -
Page 28: How To Install Bearings
How To Install Bearings Remove the rear wheel. Remove the old bearing. To do this, you will need to insert something, like a screw driver, from the opposite side and simply push it out. Put the new bearings in. You will want to use something like a rubber mallet so you do not crack the bearings. -
Page 29: How To Check Charger Output
Use a voltmeter and measure across the red and black wire while unit on and you should have throttle supply voltage of 5vdc. Slide your probe ends in where the wires go into the connector. Leave the black probe on black wire and move red probe to green wire and by varying the throttle the voltage should change from .2- 4.9vdc approx. -
Page 30: How To Understand Charger Light Sequence
How To Understand Charger Light Sequence - When you plug your charger into the wall the light should turn Green. - Plug your charger into the scooter and it should turn to Red for a good period of time. *** This indicates that the charger sees the batteries and charge cycle started. - If No Red light then charger is not making a connection to batteries to charge them. -
Page 31: How To Test Motor Direct To Battery
How To Test Motor Direct To Battery **ATTENTION: Prop the scooter up so that the rear wheel is NOT touching the ground. In this test the drive wheel will run full speed. Access the Battery and Controller compartment. Locate the Connector from the Battery to the Controller and label the male &... -
Page 32: How To Do Basic System Check For Power
pick or jeweler’s screwdriver and bend the tab in then pull the metal pin out the back of the connector. Do this for the other wires. Reinsert the new wires into the white connectors in the correct place. Now remove the old throttle and wires, mount the new throttle onto the handlebars, and tighten the setscrew. -
Page 33: Scooter Won't Run, Charger Light Stays Green
adjusts those screws out to tighten the brakes and this arises. If adjustments need to be made it must be on the wheels themselves by turning the large nut on end of cable. The brake handles are connected to the 12v supply and then connects to both lights and then connects to the gray wire on controller. - Page 34 connected to one white quick disconnect. For this project, we are concerned only with the smaller wires of Green, Yellow and Blue. There are two methods that can be used to determine a bad connection or which of the three sensors have failed. Both require the motor to be fully assembled.
-
Page 35: Scooter Will Not Turn Off
Troubleshooting: Scooter Will Not Turn Off Place the scooter off the ground so the rear wheel will not touch the ground. You do not want your scooter to take off. Take the footplate off. Disconnect the throttle clip under the footplate, then turn the scooter on and see if it still runs. -
Page 36: Throttle Voltage Test
brakes on. It functions like a 'kill switch' should anything go wrong. You should also test the key switch in the same way. You can test the motor by jumping from the batteries to the motor, but be aware that it will make a large spark, or you can test the voltage at the motor connector while turning the rear wheel backwards. -
Page 37: No Power
watch actual voltage while riding and mounting the voltmeter is a spot and secure it so it doesn't move but be able to watch it while on test runs. I have provided a drawing of this called voltmeter connection.jpg above. First pull up battery pack and pull the main power cord out of socket on battery pack to kill all power. -
Page 38: After Fully Charger, Powers Only For Short Distance Use
Second possibility is the controller box has failed. Since the controller is the heart of the system it can fail in many ways to prevent current from being supplied to the motor. Other less likely suspects can be: A battery that is completely open, supplying no current and possible even testing as having no voltage. - Page 39 from an arc. Batteries produce current and voltage that can burn you when a shorted circuit occurs. Be absolutely sure you know what you are doing before trying any tests to eliminate a component from consideration of being defective!!! You can take the battery to a shop capable of testing the battery under a loaded condition.
-
Page 41: Wiring Diagram
Wiring Diagram See notes above... -
Page 42: Controller Wiring Diagram
Controller Wiring Diagram... -
Page 43: Warranty
DO NOT RETURN TO STORE! IF YOU NEED HELP CALL OR GO ONLINE 1-253-777-0690 www.x-tremescooters.com/support/ For General Information or Parts Visit www.x-tremescooters.com Revised 02/28/12...