Makita HR2300 Instruction Manual
Rotary hammer / combination hammer
Hide thumbs
Also See for HR2300:
- Instruction manual (88 pages) ,
- Technical information (23 pages) ,
- Instruction manual (73 pages)
Table of Contents
Advertisement
Quick Links
Download this manual
See also:
Instruction Manual
Advertisement
Table of Contents

Related Manuals for Makita HR2300


Summary of Contents for Makita HR2300
- Page 1 INSTRUCTION MANUAL Rotary Hammer / Combination Hammer HR2300 HR2310T HR2600 HR2601 HR2610 HR2610T HR2611F HR2611FT 010712 DOUBLE INSULATION IMPORTANT: Read Before Using.
-
Page 2: Specifications
The following show the symbols used for the equipment. to EN60745: Be sure that you understand their meaning before use. ・ Read instruction manual. Model HR2300, HR2601, HR2611F, HR2611FT ・ Sound pressure level (L ) : 90 dB(A) DOUBLE INSULATION... -
Page 3: Ec Declaration Of Conformity
For European countries only Uncertainty (K) : 1.5 m/s EC Declaration of Conformity Makita Corporation responsible manufacturer declare that the following Makita machine(s): Designation of Machine: Rotary Hammer Model No./ Type: HR2300, HR2310T, HR2600, HR2601 are of series production and... -
Page 4: General Power Tool Safety Warnings
Makita Corporation responsible Electrical safety manufacturer declare that the following Makita Power tool plugs must match the outlet. Never machine(s): modify the plug in any way. Do not use any Designation of Machine: adapter plugs with earthed (grounded) power Combination Hammer tools. - Page 5 Personal safety 22. Maintain power tools. Check for misalignment Stay alert, watch what you are doing and use or binding of moving parts, breakage of parts common sense when operating a power tool. and any other condition that may affect the Do not use a power tool while you are tired or power tool’s operation.
-
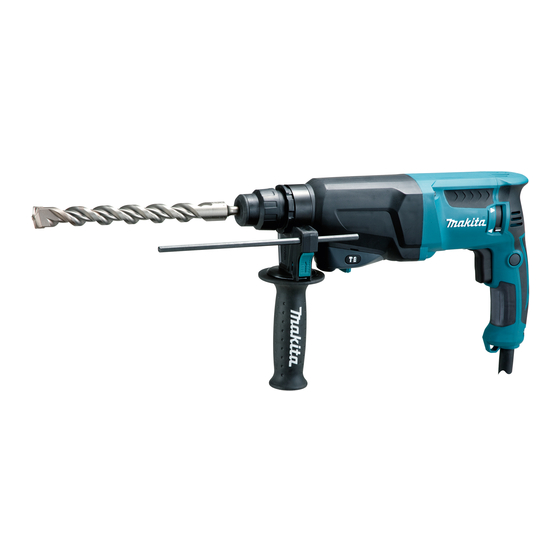
Page 6: Functional Description
warm-up, hammering operation is difficult. FUNCTIONAL DESCRIPTION Always be sure you have a firm footing. Be sure no one is below when using the tool in high locations. CAUTION: Hold the tool firmly with both hands. Always be sure that the tool is switched off and •... - Page 7 Selecting the action mode position (A side) or (B side). For Models HR2300, HR2600, HR2601 This tool has a reversing switch to change the direction of rotation. Move the reversing switch lever to the position 1. Rotation with...
-
Page 8: Torque Limiter
For Models HR2310T, HR2610, HR2610T, HR2611F, When changing from the symbol mode to the • HR2611FT symbol mode, the action mode changing knob Rotation with hammering may no longer move in the symbol position. At this time, turn the tool on or turn the chuck by hand 1. -
Page 9: Depth Gauge
The bit can be secured at the desired angle. To change Installing or removing the bit the bit angle, rotate the action mode changing knob to the O symbol. Turn the bit to the desired angle. 1. Bit shank Rotate the action mode changing knob to the symbol. - Page 10 Installing or removing the dust cup 1. Lock button symbol 2. Grooves 3. Dust cup 010718 Adjust the depth gauge to the desired depth by moving it 011506 back and forth while pressing the lock button. After the Before installing the dust cup, remove the bit from the adjustment, release the lock button to lock the depth tool if installed on the tool.
-
Page 11: Operation
OPERATION 1. Inside periphery 2. Carved side Always use the side grip (auxiliary handle) and firmly 3. Attachment hold the tool by both side grip and switch handle during 4. Cap operations. 5. Groove Hammer drilling operation 012895 1. Cap 2. - Page 12 Pressing very hard on the tool will not increase the efficiency. Drilling in wood or metal For Models HR2300, HR2600, HR2601, HR2610, 011563 Hold the ring and turn the sleeve counterclockwise to HR2611F open the chuck jaws.
-
Page 13: Maintenance
Operation when using the dust cup If you need any assistance for more details regarding (accessory) these accessories, ask your local Makita Service Center. SDS-Plus Carbide-tipped bits • 1. Dust cap Core bit •... - Page 16 Makita Corporation Anjo, Aichi, Japan www.makita.com 884939A229...