Table of Contents
Advertisement
Quick Links
Advertisement
Table of Contents

Related Manuals for HIKVISION DS-3E2510P


Summary of Contents for HIKVISION DS-3E2510P
- Page 1 8/24 Series Ethernet Switch User Manual UD03706B - I -...
- Page 2 Any and all information, including, among others, wordings, pictures, graphs are the properties of Hangzhou Hikvision Digital Technology Co., Ltd. or its subsidiaries (hereinafter referred to be “Hikvision”). This user manual (hereinafter referred to be “the Manual”) cannot be reproduced, changed, translated, or distributed, partially or wholly, by any means, without the prior written permission of Hikvision.
- Page 3 Regulatory Information FCC Information Please take attention that changes or modification not expressly approved by the party responsible for compliance could void the user’s authority to operate the equipment. FCC compliance: This equipment has been tested and found to comply with the limits for a Class A digital device, pursuant to part 15 of the FCC Rules.
- Page 4 Preparing for installation The HIKVISION 8/24 Series Ethernet Switch includes the following models: Model Name Ethernet Switch Ethernet Switch Symbol Conventions The symbols that may be found in this document are defined as follows. Symbol Description Provides additional information to emphasize or supplement important points of the main text.
-
Page 5: Table Of Contents
Table of Contents Chapter 1 8/24 Switch Overview ..........................1 1.1 Standard Configuration ............................1 1.2 Characteristic Parameters of 8/24 switch ......................4 Chapter 2 Installation Preparation ..........................5 2.1 Cautions ................................5 2.2 Safety Advice ................................. 5 2.2.1 Safety Principles ..............................5 2.2.2 Safety Notices .............................. -
Page 6: Chapter 1 8/24 Switch Overview
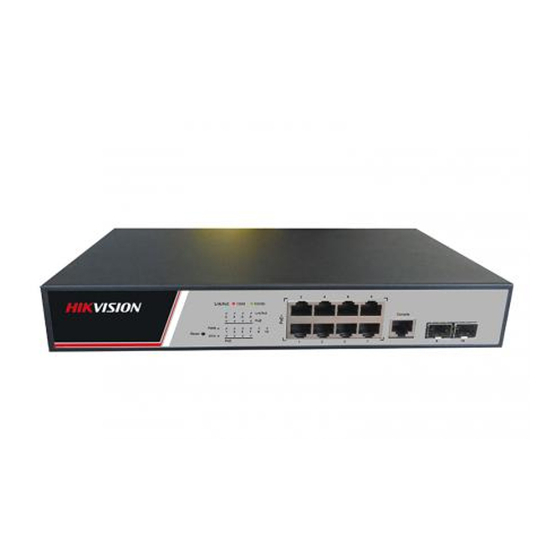
Chapter 1 8/24 Switch Overview The document describes the characteristics and parameters of 8/24 and gives an overview of 8/24 switch. 1.1 Standard Configuration 8/24 switch has three parts: 8 IEEE802.3af/at gigabit Ethernet TX ports, 2 gigabit Ethernet SFP ports and 1 Console port. See the following table: Table 1-1 Attributes of necessary ports Port Features... - Page 7 If the indicator flickers, the system works normally. If the indicator is always on, the PoE works indicator normally. corresponding each port If the indicator is off, the PoE does not work. Green indicator 10/100M Lnk/Act indicator transmitted; Lnk/Act corresponding Red indicator is on: 1000M is transmitted;...
- Page 8 If the indicator is on in red: 1000M If the indicator is not on: no signal is transmitted. If the indicator is always on: POE works normally; POE indicator If the indicator is not on, POE does not work. Reset Reset switch Return to the factory setting.
-
Page 9: Characteristic Parameters Of 8/24 Switch
Grounding column The grounding must be fine. AC power socket 100~240V AC 1.2 Characteristic Parameters of 8/24 switch IEEE 802.1d Spanning Tree Protocol IEEE 802.1p Class of Service IEEE 802.1q tagged VLAN IEEE 802.3x Flow control Supported standard IEEE 802.3ad Link aggregation IEEE 802.3af Power via Media Dependent Interface IEEE 802.3at DTE Power Enhancements RFC 1058 RIP... -
Page 10: Chapter 2 Installation Preparation
Chapter 2 Installation Preparation 2.1 Cautions Similar to other electronic products, the semiconductor chip easily gets damaged if you power on and off abruptly and frequently. To restart up the switch of 8/24, you have to open the power on-off three or five seconds after the power is cut off. Avoid severe collision or falling down from the height to protect the parts in the switch. -
Page 11: Electrostatic Discharge Damage Prevention
Put off ornaments, such as ring, necklace, watch and bracelet, before you operate under live working. When metal articles connect the power to the ground, short circuit happens and components may be damaged. Please cut off the direct-current connection when you operate the hull or work near the power supply. -
Page 12: Location Configuration Prevention
2.3.2 Location Configuration Prevention The following preventive measures assist you to design the proper environment for the switch. Make sure that the workshop is well-ventilated, the heat of TX devices is well-discharged and sufficient air circulation is provided for device cooling. ... -
Page 13: Chapter 3 Installing The 8/24 Switch
Chapter 3 Installing the 8/24 Switch Caution: Only professionals are allowed to install or replace the devices of the switch. 3.1 Installation Procedures of 8/24 switch 3.2 Installing the Chassis of 8/24 switch The chassis of the switch can be put on the desk or fixed to the cabinet. Your network installation requirements can be met if you conduct the operations according to the following procedure. -
Page 14: Connecting The Port
Figure 3-1 Fixing the machine box of the switch After the brackets are installed, install the switch on the cabinet. See Figure 3-2. Figure 3-2 Installing the switch on the cabinet 3.3 Connecting the Port 3.3.1 Connecting the Console Port The switch of 8/24 switch has a Console port. - Page 15 Figure 3-4 Connecting the console port of 8/24 and computer Table 3-1 Definition of the pins of the console port Name Abbreviation Remarks Carrier Detecting No connect Data receiving Input Data-line device ready No connect Data transmitting Output Transmission requesting No connect Response transmitting No connect...
-
Page 16: Connecting The Sfp Ports
Figure 3-5 Cable connection at the console port 3.3.2 Connecting the SFP Ports 8/24 switch provides 2/4 gigabit SFP optical ports. Each port corresponds to one indicator respectively, which is used for indicating the port Link/ACT state. When the indicator is always on, the link is normal;... - Page 17 Figure 3-7 RJ-45 connector of the console port Because 8/24 switch 10/100/1000 Base-TX ports of 8/24 support the MDI/MDIX auto-identification of the cable, 8/24 can adopt five classes of direct-through/cross network cables when it connects other Ethernet terminals. Figure 3-8 Connecting Base-T ports and other Ethernet terminal Table 3-3 Definition of the pins of the 1000M RJ45 port Pin name Symbol...
-
Page 18: Checkup After Installation
Sending the normal phase of TXD2+ Output the data Sending the paraphase of the TXD2- Output data Receiving the paraphase of RXD1- Input the data Receiving the paraphase of RXD2+ Input the data Sending the paraphase of the RXD1- Input data The direct-through or cross network cable has the function of auto-identification, so the five classes of direct-through/cross network cables can be used to connect other Ethernet devices. -
Page 19: Chapter 4 8/24 Switch Maintenance
Chapter 4 8/24 switch Maintenance Caution: Before opening the chassis, make sure that you have released the static you carried and then turn off the power on-off of 8/24. Before operating any step in Appendix B, read the section “Safety Advice”. Before performing operations beside the power supply or on the chassis, turn off the power on-off and plug out the power cable. - Page 20 Following the directions shown on the above-mentioned figure, install the cover and bottom of the frame box. Nail the bolt and screw it tightly with the screwdriver. Reinstall the switch on the DIN rail or on the desk. Reconnect all cables of the switch. - 15 -...
-
Page 21: Chapter 5 Hardware Fault Analysis
Chapter 5 Hardware Fault Analysis The part describes how to remove the faults from the switch. 5.1 Fault Separation The key for resolving the systematic faults is to separate the fault from the system. You can compare what the system is doing with what the system should do to detect the fault. You need to check the following subsystems: ... - Page 22 If the indicator is always on, it means that the connection is linked. LINK/ACT port indicators If the indicator is off, the port is not linked. If the indicator is always on, it means the indicator PoE works. corresponds to each If the indicator is off, the PoE does not port work.
-
Page 23: Chapter 6 Specifications
Chapter 6 Specifications 24 switch Item 8 switch 56Gbps Backplane 20Gbps 42Mpps Forwarding rate 15Mpps 8 10/100/1000Base-T ports, 2 24 10/100/1000Base-T ports, 4 Ports 1000Base-X ports 1000Base-X ports 440×232×45 Dimensions(W×D×H)(mm) 280*179*45 Consumption <15W <15W POE/POE+ Support Support POE 380W POE power consumption POE 125W Power supply AC:100V-240V,50Hz±... - Page 24 Static/LACP link aggregation Reliability EAPS and ERPS Console, Telnet, SSH2.0, Web SNMP v1/v2/v3 Management TFTP RMON - 19 -...