Linksys WPS54G - Wireless-G Print Server Quick Setup
- User manual (74 pages) ,
- Quick installation (2 pages) ,
- Product data (2 pages)
Advertisement
Package Contents

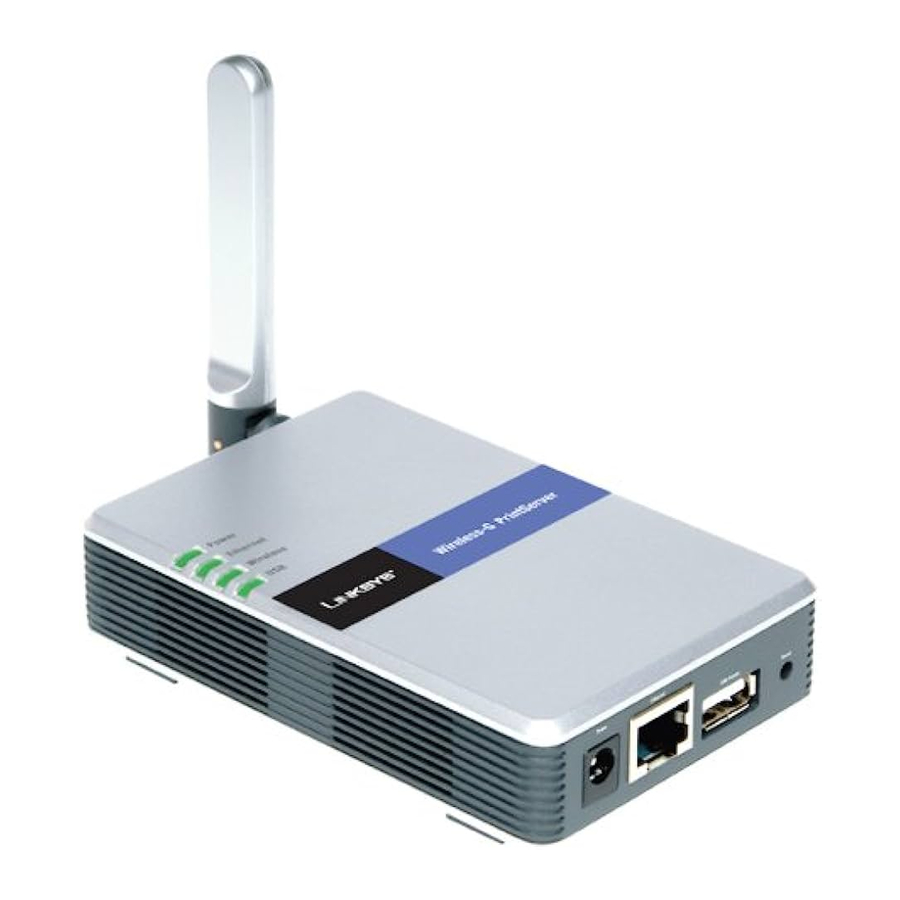
- Wireless-G PrintServer
- Setup Wizard CD-ROM
- User Guide on CD-ROM
- USB 2.0 Cable
- Network Cable
- Power Supply
- Quick Installation
- Registration Card
Connect the PrintServer
Before starting the physical installation, note the PrintServer's default name. The default name is shown in the Server field on the sticker located on the PrintServer's back panel.
- Use the USB cable to connect your USB printer to the PrintServer's USB Printer port.

- If you are connecting the PrintServer to your wired network, then plug one end of the Ethernet network cable into the PrintServer's Ethernet port. Then connect the other end to your router or switch.
- Power on your printer.

- Plug the power adapter into the PrintServer's Power port. Then plug the other end into an electrical outlet.


Configure the PrintServer
- Insert the Setup CD-ROM into the computer's CD-ROM drive. The Setup Wizard should run automatically. If it does not, click Start and choose Run. In the field that appears, enter D:\setupWizard.exe (if "D" is the letter of your CD-ROM drive).
- On the Welcome screen, click Setup Wizard.

- The Setup Wizard will search for the PrintServer. After it has been found, the Wireless-G PrintServer Setup screen will appear. If this is the first time you have run the Setup Wizard, make sure that List only new (unconfigured) Print Servers is selected and your PrintServer is listed by its default server name. If you have previously C configured the PrintServer, select List all compatible Print Servers. Click Next.

- On the Basic Settings screen, you may change the Device Name and Domain Name settings if you want. Then click Next.

- The IP Settings screen will appear. If your network uses a router that automatically assigns IP addresses, select Automatically obtain an IP address (DHCP) and click Next. If you need to assign the PrintServer a static IP address, select Set IP configuration manually, and enter the IP Address, Subnet Mask, and Gateway in the fields provided. Then click Next.

- On the Set PrintServer's Password screen, enter the PrintServer's default password, admin, in the Current Password field. Enter a new password in the New Password field, and enter it again in the Verify Password field. Click Next.

- On the Wireless Settings F screen, enter your wireless network's SSID or name. If your network is set to ad-hoc mode, select the channel at which the network broadcasts its wireless signal. For the Network Type setting, select infrastructure if the PrintServer will communicate using an access point or wireless router. G Select Ad-Hoc if the PrintServer will communicate directly with wireless-equipped computers. Click Next.

- On the Wireless Security Settings screen, select a level of WEP encryption, 64 Bit Keys or 128 Bit Keys. Then enter a Passphrase to automatically generate a WEP key. Then click Next.
If you would like to enter your WEP key manually, leave the Passphrase field blank and enter the WEP key on the next screen. Then click Next.

- If you used a Passphrase, then a WEP key will appear on the following screen. Otherwise, enter your WEP key in the Key 1 field. Click Next.

- On the Confirmation screen, I make sure your settings are correct. Click Yes to save your new settings.

- On the Congratulations screen, click User Install to install the PrintServer's driver.


Install and Configure the PrintServer's Driver
Linksys recommends that you set up your printer and install your printer's driver before you install the PrintServer's driver.
- On the Print Server Driver Setup Welcome screen, click Next.

- On the Choose Destination Location screen, select the location where the driver's folder will be installed. If you want the folder to be installed in a different location, click Browse and select the location. Click Next.

- The Select Program Folder screen will appear. An icon will be added to the program folder listed. If you want, you may change the name of the program folder. Click Next.

- After the driver is installed, the Setup Complete screen will appear. Make sure Configure Print Driver now is selected. Click Next to end the driver installation and begin the driver configuration.

- Double-click the Print Driver Setup icon on your desktop. If you do not see the icon, click Start, Programs, Print Server Utility, and Print Driver Setup.
- Read the Information screen, and click OK.

- On the Printer Port Setup screen, select a printer port to add, and click Next.

- You will be informed that the PrintServer Port has been added successfully. Click OK.
- The Configure Printer Port screen will appear. Your installed printer(s) will appear in the Existing Printers field. Select the printer you want, and click the Connect button to associate the printer with your selected printer port. To add another printer, click Add New Printer and follow the onscreen instructions.

- When you have finished configuring the PrintServer's driver, click Close on the Printer Port Setup screen.


Congratulations! The installation of the PrintServer is complete.
For additional information or troubleshooting help, refer to the User Guide on the Setup CD- ROM. You can also call or e-mail for further support.
24-hour Technical Support
800-326-7114 (toll-free from US or Canada)
E-mail Support: support@linksys.com
Website:
http://www.linksys.com or
http://support.linksys.com
RMA (Return Merchandise Authorization) http://www.linksys.com/support
FTP Site
ftp://ftp.linksys.com
Sales Information 800-546-5797 (800-LINKSYS)
Linksys is a registered trademark or trademark of Cisco Systems, Inc. and/or its affiliates in the U.S. and certain other countries. Copyright © 2004 Cisco Systems, Inc. All rights reserved.

Documents / Resources
References
![www.linksys.com]() Linksys | Networking & WiFi Technology
Linksys | Networking & WiFi Technology![support.linksys.com]() Linksys Official Support - User Guides, Downloads, FAQs
Linksys Official Support - User Guides, Downloads, FAQs![www.linksys.com]() Linksys Official Support - User Guides, Downloads, FAQs
Linksys Official Support - User Guides, Downloads, FAQs
Download manual
Here you can download full pdf version of manual, it may contain additional safety instructions, warranty information, FCC rules, etc.
Download Linksys WPS54G - Wireless-G Print Server Quick Setup
Advertisement
Thank you! Your question has been received!


Need Assistance?
Do you have a question about the WPS54G that isn't answered in the manual? Leave your question here.