Makita VC008G Instruction Manual
Cordless backpack vacuum cleaner
Hide thumbs
Also See for VC008G:
- Instruction manual (131 pages) ,
- Instruction manual (124 pages) ,
- Instruction manual (108 pages)
Table of Contents
Advertisement
Available languages
Available languages
Quick Links
Advertisement
Table of Contents

Related Manuals for Makita VC008G


Summary of Contents for Makita VC008G
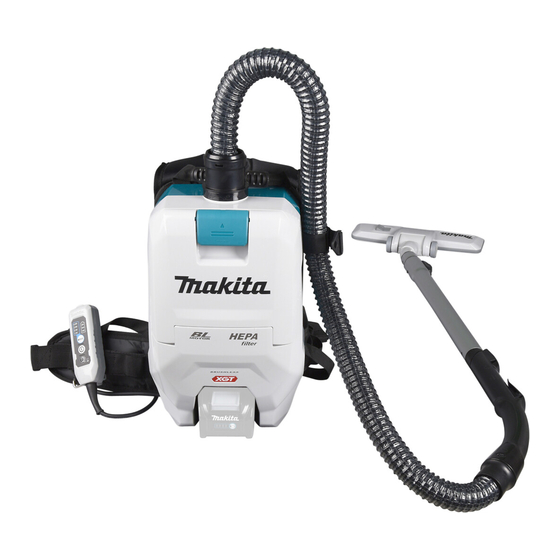
- Page 1 INSTRUCTION MANUAL MANUEL D'INSTRUCTION MANUAL DE INSTRUCCIONES Cordless Backpack Vacuum Cleaner Aspirateur Dorsal Sans Fil Aspiradora de mochila a batería VC008G IMPORTANT: Read Before Using. IMPORTANT : Lire avant usage. IMPORTANTE: Lea antes de usar.
-
Page 2: Specifications
ENGLISH (Original instructions) SPECIFICATIONS Model: VC008G Capacity Filter bag 2.0 L (0.53 gal.) Dust bag 1.5 L (0.40 gal.) Maximum air volume 2.4 m /min (84.8 cu.ft/min) (With hose ø32 mm (1-1/4″) x 1.0 m (3-15/16″)) Vacuum 18 kPa Dimensions (L x W x H) - Page 3 damaged, left outdoors, or dropped When battery pack is not in use, into water, return it to a service keep it away from other metal center. objects, like paper clips, coins, keys, nails, screws or other small Do not handle appliance with wet metal objects, that can make a hands.
-
Page 4: Additional Safety Rules
ADDITIONAL masks that are specially designed to filter out microscopic particles. Direct the exhaust air away from SAFETY RULES your face and body. NOTE: Read the OSHA regulation Read this instruction manual and on silica dust to understand the the charger instruction manual care- requirements needed to reduce fully before use. - Page 5 It will requirement on packaging and labeling also void the Makita warranty for the Makita tool and must be observed. charger. For preparation of the item being shipped,...
-
Page 6: Installing Or Removing Battery Cartridge
Indicating the remaining battery FUNCTIONAL DESCRIPTION capacity CAUTION: Always be sure that the appli- Press the check button on the battery cartridge to indi- ance is switched off and the battery cartridge is cate the remaining battery capacity. The indicator lamps removed before adjusting or checking function on light up for a few seconds. -
Page 7: Overload Protection
Let the appliance and battery(ies) cool down. 0% to 20% If no improvement can be found by restoring protection system, then contact your local Makita Service Center. Charge the Adjusting belts battery The tightness of the shoulder belts, upper and lower belts can be adjusted. - Page 8 Shoulder belts Switch action Fig.5 Fig.8 ► 1. Strap 2. Fastener ► 1. Suction power change button 2. ON/OFF button Upper belt To start the cleaner, simply push the ON/OFF button. To switch off, push the ON/OFF button again. You can change the suction power of the cleaner in four steps by pushing the suction power change button.
-
Page 9: Led Light
LED light LED light is installed in the head of the switch box to ease the operations in dark places. Press and hold button to turn the light on. To turn off, press and hold button again. Fig.11 ► 1. Loop 2. Nozzles Hose hook When you suspend the operation, the hook on the bent pipe assembly can be used for hanging the wand on the lower belt. - Page 10 Using as a cleaner NOTE: By twisting the nozzle while inserting, the noz- zle can be attached to the extension wand securely. NOTE: For the model with ø38 mm hose and front Attaching bent pipe assembly cuff 38, attach the supplied nozzle to the aluminum bending pipe / aluminum straight pipe.
- Page 11 For the ring-type extension wand For the aluminum bending pipe / aluminum straight Shoulder the vacuum cleaner body then twist and insert pipe the extension wand into the bent pipe assembly. To (Only for the model with ø38 mm hose and front cuff 38) disconnect, twist and extract it.
-
Page 12: Connecting The Tool
Connecting the tool NOTE: If the bent pipe assembly is attached to the hose, remove it beforehand. To connect a tool to the cleaner, the dedicated hose and/or additional parts are required. Depending on your cleaner model, you need to replace the hose and/or prepare additional parts. - Page 13 When using ø38 mm hose with front NOTICE: When the filter bag is already full, cuff 38 replace with new one. When the dust bag is already full, empty it. Continuous use with the filter Twist and insert the joint or the front cuff to the bag/dust bag full results in reduced suction power.
-
Page 14: Operation
Insert the filter bag into the slit on the upper side of Align the hole of the filter bag with the hose cuff the room as illustrated. and push the cardboard portion to the end. Make sure that the rubber ring on the filter bag goes over the rim on the hose cuff. - Page 15 Shoulder the vacuum cleaner body and fas- Replace the filter bag when it becomes full. Open ten lower and upper belts. Adjust the tightness as the lid and take out the filter bag. Pull the strip on the necessary. side of the opening to shut the filter bag and dispose of the filter bag in whole.
-
Page 16: Maintenance
Discoloration, deformation or cracks may result. To maintain product SAFETY and RELIABILITY, repairs, any other maintenance or adjustment should be performed by Makita Authorized or Factory Service Centers, always using Makita replacement parts. Cleaning the HEPA filter CAUTION:... -
Page 17: Optional Accessories
If the CAUTION: These accessories or attachments battery cartridge is left inserted, the cleaner may start are recommended for use with your Makita tool unexpectedly and result in injury. specified in this manual. The use of any other CAUTION:... - Page 18 Cleaning NOTE: Check that the cyclone attachment, cleaner, and straight pipe are locked properly before use. When the dust case becomes dirty or the mesh filter is NOTE: Empty the dust case of the cyclone attach- clogged, remove and wash them with water. (Refer to ment and the dust bag of the cleaner when dust has “Disposing of dust”...
- Page 19 Fig.45 ► 1. Mesh filter 2. Hook 3. Port MAKITA LIMITED WARRANTY Please refer to the annexed warranty sheet for the most current warranty terms applicable to this product. If annexed warranty sheet is not available, refer to the warranty details set forth at below website for your respective country.
-
Page 20: Spécifications
FRANÇAIS (Mode d’emploi original) SPÉCIFICATIONS Modèle : VC008G Capacité Sac filtre 2,0 L (0,53 gal.) Sac à poussières 1,5 L (0,40 gal.) Volume d’air maximum 2,4 m /min (84,8 cu.ft/min) (Avec tuyau ø32 mm (1-1/4″) x 1,0 m (3-15/16″)) Aspiration... - Page 21 Utilisez uniquement les accessoires Ne rechargez la batterie qu’avec le recommandés par le fabricant. chargeur spécifié par le fabricant. Un chargeur adéquat pour un type Ne l’utilisez pas avec une batterie donné de batterie peut entraîner un endommagée. Si l’appareil ne fonc- risque d’incendie lorsque utilisé...
- Page 22 L’entretien doit être confié à un répa- Substances explosives ou • rateur qualifié et n’utilisant que des pyrophoriques (nitroglycérine, pièces de rechange identiques aux aluminium, magnésium, titane, pièces d’origine. Cela assurera le main- zinc, phosphore rouge, phos- tien du produit dans un état sécuritaire. phore jaune, celluloïd, etc., et leurs poussières, gaz ou Ne modifiez pas ou n’essayez pas de...
- Page 23 Ne touchez les bornes avec N’utilisez les batteries qu’avec aucun matériau conducteur. les produits spécifiés par Makita. Installer les batteries sur des produits Évitez de ranger la batterie dans non conformes peut entraîner un un conteneur avec d’autres incendie, une chaleur excessive, une objets métalliques tels que...
-
Page 24: Description Du Fonctionnement
ATTENTION : Utilisez exclusivement les bat- teries fabriquées par Makita. Les batteries autres que celles fabriquées par Makita ou les batteries modifiées peuvent exploser et causer un incendie, une blessure ou des dommages. Cela annule aussi la garantie Makita de l’outil et du chargeur Makita. - Page 25 Affichage de la charge restante de la Indication de la charge restante de la batterie batterie Appuyez sur le bouton de vérification de la batterie pour afficher la charge restante de la batterie. Les témoins indicateurs s’allument pendant quelques secondes. Fig.3 ►...
-
Page 26: Protection Contre La Surcharge
Si la situation ne s’améliore pas en restaurant le sys- tème de protection, contactez votre centre de service ATTENTION : N’utilisez les pièces de suspen- Makita local. sion/montage qu’aux fins pour lesquelles elles sont prévues. L’utilisation à toute fin non prévue peut Réglage des ceintures entraîner un accident ou une blessure. - Page 27 Interrupteur Fig.9 ATTENTION : Ne regardez pas directement la Fig.8 lumière ou la source de lumière. Ne dirigez jamais ► 1. Bouton de changement de la puissance d’aspira- la lumière vers les yeux d’autres personnes. tion 2. Bouton ON/OFF (marche/arrêt) NOTE : La lampe à...
- Page 28 L’ensemble de tuyau coudé sert à raccorder le tube de Crochet de tuyau rallonge ou la buse d’aspiration à ce produit. Si vous souhaitez utiliser ce produit en tant qu’aspira- Lorsque vous interrompez le travail, vous pouvez teur, fixez l’ensemble de tuyau coudé au tuyau. utiliser le crochet de l’ensemble de tuyau coudé...
- Page 29 Suivez l’une ou l’autre des procédures ci-dessous, Pour le tube de rallonge annulaire selon le type de tube de rallonge : Enfilez le corps de l’aspirateur sur vos épaules, puis insérez le tube de rallonge en le faisant tourner dans NOTE : Le tube de rallonge coulissant et le tube l’ensemble de tuyau coudé.
- Page 30 Pour le tuyau coudé en aluminium/tuyau rectiligne Raccordement de l’outil en aluminium (Uniquement pour le modèle avec le tuyau de ø38 mm NOTE : Retirez d’abord l’ensemble de tuyau et le manchon avant 38) coudé s’il est fixé au tuyau. Enfilez le corps de l’aspirateur sur vos épaules, puis en tournant le tuyau, insérez-le dans le manchon avant.
- Page 31 Lors de l’utilisation d’un tuyau ø38 mm avec un manchon avant 38 En le faisant tourner, insérez dans l’entrée du tuyau le raccord ou le manchon avant, suivant l’outil à raccorder. Raccordez le manchon avant à la prise de collecte de l’outil.
- Page 32 Déverrouillez le levier et ouvrez le couvercle de AVIS : Lorsque le sac filtre est déjà plein, rem- boîte à poussières. placez-le par un neuf. Si le sac à poussières est déjà plein, videz-le. La puissance d’aspiration sera réduite si vous poursuivez l’utilisation avec le sac filtre ou le sac à...
- Page 33 Lorsque vous utilisez le sac à poussières, insérez sa UTILISATION bordure dans l’interstice. MISE EN GARDE : Les utilisateurs doivent être bien informés sur l’utilisation de l’aspirateur. MISE EN GARDE : Cet aspirateur n’est pas conçu pour l’aspiration des poussières dangereuses.
- Page 34 Remplacez le sac filtre quand il est plein. Ouvrez Appuyez sur le bouton pour commencer le couvercle et retirez le sac filtre. Tirez sur la bande à l’aspiration. Pour modifier la puissance d’aspiration, côté de l’ouverture pour fermer le sac filtre, et jetez tout appuyez sur le bouton jusqu’à...
-
Page 35: Entretien
Pour maintenir la SÉCURITÉ et la FIABILITÉ du produit, les répara- tions et tout autre travail d’entretien ou de réglage doivent être effec- tués dans un centre de service après-vente autorisé ou une usine Makita, exclusivement avec des pièces de rechange Makita. Nettoyage du filtre HEPA ATTENTION : N’utilisez pas l’aspirateur... -
Page 36: Accessoires En Option
Retrait ou pose de l’ensemble de tuyau coudé à complémentaires sont recommandés pour l’utili- fermoir sation avec l’outil Makita spécifié dans ce manuel. Pour le retirer, tirez sur l’ensemble de tuyau coudé en L’utilisation de tout autre accessoire ou pièce com- appuyant sur les deux languettes à... - Page 37 À propos du collecteur cyclone Jetez la poussière du compartiment à poussière et enlevez toute trace de poussière ou de poudre adhérant L’utilisation de l’aspirateur avec le collecteur cyclone à la surface du filtre à tamis. installé réduit la quantité de poussière qui pénètre dans Insérez le compartiment à...
- Page 38 ► 1. Filtre à tamis 2. Crochet ► 1. Filtre à tamis 2. Crochet 3. Port Enlevez la poussière du filtre à tamis, puis lavez-le GARANTIE LIMITÉE MAKITA avec de l’eau. Ensuite, laissez-le sécher complètement. Pour les conditions de garantie en vigueur qui s’ap- pliquent à...
-
Page 39: Instrucciones Importantes De Seguridad
ESPAÑOL (Instrucciones originales) ESPECIFICACIONES Modelo: VC008G Capacidad Bolsa del filtro 2,0 L (0,53 gal.) Bolsa recolectora de polvo 1,5 L (0,40 gal.) Volumen de aire máximo 2,4 m /min (84,8 cu.ft/min) (Con manguera diámetro32 mm (1-1/4″) x 1,0 m (3-15/16″)) Vacío... - Page 40 No lo utilice con una batería dañada. Recargue sólo con el cargador Si el aparato no está funcionando especificado por el fabricante. Un como debiera, se ha dejado caer, se cargador que es adecuado para un ha dañado, se ha dejado a la intem- solo tipo de paquete de baterías puede perie o ha caído sobre agua, llévelo generar riesgo de incendio al ser utili-...
-
Page 41: Reglas De Seguridad Adicionales
Pida que el servicio lo realice un Sustancias explosivas o pirofó- • técnico en reparaciones calificado ricas (nitroglicerina, aluminio, y que utilice únicamente piezas de magnesio, titanio, zinc, fósforo repuesto idénticas a las originales. rojo, fósforo amarillo, celu- Esto garantizará que se mantenga la loide, etc., y su polvo, gases o seguridad del producto. - Page 42 Si deja caer o golpea la aspira- Si el tiempo de operación se ha dora, verifique cuidadosamente acortado en exceso, deje de ope- si hay grietas o daños antes de la rar de inmediato. Podría correrse operación. el riesgo de sobrecalentamiento, posibles quemaduras e incluso No la acerque a estufas ni a otras explosión.
- Page 43 Asimismo, esto inva- Para deshacerse del cartucho de lidará la garantía de Makita para la herramienta y el batería, sáquelo de la herramienta y cargador Makita. deséchelo en un lugar seguro. Siga Consejos para alargar al máximo...
-
Page 44: Descripción Del Funcionamiento
DESCRIPCIÓN DEL PRECAUCIÓN: Introduzca siempre com- pletamente el cartucho de batería hasta que FUNCIONAMIENTO el indicador rojo no pueda verse. Si no, podría accidentalmente salirse de la herramienta y caer al suelo causando una lesión a usted o alguien a su PRECAUCIÓN: Asegúrese siempre de que alrededor. -
Page 45: Protección Contra Sobrecarga
Deje que el aparato y la(s) batería(s) se enfríen. Si no hay ninguna mejora al restaurar el sistema de protec- ción, comuníquese con su centro local de servicio Makita. Sistema de protección del aparato/batería Ajuste de las correas El aparato está equipado con un sistema de protección del aparato/batería. - Page 46 Correas para hombro Accionamiento del interruptor Fig.5 Fig.8 ► 1. Correa 2. Sujetador ► 1. Botón de cambio de potencia de succión 2. Botón de encendido/apagado Correa superior Para poner en marcha la aspiradora, simplemente oprima el botón de encendido/apagado. Para apagarla, oprima el botón de encendido/apagado nuevamente.
-
Page 47: Montaje
Gancho de la manguera Cuando suspenda la operación, el gancho en el con- junto de tubo curvo puede utilizarse para colgar el tubo en la correa inferior. Fig.9 PRECAUCIÓN: No mire a la luz o a la fuente de luz directamente. Nunca apunte la luz a los ojos de otras personas. - Page 48 Uso como aspiradora NOTA: Girándola mientras se inserta, la boquilla puede fijarse firmemente al tubo de extensión. NOTA: Para el modelo con manguera de ø38 mm y Acoplamiento del conjunto de tubo curvo boca delantera 38, acople la boquilla suministrada al tubo curvo/recto de aluminio.
- Page 49 Para el tubo de extensión de tipo anillo Para el tubo curvo de aluminio / tubo recto de alu- Cárguese al hombro el cuerpo de la aspiradora y a minio continuación inserte girando el tubo de extensión en el (solo para el modelo con manguera de ø38 mm y boca conjunto de tubo curvo.
-
Page 50: Conexión De La Herramienta
Conexión de la herramienta NOTA: Si el conjunto de tubo curvo está acoplado a la manguera, extráigalo primero. Para conectar una herramienta a la aspiradora, hacen falta la manguera especificada y/o accesorios adiciona- les. Dependiendo del modelo de aspiradora, necesitará reemplazar la manguera y/o preparar los accesorios adicionales. - Page 51 Al utilizar manguera de ø38 mm con AVISO: Cuando la bolsa del filtro ya esté llena, reem- boca delantera 38 plácela con una nueva. Cuando la bolsa recolectora de polvo ya esté llena, vacíela. El uso continuo de la bolsa Inserte girando la junta o la boca delantera a la del filtro/bolsa recolectora de polvo cuando está...
- Page 52 Desbloquee la palanca y abra la cubierta de la Cuando utilice la bolsa recolectora de polvo, inserte su caja para polvo. reborde en la hendidura. Fig.26 ► 1. Palanca 2. Cubierta de la caja para polvo Fig.28 Inserte la bolsa del filtro en la hendidura en la ►...
-
Page 53: Operación
OPERACIÓN Oprima el botón para comenzar a aspirar. Si desea cambiar la potencia de succión, oprima el botón hasta seleccionar la potencia de succión ADVERTENCIA: Los operadores deberán deseada. Oprima el botón para parar. recibir las instrucciones adecuadas sobre el uso de la aspiradora. -
Page 54: Mantenimiento
Para mantener la SEGURIDAD y FIABILIDAD del pro- ducto, las reparaciones, y cualquier otra tarea de man- tenimiento o ajuste deberán ser realizadas en centros de servicio autorizados o de fábrica Makita, empleando siempre repuestos Makita. Limpieza del filtro HEPA Fig.33... - Page 55 Para instalar el filtro HEPA, inserte el lado sin la Desatascamiento lengüeta en el soporte y luego empuje el filtro HEPA hacia abajo hasta que la lengüeta quede asegurada por Para reparar los atascamientos, extraiga la manguera la varilla. o el tubo de extensión o el conjunto de tubo curvo para comprobar su interior.
-
Page 56: Accesorios Opcionales
Estos accesorios o aditamen- uso es algo sencillo. tos están recomendados para utilizarse con su PRECAUCIÓN: herramienta Makita especificada en este manual. Asegúrese siempre de que la El empleo de cualquier otro accesorio o aditamento herramienta esté apagada y el cartucho de batería puede conllevar el riesgo de lesiones personales. - Page 57 Eliminación del polvo Limpieza Cuando se haya acumulado el polvo hasta la línea de Cuando la caja para polvo se ensucia o el filtro de malla llenado completo de la caja para polvo, siga el procedi- se obstruye, quítelos y lávelos con agua. (Consulte la miento a continuación y deseche el polvo.
- Page 58 Fig.45 ► 1. Filtro de malla 2. Gancho 3. Puerto GARANTÍA LIMITADA DE MAKITA Ésta Garantía no aplica para México Consulte la hoja de la garantía anexa para ver los términos más vigentes de la garantía aplicable a este producto.
- Page 60 Para reducir la exposición a estos productos químicos: trabaje en un área bien ventilada y póngase el equipo de seguridad indicado, tal como las máscaras contra polvo que están especialmente diseñadas para filtrar partículas microscópicas. Makita Corporation 3-11-8, Sumiyoshi-cho, Anjo, Aichi 446-8502 Japan 885948A930...