Table of Contents
Advertisement
Quick Links
Advertisement
Table of Contents

Related Manuals for AEG BSE577221M


Summary of Contents for AEG BSE577221M
- Page 1 BSE577221M User Manual Steam oven BSK577221M USER MANUAL...
-
Page 2: Table Of Contents
15. ENVIRONMENTAL CONCERNS..............42 FOR PERFECT RESULTS Thank you for choosing this AEG product. We have created it to give you impeccable performance for many years, with innovative technologies that help make life simpler – features you might not find on ordinary appliances. Please spend a few minutes reading to get the very best from it. -
Page 3: Safety Information
ENGLISH SAFETY INFORMATION Before the installation and use of the appliance, carefully read the supplied instructions. The manufacturer is not responsible for any injuries or damage that are the result of incorrect installation or usage. Always keep the instructions in a safe and accessible location for future reference. -
Page 4: Safety Instructions
Disconnect the appliance from the power supply • before carrying out any maintenance. If the mains power supply cable is damaged, it must • be replaced by the manufacturer, its Authorised Service Centre or similarly qualified persons to avoid an electrical hazard. - Page 5 ENGLISH • Keep the minimum distance from electrical ratings of the mains power other appliances and units. supply. • Before mounting the appliance, check • Always use a correctly installed if the oven door opens without shockproof socket. restraint. • Do not use multi-plug adapters and •...
- Page 6 – do not put ovenware or other objects in the appliance directly Total power (W) Section of the ca‐ on the bottom. ble (mm²) – do not put aluminium foil directly on the bottom of cavity of the maximum 1380 3 x 0.75...
- Page 7 ENGLISH • Clean regularly the appliance to operation to a well ventilated prevent the deterioration of the area. surface material. • Small pets can also be highly • Clean the appliance with a moist soft sensitive to the localized temperature cloth.
-
Page 8: Installation
• Contact your municipal authority for trapped in the appliance. information on how to dispose of the appliance. 3. INSTALLATION 3.1 Building in WARNING! Refer to Safety chapters. www.youtube.com/electrolux www.youtube.com/aeg How to install your AEG/Electrolux Oven - Column installation (*mm) min. 550 min. 560... - Page 9 ENGLISH (*mm) min. 550 min. 560 3.2 Securing the oven to the cabinet...
-
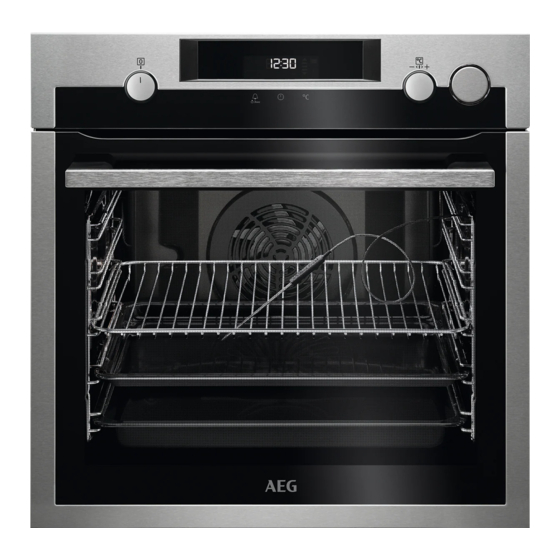
Page 10: Product Description
4. PRODUCT DESCRIPTION 4.1 General overview Control panel Knob for the heating functions Display Control knob (for the temperature) Water drawer Heating element Socket for the food sensor Lamp Shelf support, removable Draining pipe Water outlet valve Shelf positions Steam inlet 4.2 Accessories... -
Page 11: Before First Use
ENGLISH 5.3 Display A. Timer / Temperature B. Heat-up and residual heat indicator C. Water drawer D. Food Sensor (selected models only) E. Door lock (selected models only) F. Hours / minutes G. Demo Mode (selected models only) H. Clock functions 6. - Page 12 Wait for at least 60 minutes after each use of the steam function to prevent hot Step 3 When the cooking ends, turn water from exiting the water outlet valve. the knobs to the off position to turn off the oven.
- Page 13 ENGLISH Heating func‐ Application tion To bake and roast food on one shelf position. Conventional Cooking To bake cakes with crispy bottom and to pre‐ serve food. Bottom Heat To defrost food (vegeta‐ bles and fruit). The de‐ 3. Open the oven door and put the frosting time depends on connector (B) into the outlet valve Defrost...
-
Page 14: Clock Functions
7.8 Notes on: Moist Fan When you use this function the lamp automatically turns off after 30 sec. Baking For the cooking instructions refer to This function was used to comply with "Hints and tips" chapter, Moist Fan the energy efficiency class and Baking. - Page 15 ENGLISH 8.3 How to set function: Duration Step 1 Set a heating function. Step 2 - press repeatedly. - starts to flash. Step 3 Turn the control knob to set the minutes. - press to confirm. Step 4 Turn the knob for the temperature to set the hour. - press to confirm.
-
Page 16: Using The Accessories
Step 5 Turn the knob for the temperature to set the hour for the function: End Time. Press: Step 6 Turn the knob for the temperature to set the minutes for the function: End Time. Press: The display shows: the set temperature, Oven turns on automatically later on, works for the set Duration time and stops at the set End Time. - Page 17 ENGLISH 2. Put the point of the core temperature 7. Turn off the oven. sensor (with the symbol on the WARNING! handle) into the centre of the meat. Be careful when you remove 3. Put the plug of the core temperature the tip and plug of the core sensor into the socket on the top of temperature sensor.
- Page 18 Wire shelf: Push the shelf between the guide bars of the shelf support and make sure that the feet point down. Deep pan: Push the tray between the guide bars of the shelf support. Wire shelf, Deep pan: Push the tray between the guide bars of the shelf support and the wire shelf on the guide bars above.
- Page 19 ENGLISH Make sure the supports of the wire shelf Make sure the supports of the wire shelf point up. point down. 9.4 Accessories for steam The dietary baking dish for steam cooking functions cooking Dietary Baking dish consists of a glass The steam kit accessories bowl (A), a lid (B), injector tube (C), are not supplied with the...
-
Page 20: Additional Functions
Injector, injector tube, and a steel grill. Steel grill (E) • Do not put the hot baking dish on • Do not clean the baking dish with cold / wet surfaces. abrasives, scourers and powders. • Do not pour cold liquids into the 9.5 Steam cooking in a... -
Page 21: Hints And Tips
ENGLISH the temperature in the oven is more than 40 °C.Turn the knob for the temperature Step 1 Ensure the knob for the heat‐ left or right to check the oven ing functions is in the off posi‐ temperature. tion. 10.4 Automatic switch-off Step 2 - press and hold at... - Page 22 Count the shelf positions from the bottom Leave the meat for approximately 15 of the oven floor. minutes before carving so that the juice does not seep out. Your oven may bake or roast differently to the oven you had before.The below...
- Page 23 ENGLISH FLANS (°C) (min) Lasagne 170 - 180 40 - 50 Potato gratin 160 - 170 50 - 60 1 (2 and 4) Use the second shelf position. Use the wire shelf. (°C) (min) MEAT Whole goose, 3 160 - 170 150 - 200 (°C) (min)
- Page 24 11.3 Cooking in the dietary baking dish MEAT Use the function: True Fan + Steam. (min) Use the second shelf position. Cooked ham 55 - 65 Set the temperature to 130°C. Kasseler 80 - 100 Set the temperature to 130°C.
- Page 25 ENGLISH Conventional Cook‐ True Fan Cooking CAKES (min) (°C) (°C) Shortbread 3 (2 and 4) 20 - 30 Cake mould dough Buttermilk 80 - 100 Cake mould, cheesecake Ø 26 cm Strudel 60 - 80 Baking tray Jam tart 30 - 40 Cake mould, Ø...
- Page 26 Conventional Cook‐ True Fan Cooking CAKES (min) (°C) (°C) Meringues, 2 and 4 80 - 100 Baking tray two levels, preheat the empty oven Buns, preheat 12 - 20 Baking tray the empty oven Eclairs 25 - 35 Baking tray...
- Page 27 ENGLISH Conventional Cooking True Fan Cooking FLANS (min) (°C) (°C) Pasta flan, preheating 40 - 50 is not needed Vegetable flan, pre‐ 45 - 60 heating is not needed Quiches 50 - 60 Lasagne 180 - 190 180 - 190 25 - 40 Cannelloni 180 - 190...
- Page 28 Conventional Cooking True Fan Cooking MEAT (min) (°C) (°C) Whole duck 120 - 150 Whole goose 150 - 200 Rabbit, cut in pieces 60 - 80 Hare, cut in pieces 150 - 200 Whole pheasant 90 - 120 Use the second shelf position.
- Page 29 ENGLISH VEAL POULTRY (°C) (min) (°C) (min) Veal knuckle, 1.5 160 - 180 120 - 150 Chicken, half, 0.4 190 - 210 35 - 50 - 2 kg - 0.5 kg each Chicken, poulard, 190 - 210 50 - 70 1 - 1.5 kg LAMB Duck, 1.5 - 2 kg...
- Page 30 11.7 Dehydrating - True Fan Cooking FRUIT Cover trays with grease proof paper or baking parchment. For a better result, stop the oven halfway Apple slices 6 - 8 through the drying time, open the door Pears 6 - 9 and let it cool down for one night to complete the drying.
- Page 31 ENGLISH 11.10 Moist Fan Baking For the best results follow suggestions listed in the table below. (°C) (min) Sweet rolls, 16 baking tray or dripping 20 - 30 pieces Rolls, 9 pieces baking tray or dripping 30 - 40 Pizza, frozen, wire shelf 10 - 15 0.35 kg...
- Page 32 (°C) (min) Savory pastry, 20 baking tray or dripping 25 - 30 pieces Short crust bis‐ baking tray or dripping 25 - 35 cuits, 20 pieces Tartlets, 8 pieces baking tray or dripping 20 - 30 Vegetables, baking tray or dripping 35 - 45 poached, 0.4 kg...
- Page 33 ENGLISH (°C) (min) Apple True Fan Wire shelf 2 70 - 90 pie, 2 Cooking tins Ø20 Sponge Conven‐ Wire shelf 2 40 - 50 Preheat the oven cake, tional for 10 minutes. cake Cooking mould Ø26 cm Sponge True Fan Wire shelf 2 40 - 50 Preheat the oven...
-
Page 34: Care And Cleaning
12. CARE AND CLEANING WARNING! Refer to Safety chapters. 12.1 Notes on cleaning Clean the front of the oven with a soft cloth with warm water and a mild detergent. Use a cleaning solution to clean metal surfaces. Clean stains with a mild detergent. - Page 35 ENGLISH Step 3 Pull the rear end of the shelf support away from the side wall and remove it. Step 4 Install the shelf supports in the opposite sequence. 12.3 How to use: Pyrolysis CAUTION! If there are other appliances Clean the oven with Pyrolysis.
- Page 36 12.4 Cleaning reminder 12.5 How to clean: Water tank The oven reminds you when to clean the Do not pour water into the water tank oven with: pyrolytic cleaning. during the cleaning. PYR - flashes in the display for 10 sec after each activation and deactivation of the oven.
- Page 37 ENGLISH Water hardness Test strip Calcium de‐ Water clas‐ Clean the posit (mg/l) sification water tank Level every 22 - 28 over 151 very hard 30 cycles - 1 month 12.6 How to remove and install: Door The oven door has three glass panels. You can remove the oven door and the internal glass panels to clean them.
- Page 38 Step 7 Hold the door trim (B) on the top edge of the door at the two sides and push inwards to release the clip seal. Step 8 Pull the door trim to the front to re‐ move it.
-
Page 39: Troubleshooting
ENGLISH 12.7 How to replace: Lamp Always hold the halogen lamp with a cloth to prevent grease residue from WARNING! burning on the lamp. Risk of electric shock. The lamp can be hot. Before you replace the lamp: Step 1 Step 2 Step 3 Turn off the oven. - Page 40 Error codes Cleaning You removed the The steam cooking There is no lime Food Sensor plug does not work. residue in the steam from the socket. inlet opening. The oven door is The steam cooking There is water in closed or the door does not work.
-
Page 41: Energy Efficiency
Serial number (S.N.) ......... 14. ENERGY EFFICIENCY 14.1 Product Information Sheet according to UK Ecodesign and Energy Labelling Regulations Supplier's name BSE577221M 949494757 Model identification BSK577221M 949494758 Energy Efficiency Index 81.2 Energy efficiency class Energy consumption with a standard load, conven‐... -
Page 42: Environmental Concerns
Residual heat Keep food warm If a programme with the Duration or End Choose the lowest possible temperature Time selection is activated and the setting to use residual heat and keep a cooking time is longer than 30 min, the meal warm. - Page 44 www.aeg.com/shop...