Table of Contents
Advertisement
Quick Links
All operators must fully read and understand
this operator's manual before using the chipper.
Keep this manual for future reference.
HANSA NEW ZEALAND
+64 7 849 4749
www.hansachippers.com
HANSA C45
Operation, maintenance, and safety manual
info@hansaproducts.co.nz
Register your Hansa chipper to qualify
www.hansaproducts.com/registration
HANSA AUSTRALIA
1800 426 722
www.hansaproducts.com.au
info@hansaproducts.com.au
Advertisement
Table of Contents

Related Manuals for Hansa C45


Summary of Contents for Hansa C45
- Page 1 HANSA C45 Operation, maintenance, and safety manual All operators must fully read and understand Register your Hansa chipper to qualify this operator’s manual before using the chipper. www.hansaproducts.com/registration Keep this manual for future reference. HANSA NEW ZEALAND HANSA AUSTRALIA +64 7 849 4749 info@hansaproducts.co.nz...
-
Page 2: Table Of Contents
OLT TORQUE & ....................................26 AINTENANCE SERVICE INTERVALS SPECIFICATIONS ....................................... 27 DECALS ..........................................28 HANSA GLOBAL INDUSTRIAL LIMITED WARRANTY ........................... 32 COMMISSIONING CHECKLIST AND REGISTRATION ..........................34 Hansa C45 O&M Manual – OM-027 First Release 4/05/2021 © Hansa Chippers 2021... -
Page 3: What Can My Hansa Chipper Process
Intended uses of the chipper The Hansa C45 chipper is built to process organic material including wooden branches not exceeding 178mm in diameter. It is designed to be used on by commercial arborists, tree contractors and hire / rental companies. Do NOT use the chipper for any other purpose. -
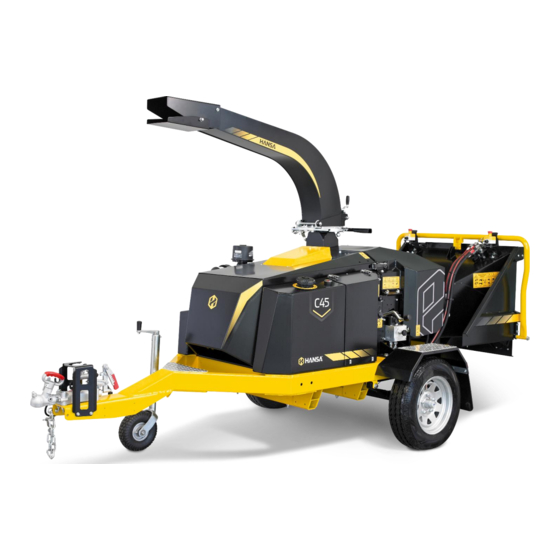
Page 4: Chipper Overview
Chipper overview Hansa C45 O&M Manual – OM-027 First Release 4/05/2021 © Hansa Chippers 2021... -
Page 5: Safety
Always wear hearing protection when operating the machinery Discharge material Eye injury, minor cuts Always wear safety glasses when operating the machinery Do NOT stand in front of the outlet chute Hansa C45 O&M Manual – OM-027 First Release 4/05/2021 © Hansa Chippers 2021... -
Page 6: Towing Safety
Ensure the jockey wheel is in the up position and locked away during transport Ensure the machine is towed in accordance with local trailer transport regulations Turn the machine off while towing Hansa C45 O&M Manual – OM-027 First Release 4/05/2021 © Hansa Chippers 2021... -
Page 7: Chipping Safety
✓ Check direction of the discharge chute ✓ Check guards are all in place and in good condition ✓ Check all labels are legible. Replace if necessary (contact Hansa for replacements) ✓ Refer to maintenance section for more details Safe setup procedures... - Page 8 This will damage the sharp edge of the cutting knives and can rebound and injure the operator Put root balls and dead wood into the chipper Hansa C45 O&M Manual – OM-027 First Release 4/05/2021 © Hansa Chippers 2021...
- Page 9 Inside or near the opening of the discharge chute Near any moving part Use the feed control bar as a handle to manoeuvre the machine Hansa C45 O&M Manual – OM-027 First Release 4/05/2021 © Hansa Chippers 2021...
-
Page 10: Operation
Pushing in short, brushy and very leafy materials • Keeping the inlet table clear Outlet chute adjustment The C45 is fitted with a rotating outlet chute and deflector, allowing the operator to control the direction of material discharge from the machine: Outlet height adjustment Outlet deflector adjustment... -
Page 11: Feed Roller Control
WARNING! Be careful using the machine with auto-feed disabled as the machine can be stalled easily. Hansa C45 O&M Manual – OM-027 First Release 4/05/2021 © Hansa Chippers 2021... -
Page 12: Adjust The Auto-Trip Setting
(highlighted in blue). navigate “OK” to select Once the desired setting has been selected, push the “ESC” button twice to go back to the main menu Hansa C45 O&M Manual – OM-027 First Release 4/05/2021 © Hansa Chippers 2021... -
Page 13: Hour Meter / Tachometer
Emergency stop The C45 has two emergency stops on the top of the inlet chute. The emergency stops act as an immediate kill switch to the engine. It does not immediately stop the rotor from spinning. The rotor will continue to spin for some time due to its rotational inertia. The feed roller, however, will stop almost immediately. -
Page 14: Starting Procedure
Increase throttle to maximum for chipping (move the control throttle lever to the highest position). (max) Note: Engine must run at full throttle for the automatic feed control system to operate correctly. Hansa C45 O&M Manual – OM-027 First Release 4/05/2021 © Hansa Chippers 2021... -
Page 15: Shutdown Procedure
Do not open the rotor housing cover until the engine and cutting disk have completely stopped and the rotor is disengaged. Hansa C45 O&M Manual – OM-027 First Release 4/05/2021 © Hansa Chippers 2021... -
Page 16: Troubleshooting
Engine is not running at full throttle Increase the engine throttle to max RPM WARNING! Do NOT open the housing unless the engine and cutting rotor have completely stopped. Hansa C45 O&M Manual – OM-027 First Release 4/05/2021 © Hansa Chippers 2021... -
Page 17: Maintenance & Service
With the machine off and cutting rotor stopped, the feed roller area can be accessed safely. Do NOT attempt to access this area unless the engine is off, and rotor has stopped turning. Hansa C45 O&M Manual – OM-027 First Release 4/05/2021 © Hansa Chippers 2021... -
Page 18: Opening The Rotor Cover For Access To Cutting Rotor
Blunt knives result in damage to the chipper How to re-sharpen the knives: If you don’t have a surface grinder or are unsure how to re-sharpen the knives, contact a professional saw doctor or Hansa to arrange re-sharpening. WARNING! Be careful when working around the sharp knives. - Page 19 Note: You do not need to sharpen your knives unless both sides of the reversible knives have been used. Hansa C45 O&M Manual – OM-027 First Release 4/05/2021 © Hansa Chippers 2021...
- Page 20 WARNING! Every time the knife clamping bolts are torqued up to 190 Nm and loosened off again, the life of the bolts is reduced. The knife clamping bolts must be replaced at most after every six sharpens. Contact Hansa for replacement bolts (M16x50 countersunk bolts of grade 12.9 and Zinc finish).
-
Page 21: Anvil Adjustment
If both sides of the anvil are blunt: remove the anvil and replace it with a new one. Contact Hansa if a replacement anvil is required. Tighten the clamping bolts, ensuring there is a spring washer between the clamping plate and each nut. Torque the nuts to 44 Nm. -
Page 22: Belt Tension
Belt tension Correct belt tension is crucial for minimising belt wear and maximising machine efficiency. The C45 uses a flexible tensioning device (shown in blue below). The tension of the device is set by adjusting the angle of how much the device flexes. -
Page 23: Belt Replacement
Worn cover on back of belt Sidewall belt wear To remove the belts, open the bonnet and fully disengage the belts. The C45 requires three SPB1340 belts. Hansa C45 O&M Manual – OM-027 First Release 4/05/2021 © Hansa Chippers 2021... -
Page 24: Grease Points
2. One bearing on the right-hand side of the feed roller 3. Two bearings on either side of the feed roller pivot (also referred to as “swing arm”): Hansa C45 O&M Manual – OM-027 First Release 4/05/2021 © Hansa Chippers 2021... - Page 25 ‘Engagement Guard’ to reach the grease nipple by removing the 3 mounting bolts 6. One grease nipple for the feed roller spline connection: 7. Two grease nipples on the tow coupling Hansa C45 O&M Manual – OM-027 First Release 4/05/2021 © Hansa Chippers 2021...
-
Page 26: Engine Output Shaft Greasing
Fill the hydraulic oil tank so that the oil level is at the line indicated by the cold oil level label to the left of the oil level indicator. The level should be checked with the engine off while the oil is cold. For any repair in the hydraulic system, contact Hansa Products or seek advice from a competent service agent. -
Page 27: Tyre Pressure
Replacing rotor bearing on inlet chute side of rotor: It is recommended to have this bearing replaced by a specialist Hansa dealer. Tyre Pressure The recommended tyre pressure is 65 Psi. Bolt torque When servicing the machine, ensure any bolts you remove are done back up and torqued to the values listed in the torque table... -
Page 28: Maintenance & Service Intervals
Nuts & bolts – check torque & • replace if worn Battery – replace • Drive belts – replace • Knives – replace • Anvil – replace • Hazard labels – replace • Hansa C45 O&M Manual – OM-027 First Release 4/05/2021 © Hansa Chippers 2021... -
Page 29: Specifications
Single roller, spring mounted, 220 mm (8.7”) diameter Feed speed range 0-40 m/min (135 f/min), full reverse Discharge System Discharge height 2010-2186 mm (adjustable) Degree of rotation 360° Transmission System Belt drive 3x SPB1340 Hansa C45 O&M Manual – OM-027 First Release 4/05/2021 © Hansa Chippers 2021... -
Page 30: Decals
Side of inlet chute (both sides) Inlet chute safety Inside of inlet table Rotor engagement control Belt guard next to engagement arm Throttle control Below throttle lever Hansa C45 O&M Manual – OM-027 First Release 4/05/2021 © Hansa Chippers 2021... - Page 31 Weekly service checks Rotor cover RH side Start procedure Under display screen Stop procedure Under start procedure Outlet chute safety Outlet chute Hansa C45 O&M Manual – OM-027 First Release 4/05/2021 © Hansa Chippers 2021...
- Page 32 Hydraulic oil tank Hydraulic oil tank Feed roller guard safety (keep clear) Feed roller guard RH side Feed roller cover safety (keep clear) Feed roller cover LH side Hansa C45 O&M Manual – OM-027 First Release 4/05/2021 © Hansa Chippers 2021...
- Page 33 Rotor cover (LH side near throttle) Hydraulic oil fill level On hydraulic tank. (Label arrow aligned with 80 degree temperature mark to the left of the hydraulic level gauge) Hansa C45 O&M Manual – OM-027 First Release 4/05/2021 © Hansa Chippers 2021...
-
Page 34: Hansa Global Industrial Limited Warranty
HANSA offers a special extended warranty period (“Extended Warranty”) to new HANSA products purchased from an authorised HANSA dealer. The Extended Warranty period is set out below. In order to take advantage of the Extended Warranty you must: 1. Register your HANSA product through the HANSA warranty registration process and identify your HANSA product by its machine serial number. - Page 35 General 1. Your rights: a. HANSA will recognise any implied rights and remedies that are available to you at law in the applicable territory and that cannot be excluded by HANSA. b. In New Zealand, Hansa Products Ltd will recognise your statutory rights under the Consumers Guarantee Act 1993 (provided that you are a consumer for the purposes of that Act).
-
Page 36: Commissioning Checklist And Registration
It is the retailers’ responsibility to ensure that this chipper is correctly commissioned for use, and that the purchase is registered with Hansa Chippers so as to provide the owner with the full benefit of the warranty policy. Product registration must be completed online: www.hansaproducts.com/registration...