Table of Contents
Advertisement
Quick Links
Download this manual
See also:
Owner's Manual
Advertisement
Table of Contents

Related Manuals for Tripp Lite B050-000


Summary of Contents for Tripp Lite B050-000
- Page 1 B050-000 Installation and User Guide...
- Page 2 B050-000 Installation and User Guide: Copyright © 2005-2006 Tripp Lite, 1111 W. 35th Street, Chicago, IL 60609 USA Based on Firmware 04.01.00 Last updated on 28 April 2006 Document ID:...
-
Page 3: Table Of Contents
Installation...1 Connectors and Indicators ...1 General Overview...1 Front Side Connectors (Figure 1-2) ...1 Rear Side Connectors (Figure 1-3)...2 Connecting the B050-000 to the Host System...3 Initial Network Configuration ...3 B050-000 Setup Tool ...4 Main Window...4 MAC Address Detection...5 Authentication ...6 Configuration via Serial Interface...6... - Page 4 Resetting the B050-000 to its Factory Settings...24 Using the Serial Interface...24 5. Usage ...27 Prerequisites...27 Login into the B050-000 and logout...28 Login into the B050-000 ...28 Navigation ...29 Logout from the B050-000 ...30 The Remote Console ...31 General Description...31 Main Window...31 Optimizing the Video Picture ...42...
- Page 5 G. Specifications...105 Sizes and Weight ...105 Environment ...105 Temperature...105 Humidity...105 H. B050-000 Operation Advices...107 I. Tripp Lite Warranty Information...109 Limited Warranty ...109 Customer Remedies ...109 No Other Warranties...109 No Liability For Consequential Damages ...109 J. GNU General Public License (GPL)...111...
-
Page 7: Preface
Limited Warranty The buyer agrees that if this product proves to be defective, Tripp Lite is only obli- gated to repair or replace this product at Tripp Lite’s discretion according to the terms and conditions of Tripp Lite’s general trading conditions. Tripp Lite shall not be held liable for any loss, expenses or damage, directly, incidentally or consequentially re- sulting from the use of this product. -
Page 8: Limitations Of Liability
Preface Limitations of Liability Tripp Lite shall in no event be held liable for any loss, expenses or damages of any kind whatsoever, whether direct, indirect, incidental, or consequential (whether aris- ing from the design or use of this product or the support materials provided with the product). -
Page 9: The Quick Start Guide
All data is transmitted with the TCP/IP protocol family. The B050-000 can be used in a multi-administrator and multi-server environment as well. Combin- ing the B050-000 with a KVM switch allows to access multiple remote servers over one single remote console. -
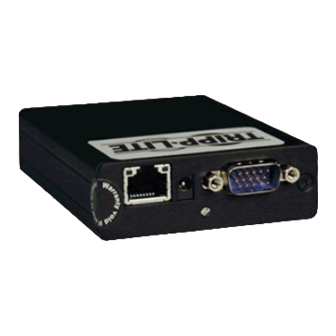
Page 10: Rear Side Connectors (Figure 1-3)
Displays the status of the B050-000: LED off: the B050-000 has no or not enough power • LED blinking: the B050-000 is booting up (if this process takes longer than one • minute, the reason may be a lack of power). -
Page 11: Connecting The B050-000 To The Host System
B050-000. The USB standard guarantees up to 500mA power per single USB port. The B050-000 needs up to 700mA current and therefore does not work on USB alone. However, most of the current USB ports provide more than 700mA so that no external power is needed to power the B050- 000. -
Page 12: Initial Network Configuration
CD ROM delivered with this package. B050-000 Setup Tool The setup tool is used to determine the IP address assigned to the B050-000 by the DHCP server or to change the device’s initial network configuration. -
Page 13: Mac Address Detection
MAC address is the same MAC address printed on the white sticker placed on the back of the B050-000. If the B050-000 is connected via USB, it is classified as a USB device and an appropriate drive letter is chosen for this device. -
Page 14: Authentication
Configuration via Serial Interface To configure the B050-000 via serial interface both a serial port replicator cable and a null modem cable are required. . (available separately). Connect the Null Modem Cable to the serial interface with the black connector on the port replicator. -
Page 15: Web Interface
The Remote Console is the redirected screen, keyboard and mouse of the remote host system in which the B050-000 is installed. The web browser which is used for accessing the B050-000 has to supply a Java Runtime Environment version 1.1 or higher. - Page 16 Auto Adjust button If the video displayed is of bad quality or distorted in some way, press this but- ton and wait a few seconds while the B050-000 tries to adjust itself for the best possible video quality. Sync Mouse Choose this option in order to synchronize the local with the remote mouse cur- sor.
-
Page 17: Introduction
Features The B050-000 defines a new class of remote access devices . It combines digital remote access via IP networks with comprehensive and integrated system management. The B050-000 offers convenient, remote KVM access and control via LAN or Inter- net. -
Page 18: B050-000 System Components
• When the Server is up and running The B050-000 gives you full control over the remote server. The Management Console allows you to access the remote server’s graphics, keyboard and mouse and to send special commands to the server. - Page 19 Using the B050-000, administrators can determine which kind of serious hardware failure has occurred (see Table 2-2). Table 2-2. Host system failures and how they are detected Type of failure Hard disk failure Power cable detached, power supply failure CPU, Controller, main board failure...
- Page 20 Chapter 2. Introduction...
-
Page 21: Installation
All data is transmitted with the TCP/IP protocol family. The B050-000 can be used in both a multi-administrator and multi-server environ- ment. Combining one or more B050-000 s with a single KVM switch allows access to multiple servers on a single remote console. -
Page 22: Rear Side Connectors
Displays the status of the B050-000: LED off: the B050-000 has no or not enough power • LED blinking: the B050-000 is booting up (if this process takes longer than one • minute, the reason may be a lack of power). -
Page 23: Connecting The B050-000 To The Host System
B050-000. The USB standard guarantees up to 500mA power per single USB port. The B050-000 needs up to 700mA current and therefore does not work on USB alone. However, most of the current USB ports provide more than 700mA so that no external power is needed to power the B050- 000. -
Page 24: Connecting Ethernet
Chapter 3. Installation Connecting a Local Console To connect a local console to the host system besides the B050-000 you may attach a monitor, a keyboard and a mouse to the connectors on the port replicator (available separately) . Connecting Ethernet The front side of the B050-000 provides a RJ45 connector for Ethernet. -
Page 25: Configuration
IP configuration that is necessary to access the B050-000 for the first time. B050-000 Setup Tool The setup tool is used to determine the IP address assigned to the B050-000 by the DHCP server or to change the device’s initial network configuration. -
Page 26: Mac Address Detection
MAC address is the same MAC address printed on the white sticker placed on the back of the B050-000. If the B050-000 is connected via USB, it is classified as a USB device and an appropriate drive letter is chosen for this device. -
Page 27: Authentication
Initial Configuration via DHCP Server By default, the B050-000 will try to contact a DHCP server in the subnet to which it is physically connected. If a DHCP server is found, it may provide a valid IP address, gateway address and net mask. - Page 28 Chapter 4. Configuration Initial Configuration via Serial Console To configure the B050-000 via serial interface both a serial port replicator cable and a null modem cable are required (available separately). Using a serial terminal, the B050-000 has a serial line interface (rear side). This connec- tor is compliant with the RS 232 serial line standard.
-
Page 29: Web Interface
Keyboard/Mouse in Chapter 6 for more details. B050-000 Keyboard Settings The B050-000 settings for the host’s keyboard type have to be correct in order to make the remote keyboard work properly. Check the settings in the B050-000 front-end. See the Section called Keyboard/Mouse in Chapter 6 for details. -
Page 30: Auto Mouse Speed And Mouse Synchronization
Chapter 4. Configuration Fixed Mouse Speed This mode just translates the mouse movements from the Remote Console in a way that one pixel move will lead to n pixel moves on the remote system. This parameter n is adjustable with the scaling. It should be noted that this works only when mouse acceleration is turned off on the remote system. -
Page 31: Host System Mouse Settings
The following limitations do not apply in case of USB and Mouse Type “MS Windows 2000 and newer”. While the B050-000 works with accelerated mice and is able to synchronize the lo- cal with the remote mouse pointer, there are the following limitations which may... -
Page 32: Video Modes
Reset the B050-000 and immediately press the “ESC” key. On your screen a command prompt “=>” will be visible. Enter the command “defaults”, press the “Enter” key and wait for a few seconds for the B050-000 to reboot. Now, you may use the default settings as described in the Section called Initial Configuration. - Page 33 Chapter 4. Configuration Figure 4-4. Terminal with reset messages...
- Page 34 Chapter 4. Configuration...
-
Page 35: Usage
A standard Telnet client can be used to access an arbitrary device connected to the B050-000’s serial port via a terminal mode. The B050-000 also offers SSH (Secure Shell) access as a secure alternative to Tel- net. The primary interface of the B050-000 is the HTTP interface. This is covered exten- sively in this chapter. -
Page 36: Login Into The B050-000 And Logout
The address used might be a plain IP address or a host and domain name, in case you have given your B050-000 a symbolic name in the DNS. For instance, type the following in the address line of your browser when establishing an unsecured connection: http://192.168.1.22/... -
Page 37: Navigation
Your web browser has to accept cookies or else login is not possible. The B050-000 has a built-in super user that has all the permissions to administrate your B050-000. See the following table for the default settings. Please note that the user “super”... -
Page 38: Logout From The B050-000
Chapter 5. Usage Table 5-2. Buttons from the front end If there is no activity for half an hour, the B050-000 will log you out automatically. A click on one of the links will bring you back to the login screen. -
Page 39: The Remote Console
The Remote Console window is a Java Applet that tries to establish its own TCP connection to the B050-000. The protocol that is run over this connection is neither HTTP nor HTTPS, but RFB (Remote Frame Buffer Protocol). Currently RFB tries to establish a connection to port #443. - Page 40 Auto Adjust button If the video displayed is of bad quality or distorted in some way, press this but- ton and wait a few seconds while the B050-000 tries to adjust itself for the best possible video quality. Sync Mouse Choose this option in order to synchronize the local with the remote mouse cur- sor.
- Page 41 To open the Options menu click on the button “Options”. See the Section called Remote Console Options for a detailed description of the available options for the B050-000. Remote Console Options To open the Options menu click on the button “Options”.
- Page 42 Chapter 5. Usage Scaling Allows you to scale down the Remote Console. You can still use both mouse and keyboard, however the scaling algorithm will not preserve all display details. Figure 5-7. Remote Console Options Menu: Scaling Mouse Handling The submenu for mouse handling offers two options for synchronizing the local and the remote mouse pointer as explained in the Section called Mouse, Keyboard and Video configuration in Chapter 4.
- Page 43 B050-000 is active and passing through the incoming signal from the host system. The option Noise Filter defines how the B050-000 reacts to small changes in the video input signal. A large filter setting needs less network traffic and leads to a faster video display but small changes in some display regions may not be recog- nized immediately.
- Page 44 Chapter 5. Usage Video Settings through the remote console Brightness Controls the brightness of the picture. Contrast Controls the contrast of the picture. Clock Defines the horizontal frequency for a video line and depends on the video mode. Different video card types may require different values here. The de- fault settings in conjunction with the auto adjustment procedure should be adequate for all common configurations.
- Page 45 Use this option to refresh the video picture. The video data for the Remote Console is updated completely. On startup of the Remote Console, the B050-000 transmits the entire video picture from the remote host. Subsequently, the parts of the video picture that did not change are filtered and not transmitted, again.
- Page 46 Chapter 5. Usage Show • Displays the Soft Keyboard. Mapping • Used for choosing the according language and country mapping of the Soft Key- board. Figure 5-11. Soft Keyboard Figure 5-12. Soft Keyboard Mapping...
- Page 47 Local Keyboard Used to change the language mapping of your browser machine running the Re- mote Console Applet. Normally, the applet determines the correct value automati- cally. However, depending on your particular JVM and your browser settings this is not always possible. A typical example is a German localized system that uses a US-English keyboard mapping.
- Page 48 Chapter 5. Usage Figure 5-14. Remote Console Options: Encoding compression Color depth • Set the desired color depth. You may select between 8 or 16 bit for Video Opti- mized/compression level 0, or between 1 and 8 bit for compression level 1 to 9. The higher the color depth, the more video information has to be captured and to be transferred.
- Page 49 “Video Optimized”. As a general result, the data rate is reduced (less bits per color). Furthermore, the B050-000 will not have to do any video compression. In total, this will lead to less transfer time of the motion picture.
-
Page 50: Optimizing The Video Picture
The next button displays the Remote Console Access settings. Table 5-3. Buttons displaying the access state One single user is connected to the Remote Console of the B050-000. One or more users are connected to the Remote Console of the B050-000. -
Page 51: Reducing The Noise Of The Video Picture
Figure 5-18. Remote Console Video Settings: Reset this Mode 3. Again, press the Auto Adjust button once. 4. The B050-000 detects the video mode with 8 bits (256 colors) automatically. To improve the picture quality you may select 16 bit (True Color) from the Options Menu of the Remote Console, sub menu “Encoding”, entry “Color Depth”... - Page 52 Chapter 5. Usage to transfer the video data from the B050-000 to the Remote Console on the local host. If the remote screen has changed a new picture is sent. In terms of transfer time there is no difference between text screens and screens in graphics mode.
-
Page 53: Menu Options
Chapter 6. Menu Options Remote Control KVM Console Remote Console Preview To open the KVM console either click on the menu entry on the left or on the console picture on the right. To refresh the picture click on the button that is named “Refresh”. -
Page 54: Remote Power
The B050-000 is capable of controlling the power status of an IPMI-enabled host sys- tem. See the Section called Intelligent Platform Management Interface (IPMI) for config- uration instructions. If the B050-000 is configured to act as an IPMI client the Remote Power Control page will show three buttons: Power On Sends an IPMI “Power On”... -
Page 55: Telnet Console
Menu. As an example you may type the following sequence: telnet 192.168.1.22 Replace the IP address by the one that is actually assigned to the B050-000. This will prompt for user name and password in order to log into the device. The credentials that need to be entered for authentication are identical to those of the web interface. -
Page 56: Virtual Media
Chapter 6. Menu Options The following list shows the command syntax and their usage. help Displays the list of possible commands quit Exits the current session and disconnects from the client version Displays the release information terminal Starts the terminal pass-through mode for serial port #1. The key sequence switches back to the command mode. - Page 57 B050-000. Download a Floppy Image A floppy image kept in the B050-000’s memory can be both read and written to. To retrieve the changed image contents after writing to it click the “Download” button and select a folder to store the file in.
-
Page 58: Cd Rom
Password (optional) If necessary, specify the password for the given user name. For an example you may have a look on Figure 6-7. First, the B050-000 will look for a server named mysql.acme.com . Then, the entered share name is selected (in... - Page 59 The specified image file is supposed to be accessible from the B050-000. The informa- tion above has to be given from the point of view of the B050-000. It is important to specify correct IP addresses and device names. Otherwise, the B050-000 may not be able to access the referenced image file properly, leave the given file unmounted and...
- Page 60 Chapter 6. Menu Options Figure 6-9. Explorer Context Menu Figure 6-10. Share configuration dialog...
-
Page 61: Drive Redirection
Adjust the settings for the selected directory. Activate the selected directory as a share. Select “Share this folder”. • Choose an appropriate name for the share. You may also add a short descrip- • tion for this folder (input field “Comment”). If necessary, adjust the permissions (button “permissions”). - Page 62 Chapter 6. Menu Options Please note that Drive Redirection works on a level which is far below the operating system. That means that neither the local nor the remote operating system is aware that the drive is currently redirected, actually. This may lead to inconsistent data as soon as one of the operating systems (either from the local machine, or from the remote host) is writing data on the device.
- Page 63 Figure 6-12. Main View Specify the parameters of the network connection (see Figure 6-12). Device This is the address (either the DNS name or the IP address) of the B050-000 you would like to connect to. Port This is the network port. By default, B050-000 uses the remote console port (#443) here.
- Page 64 Chapter 6. Menu Options Drive Selection Select the drive you would like to redirect. All available devices (drive letters) are shown here. Please note that the whole drive is shared with the remote computer, not only one partition. If you have a hard disc with more than one partition all drive letters that belong to this disc will be redirected.
- Page 65 Chapter 6. Menu Options Write Support Figure 6-14. Selecting write support This feature may be enabled here. Write support means that the remote computer is allowed to write on your local drive. As you can imagine, this is very dangerous. If both the remote and the local system try to write data on the same device, this will certainly destroy the file system on the drive.
- Page 66 Chapter 6. Menu Options Device Authentication To use the Drive Redirection, you have to authenticate on the B050-000 using a valid username and password. A permission to change the virtual disc configuration is necessary . Navigation Buttons Connect/Disconnect To establish the drive redirection press the Connect button once. If all the settings are correct, the status bar displays that the connection has been established, the Connect button is disabled and the Disconnect button is enabled.
-
Page 67: Options
Using the Hide to Tray button the application is hidden, but not terminated com- pletely. That means that an active connection will be kept active until it is closed explicitly. You can access the software by its tray icon. The tray icon also shows whether a connection is established or not. - Page 68 Chapter 6. Menu Options MS Windows You can use the tool “RawWrite for Windows”. Figure 6-18. RawWrite for Windows selection dialog Select the tab “Read” from the menu. Enter (or choose) the name of the file in which you would like to save the floppy content. Click on the button “Copy” to initiate the image creation process.
- Page 69 Chapter 6. Menu Options MS Windows To create the image file use your favourite CD imaging tool. Copy the whole contents of the disc into one single ISO image file on your harddisk. For example, with “Nero” you choose “Copy and Backup”. Then, navigate to the “Copy Disc”...
-
Page 70: User Management
Chapter 6. Menu Options User Management Change Password To change your password enter the new password in the upper entry field. Retype the password in the field below. Click “Apply” to submit your changes. Figure 6-20. Set password... -
Page 71: Users And Groups
Users And Groups User Management The B050-000 comes with a pre-configured user account for the user “super” that has fixed permissions. This user has all possible rights to configure the device and to use all functions the B050-000 offers. Upon delivery, the account for the user “super” has the password “pass”. Make sure to change the password immediately after you have installed and firstly accessed... -
Page 72: Kvm Settings
25 users connected to the B050-000 at the same time. The memory space that is available onto the B050-000 mainly depends on the configuration and the usage of the B050-000 (log file entries etc.). - Page 73 Manually Allows to adjust both compression rate and the color depth individually. De- pending on the selected compression rate the data stream between the B050-000 and the Remote Console will be compressed in order to save bandwidth. Since high compression rates are very time consuming, they should not be used while several users are accessing the B050-000 simultaneously.
- Page 74 Chapter 6. Menu Options Remote Console Type Specifies which Remote Console Viewer to use. Default Java Virtual Machine (JVM) Uses the default JVM of your web browser. This may be the Microsoft JVM for the Internet Explorer or the Sun JVM if it is configured this way. Use of the Sun JVM may also be forced (see below).
- Page 75 (Hint: If you are connected over a slow connection to the Internet you can also pre-install the JVM on your administration machine. ) Miscellaneous Remote Console Settings Start in Monitor Mode Sets the initial value for the monitor mode. By default the monitor mode is dis- abled.
-
Page 76: Keyboard/Mouse
Chapter 6. Menu Options Keyboard/Mouse Figure 6-24. Keyboard and Mouse Settings Host Interface Enables a certain interface the mouse is connected to. You can choose between “Auto” for automatic detection, “USB” for a USB mouse and “PS/2” for a PS/2 mouse. To use the USB and/or PS/2 interface you need a correct cabling be- tween the managed host and the managing device. - Page 77 Auto mouse speed • Use this option if the mouse settings on the host use an additional acceleration setting. The B050-000 tries to detect the acceleration and speed of the mouse during the mouse sync process. Fixed mouse speed •...
-
Page 78: Video
Miscellaneous Video Settings Noise filter This option defines how the B050-000 reacts to small changes in the video input signal. A large filter setting needs less network traffic and leads to a faster video display, but small changes in some display regions may not be recognized im- mediately. - Page 79 B050-000. Basic Network Settings IP auto configuration With this option you can define if the B050-000 should fetch its network settings from a DHCP or BOOTP server. For DHCP select “dhcp” and for BOOTP select Chapter 6. Menu Options Warning...
- Page 80 The net mask of the local network. Gateway IP address In case the B050-000 should be accessible from networks other than the local one, this IP address must be set to the local network router’s IP address. Primary DNS Server IP Address IP address of the primary Domain Name Server in dot notation.
- Page 81 Enable SSH access Set this option to allow accessing the B050-000 using the Secure Shell (SSH) pro- tocol. Ths SSH console offers the same features as Telnet (see the Section called Telnet Console), but uses a secure, encrypted connection instead.
-
Page 82: Dynamic Dns
A freely available Dynamic DNS service ( scenario (see Figure 6-28): The B050-000 is reachable via the IP address of the DSL router which is dynamically assigned by the provider. Since the administrator does not know the IP address as- Figure 6-27. - Page 83 IP address belonging to his card. The administrator has to register a B050-000 that is supposed to take part in the ser- vice with the Dynamic DNS Server and assign a certain hostname to it. He will get a nickname and a password in return to the registration process.
-
Page 84: Security
Force HTTPS If this option is enabled, access to the web front-end is only possible using a HTTPS connection. The B050-000 will not listen on the HTTP port for incoming connections. In case you want to create your own SSL certificate that is used to identify the B050-000 refer to the Section called Certificate. -
Page 85: Certificate
However, it is possible to generate and install a new base64 x.509 certificate that is unique for a particular B050-000. In order to do that, the B050-000 is able to generate a new cryptographic key and the associated Certificate Signing Request (CSR) that needs to be certified by a certification authority (CA). - Page 86 After completing these three steps the B050-000 has its own certificate that is used for identifying the card to its clients. If you destroy the CSR on the B050-000 there is no way to get it back! In case you deleted it by mistake, you have to repeat the three steps as described above.
-
Page 87: Serial Settings
Confirm Challenge Password Confirmation of the Challenge Password. Email The email address of a contact person that is responsible for the B050-000 and its security. Key length This is the length of the generated key in bits. 1024 Bits are supposed to be suf- ficient for most cases. - Page 88 Do not use the serial port for any special function, use it only for the initial con- figuration (see Table 4-1). Modem The B050-000 offers remote access using a telephone line in addition to the stan- dard access over the built-in Ethernet adapter. The modem needs to be connected to the serial interface of the B050-000.
-
Page 89: Intelligent Platform Management Interface (Ipmi)
Intelligent Platform Management Interface (IPMI) Generals By using the B050-000 IPMI facilities you have an additional way to power on or off the system or to perform a hard reset. Furthermore, it provides the possibility to show an event log of the host system and the status of some system sensors (i.e. -
Page 90: Date And Time
NTP time server. Without a time server your time setting will not be persistent, so you have to adjust it again after the B050-000 loses power for more than a few minutes. To avoid this you can use a NTP time server which sets up the internal clock... -
Page 91: Event Log
automatically to the current UTC time. Because NTP server time is always UTC, there is a setting that allows you to set up a static offset to get your local time. There is currently no way to adjust the daylight saving time automati- cally. - Page 92 Chapter 6. Menu Options which can be activated separately. The common way to log events is to use the internal log list of the B050-000. To show the log list click on the item “Event Log” from the section “Maintenance”. In the Event Log Settings you can choose how many log entries are shown on each page.
-
Page 93: Maintenance
fields with detailed information about the occurred event. To receive this SNMP traps any SNMP trap listener may be used. Event Log Assignments You may choose which actions of the B050-000 will be saved in the log file. Tick the desired box(es) and click “Apply” to confirm your selection. Maintenance... -
Page 94: Event Log
Event Log Figure 6-38 displays the Event Log list. It includes the events that are kept by the B050-000 extended by the event date, a short event description and an IP address the request was sent from. Figure 6-37. Connected Users... -
Page 95: Update Firmware
B050-000. Updating the firmware is a three-stage process: Firstly, the new firmware file is uploaded onto the B050-000. In order to do that you • need to select the file on your local system using the button “Browse” of the Up- load Firmware panel (see Figure 6-39). -
Page 96: Unit Reset
This section allows you to reset specific parts of the device. This involves the both keyboard and mouse, the video engine and the B050-000 itself. Resetting the card itself is mainly needed to activate a newly updated firmware. It will close all current... - Page 97 Resetting subdevices (e.g. video engine) will take some seconds only and does not result in closing connections. To reset a certain B050-000 functionality click on the button “Reset” as displayed in Figure 6-40.
- Page 98 Chapter 6. Menu Options...
-
Page 99: Frequently Asked Questions
Make sure that your mouse settings match your mouse model, i.e. PS/2 or wheel mouse. The mouse model has to be set similarly on both the B050-000 and the Oper- ating System you use on your host. - Page 100 10. For SUN computers a USB keyboard does not work. The B050-000 emulates a USB keyboard. If you attach a USB keyboard to your host two keyboards are detected. It cannot be predicted which one of these comes first and you will be able to work with.
-
Page 101: Glossary
Appendix B. Glossary ACPI Advanced Configuration and Power Interface A specification that enables the operating system to implement power manage- ment and system configuration. Advanced Technology Extended A particular specification that covers the style of motherboards and enclosure introduced by Intel in 1995. DHCP Dynamic Host Configuration Protocol A protocol for dynamically assigning IP configurations to host names, especially... - Page 102 Appendix B. Glossary SNMP Simple Network Management Protocol A widely used network monitoring and control protocol. Secure Shell An encrypted network protocol providing a secure replacement for Telnet. Secure Socket Layer An encryption technology for the Internet used to provide secured data trans- missions.
-
Page 103: B050-000 Video Modes
Appendix C. B050-000 Video Modes Table C-1 lists the video modes the B050-000 supports. Please do not use any other custom video settings besides of these. If done so, the B050-000 may not be able to detect them. Table C-1. B050-000 Video Modes... - Page 104 Appendix C. B050-000 Video Modes...
-
Page 105: Users And Roles
Appendix D. Users and Roles Table D-1. Roles Frontend Section Remote Control: KVM Remote Control: Remote Power - Remote Control: Telnet Console x Virtual Media User Management: Change Password User Management: Users KVM Settings: User Console KVM Settings: Keyboard/Mouse KVM Settings: Video Device Settings Maintenance: Device Information... - Page 106 Appendix D. Users and Roles...
-
Page 107: Key Codes
Appendix E. Key Codes Table E-1 shows the key codes used to define the key strokes or hotkeys for sev- eral functions. Please note that these key codes do not necessarily represent the key characters that are used on international keyboards. A key on a standard 104 key PC keyboard with a US English language mapping is named. - Page 108 Appendix E. Key Codes LALT SPACE ALT GR ESCAPE PRINTSCREEN SCROLL LOCK BREAK INSERT HOME PAGE_UP PAGE_DOWN DELETE LEFT DOWN RIGHT NUM_LOCK NUMPAD0 NUMPAD1 NUMPAD2 NUMPAD3 NUMPAD4 NUMPAD5 NUMPAD6 NUMPAD7 NUMPAD8 NUMPAD9 NUMPADPLUS Alias Key(s) POS 1 NUMPAD_PLUS, +...
- Page 109 Alias Key(s) NUMPAD / NUMPADMUL NUMPAD_MUL, x NUMPADMINUS NUMPAD_MINUS, - NUMPADENTER WINDOWS MENU Appendix E. Key Codes...
- Page 110 Appendix E. Key Codes...
-
Page 111: Pin Assignment
Appendix F. Pin Assignment VGA HD-15 Table F-1. VGA HD-15 Assignment Green Blue USB_D - GND red GND green GND blue RJ45 Connector Ethernet Table F-2. RJ45 Assignment TX + TX - RX + Not connected Figure F-1. VGA HD-15 Assignment USB+5V GND sync... - Page 112 Appendix F. Pin Assignment...
-
Page 113: Specifications
Appendix G. Specifications Sizes and Weight Table G-1. B050-000 Specification Attribute Height Width Length Weight Housing Power Consumption Environment Temperature Table G-2. Temperature Attribute Operating Storage Humidity Table G-3. Humidity Attribute Operating Storage Value 95mm 25mm 72mm 160g (w/o replicator cable) - Page 114 Appendix G. Specifications...
-
Page 115: B050-000 Operation Advices
Appendix H. B050-000 Operation Advices This device has to be operated with the provided power supply only. The use of other power supplies voids the product liability of the manufacturer. If the power supply shows a malfunction, it must not be opened. Instead a request a replacement from the manufacturer or the vendor. - Page 116 Appendix H. B050-000 Operation Advices...
-
Page 117: Tripp Lite Warranty Information
If warranty service is required, Tripp Lite will issue a Return Material Authoriza- tion Number. You must ship the products back to Tripp Lite in their original or an equivalent packaging, prepay shipping charges, and insure the shipment or accept the possibility of loss or damage during shipment. - Page 118 Appendix I. Tripp Lite Warranty Information...
-
Page 119: Gnu General Public License (Gpl)
Appendix J. GNU General Public License (GPL) Version 2, June 1991 Copyright (C) 1989, 1991 Free Software Foundation, Inc. 59 Temple Place, Suite 330, Boston, MA 02111-1307 USA Everyone is permitted to copy and distribute verbatim copies of this license document, but changing it is not allowed. Preamble The licenses for most software are designed to take away your freedom to share and change it. - Page 120 Appendix J. GNU General Public License (GPL) based on the Program (independent of having been made by running the Program). Whether that is true depends on what the Program does. 1. You may copy and distribute verbatim copies of the Program’s source code as you receive it, in any medium, provided that you conspicuously and appropriately publish on each copy an appropriate copyright notice and disclaimer of warranty;...
- Page 121 source code, to be distributed under the terms of Sections 1 and 2 above on a medium customarily used for software interchange; or, c. Accompany it with the information you received as to the offer to distribute corresponding source code. (This alternative is allowed only for noncommer- cial distribution and only if you received the program in object code or exe- cutable form with such an offer, in accord with Subsection b above.) The source code for a work means the preferred form of the work for making mod-...
- Page 122 Appendix J. GNU General Public License (GPL) consistent application of that system; it is up to the author/donor to decide if he or she is willing to distribute software through any other system and a licensee cannot impose that choice. This section is intended to make thoroughly clear what is believed to be a conse- quence of the rest of this License.
- Page 123 Appendix J. GNU General Public License (GPL) file should have at least the “copyright” line and a pointer to where the full notice is found. <one line to give the program’s name and a brief idea of what it does.> Copyright (C) <year>...
- Page 124 Appendix J. GNU General Public License (GPL)
-
Page 125: The Openldap Public License
Appendix K. The OpenLDAP Public License Version 2.8, 17 August 2003 Redistribution and use of this software and associated documentation (“Software”), with or without modification, are permitted provided that the following conditions are met: 1. Redistributions in source form must retain copyright statements and notices, 2. - Page 126 Appendix K. The OpenLDAP Public License...