Honeywell Thor VM1 Quick Start Manual
Vehicle-mount computer
Hide thumbs
Also See for Thor VM1:
- Reference manual (324 pages) ,
- User manual (272 pages) ,
- Quick start manual (4 pages)

Related Manuals for Honeywell Thor VM1


Summary of Contents for Honeywell Thor VM1
- Page 1 Computador Honeywell Thor MV1 Computador veicular Thor™ VM1 da Honeywell, o computador ideal para empilhadeiras, supera a competição com inovações de design. Na cadeia de suprimentos de hoje, a única constante é a mudança. www.bztech.com.br...
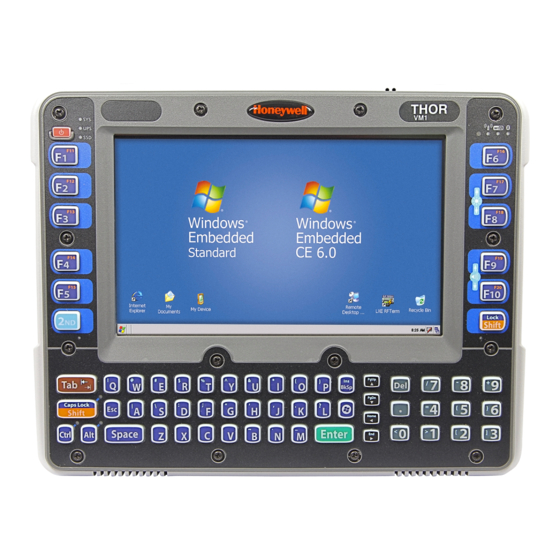
- Page 2 Thor™ VM1 Vehicle-Mount Computer ® ® With Microsoft Windows Embedded CE 6 or Windows Embedded Standard 2009 Operating System Quick Start Guide VM1-QS Rev B 7/14...
-
Page 3: Connecting The Power Cable
The Thor VM1 can be connected to vehicle power as follows: • Direct power connection (12-48VDC vehicles). See Connecting the Power Cable, below. • Replace a previously installed VX6/VX6 or Thor VX8/VX9 with an adapter cable. See Adapter Cables, below. - Page 4 • Choose a mounting location so that the power cable does not extend outside the vehicle and that provides sufficient clearance so that the power cable (especially the dock connector end) is not pressed against part of the vehicle. • Regularly inspect power cable for damage, especially in low temperature environments.
- Page 5 Power Cable Installation 1. The Thor VM1 must not be mounted in the Quick Mount Smart Dock. The power switch on the dock must be turned Off. The power cable must be UNPLUGGED from the dock.
- Page 6 Screen Blanking box, or to the Thor VM1 User’s Guide, available at www.honeywellaidc.com for fur- ther information about the Screen Blanking box.) 11. Press the power switch on the back of the Thor VM1 dock. 12. Press the power button on the front of the Thor VM1.
-
Page 7: Adapter Cables
VX6 or VX7 power con- nection installation. This adapter cable is available to attach the Thor VM1 to a vehi- cle previously equipped with a VX6/VX7 DC power cable. When this adapter cable is used, there is no provision for an ignition switch input. - Page 8 VX8/VX9 DC power cable. This cable has bare wires for ground and ignition sense connection plus a D9 cable that connects to a COM port on the Thor VM1 dock to provide a screen blanking signal.
- Page 9 9. Secure the power cable to the Thor VM1 using strain relief cable clamps, and place the Thor VM1 in the dock.
- Page 10 1. Connect the Thor VM1 to an external power source. 2. Press the Power button. 3. For a 12-key Thor VM1, you may want to attach a USB keyboard via the USB adapter cable during the setup process. 4. Accept the EULA.
- Page 11 ActiveSync using USB-Client Connection The only connection type is USB Client. 1. Connect the Thor VM1 end of the USB cable to the USB port on the back of the Thor VM1 Quick Mount Smart Dock. 2. Connect the other end of the cable to a USB port on a PC or laptop.
-
Page 12: Wireless Network Configuration
Refer to the Thor VM1 User’s Gouide, available at www.honeywellaidc.com, for further information about ActiveSync information. Wireless Network Configuration If the access point uses an authentication protocol (WEP, LEAP, etc.), your radio must use the same authentication. Contact your IT department for any necessary keys, login credentials, or certificates. - Page 13 11. Reboot the Thor VM1. Setting Up AppLock (CE 6.0 only) Thor VM1 devices are shipped to boot in Administration mode. In this mode, the user has full access to the device and no password is needed. After the administrator completes the process below, the Thor VM1 switches to end-user mode and restricts access to only the specified application(s).
- Page 14 1. Make sure the mobile client network settings are properly configured. If you are connecting via WLAN (802.11x), make sure your Thor VM1 is connected to the network. 2. Launch RFTerm by tapping the RFTerm icon on the desktop. 3. Select Session > Configure from the application menu and select the host type.
-
Page 15: Rebooting The Thor Vm1
To warmboot the Thor VM1 with Windows Embedded Standard: 1. Select Start > Shutdown > Restart to reboot. When the Thor VM1 is booting, there may be small delays while the wireless client connects, applications launch, remote management completes and Bluetooth devices connect. - Page 16 Disclaimer Honeywell International Inc. (“HII”) reserves the right to make changes in specifications and other information contained in this document without prior notice, and the reader should in all cases consult HII to determine whether any such changes have been made. The information in this publication does not represent a commitment on the part of HII.