Keiser M Series Assembly And Operation Manual
Indoor group cycle
Hide thumbs
Also See for M Series:
- Manual (82 pages) ,
- Assembly and operation manual (25 pages) ,
- Calibration instruction (4 pages)

Related Manuals for Keiser M Series


Summary of Contents for Keiser M Series
- Page 1 STRENGTH | CARDIO | FUNCTIONAL M SERIES M3 INDOOR GROUP CYCLE ASSEMBLY AND OPERATION MANUAL...
- Page 2 Distribution and copying of this document, use and communication of its contents is not permitted without written authorization from Keiser Corporation. The content of this document is furnished for informational use only, may be subject to change without notice, and should not be construed as a commitment by Keiser...
-
Page 3: Record Your Serial Number
GENERAL INFORMATION INTRODUCTION Congratulations on the purchase of your new Keiser M3 Indoor Group Cycle and welcome to the Keiser family. Your new resistance system is a revolutionary way to exercise providing a smoother, quieter, and more predictable workout. We commend you on your decision to work toward your health and wellness goals. -
Page 4: Important Safety Information
M3 INDOOR GROUP CYCLE IMPORTANT SAFETY INFORMATION It is the sole responsibility of the purchaser of Keiser Corporation feet from the Pedals while the Flywheel is in motion as equipment to instruct all individuals, whether they are the serious user injury may occur. - Page 5 Maintain safety and serial number labels. Do not remove to safely and successfully complete installation. labels for any reason. They contain important information. If unreadable or missing, contact Keiser Corporation for a IMPORTANT: Indicates information considered critical, replacement by telephone at 1 559 256 8000, online 24/7 but not hazard-related.
-
Page 6: Equipment Specifications
• Keep the packing materials until you successfully finish warranty. all assembly steps. NOTE: Keiser Corporation is not responsible for damage or injury caused by incorrect installation, assembly or use. TOOLS AND MATERIALS REQUIRED CAUTION: Always follow tool manufacturer's safety and operating instructions. -
Page 7: Parts List
Familiarize yourself with the parts below before you continue to the assembly procedure. Figure 2. Parts List Description Keiser Part Number M3 Main Frame and Computer Display 550820XXC, 550874X Base 550814 Handlebar 550844 Hubcap 555005 Flywheel 555003 Flywheel Guard 550845 Keiser M Series Bike Pedal Set 555473 ®... - Page 8 M3 INDOOR GROUP CYCLE HARDWARE & FITTINGS Figure 3. Hardware and Fittings Description Keiser Part Number Acorn Nut (7/16-20 SS) 555022 Washer (FW-ACFT 7/16 SS) 9384 Socket Head Cap Screw (M6X1X18 SS) 9547 Hex Head Cap Screw (M6X1X45 SS) 9525...
- Page 9 Place all parts in a cleared area and check for missing parts. Refer to the Parts and Hardware & Fittings sections for itemized lists (pages 7 and 8). Parts damaged in shipping or missing? Contact Keiser Customer Support by telephone at 1 559 256 8000, online 24/7 at keiser.com/support, or by email at service@keiser.com.
- Page 10 M3 INDOOR GROUP CYCLE HOW TO ASSEMBLE THE M3 BIKE Prepare Base and Main Frame. (a) Position the front of the Main Frame facing the Transport Wheels, then carefully lower the Main Frame onto the Base over the Base Studs. Pull x3 Caps off Base Studs REAR...
- Page 11 M3 INDOOR GROUP CYCLE HOW TO ASSEMBLE THE M3 BIKE Prepare for Flywheel installation. (a) Pivot the Flywheel into the folded paper and onto the Hub. Push the Move Shifter to the Flywheel up against the down position. Hub and align the screw holes.
- Page 12 M3 INDOOR GROUP CYCLE HOW TO ASSEMBLE THE M3 BIKE (a) Clean the Pedal threads using a clean cloth, then apply Loctite ® 242 Threadlocker (Item G) to the leading threads of the Pedals. Apply Loctite ® Left-Hand Side (LHS) Pedal Right-Hand Side (RHS) Pedal turn clockwise turn counter-clockwise...
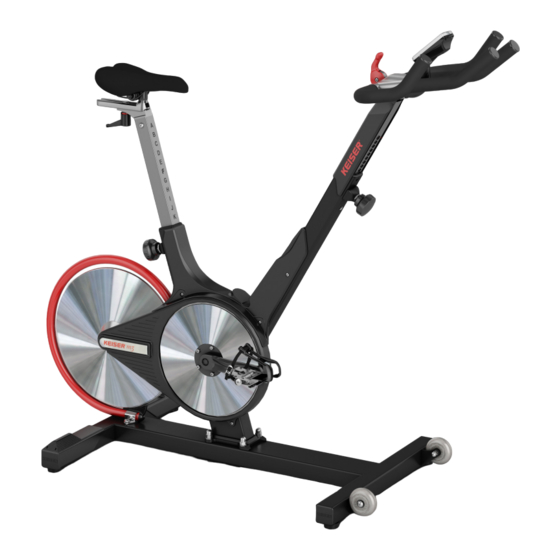
- Page 13 M3 INDOOR GROUP CYCLE SET UP AND OPERATION PRODUCT OVERVIEW Take this time to familiarize yourself with the bike by reviewing the Product Overview below. Figure 5. M3 Indoor Group Cycle Computer Display Base Resistance Lever / Emergency Brake Stretch Pads Seat Handlebar Seat Depth Adjustment L-Handle...
-
Page 14: Emergency Brake
M3 INDOOR GROUP CYCLE TRANSPORT To position the bike at the desired location refer to Figure 6 and follow the instructions below: Be sure there is a minimum of 24 inches (610 mm) free space for the bike on all sides before placement. Grasp the Handlebar with both hands. - Page 15 M3 INDOOR GROUP CYCLE SEAT/HANDLEBAR HEIGHT ADJUSTMENT KNOB Set the Seat height to align with the top of your hip when standing beside the bike. Refer to Figure 9 and follow the instructions below: Loosen the Adjustment Knob by turning it counterclockwise 1/4 to 1/2 turn.
-
Page 16: Display Features
M3 INDOOR GROUP CYCLE COMPUTER DISPLAY OVERVIEW BACKLIGHT SENSOR While the computer is awake, the backlight sensor automatically detects ambient light levels in the room and turns on the backlight display when needed. RPM (CADENCE) The RPM displays the revolutions per minute of the crank arm—also known in the cycling world as cadence— and is roughly the speed at which the cyclist is pedaling. - Page 17 M3 INDOOR GROUP CYCLE WATTS GEAR TRIP Figure 12. Computer Overview WATTS WATTS GEAR GEAR TRIP Odometer Trip Unit Figure 13. Computer Start-up Display WARNING: Heart rate monitoring systems may be inaccurate. Over exercising may result in serious injury or death.
- Page 18 M3 INDOOR GROUP CYCLE HOW TO EXERCISE ON THE BIKE The M3 cycle is intended for cardiovascular workout. Special programs have been designed for group exercise environments. The bike must always be used in a supervised area under control of a trained and authorized instructor. The following pages are a brief overview for the safe and proper operation of the bike.
- Page 19 M3 INDOOR GROUP CYCLE RIDE POSITIONS Observe the following suggested ride and hand positions for your desired workout. Include a variety of hand positions in combination with the cycling postures to add variety and to help prevent wrist and hand discomfort. Maintain proper ride positioning with control of both the upper and lower body for optimal cycling experience (Note: M3i bike model shown in ride positions illustrations;...
- Page 20 M3 INDOOR GROUP CYCLE RIDE POSITIONS (CONTINUED) LIFTS Cadence: 70–90 RPM Lifts are advanced postures. Riders will alternate from seated to standing positions at the desired pace. Goal: take full advantage of body weight and strength. • The resistance is moderate to heavy, and the lift or “attack” is short.
-
Page 21: Preventative Maintenance Schedule
CAUTION: Routine maintenance is an essential part of maintaining the highest level of equipment safety, as well as optimal equipment performance. Immediately replace damaged, worn, or broken parts and do not use the bike until all repairs have been completed and tested by a certified Keiser technician. PREVENTATIVE MAINTENANCE SCHEDULE •... -
Page 22: Computer Battery Replacement
1. Figure 22. Bike Battery Replacement NOTE: Upon end of life of your bike, contact Keiser Customer Support for handling direction (see back page for contact information). Be sure to follow your local government guidelines for battery disposal/recycling. -
Page 23: Regulatory And Compliance Notices
Hydrotex, Partners, Ltd.; MEGUIAR’S ® is the registered trademark of Meguiar’s, Inc.; and POLAR is the registered trademark of Electro Oy. ® WARRANTY STATEMENT For information about Keiser’s product warranty and thereto related information, refer to keiser.com/support/warranty. - Page 24 M3 INDOOR GROUP CYCLE CUSTOMER SUPPORT If you have any questions regarding the bike assembly, installation, or operation after reading this manual, contact Keiser Customer Support: KEISER CORPORATION 1 559 256 8000 2470 S. Cherry Ave. service@keiser.com Fresno, CA 93706 keiser.com/support...