Makita DSD180 Instruction Manual
Cordless drywall saw
Hide thumbs
Also See for DSD180:
- Instruction manual (65 pages) ,
- Instruction manual (64 pages) ,
- Instruction manual (9 pages)
Table of Contents
Advertisement
Quick Links
Download this manual
See also:
Instruction Manual
Advertisement
Table of Contents

Related Manuals for Makita DSD180


Summary of Contents for Makita DSD180
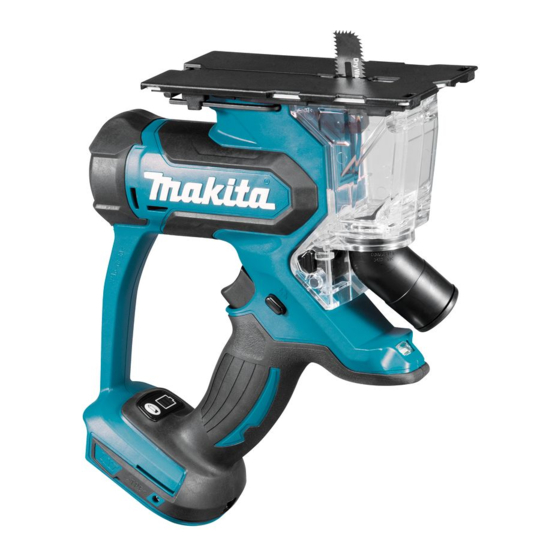
- Page 1 INSTRUCTION MANUAL Cordless Drywall Saw DSD180 Read before use.
-
Page 2: Specifications
SPECIFICATIONS Model: DSD180 Length of stroke 6 mm Strokes per minute 0 - 6,000 min Maximum cutting capacities Drywall 30 mm Wood 15 mm Rated voltage D.C. 18 V Standard battery cartridges BL1815N, BL1820, BL1820B BL1830, BL1830B, BL1840, BL1840B, BL1850, BL1850B,... -
Page 3: Save All Warnings And Instruc- Tions For Future Reference
Do not overreach. Keep proper footing and Save all warnings and instruc- balance at all times. tions for future reference. of the power tool in unexpected situations. Dress properly. Do not wear loose clothing or mains-operated (corded) power tool or battery-operated jewellery. - Page 4 SAVE THESE INSTRUCTIONS. also void the Makita warranty for the Makita tool and WARNING: charger. DO NOT let comfort or familiarity...
-
Page 5: Functional Description
Tips for maintaining maximum CAUTION: Always install the battery cartridge battery life fully until the red indicator cannot be seen. If not, Charge the battery cartridge before completely you or someone around you. discharged. Always stop tool operation and charge the battery cartridge when you notice CAUTION: Do not install the battery cartridge less tool power. -
Page 6: Adjusting Depth Of Cut
NOTE: Depending on the conditions of use and the ambient temperature, the indication may differ slightly battery. from the actual capacity. Battery indicator status Switch action Remaining battery capacity 50% or more 20% - 50% Less than 20% Indicating the remaining battery capacity 1. -
Page 7: Led Light
Removing the dust collector CAUTION: Never operate the tool without the dust collector. Dust may come into your eyes and pull back the tabs on the tool. Be sure to pull the tabs on the both sides at the same time. 1. - Page 8 blade holder so that its protrusion faces outward. Insert the snap-off blade so that the sharp edge faces forward. Secure the snap-off blade at the position where holder as illustrated. 1. Bolts 2. Blade holder 3. Blade that the curved edge of the blade points forward. Fit the protrusion of the blade holder into the slot on the blade.
-
Page 9: Operation
Connecting a vacuum cleaner Connect a Makita vacuum cleaner for clean operation. tool so that the front edge of the base touches the work- Remove the rubber cap on the dust collector and con- nect the vacuum cleaner's hose to the nozzle of the with the cutting line. -
Page 10: Optional Accessories
OPTIONAL ACCESSORIES CAUTION: These accessories or attachments are recommended for use with your Makita tool accessories or attachments might present a risk of for its stated purpose. If you need any assistance for more details regard- ing these accessories, ask your local Makita Service Center. - Page 12 Jan-Baptist Vinkstraat 2, M a k i t a E u r o p e N . V . 3070 Kortenberg, Belgium 3-11-8, Sumiyoshi-cho, M a k i t a C o r p o r a t i o n Anjo, Aichi 446-8502 Japan 885512-228 w w w .