Table of Contents
Advertisement
Drain Cleaning
Machine
WARNING!
Read this Operator's Manual
carefully before using this tool.
Failure to understand and fol-
low the contents of this manual
may result in extensive prop-
erty damage and/or serious
personal injury.
Find Quality Products Online at:
K 6200
Manual
GlobalTestSupply
www.
•
Castellano – pág. 35
.com
sales@GlobalTestSupply.com
•
Français – 17
Advertisement
Table of Contents

Related Manuals for RIDGID K-6200


Summary of Contents for RIDGID K-6200
- Page 1 K 6200 Manual Drain Cleaning Machine WARNING! Read this Operator’s Manual carefully before using this tool. Failure to understand and fol- low the contents of this manual may result in extensive prop- erty damage and/or serious • Français – 17 personal injury.
-
Page 2: Table Of Contents
K-6200 Drain Cleaning Machine Table of Contents Recording Form for Machine Serial Number ......................1 General Safety Information Work Area Safety ................................2 Electrical Safety................................2 Personal Safety ................................2 Tool Use and Care ..............................3 Service ..................................3 Specific Safety Information Drain Cleaner Safety ..............................3 Description, Specifications and Standard Equipment Description ..................................4... -
Page 3: Recording Form For Machine Serial Number
K-6200 K-6200 Drain Cleaning Machine K-6200 Drain Cleaning Machine Record Serial Number below and retain product serial number which is located on nameplate. Serial GlobalTestSupply www. .com Find Quality Products Online at: sales@GlobalTestSupply.com... -
Page 4: General Safety Information
K-6200 Drain Cleaning Machine General Safety Information are rated for outdoor use and reduce the risk of elec- trical shock. WARNING! Read and understand all instructions. Failure to follow all instructions listed below may • Use only three-wire extension cords which have... -
Page 5: Tool Use And Care
• Keep handles dry and clean; free from oil and • Be careful when using the K-6200 in drains where grease. Allows for better control of the tool. cleaning compounds or chemicals have been used. -
Page 6: Description, Specifications And Standard Equipment Description
K-6200 Drain Cleaning Machine Standard Equipment • Only use the K-6200 to clean drain lines 3″ to 6″ in diameter. Follow instructions on the use of the Machine Options – AUTOFEED machine. Other uses or modifying the drain cleaner for Catalog No. -
Page 7: Cables And Flexible Leaders
K-6200 Drain Cleaning machine Cables and Flexible Trap Leaders Machine Assembly Catalog Model WARNING Description 92460 C-25 25′ I.C. Cable (7,6m) 92465 C-26 50′ I.C. Cable (15,2m) 92470 C-27 75′ I.C. Cable (22,9m) 43647 C-24 100′ I.C. Cable (30,5m) ″ (16mm) -
Page 8: Connecting/Disconnecting 5/8" And 3/4" Drum Machine Cable Couplings
K-6200 Drain Cleaning Machine Connecting/Disconnecting 5/8" and 3/4" Drum Machine Cable Couplings Keep couplings clean and lubricated. Plunger pin must move freely and fully extend to secure connection. New style – Plunger pin Old style – Rotating pin Screwdriver required. -
Page 9: Machine Inspection
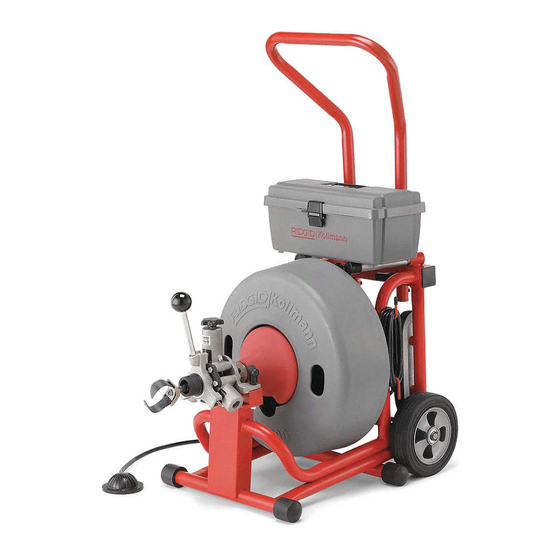
2. Make sure the foot switch is present and attached to the Drain Cleaning Machine (Figure 5). Do not oper- Figure 5 – K-6200 Drain Cleaner ate the machine without a foot switch. 8. Inspect the cutting edges of your tools. If necessary, 3. -
Page 10: Operating Instructions
K-6200 Drain Cleaning Machine • Clear path to the electrical outlet that does not WARNING contain any sources of heat or oil, sharp edges or To prevent tipping during use, machine should rest firmly moving parts that may damage electrical cord. - Page 11 K-6200 Drain Cleaning machine 5. Move the feed lever in the opposite direction of the ro- Always wear eye protection to protect your eyes against dirt and other foreign objects. Wear rubber tating drum to advance the cable (Figure 9). The soled, non-slip shoes.
-
Page 12: Main Sewer Or Septic Tank Overrun
K-6200 Drain Cleaning Machine from air foot switch pedal and allow machine to come to a can happen quickly and without warning, so proceed slowly and carefully as you feed the cable into the full and complete stop. Place FOR/OFF/REV switch to drain. -
Page 13: Operating Machine In Reclined Position
Operating Machine In Reclined Position Drum Installation The K-6200 can be operated in the reclined position to ac- 1.Set the kickstand to keep machine from moving. cess overhead waste lines. As shown in Figure 11, screw the two (2) support legs into the frame. -
Page 14: Pigtail Removal And Installation
K-6200 Drain Cleaning Machine 2. Disconnect the original cable from the pigtail sec- 6. Remove the bolt anchoring the pigtail. It is located on tion. Secure the initial cable to keep it from falling the back of the drum (Figure 14). -
Page 15: Accessories
4. Nest hex head front adapter onto front mounting block. Only the following RIDGID products have WARNING been designed to function with the K-6200 Drain Cleaning 5. Attach AUTOFEED by sliding the assembly onto the Machine. Other accessories suitable for use with other cable. -
Page 16: Autofeed Assembly
RIDGID service technician. Grease all exposed, moving and rotating parts as re- Tool should be taken to a RIDGID Independent Auth - quired. A grease fitting is provided for the drum front and orized Service Center or returned to the factory. All re pairs rear bearings. -
Page 17: Troubleshooting
K-6200 Drain Cleaning machine Chart 1 Troubleshooting PROBLEM POSSIBLE REASONS SOLUTION Cable kinking or breaking. Cable is being forced. Do Not Force Cable! Let the cutter do the work. Cable used in incorrect pipe diameter. ″ cables in 3″ to 6″ lines. Use Trap Leader Motor switched to reverse. - Page 18 ©2002, 2015, RIDGID, Inc. Printed 12/15 The Emerson logo and RIDGID logo are registered trademarks of Emerson Electric Co. or RIDGID, Inc. in the U.S. and other countries. 999-998-081.10 EC41421 All other trademarks belong to their respective holders.