
Related Manuals for RIDGID micro CA-350


Summary of Contents for RIDGID micro CA-350
- Page 1 CA-350 Operator’s Manual micro CA-350 Inspection Camera 0.561.8187 information@itm. www. .com...
-
Page 2: Table Of Contents
Electrical Safety.........................2 Personal Safety .........................2 Equipment Use and Care ....................2 Battery Use and Care ......................2 Service ..........................3 Specific Safety Information micro CA-350 Inspection Camera Safety................3 Description, Specifications and Standard Equipment Description ........................4 Specifications ........................4 Standard Equipment......................5 Controls ..........................5 FCC Statement........................5 Electromagnetic Compatibility (EMC) ................6... - Page 3 Failure to understand and follow the contents of this micro CA-350 Inspection Camera manual may result in electri- Record Serial Number below and retain product serial number which is located on nameplate. cal shock, fire and/or serious Serial personal injury.
-
Page 4: Safety Symbols
CA-350 Inspection Camera Safety Symbols In this operator’s manual and on the product, safety symbols and signal words are used to communicate important safety information. This section is provided to improve under- standing of these signal words and symbols . -
Page 5: Service
• Recharge only with the charger speci- fied by the manufacturer. A charger that is • Do not place the micro CA-350 Inspec - suitable for one type of battery pack may tion Cam era anywhere that may con- create a risk of fire when used with an- tain a live electrical charge. -
Page 6: Description, Specifications And Standard Equipment Description
Recommended Use..Indoor infectious material. Viewable Distance ..0.4" (10 mm) to • Do not operate the micro CA-350 In - Display......3.5" (90 mm) Color spection Camera if operator or device is TFT (320 x 240 standing in water. -
Page 7: Standard Equipment
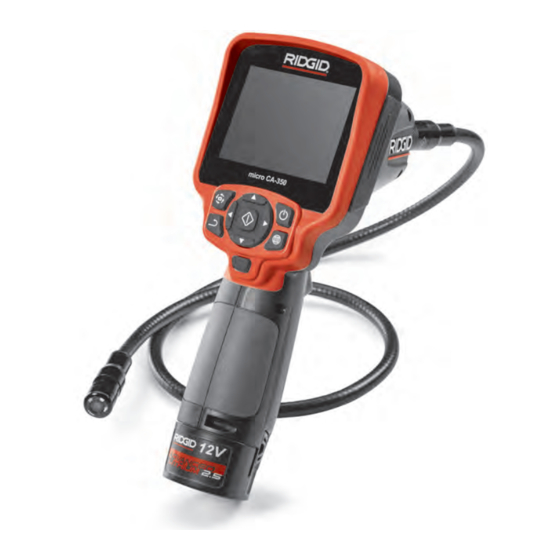
SD™ Slot Figure 4 – Left Side Port Cover FCC Statement Figure 1 – micro CA-350 Inspection Camera This equipment has been tested and found to comply with the limits for a Class B digital device, pursuant to part 15 of the FCC Rules. -
Page 8: Electromagnetic Compatibility (Emc)
Select – Pressing select from the live The RIDGID micro CA-350 Inspect - NOTI E screen will take you to the playback screen. ion Camera conforms to all applicable EMC Return –... -
Page 9: Changing/Installing Batteries
To use the micro CA-350 Inspection Cam er a, facing down (Figure 9). SD cards can only be the imager head cable must be connected to installed one way –... -
Page 10: Pre-Operation Inspection
5. Inspect the camera head lens for con- densation. To avoid damaging the unit, do not use the camera if condensation forms Set up the micro CA-350 In spec tion Cam - era and work area according to these inside the lens. Let the water evaporate procedures to reduce the risk of injury before using. -
Page 11: Operating Instructions
• Determine the access points to the space. The minimum opening the cam - era head can fit through is approxi - 3. Make sure the micro CA-350 Inspec tion mate ly " (19 mm) in diameter for the Camera has been properly inspect ed be- 17 mm camera head. -
Page 12: Live Screen
CA-350 Inspection Camera Figure 11 – Splash Screen (Note: Version will change with each firmware update.) Figure 13 – Screen Shot of Mode Selection Live Screen 3. If the other inspection camera settings (Time Stamp, Language, Date/Time, TV The live screen is where you will do most of Out, Update Firmware, Speaker/Micro - your work. -
Page 13: Image Capture
5. When the inspection is complete, carefully Figure 14 – Adjusting LED withdraw the camera and cable from the inspection area. Zoom : The micro CA-350 Inspection Camer a has a 2.0x digital zoom. Simply press the up and down arrows while in the live screen to zoom in or out. -
Page 14: Time Stamp
Navigation is done with the arrow buttons Select the About function to display the firm - ware revision of the micro CA-350 as well as Time Stamp the software copyright information. Enable or Disable the display of the Date and Transferring Images to a Time. -
Page 15: Connecting To Tv
CA-350 Inspection Camera Connecting to TV The micro CA-350 Inspection Camera can be connected to a television or other monitor for remote viewing or recording through the in- cluded RCA cable. Open the right side port cover (Figure 3). -
Page 16: Maintenance
Microphone Improper service or repair can make the RIDGID micro CA-350 Inspection Camera unsafe to operate. Service and repair of the micro CA-350 In - spec tion Camera must be performed by a RIDGID In dependent Authorized Service Center. For information on your nearest RIDGID In -... -
Page 17: Disposal
CA-350 Inspection Camera Disposal Parts of the RIDGID micro CA-350 Inspection Camera contain valuable materials and can be recycled. There are companies that specialize in recycling that may be found locally. Dispose of the com ponents in compliance with all ap- plicable regulations. -
Page 18: Troubleshooting
CA-350 Inspection Camera Troubleshooting SYMPTOM POSSIBLE REASON SOLUTION Display turns ON, but Loose cable connections. Check cable connections, clean if re- does not show image. quired. Re-attach. Imager is broken. Replace the Imager. Imager head covered by debris. Visually inspect imager head to make certain it is not covered by debris.