Table of Contents
Advertisement
Quick Links
Download this manual
See also:
User Manual
Original User Manual
English
General Original User Manual
Original User Manual | Pedelec Impulse
Original User Manual | Pedelec Impulse Ergo
Original User Manual | Pedelec Groove
Original User Manual | Pedelec Xion
Original User Manual | Bosch Performance Line
Original User Manual | Bosch Active Line
Derby Cycle Werke GmbH 2013
* Not included in this document.
Advertisement
Chapters
Table of Contents
Troubleshooting

Related Manuals for Kalkhoff Pedelec Impulse


Summary of Contents for Kalkhoff Pedelec Impulse
- Page 1 Original User Manual English General Original User Manual Original User Manual | Pedelec Impulse Original User Manual | Pedelec Impulse Ergo Original User Manual | Pedelec Groove Original User Manual | Pedelec Xion Original User Manual | Bosch Performance Line...
- Page 2 General User Manual English Derby Cycle Werke GmbH 2012...
- Page 3 1 The bike and its components Handlebar Handlebar stem Bell Headset Front light 6 Mudguard Fork Front wheel brake 9 Tyres 10 Wheels 11 Bottom bracket 12 Pedals 13 Chain 14 Rear derailleur 14 a Front derailleur 14 b Rear derailleur 15 Rear light 16 Reflector 17 Pannier rack...
-
Page 4: Preface
2 Preface Your bike has been delivered to you fully assembled. If parts of your bike have not been installed, please con- sult your specialist cycle shop. The purpose of this User Manual is to help you use your bike safely in the manner for which is is intended, and en- joy all its benefits for many years to come. -
Page 5: Table Of Contents
3 Content 9.2.4 Adjusting the saddle angle 1 The bike and its components 9.2.4.1 With a two-bolt seatpost 2 Preface 9.2.4.2 With a seatpost saddle clamp 3 Content 9.2.4.3 With a suspension seatpost 4 Safety information Adjusting the handlebar position Basic safety information 9.3.1 Adjusting / aligning the handlebar height For your own safety... - Page 6 18 Repairing a puncture 20 Bike chain 18.1 Opening the brake 20.1 Maintenance of bike chains 21 Brake, brake levers and brake systems 18.1.1 Opening the cantilever or V-brake 18.1.2 Removing the hydraulic rim brake 21.1 Important information and precautionary measures 18.1.3 Opening the side-pull calliper brake 21.2 Brake lever...
- Page 7 23 Add-on components 27.5 Brake pads 23.1 Pannier rack 27.6 Brake discs 23.1.1 Front pannier rack 27.7 Bike chains or toothed belts 23.1.2 Rear pannier rack 27.8 Chainrings, sprocket wheels and jockey wheels 23.2 Wheel guards / mudguards 27.9 Lamps of lighting set 23.2.1 Re-engaging the safety-release mechanism 27.10 Handlebar tapes and handle grips...
-
Page 8: Safety Information
4 Safety information Information for parents and legal guardians Basic safety information Please read all the warnings and information in this User Manual carefully before using the bike. Keep this User › Make sure that your child has been taught, and Manual near your bike for ready reference. -
Page 9: Bike Safety
› Be ready to brake, especially if you are not sure what lies ahead or are riding downhill. Bear in mind that with intensive use of your bike wear increases accordingly. Many bike parts, particularly on light sports bikes, are only designed for a specific period of use. -
Page 10: Intended Use
Trekking bike / all-terrain bike lations (StVZO) in Germany. When performing technical modifications, bear in mind that electrical components (ATB), if equipped in accordance must only be replaced by type-tested components. with the applicable road traffic licensing regulations 6 Intended use General information Bikes are a means of transportation for one person. -
Page 11: Mountain Bike (Mtb) / Cross Bike
Mountain bike (MTB) / cross bike The bike is exempt from these requirements for the dura- tion of officially approved cycling events. The manufacturer and cycle shop will not accept liability claims should the bike not be used as intended. This par- ticularly applies for non-observance of the safety informa- tion and damage resulting for example from: •... -
Page 12: Before The First Ride
7 Before the first ride Never inflate the tyres to less than the minimum or more than the maximum specified tyre pressure. As a rule of thumb, e.g. when on the road, you can check the tyre pressure as follows: If you press your thumbs into the inflated tyre, there should not be much give in the tyre even if you press hard. -
Page 13: Before Every Ride
8 Before every ride 9 Setting up the bike for the rider Road bikes or mountain bikes can also be supplied with- out pedals. Proceed as follows if you wish to fit pedals to your bike yourself: Although a great deal of care has been taken during production and assembly, parts may still come loose or change function during transportation for example. -
Page 14: Adjusting The Seat Position
Adjusting the seat position Make sure you fit or screw in the pedals straight, as 9.2.1 Adjusting the bike saddle otherwise you could damage the thread in the crank arm beyond repair. The seat position is decisive for your well-being and cy- cling performance. -
Page 15: Determining The Correct Saddle Height
Quick-release device › When closed, quick-release levers must lie flat against the frame, fork and saddle clamp. Make sure that quick-release devices for the hubs point backwards when closed as otherwise they could snag on obstructions when the bike is moving and open. -
Page 16: Adjusting The Saddle Angle
9.2.4.1 With a two-bolt seatpost Some seatposts have two screws for adjusting the sad- The minimum insertion depth is marked on the seat- dle angle, one in front of and one behind the seat tube. post. If this is not the case, the minimum insertion If you want to tilt the saddle forwards, loosen the rear depth must be 7.5 cm. -
Page 17: With A Suspension Seatpost
9.2.4.3 With a suspension seatpost › Bend your upper body towards the handlebar until you have found a position that is comfortable for Suspension seatposts reduce vibrations caused by uneven your back. roads thereby reducing stress on the spinal column. ›... -
Page 18: Adjusting The Handlebar Height With
9.3.4 Adjusting the handlebar position by turning the handlebar Never tighten the handlebar stem if the maximum mark or stop mark is above the top of the shaft. If you Loosen the hexagon socket screws on the front of the cannot find a mark, insert the handlebar stem into stem. -
Page 19: Adjusting The Handlebar Height With An Adjustable Handlebar Stem
10 Frame 9.3.5 Adjusting the handlebar height with an adjustable handlebar stem The form of the frame depends on the bike type and func- tion. Frames are manufactured from different materials With some types of handlebar stems, you can vary the –... -
Page 20: Headset
11 Headset 12 Fork The front wheel is held in place by the bike fork. The bike fork consists of two fork blades, the fork crown and steer- ing tube. Headset The headset is the bearing for the bike fork in the frame. If the headset has been properly adjusted, it will turn easily. -
Page 21: Suspension Frame And Suspension Elements
13 Suspension frame and suspension response, but does not strike through if you ride over an obstruction. It must give slightly when you sit on your elements bike. 13.1 Frame with rear suspension 13.2 Care and maintenance If you wish to ride offroad in a particularly sporty manner You can clean your full-suspension MTB in the usual man- or with a high degree of comfort, you may have opted for a ner. -
Page 22: Bottom Bracket And Cranks
14 Bottom bracket and cranks 16 Wheels Chainrings are wear parts. Their service life depends on various factors, e.g. 16.1 Checking the wheels • maintenance and care, The wheels connect the bike with the surface you are rid- ing on. The wheels are subject to a particularly high level •... -
Page 23: Checking The Rims
17 Tyres and inner tubes triangle backwards and forwards perpendicular to the direction of travel. › If you notice that there is play between the bear- 17.1 Tyres ings or if you encounter resistance when turning the wheel, have the hub bearing adjusted by a spe- A large number of different tyre types exist. -
Page 24: Tubeless Tyres
The tyre pressure is frequently stated in PSI. ➠ Chap- ter 30 "Technical data" contains a table which you can use to convert tyre pressures from PSI into bar. Only use tubed tyres on the designated rims. These do not have turned-up edges (rim flanges) and instead have a smooth inwards-curving surface onto which the tubed tyre is glued. -
Page 25: Repairing A Puncture
18 Repairing a puncture To inflate an inner tube with a Sclaverand or road valve, proceed as follows: To repair a puncture, you will need the following equip- ment: • Plastic tyre lever • Patches • Rubber solution • Sandpaper •... -
Page 26: Opening The Side-Pull Calliper Brake
18.1.3 Opening the side-pull calliper brake 18.2.2 Removing the rear wheel › Open the quick-release lever on the brake arm or › If your bike is equipped with derailleur gears, shift brake lever. down to the smallest sprocket. The rear derailleur does not prevent the wheel from being removed in ›... -
Page 27: Removing The Tyre And Inner Tube
› 2. Pull the outer casing out from the outer casing › 5. Undo the wheel nuts and put them to one side. holder of the cassette joint, and then remove the Remove the lock washers from the wheel axle. inner cable from the slit in the bracket. -
Page 28: Fitting The Tyre And Inner Tube
18.5 Fitting the tyre and inner tube 18.6 Fitting the wheel Please note that the work steps described here are for a specific example. Please observe the information from the relevant manu- facturer or consult your specialist cycle shop. Make sure that foreign bodies do not enter the inside of the tyre. - Page 29 › 2. Fit the fixing washers onto both sides of the hub axle. Turn the shifting arm until the projections on the fixing washers engage with the slits in the Counter the clamp nut with a 10 mm spanner when dropouts.
- Page 30 Installing the shifting cable with hub gears › Attach the inner cable to the pulley as shown in the illustration, pass the inner cable through the slit in › Bring the cable around to the cassette joint pulley, the cassette joint bracket, and then insert the end hold so that the inner cable fixing nut is facing to of the outer casing securely into the outer casing the outside (toward the dropout), and then slide...
-
Page 31: Bike Gears
19 Bike gears Check that the inner cable is correctly seated inside the pulley guide. 19.1 Derailleur gears This User Manual describes the handling of typical, com- mercially available gear-shift components for MTB, ATB, cross and road bikes. Separate instructions are provided for other components on the CD or on the web pages of the CJ-8S20 CJ-8S20... -
Page 32: Operating The Shifting Lever
19.1.1 Operating the shifting lever The bike chain must not be on the smallest chainring 19.1.1.1 Shifting lever on road bike at the front and the small outer rear sprocket wheel simultaneously. The bike chain must not be on the Shimano shifting lever largest chainring at the front and large inner sprocket wheel at the rear simultaneously. - Page 33 Operating the rear derailleur shifting lever Lever a: Shift to a larger sprocket. When lever a is pressed, lever b moves with it. How- Lever a engages in positions 1, 2 and 3. ever, you should avoid putting any pressure on lever b in doing so.
- Page 34 Operating the front derailleur lever with trimming Trimming (noise prevention) (noise prevention), optional Depending on the position of the chain after shifting, it may rub against the outer chain guide plate or inner chain Gear shifting operations guide plate of the front derailleur and produce noise. In this case, lightly press lever a or lever b to move the front Lever a: Shift to a larger chainring derailleur until it is no longer in contact with the chain.
- Page 35 TRIMMING CHAIN POSITION INDICATION LEVER OPERATION FRONT DERAILLEUR MOVEMENT large chainring Chain in contact with outer chain guide plate Lever Trimming Outer chain guide plate before trimming after trimming smaller sprockets Front derailleur movement Middle chainring Smaller sprockets Small chainring Click-in position (contact)
-
Page 36: Shifting Lever On Mtb, Trekking And Touring Bike
SRAM shifting lever Setting the swivel range The range of the shifting and brake lever pivoting move- ment can be adjusted individually to suit the size of your hand. XX° 0° X° › First, set the shifting lever range then adjust the Click Click brake lever until the brake lever limit stop makes... - Page 37 Gear shift complete stroke Click-in position Trimming operation Click-in position H b l (B) Lever Lever Shifting from a large to a smaller chainring Press lever b once to move the chain from a large to a When lever b is operated, there is one click where trim- smaller chainring.
- Page 38 Rear derailleur The adjustment screw may also be on the shifting lever or on the frame. Have your specialist cycle shop carry out maintenance Adjustment screw on the derailleur gears, or replace or adjust them. Precision adjustment / rear derailleur Operate the shifting lever to shift the chain from the small- est sprocket to the second sprocket.
-
Page 39: Hub Gears
Cleaning › Whenever possible, avoid using cleaning agents on The gears can be changed when the pedals are turn- the chain. If you use cleaning agents, such as rust ing. Very occasionally, the hub may produce a harm- remover, this may wash lubricant out of the chain less noise which is caused by its internal cogs and which could lead to malfunctions. -
Page 40: Adjusting Gears With Shimano Hub Gears
19.2.2 Adjusting gears with Shimano hub › Turn the cable adjustment bolt on the shift lever to align the marking lines. Next, set the Revo-shift gears lever from position 4 to position 1 then back to position 4. Check that the yellow marking lines still Example shown is a 7/8-speed hub. -
Page 41: Bike Chain
20 Bike chain There are two types of bike chain: Tighten all screws to the prescribed torque as other- wise screws could shear off and components could • A wide bike chain (½ × 1 / 8") for hub gears and come loose or detach altogether (see ➠... -
Page 42: Brake, Brake Levers And Brake Systems
21 Brake, brake levers and brake Rubber brake blocks and brake pads must not come into contact with oil or grease. If the rubber brake blocks and systems brake pads come into contact with oil or grease, this dras- tically reduces their braking performance and they must This User Manual describes the maintenance and handling be replaced. -
Page 43: Brake Lever
21.2 Brake lever 21.3.1 Drum and roller brakes With the roller brake or drum brake, the braking force is transmitted via a cable from the hand brake lever to the 21.2.1 Standard brake lever brake system. If applied continuously for an extended period, roller brakes or drum brakes become very hot. -
Page 44: Back-Pedal Brake
21.3.2 Back-pedal brake With back-pedal brakes the braking force is transmitted Avoid operating the back-pedal brake continuously on by the foot via the chain to the brake system. If applied long descents as the internal components of the brake continuously for an extended period, back-pedal brakes system can become extremely hot which reduces brak- become very hot. -
Page 45: Rim Brakes
21.4 Rim brakes 21.4.2 Adjusting the brake-pad clearance in relation to the rim Turn the cable adjustment bolt to adjust the clearance between the brake pad and the rim. Turn the bolt inwards (clockwise) to increase the brake-pad clearance. Turn the V-brakes produce an extremely high braking force. -
Page 46: Wear Of Brake Pad
21.4.3 Wear of brake pad If required, you can readjust the rebound force via the spring adjustment screw so that both brake arms move Most brake pads for rim brakes come with grooves or symmetrically. Once you have done this, check that the notches. -
Page 47: Hydraulic Disc Brake
If you hear unusual noises when braking, the brake blocks If the brake disc is worn, cracked or bent it must be re- may have reached their wear limit. Allow the brakes to placed. Have this work carried out by a professional bike cool down then check the brake block depth. -
Page 48: Vapour Bubble Formation
21.5.2 Vapour bubble formation › Vapour bubble formation can occur if the brakes Brake pads and brake blocks are wear parts. Have the are operated continuously for some time, e. g. dur- brake pads of hydraulic disc brakes checked regularly, ing a long steep descent. -
Page 49: Lighting System
22 Lighting system 22.3 Generator / dynamo The dynamo produces the energy required to operate the front and rear lights. There are different types of dynamos. In some EU countries, only lighting systems that are 22.3.1 Sidewall dynamo prescribed by national legislation (the Road Traffic Li- censing Regulations (StVZO) in Germany for example) and have been approved for use may be installed on bikes. -
Page 50: Hub Dynamo
22.4 Failure of the lighting system 22.3.2 Hub dynamo The hub dynamo is inside the hub of the front wheel. The hub dynamo is highly efficient, and the wear is extremely low. If the lighting system fails or develops a fault when riding in the dark this could cause a serious accident. -
Page 51: Add-On Components
23 Add-on components 23.1.1 Front pannier rack 23.1 Pannier rack The pannier racks on the bike satisfy the standard EN 14873. The load-carrying capacity of the pannier rack falls into one of four possible categories: 5 kg, 10 kg, 18 kg and 25 kg. The information on load-carrying capacity is embossed on Front pannier rack the pannier rack. -
Page 52: Wheel Guards / Mudguards
If you notice that a wheel guard is damaged, always re- place it before using the bike again. If you carry pannier bags or other loads on the pan- nier racks, make sure they are securely attached. 23.2.1 Re-engaging the safety-release Make sure that nothing can become caught in the spokes and the turning wheels. -
Page 53: Accessories And Equipment
24 Accessories and equipment › Never attach the child seat to the bike handle- bars directly as it will not be possible to steer the bike safely. › Do not use a suspension saddle if you are car- rying a child in a child seat behind the saddle. The child's fingers could be crushed. -
Page 54: Bike Stand
24.2 Bike stand 24.4 Bike basket The fixing for the basket must not damage the handle- › Never leave your child sitting unattended in the bar or handlebar stem. child seat when you park your bike. The bike › Attach the basket so as not to cover the front could fall over and severely injure the child. -
Page 55: Bike Carriers For Mounting On Roof And Rear Of Car
25 Bike carriers for mounting on 26 Carbon components roof and rear of car Carbon is a specific material that requires special han- dling and care when setting up and carrying out mainte- nance on the bike as well as when riding and also during transportation and storage. -
Page 56: Visual Inspection
Inspect the following components and areas regularly (at ranty void. This kind of adapter should only be least every 100 km) for cracks, fractures or changes in fitted by a specialist cycle shop. surface appearance. Furthermore, if you come off the bike •... -
Page 57: Carbon Wheels
26.7 Carbon wheels ment of pannier racks, trailers and other fixtures are not permitted due to the risk of breakage. Surface wear, change of surface, e. g. due to heat pro- duced when braking, abrasion of brake blocks, wheel hub 26.10 Splinters or their flanks If you are using a bike with carbon rims, bear in mind that... -
Page 58: Care And Maintenance Of The Bike
27 Care and maintenance of the bike › Have defective parts replaced before you ride the bike again. › Touch up damaged paintwork. 27.1 Care Treat all parts that are susceptible to corrosion more frequently than other parts with preservatives and care products, especially during the winter and in aggressive Do not allow care products or oils to come into con- environments such as coastal regions as otherwise your... -
Page 59: Tyres
27.3 Tyres 27.6 Brake discs Due to their function, bike tyres are subject to wear. This Brake discs also wear out as a result of intensive braking, depends on how the bike is used and the rider can influ- or during the course of time. Find out from the manufac- ence this significantly. -
Page 60: Handlebar Tapes And Handle Grips
27.10 Handlebar tapes and handle grips 27.15 Sliding bearings and bearings for full-suspension frames, suspension Handlebar tapes and handle grips are subject to function- forks or other suspension elements related wear and therefore may need to be replaced. The suspension components on the bike, particularly the ›... -
Page 61: Regular Inspections
28 Regular inspections › Have the following components readjusted: • headset, As the spokes settle, the length of the brake and shifting cables increases and the bearings will run in during the • gearshift, first kilometres on the bike, you will have to have an ini- •... -
Page 62: Link List
29 Link list after 3000 kilometres › If necessary, the You can obtain important information on your bike and its components via these links. The relevant user manual • hubs, is normally provided on the manufacturer's web pages, in • headset, addition to important tips for use and making settings. -
Page 63: Technical Data
30 Technical data 30.1 Maximum permitted gross weight of bike The maximum permitted gross weight of the bike compris- es the weight of the bike, the weight of the rider and the weight of the luggage. It also includes the laden weight of a trailer. -
Page 64: Maximum Permitted Loading Of Pannier Rack
30.2 Maximum permitted loading Observe the minimum screw-in depth. For hard aluminium alloys this is at least 1.4 times the screw diameter (e.g. of pannier rack nominal diameter M 5 × 1.4 = 7 mm). Whenever possible, you should tighten all safety-relevant screw connections using a torque wrench. - Page 65 SCREW CONNECTION THREAD TIGHTENING TORQUE (NM) General Crank arm, steel M8x1 Crank arm, alu M8x1 Pedal 9 / 16" Axle nuts, front gen. Axle nuts, rear gen. Stem expander bolt wedge Stem, A-head, angle adjustment Stem, A-head, handlebar clamping fixture M5 / M6 / M7 M5: 5 / M6: 10 / M7: 14 Stem, A-head, head tube M5 / M6 / M7...
-
Page 66: General Tightening Torques For Screw Connections
30.5 Lighting set 30.3.1 General tightening torques for screw connections Depending on which type of lighting set is fitted on your bike you may require different spare lamps. The following The screw grade, e.g. 8.8, is embossed in the screw head. table shows which bulbs you require. -
Page 67: Warranty Conditions
31 Warranty conditions • Non-compatible add-on components that were not part of the scope of delivery at the time the prod- Read ➠ Chapter 27 "Care and maintenance of the bike" uct was handed over, or damage caused by unpro- carefully. - Page 68 I General User Manual...
- Page 69 We hope you thoroughly enjoy using your new bike! Copyright © 2012 Derby Cycle Werke GmbH Reproduction in whole or in part is not permitted without the consent of Derby Cycle Werke GmbH. Subject to misprints, errors and technical modifications.
- Page 70 Original User Manual Pedelec Impulse 2.0 English Item no. 1973K0014008...
- Page 71 Contents 7.3.2 Battery charge state indicator 7.3.3 Remaining range indicator 7.3.4 Units 1 Safety Programming and settings General 7.4.1 Drive data Statutory requirements 7.4.2 Delete trip data 1.2.1 Meaning for the rider 7.4.3 Delete overall data Battery 7.4.4 Device settings Motor 7.4.4.1 Display...
- Page 72 The purpose of this User Manual is to help you get the 5. Select “Open User Manual from CD” or “Check for new most out of your Pedelec Impulse 2.0 and use it correctly. version of User Manual online”. Structure of the User Manual To call up the files, you need the program Adobe Reader.
-
Page 73: Safety
These regulations apply to you wherever you are in the European Union. It is possible that different regu- lations exist in other countries, also inside the EU in Original User Manual | Pedelec Impulse 2.0... -
Page 74: Battery
Extinguishers with metal fire powder (Class D) are better suited to this task. If the battery can be safely moved outdoors, the fire can also be suffocated using sand. Original User Manual | Pedelec Impulse 2.0... -
Page 75: Adjustments/Maintenance/Repair
Batteries are subject to dangerous goods legislation. Therefore, they must not be carried on passenger planes – neither in the cargo hold, nor the cabin. Please contact the relevant airline for detailed information. Original User Manual | Pedelec Impulse 2.0... -
Page 76: Composition Of The Vehicle
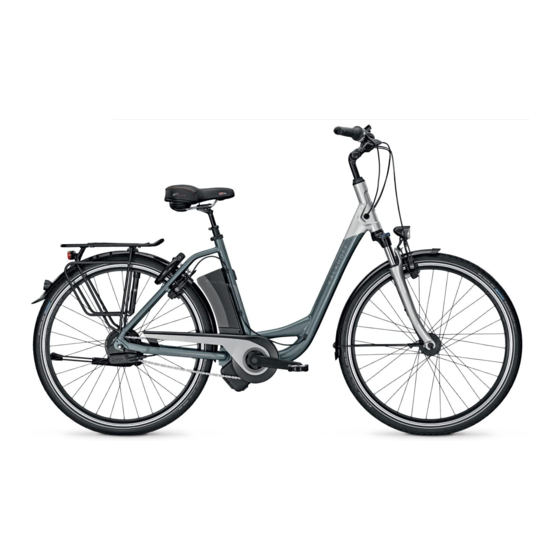
2. Display small Control panel Seatpost clamp Battery (with quick-release (on down tube or seat tube) lever or screw) Frame 1. Seat tube Handlebar 2. Down tube Saddle Seatpost Motor Pedal Fork Wheel Original User Manual | Pedelec Impulse 2.0... -
Page 77: First Steps
For opening, the quick-release lever must be folded back slightly. through 180° – you will see the lettering “OPEN”. For closing, fold the quick-release lever back in through 180° – you will see the lettering “CLOSE”. Original User Manual | Pedelec Impulse 2.0... -
Page 78: Quick Start
“PEDAL”. This instruction will disappear as soon as At the same time, the key must be in the lock and must you start riding. Press the / buttons to select the level of assistance: ECO (low), SPORT (medium), Original User Manual | Pedelec Impulse 2.0... -
Page 79: Battery
The battery can be charged at temperatures 3. You should now remove the key and keep it in a safe between 0°C and 45°C. place to prevent it from breaking off or being lost. Original User Manual | Pedelec Impulse 2.0... -
Page 80: Charging Operation
› The battery may heat up during charging. A maxi- mum temperature of 45°C may be reached. If the battery becomes any warmer than this, suspend the charging process immediately. SEAT TUBE BATTERY Charging the battery Original User Manual | Pedelec Impulse 2.0... -
Page 81: Installing The Battery
2 LEDs light up 40–20% 1 LED lights up 20–10% • 1 LED flashes 10–0% ¡ b) Seat tube battery: Press the push button briefly, the LEDs light up and display the current battery charge state. Original User Manual | Pedelec Impulse 2.0... -
Page 82: Checking The Capacity
After 1,100 charging cycles, your battery will still have 60% of its initial capacity, providing it has 1 LED flashes < 20% ¡ been well looked after. This means 6.6 Ah in an Original User Manual | Pedelec Impulse 2.0... -
Page 83: Storage
• You can also extend the service life of the bat- tery by using the assistance selectively. Use a low assist level when riding. With lower dis- charge currents, you conserve your battery. Original User Manual | Pedelec Impulse 2.0... -
Page 84: Charger
› Read the type plates on the charger before using it for the first time. The Pedelec Impulse 2.0 can be controlled via two ele- ments. The control panel can be found on the handlebar grip; the display is located in the middle of the handlebar. -
Page 85: Switching On/Off
If you press the button, the assistance becomes weaker each time you press it. No assistance. Battery indicator still lights up. Use the buttons to switch between the individual power-assist modes. Original User Manual | Pedelec Impulse 2.0... -
Page 86: Battery Charge State Indicator
Please consider this factor when planning your trips. You are probably familiar with this effect from the remaining range indicator of your car. The remaining range depends on the current battery charge state and Original User Manual | Pedelec Impulse 2.0... -
Page 87: Assistance Indicator
You are taken to the menu sub-items: delete the total kilometres covered. The following ques- • Drive data ➠ Chapter 7.4.1 tion appears on the display: “Confirm delete?”, and below • Delete trip data ➠ Chapter 7.4.2 Original User Manual | Pedelec Impulse 2.0... -
Page 88: Device Settings
• Back you back to the menu sub-item display. Confirm your selection by tapping the button. You are taken back to the menu sub-item display. Original User Manual | Pedelec Impulse 2.0... -
Page 89: Miscellaneous
Climb Assist. The lower the value you set, the less responsive the system becomes. The higher the value you set, the more dynamic the system be- comes, but beware a yo-yo effect. Original User Manual | Pedelec Impulse 2.0... -
Page 90: Target Cost
• Fuel price • Fuel consumption Ø • Fuel type • Power cost • Back You can select the sub-items using the buttons. Pressing the button takes you to the respective sub- Original User Manual | Pedelec Impulse 2.0... -
Page 91: The Motor
If the ground is uneven, as on a country path or less abrupt. Original User Manual | Pedelec Impulse 2.0... -
Page 92: Riding Your Pedelec Efficiently
599 euros: 88,000 km = 0.68 euro cents / km • You use roughly 0.565 kWh to fully charge the bat- tery. Assuming a unit price of 20 euro cents / kWh, it costs you 11.3 euro cents to fully charge the battery. Original User Manual | Pedelec Impulse 2.0... -
Page 93: Troubleshooting
If the error message still ap- pears, contact your specialist cycle shop and have the staff there check the battery and charger. Original User Manual | Pedelec Impulse 2.0... -
Page 94: Cleaning
Running water such as that from a hose pipe or even a high-pressure cleaner must not be used for cleaning. The ingress of water can destroy the motor. Therefore, ensure that neither fluids nor moisture enter the motor at any time during cleaning. Original User Manual | Pedelec Impulse 2.0... -
Page 95: Technical Data
➠ Chapter 30 “Technical data” of the General User Manual (CD). The Impulse 2.0 mountain bike is an exception. Bike trail- ers may not be used on this bike. Original User Manual | Pedelec Impulse 2.0... - Page 96 We hope you thoroughly enjoy using your new Pedelec with Impulse drive. Copyright © Derby Cycle Werke GmbH / Raleigh Univega GmbH Reproduction, in whole or in part, is not permitted without the consent of Derby Cycle Werke GmbH / Raleigh Univega GmbH. Subject to misprints, errors and technical modifications.
- Page 97 User Manual Impulse Ergo Pedelec English Derby Cycle Werke GmbH 2013...
- Page 98 Control panel Display NuVinci Harmony gears Charger and docking station Chest belt Control panel Display NuVinci Harmony gears 4a Charger 4b Docking station 5a Battery 5b Battery lock Chest belt Motor unit VI User Manual | Impulse Ergo Pedelec...
- Page 99 Dear Customer, › Even if you can’t wait to go for your first ride, in the interest of your own safety you should read ➠ Chapter 1 “Quick start” carefully without fail Thank you for choosing the Impulse Ergo Pedelec from before use.
- Page 100 Warnings › Keep children away from electrical appliances. If › The Pedelec operates using low voltage children are present, keep a close eye on them, (36 volts). Never attempt to operate the Pedelec especially if there is a possibility they could in- using power from a source other than a suitable sert objects into the appliance through apertures genuine battery.
- Page 101 Recommendations Disclaimer The contents described hereafter are merely recommenda- Question: What is the intended field of application of the tions. Liability claims relating to damage or injury caused Impulse Ergo Pedelec? by the use or disuse of the information presented therein The intended field of application is are strictly excluded.
- Page 102 Contents Warnings Control panel and display Recommendations Disclaimer Content 1 Quick start Basic functions Riding in the ERGO power-assist mode 5.1.1 Switching on/off Troubleshooting for the ERGO power-assist mode 5.1.2 Pushing assistance 2 Legal principles 5.1.3 Buttons for power-assist level Meaning for the rider 5.1.4 Display of the power-assist mode 3 Special features of the Pedelec with...
- Page 103 5.2.3 Target cost Battery information system 5.2.3.1 Fuel price 8.4.1 Checking the battery charge state 5.2.3.2 Electricity costs 8.4.2 Checking the battery capacity 5.2.3.3 Fuel consumption Service life and warranty 5.2.3.4 Fuel type 8.5.1 Service life and warranty of the drive 5.2.4 ERGO settings 8.5.2 Service life and warranty of the battery 31 5.2.4.1...
- Page 104 1 Quick start 6. If you have charged the battery in the docking station, reinsert the battery into the holder on the Pedelec 1. Charge the battery completely before riding for the from the left-hand side. Tilt the battery outwards at an first time.
-
Page 105: Riding In The Ergo Power-Assist Mode
As soon as the heart rate is displayed, you can adjust the settings further. From the first moment on, you have full assistance. This is unfamiliar but comfortable. Practice starting up in a safe location before venturing into the road traffic. - Page 106 Now you can set both a. the target heart rate and b. the Heart rates differ from person to person. Varia- warning heart rate. Navigate to the desired item using tions occur as a result of illness (such as func- the arrow buttons and press the Set button. tional disorders of the thyroid gland), for exam- ple, or the intake of bradycardia- or tachycardia- inducing medication (such as digitalis, calcium...
- Page 107 7. Pressing the Set button will take you back to the menu sub-items. When the bike is stationary, you cannot switch from minimum to maximum pedalling cadence, or vice versa. You can only do this whilst riding. 11. You can now ride off just as you would if you were riding a normal bike.
-
Page 108: Troubleshooting For The Ergo Power-Assist Mode
› Riding steadily for extended periods allows the switches off as soon as you begin to ride using ERGO system to learn how you handle the bike the power-assist mode once more. and adapt better to your own personal handling Observe the following points to avoid major short- style and the behaviour of your heart rate. -
Page 109: Legal Principles
2 Legal principles 3 Special features of the Pedelec with Impulse drive The essential idea behind the Pedelec is not only to be able to cover greater distances more quickly, but also Your Pedelec is equipped with special features that are more comfortably. - Page 110 Of course, this only applies in the manual mode of the NuVinci Harmony hub and is not recommended in the ERGO mode. IMPULSE DRIVE OTHER CENTRE MOTOR CRANK REVOLU- MOTOR CRANK REVOLU- MOTOR GEAR SPEED (KM/H) SPEED (KM/H) TIONS / MIN. SPEED TIONS / MIN.
-
Page 111: Charging The Battery
4 Charging the battery Removing the battery 1. Grip the battery by the handle, insert the key into the lock and turn it anticlockwise. Now the battery is un- locked. › You can charge the battery whilst it is on the Pedelec (➠... -
Page 112: Learning Cycle
Learning cycle hot air around the battery warmed during the charging operation can dissipate via the surrounding ventila- tion slots. 3. Connect the plug of the charger to the docking station. The LED in the charger now lights up briefly in red and then permanently in green. -
Page 113: Fitting The Battery
5 Control panel and display › Damaged batteries may not be charged, and further use is not permitted. Basic functions › The battery may heat up during charging. A maxi- Control panel mum temperature of 45°C may be reached. If the battery becomes any warmer than this, suspend the charging process immediately. -
Page 114: Switching On/Off
5.1.1 Switching on/off Display Press the power button to switch the Impulse system on. After switching on, the system is always in the display mode in which you switched it off. If you cannot feel any assistance, simply back-pedal briefly and then pedal forwards again to trigger the Speed system check. -
Page 115: Buttons For Power-Assist Level
5.1.3 Buttons for power-assist level DISPLAY BATTERY CHARGE STATE • You can specify the power-assist level using the 100-85.5% arrow buttons. 85.5-71.5% • Each time you press an arrow button, the power assist changes by one level. 71.5-57.5% • If you press the upper arrow button, the level of assistance increases by one level each time you 57.5-42.4% press it. -
Page 116: Troubleshooting
Setting and programming the 5.1.7 Troubleshooting display You can switch between the various displays within the information area (also referred to as the “main menu”) by pressing the Set button. If your bike has been exposed to wet conditions for Pressing and holding the Set button will take you from any an extended period, e.g. -
Page 117: Delete Trip Data
You can select the menu sub-items using the two arrow 5.2.2.2 Brightness buttons on the control panel. You can confirm your selec- You can leave the brightness of the display at its preset tion by pressing the Set button. The respective contents level or adjust it in 5% steps to between 0% and 50% by are then displayed for you. -
Page 118: Target Cost
5.2.2.5 Unit 5.2.2.8 Software Under the sub-item “Unit”, you can choose whether in- Via the sub-item “Software” you can access the sub-items formation relating to distance travelled and speed is dis- “Version” and “Update”, which can be selected using the played in kilometres (km) or miles (mi). -
Page 119: Ergo Settings
5.2.3.2 Electricity costs 5.2.4.1 Target heart rate Under the sub-item “Power cost”, you can specify the price Under the sub-item “Target heart rate”, you can set your of electricity in cents (ct). You can set this to a value of be- optimal target heart rate. -
Page 120: Nuvinci Harmony Gears
6 NuVinci Harmony gears 5.2.4.2 Warning heart rate Under the sub-item “Warning heart rate”, you can set your As soon as you operate the twist-grip shifter or start optimal warning heart rate. You can set this to a value of riding, the NuVinci Harmony gears switch on. -
Page 121: Manual Mode
Manual mode Set the desired pedalling cadence using the twist-grip shifter. You can choose between 12 different pedalling ca- dences. The further forward you move the twist-grip shift- er, the faster the pedalling cadence becomes. The number of boxes lit up in orange increases. The further back you move the twist-grip shifter, the slower the pedalling ca- dence becomes. -
Page 122: Assistance By The Electric Motor
7 Assistance by the electric motor • The level of assistance you have selected. In the power-assist mode POWER, the motor assists you with the highest output and therefore also uses the most energy. If you ride in the SPORT Operating principle of assistance mode, the motor produces slightly less power. -
Page 123: Power-Assist Modes
Power-assist modes its power at low ambient temperatures. The bat- tery cells can discharge at temperatures of -15 to You can choose between the power-assist modes ERGO, +60°C. This is also the temperature range within POWER, SPORT and ECO (➠ Chapter 5.1.4 “Display of the which you can use your battery. -
Page 124: Riding Your Pedelec Efficiently
8 Battery Riding your Pedelec efficiently You can monitor and influence the cost of your journeys Your battery is a lithium-ion battery, the ideal type of bat- with the Pedelec yourself. You can reduce your consump- tery for this application. tion and therefore costs by following the tips for increas- One of the main benefits of this battery is its low weight ing the range. -
Page 125: Learning Cycle
8.1.1 Learning cycle discharge. This can occur after different lengths of time without being used. Depending on the charge state of the battery, this can occur earlier with a lower charge and later with a higher charge. At the latest, the management system activates the sleep mode after 10 days without using the battery. -
Page 126: Battery Information System
in a warm garage when the outside temperature DISPLAY BATTERY CHARGE STATE is low. In this case you should only fit the battery ••••• 5 LEDs light up 100-84% on your bike just before using it. •••• 4 LEDs light up 83-68% ›... -
Page 127: Checking The Battery Capacity
8.4.2 Checking the battery capacity 8.5.2 Service life and warranty of the battery If you press the red Push button for five seconds, the LEDs Batteries are wear parts. Wear parts come with a two-year show the current capacity of the battery. warranty. -
Page 128: Transportation And Shipping Of The Battery
If you always ride with maximum motor output, 8.6.1.3 The E-Bike on aeroplanes • your motor will always require a higher current. Your E-Bike is generally subject to the policies of the re- Higher currents cause the battery to age more spective airline concerning bikes. -
Page 129: Disposal Of Batteries
9 Charger Disposal of batteries Batteries are not to be disposed of with domestic waste. Read the type plates on the charger before using it for the Consumers are legally bound to dispose of used or dam- first time. aged batteries at the locations designated for the purpose You can charge your Pedelec with Impulse drive directly (battery collection point or specialist cycle shop). -
Page 130: Cleaning
10 Cleaning Do not use other chargers. Only charge the battery us- ing the charger provided, or a charger approved by us. › Remove the battery before you clean your • If a charging fault occurs, the LED in the charger Pedelec. -
Page 131: Cleaning The Control Panel
10.4 Cleaning the control panel The control panel can be cleaned with a damp cloth where necessary. 10.5 Cleaning the chest belt Clean the chest belt regularly with water or a mild soap solution. 11 Technical data MOTOR Brushless electric motor with gear unit and freewheel 250 W rated output/ Output 650 W maximum output... - Page 132 We hope you thoroughly enjoy using your new Impulse Ergo Pedelec. Copyright © 2013 Derby Cycle Werke GmbH Reproduction, in whole or in part, is not permitted without the consent of Derby Cycle Werke GmbH. Subject to misprints, errors and technical modifications.
- Page 133 User Manual Groove Pedelec English Derby Cycle Werke GmbH 2013...
- Page 134 Battery and charger Battery lock Control panel Motor unit Battery Battery lock Motor unit Control panel Charger VII User Manual | Pedelec Groove...
- Page 135 Dear Customer, In addition to texts and tables, the User Manual contains the following symbols that denote important information Thank you for choosing a Pedelec (pedal electric cycle) or dangers. featuring the innovative Groove drive from our company. This bike is equipped with an electric drive that assists you when you are cycling.
- Page 136 Contents 1 Quick start Operating principle of assistance 2 Legal principles Distance Meaning for the rider Riding your Pedelec efficiently 7 Battery Pushing assistance 3 Special features of Pedelec with Groove drive Straightforward charging 4 Charging the battery High degree of safety due to battery management Straightforward storage Battery information system...
-
Page 137: Quick Start
1 Quick start › 5. If you have charged the battery somewhere other than on the Pedelec, place the battery back › 1. Charge the battery completely before riding for into the holder in the pannier rack by reinserting it the first time. -
Page 138: Legal Principles
2 Legal principles Pushing assistance Your Pedelec is available in a version with or without push- The essential idea behind the Pedelec is not only to be ing assistance. able to cover greater distances more quickly, but also more comfortably. You can choose to relax and let the bike do the work, exert yourself more physically, or simply get from A to B as fast as possible. -
Page 139: Charging The Battery
› The Groove drive also makes it possible to ride › Hold the battery by the recessed grip at the back of with power assistance even if you are only gently the battery and turn the key anticlockwise. turning the cranks. ›... -
Page 140: Charging Operation
Charging operation Before charging the battery, read the directions on the charger carefully. LEDs on the battery › 5. If the LED on the charger lights up green, the battery is fully charged. › 6. To save power, pull the charger plug out of the socket once the charging operation is complete. -
Page 141: Control Panel
5 Control panel On/Off button Press the POWER button to switch the control panel on and off. After it has been switched on, the system is always in the medium power-assist mode SPORT. Switches for power-assist level You can specify the power assist level via the Mode button. -
Page 142: Display Of Power-Assist Mode
Display of power-assist mode Battery charge state indicator The upper row of LED indicators on the right next to the The battery charge state indicator is located below the Mode button shows how much assistance the motor is cur- row of LED indicators that displays the power-assist mode. rently providing. -
Page 143: Assistance By The Electric Motor
6 Assistance by the electric motor Distance The distance you can travel using the power assist with the battery fully charged depends on several factors: Operating principle of assistance Ambient temperature • If you switch on the assistance and start pedalling, the If it is colder, you will travel a shorter distance motor starts up once the cranks have completed roughly with the same battery charge. -
Page 144: Riding Your Pedelec Efficiently
7 Battery Riding your Pedelec efficiently You can monitor and influence the cost of your journeys Your battery is a lithium cobalt battery, the ideal lithium- with the Pedelec yourself. You can reduce your consump- ion (Li-Ion) battery type for this application. One of the tion and therefore costs by following the tips for achieving main benefits of this type of battery is its low weight a long range. -
Page 145: Battery Information System
Battery information system There is a display panel on the top of the battery which Observe the following points to increase the service contains four LEDs and a button. The LEDs light up if you life of your Pedelec battery: press the button. -
Page 146: Service Life And Warranty
› The range of the battery is less in winter due to the The battery of course also ages over time. Even if you do lower temperatures. Only move the battery from not use your battery, its capacity reduces. In general, the the warm room where you store it and fit it on your battery is expected to age at a rate of 5% per year. -
Page 147: Removing The Front Wheel
9 Removing the front wheel If you need to remove the front wheel, to repair a punc- Do not use other chargers. Only charge the battery us- ture for example, this can be done in the same way as ing the charger provided, or a charger approved by us. removing the front wheel of a normal bike, excluding one If a problem occurs, remove the battery from the Pe- procedure. -
Page 148: Cleaning
10 Cleaning › If risk free operation of your Pedelec cannot be assumed, take it out of operation and make sure it cannot be used until you have it checked by a specialist cycle shop. Risk-free operation is no longer possible if live parts or the rechargeable battery show signs of damage. -
Page 149: Technical Data
12 Technical data MOTOR Brushless electric motor with planetary gear unit and freewheel Output 250 watts Maximum torque 35 Nm Weight of motor 2.88 kg Assist levels 70, 150, 250 watts Switch-off speed 25 km/h at all assist levels Control via speed sensor GROOVE LI-ION BATTERY Voltage... - Page 150 We hope you thoroughly enjoy using your new Pedelec with Groove drive. Copyright © 2013 Derby Cycle Werke GmbH Reproduction in whole or in part is not permitted without the consent of Derby Cycle Werke GmbH. Subject to misprints, errors and technical modifications.
- Page 151 Original User Manual Xion Pedelec English...
- Page 152 Contents 1 Safety 7.4.1 Tour Reset General 7.4.2 Assist mode Statutory requirements 7.4.3 Brake assist 1.2.1 Meaning for the rider 7.4.4 Push assist Battery 7.4.5 Settings Motor 7.4.5.1 Date Adjustments/maintenance/repair 7.4.5.2 Time Transportation of the Pedelec 7.4.5.3 Language 1.6.1 The Pedelec and your car 7.4.5.4 Units 1.6.2 The Pedelec on trains...
- Page 153 Introduction PROCEDURE B: 1. Insert the CD. Thank you for choosing the Xion Pedelec from our com- pany. This Pedelec is equipped with an innovative electric 2. Using the mouse, right-click once on: “Open folder to drive that assists you when you are cycling. This will make display files.”...
-
Page 154: Safety
1 Safety The User Manual contains the following symbols that Bear in mind that the Pedelec is only designed for a denote dangers or important information. maximum speed of 70 km/h. Exceeding this speed causes damage to the electrical components. WARNING If you wish to make any adjustments to the ride char- regarding possible physical injury, increased... -
Page 155: Battery
› No age restriction applies for a Pedelec. are better suited to this task. If the battery can be safely moved outdoors, the fire can also be › The regulations governing the use of cycle paths suffocated using sand. are the same as for normal bikes. These regulations apply to you wherever you are in the European Union. -
Page 156: Adjustments/Maintenance/Repair
Adjustments/maintenance/repair 1.6.3 The Pedelec on aeroplanes Your Pedelec is generally subject to the policies of the respective airline concerning bikes. Batteries are subject to dangerous goods legislation. Therefore, they must not be carried on passenger planes – neither in the cargo hold, nor the cabin. -
Page 157: Composition Of The Vehicle
2 Composition of the vehicle Seatpost clamp Battery Display (with quick-release (on down tube lever or screw) or seat tube) Control panel Frame 1. Top tube 2. Seat tube Handlebar 3. Down tube Saddle Seatpost Motor Pedal Fork Wheel Original User Manual | Xion Pedelec... -
Page 158: First Steps
3 First steps 3.3.2 Quick-release device For opening, the quick-release lever must be folded back through 180° – you will see the lettering “OPEN”. For clos- Checking the tightening torques ing, fold the quick-release lever back in through 180° – you will see the lettering “CLOSE”. -
Page 159: Quick Start
4 Quick start 1. Charge the battery completely before riding for the first time. Charge temperature: 0°C to 45°C. 2. Remove the cover from the charging socket. 3. Connect the plug of the charger to the battery. When positioned correctly, the plug is held in the socket by magnets. -
Page 160: Battery
5.1.1 Removing the battery tance by one level. This works both ways, depending on which arrow button you press. 1. Insert the key into the lock and turn it anticlockwise. 10. You can also use the arrow button to set the assistance The battery is now unlocked. -
Page 161: Charging Operation
5.1.2 Charging operation 5. To save power, pull the charger plug out of the socket once the charging operation is complete. Before charging the battery, read the information on › Damaged batteries may not be charged, and fur- the charger carefully. ther use is not permitted. -
Page 162: Installing The Battery
Battery information system 5.1.3 Installing the battery 1. a) Down tube battery: Insert the battery into the bat- There is a display panel on the outer face of the battery tery holder of the Pedelec from the front/above. At the which includes five LEDs and a battery key. -
Page 163: Battery Management
vidual charges until the charges reach the overall capacity of the battery. The range of the battery is less in winter due to the For example: You charge the battery with 5 Ah on lower temperatures. Only move the battery (from the the first day, 2 Ah on the second day and 4 Ah on warm room where you store it) and fit it on your the third day;... -
Page 164: Storage
6 Charger low assist level when riding. With lower dis- charge currents, you conserve your battery. › Make sure that the battery is fully charged before Read the type plates on the charger before using it for you ride your bike for the first time or if you have the first time. -
Page 165: Control Panel And Display
Control panel Disconnect the battery from the charger and then connect it again. If the error message still appears, the battery and charger must be checked by a specialist dealer. If used incorrectly, the device may be damaged or inflict injuries. •... -
Page 166: Pushing Assistance
Display 7.1.2 Pushing assistance First of all, pushing assistance must be activated in the programming mode ➠ Chapter 7.4.4 “Push assist”. To switch the pushing assistance on, press and hold the upper arrow button. To receive no further pushing assis- tance, release the button. -
Page 167: Mounting And Removal Of The Display
7.2.1 Mounting and removal of the display Please always turn the Pedelec off first before you remove the display ➠ Chapter 7.1.1 “Switching on/off”. Removing the display › In order to protect your Pedelec from undesir- able use by third parties or theft, the display 7.2.2 Menu availability should always be removed from the handlebar when the Pedelec is not in use. -
Page 168: Battery Charge State Indicator
Below the diamond, the energy recovery (recuperation) is displayed. You can set two different recuperation levels. The first level yields 50% energy recovery, while the sec- If the conditions of the journey change, for example, ond yields 100%. In the second level, the maximum pos- by riding up an incline after a long, flat stretch, the sible energy recovery is achieved. -
Page 169: Programming And Settings
Programming and settings SYMBOL MEANING Battery charge state indicator. After switching on the Xion system, you can switch to the programming mode by pressing the diamond button. This only works when the Pedelec is at a standstill. This is al- ways possible when the “M”... -
Page 170: Tour Reset
7.4.1 Tour Reset Under the menu sub-item “Tour Reset” you can delete The Eco mode is recommended for beginners or inex- your tour data. As soon as you press the diamond button, perienced riders. the tour kilometres, the average speed and the journey time for the tour are deleted –... -
Page 171: Push Assist
7.4.4 Push assist 7.4.5 Settings Under the menu sub-item “Settings”, you can set and review the following sub-items: • Back In order to activate the pushing assistance for the first • Date time after switching on, move the rear wheel 30 centi- •... -
Page 172: Time
7.4.5.2 Time 7.4.5.4 Units Under the item “Time”, you can set the time. To do so, Under the item “Units”, you can choose between kilome- press the diamond button and set the desired time in the tres (km/h) or miles (mph). Navigate to the desired item format hh:mm using the arrow buttons. -
Page 173: Energy Recovery (Recuperation)
8.1.1 Energy recovery (recuperation) The higher the assist level you have set, the more distinct this assistance characteristic becomes. Derives from the Latin word for “regain, recover”. In • The level of assistance you have selected. technology, “recovery” relates to the feeding of electric- In the highest assist level (Boost), the motor as- ity back into the battery. -
Page 174: Braking Assistance
› The charge state of the battery must be no higher than 90%. When the battery is fully charged, energy recovery does not work. Instead, the fol- Always be ready to brake, as the braking assistance lowing symbol is displayed: can switch off. -
Page 175: Range
Range XION BATTERY 11 AH 15.5 AH The distance you can travel using the power assist with Range 85 km 120 km the battery fully charged depends on several factors: Temperature 10-15°C 10-15°C • Selected assist level If you want to cover a large distance with power Wind speed windless windless... -
Page 176: Troubleshooting
9 Troubleshooting TEXT / SYMBOL CAUSE SOLUTION Battery heats up to more than 45°C High ambient temperatures Suspend the charging process and allow during charging. the battery to cool down. Then charge the battery in a cooler environment. If the problem still occurs, contact your specialist cycle shop;... - Page 177 TEXT / SYMBOL CAUSE SOLUTION Assist levels cannot be adjusted. Pushing assistance is activated. The assist levels can be adjusted again whilst riding. Contact with display. Spray contact spray onto the contacts located on the underside of the display. If the problem persists, contact your specialist cycle shop.
-
Page 178: Repair
10 Repair Never hold or carry the rear wheel by the cable. This 10.1 Removing the rear wheel poses the danger of the cable breaking. 1. First, shift the bike chain to the smallest sprocket. 2. Then disconnect the cable between the motor and the 6. -
Page 179: Cleaning
11.2 Motor 7. Reattach the plug to the chain stay using the rubber ring. Dirt should be removed from the motor of your Pedelec 8. If your Pedelec has rim brakes, engage the brake cable regularly, ideally using a dry brush or a damp (not wet) again. -
Page 180: Technical Data
12 Technical data MOTOR Brushless electric motor Output 250 W rated output/ 650 W maximum output Torque 12 Nm rated torque 41 Nm maximum torque Gross weight 11 Ah 15.5 Ah of electric drive, 7.8 kg 7.8 kg battery, control unit Control Via torque sensor and speed sensor in the motor... - Page 181 We hope you thoroughly enjoy using your new Pedelec with Xion drive. Copyright © Derby Cycle Werke GmbH / Raleigh Univega GmbH Reproduction, in whole or in part, is not permitted without the consent of Derby Cycle Werke GmbH / Raleigh Univega GmbH. Subject to misprints, errors and technical modifications.
- Page 182 Performance Line Performance Line Robert Bosch GmbH Bosch eBike Systems 72703 Reutlingen Drive Unit | Intuvia | Germany PowerPack 300 | PowerPack 400 | Charger www.bosch-ebike.com 0 275 007 021 | 0 275 007 023 | 1 270 020 909 | 0 275 007 907 | 0 276 001 SPI (2013.08) T / 156 0 275 007 511 | 0 275 007 512 | 0 275 007 522 en Original instructions...
- Page 183 TURBO SPORT TOUR KM/H PMWH KM/H Reichweite 0 276 001 SPI | (22.8.13) Bosch eBike Systems...
- Page 184 Bosch eBike Systems 0 276 001 SPI | (22.8.13)
- Page 185 C7 C6 0 276 001 SPI | (22.8.13) Bosch eBike Systems...
- Page 186 7° Bosch eBike Systems 0 276 001 SPI | (22.8.13)
- Page 187 eBike Battery Charger 36-4/230 For safe operation see manual. Risk of electric shock. Dry location use only. Charge only batteries of WARNING the Bosch eBike Systems. Other batteries may burst causing personal damage. Do not replace the plug Active/Performance Line assembly as risk of fire or electric shock may result.
- Page 188 Bosch eBike Systems 0 276 001 SPI | (22.8.13)
- Page 189 0 276 001 SPI | (22.8.13) Bosch eBike Systems...
- Page 190 Deutsch–1 Antriebseinheit Drive Unit/ Bediencomputer Intuvia Sicherheitshinweise Ihres eBike-Systems zu erhöhen. Sie verringern hiermit in der Regel die Lebensdauer des Systems und riskieren Lesen Sie alle Sicherheitshinweise und An- Schäden an der Drive Unit und am Rad. Außerdem besteht weisungen. Versäumnisse bei der Einhaltung die Gefahr, dass Ihnen Garantie- und Gewährleistungsan- der Sicherheitshinweise und Anweisungen sprüche auf das von Ihnen gekaufte Rad verloren gehen.
- Page 191 Deutsch–2 10 Bedieneinheit Bediencomputer Intuvia 11 Taste Anzeigenfunktion „i“ an der Bedieneinheit Sachnummer 1 270 020 909 12 Taste Wert senken/nach unten blättern „–“ Ladestrom USB-Anschluss 13 Taste Wert erhöhen/nach oben blättern „+“ max. 14 Taste Schiebehilfe „WALK“ Ladespannung USB- Anschluss 15 Arretierung Bediencomputer 16 Blockierschraube Bediencomputer...
- Page 192 Deutsch–3 Hinweis: Ist der Abstand zwischen Geschwindigkeitssensor Wird etwa 10 min lang keine Leistung des Antriebs abgerufen 17 und Speichenmagnet 18 zu klein oder zu groß, oder ist der (z.B., weil das eBike steht), schaltet sich das eBike-System Geschwindigkeitssensor 17 nicht richtig angeschlossen, fällt aus Energiespargründen automatisch ab.
- Page 193 Deutsch–4 Die Kapazität des Akkus reicht noch für etwa 2 Stunden Gang ist, desto geringer ist die Geschwindigkeit in dieser Beleuchtung. Weitere Verbraucher (z.B. Automatikgetriebe, Funktion (bei voller Leistung). Laden von externen Geräten am USB-Anschluss) werden Die Funktion Schiebehilfe/Anfahrhilfe darf ausschließ- hierbei nicht berücksichtigt.
-
Page 194: Specifications
English–1 Drive Unit/ HMI Intuvia Safety Notes Please observe all national regulations on registering and using eBikes. Read all safety warnings and all instruc- Please read and observe the safety warnings and in- tions. Failure to follow the warnings and in- structions enclosed in the operating instructions of the structions may result in electric shock, fire battery pack as well as in the operating instructions of... - Page 195 English–2 Indication Elements, HMI Lighting* a Motor-output indicator Rated voltage b Assistance-level indicator Power output c Illumination indicator – Front light d Text indication – Rear light e Value indication * Not possible via the eBike battery pack in all country-specific versions, f Speed indication depending on the statutory regulations g Battery charge-control indicator...
-
Page 196: Initial Operation
English–3 Operation To recharge the internal battery pack, insert the HMI into the holder 4 (a battery pack must be inserted in the eBike). Switch the eBike battery pack off by its On/Off button (see Initial Operation battery pack operating instructions). Requirements The HMI can also be charged via USB connection. - Page 197 English–4 The following assistance levels (max.) are available: Switching the Lighting On/Off – “OFF”: The drive is switched off, the eBike can be operat- In the version in which the driving light is powered via the ed as a normal bicycle through pedaling. eBike system, you can use the 2 button on the HMI to simulta- –...
- Page 198 English–5 To change the basic settings, press the On/Off button 5 next – “power-on hours”: Indicates the total travel duration with to the “–” indication to decrease the value or scroll down, or the eBike (not changeable). the illumination button 2 next to the “+” indication to increase –...
- Page 199 English–6 Code Cause Corrective Measure Battery pack error Switch off the e-Bike, remove the battery pack and reinsert the battery pack. Restart the system. If the problem persists, contact your Bosch eBike dealer. Configuration error Restart the system. If the problem persists, contact your Bosch eBike dealer.
-
Page 200: Maintenance And Service
English–7 Notes on Riding with the eBike System For this reason, it is not possible to precisely predict the range before commencing a trip. General rules: When does the eBike Drive Operate? – For the same motor output of the eBike drive: The less The eBike drive supports you when riding, as long as you step power or force that you have to bring about to reach a cer- into the pedals. - Page 201 English–8 Disposal The drive unit, HMI (incl. operating unit), battery pack, speed sensor, accessories and packaging should be sorted for environmental-friendly recy- cling. Do not dispose of eBikes and their components into house- hold waste! Only for EC countries: According to the European Guideline 2012/19/EU, electrical devices/tools that are no longer usable, and according to the European Guideline 2006/66/EC, defec-...
-
Page 202: Lithium Ion Battery Pack Powerpack
English–9 Lithium ion battery pack PowerPack Safety Notes Charge the battery pack only with original Bosch bat- tery chargers. When using non-original Bosch chargers, Read all safety warnings the danger of fire cannot be excluded. and all instructions. Failure ... -
Page 203: Charging The Battery Pack
English–10 Technical Data Lithium ion battery pack PowerPack 300 PowerPack 400 Article number – Standard battery pack 0 275 007 509 0 275 007 510 0 275 007 511 0 275 007 512 – Rack-type battery pack 0 275 007 513 0 275 007 514 0 275 007 522 Rated voltage... - Page 204 English–11 Inserting and Removing the Battery Pack When no power output of the eBike drive is requested for ap- prox. 10 minutes (e. g., because the eBike is parked) and no (see figures C–D) button of the drive HMI or operating unit is pressed, the eBike ...
- Page 205 English–12 Maintenance and Service Disposal Battery packs, accessories and packaging should be Maintenance and Cleaning sorted for environmental-friendly recycling. Keep the battery pack clean. Clean the battery pack carefully Do not dispose of the battery packs into household waste! with a soft, damp cloth. The battery pack may not be im- Only for EC countries: mersed in water or cleaned with a water jet.
- Page 206 English–13 Charger Safety Notes Please read and observe the safety warnings and in- structions enclosed in the operating instructions of the Read all safety warnings and battery pack and drive unit/HMI, as well as in the oper- all instructions. Failure to fol- ating instructions of your eBike.
- Page 207 English–14 Technical Data Charging the battery on the Bike (see figure G) Switch the battery off. Clean the cover of the charge socket Battery Charger Charger C7. Prevent especially the charge socket and the contacts Article number 0 275 007 907 from getting dirty, e.g.
- Page 208 English–15 Maintenance and Service Note: If you have charged on the bike, carefully close the charge socket C6 with the cover C7 after the charging proce- dure so that no dirt or water can get in. Maintenance and Cleaning If the charger is not disconnected from the battery after If the charger should fail, please refer to an authorised bicycle charging, after a few hours the charger will switch itself back dealer.
- Page 209 Active Line Active Line Robert Bosch GmbH Bosch eBike Systems 72703 Reutlingen Drive Unit | Intuvia | Germany PowerPack 300 | PowerPack 400 | Charger www.bosch-ebike.com 0 275 007 020 | 0 275 007 022 | 1 270 020 906 | 0 275 007 907 | 0 276 001 SAI (2013.08) T / 154 0 275 007 509 | 0 275 007 510 | 0 275 007 513 | 0 275 007 514 en Original instructions...
- Page 210 TURBO SPORT TOUR KM/H PMWH KM/H Reichweite 0 276 001 SAI | (14.8.13) Bosch eBike Systems...
- Page 211 Bosch eBike Systems 0 276 001 SAI | (14.8.13)
- Page 212 C7 C6 0 276 001 SAI | (14.8.13) Bosch eBike Systems...
- Page 213 7° Bosch eBike Systems 0 276 001 SAI | (14.8.13)
- Page 214 eBike Battery Charger 36-4/230 For safe operation see manual. Risk of electric shock. Dry location use only. Charge only batteries of WARNING the Bosch eBike Systems. Other batteries may burst causing personal damage. Do not replace the plug Active/Performance Line assembly as risk of fire or electric shock may result.
- Page 215 Bosch eBike Systems 0 276 001 SAI | (14.8.13)
- Page 216 0 276 001 SAI | (14.8.13) Bosch eBike Systems...
- Page 217 English–1 Drive Unit Cruise/ HMI Intuvia Safety Notes thus running the risk of high personal liability costs and possibly even criminal prosecution in the event of acci- Read all safety warnings and all instruc- dents attributable to manipulation. tions. Failure to follow the warnings and in- ...
- Page 218 English–2 Inserting and Removing the HMI (see figure A) Indication Elements, HMI a Motor-output indicator To insert the HMI 3, slide it from the front into the holder 4. b Assistance-level indicator To remove the HMI 3, press the lock latch 15 and slide the c Illumination indicator HMI toward the front out of the holder 4.
- Page 219 English–3 As soon as you stop pedaling when in normal operation, or as On indicator g, each bar of the battery pack symbol is equiva- soon as you have reached a speed of 25 km/h, the assistance lent to a capacity of approx. 20 %: from the eBike drive is switched off.
- Page 220 English–4 Switching the Push-assistance mode On/Off To switch between the indication functions, press the “i” button 1 on the HMI or the “i” button 11 on the operating unit The push-assistance feature makes it easier to push the until the desired function is displayed. eBike.
- Page 221 English–5 Error Code Indication Depending on the type of error, the drive is automatically shut off if required. Continued travel without assistance from the The components of the eBike system are continuously and au- drive is possible at any time. However, have the eBike tomatically monitored.
- Page 222 English–6 Code Cause Corrective Measure Internal battery pack error Restart the system. If the problem persists, contact your Bosch eBike dealer. Internal battery pack error Restart the system. If the problem persists, contact your Bosch eBike dealer. Battery pack temperature error The eBike is outside of the permissible temperature range.
- Page 223 English–7 Transport Gathering First Experience It is recommended to gather first experience with the eBike The battery packs are subject to the Dangerous Goods Legis- away from roads with heavy traffic. lation requirements. Private users can transport undamaged Try out the different assistance levels. As soon as you feel battery packs by road without further requirements.
- Page 224 English–8 Lithium ion battery pack PowerPack Safety Notes Charge the battery pack only with original Bosch bat- tery chargers. When using non-original Bosch chargers, Read all safety warnings the danger of fire cannot be excluded. and all instructions. Failure ...
- Page 225 English–9 Technical Data Lithium ion battery pack PowerPack 300 PowerPack 400 Article number – Standard battery pack 0 275 007 509 0 275 007 510 0 275 007 511 0 275 007 512 – Rack-type battery pack 0 275 007 513 0 275 007 514 0 275 007 522 Rated voltage...
- Page 226 English–10 Inserting and Removing the Battery Pack When no power output of the eBike drive is requested for ap- prox. 10 minutes (e. g., because the eBike is parked) and no (see figures C–D) button of the drive HMI or operating unit is pressed, the eBike ...
- Page 227 English–11 Maintenance and Service Disposal Battery packs, accessories and packaging should be Maintenance and Cleaning sorted for environmental-friendly recycling. Keep the battery pack clean. Clean the battery pack carefully Do not dispose of the battery packs into household waste! with a soft, damp cloth. The battery pack may not be im- Only for EC countries: mersed in water or cleaned with a water jet.
- Page 228 English–12 Charger Safety Notes Please read and observe the safety warnings and in- structions enclosed in the operating instructions of the Read all safety warnings and battery pack and drive unit/HMI, as well as in the oper- all instructions. Failure to fol- ating instructions of your eBike.
- Page 229 English–13 Technical Data Charging the battery on the Bike (see figure G) Switch the battery off. Clean the cover of the charge socket Battery Charger Charger C7. Prevent especially the charge socket and the contacts Article number 0 275 007 907 from getting dirty, e.g.
- Page 230 English–14 Maintenance and Service Note: If you have charged on the bike, carefully close the charge socket C6 with the cover C7 after the charging proce- dure so that no dirt or water can get in. Maintenance and Cleaning If the charger is not disconnected from the battery after If the charger should fail, please refer to an authorised bicycle charging, after a few hours the charger will switch itself back dealer.
Need help?
Do you have a question about the Pedelec Impulse and is the answer not in the manual?
Questions and answers