Table of Contents
Advertisement
Advertisement
Table of Contents

Related Manuals for SpeeCo 40100500


Summary of Contents for SpeeCo 40100500
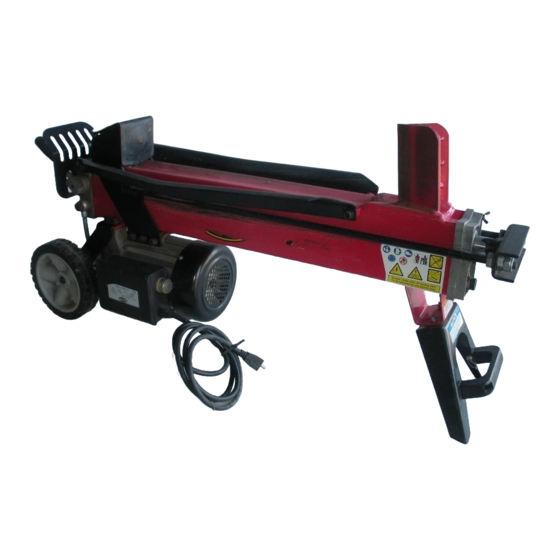
- Page 1 5 TON ELECTRIC LOG SPLITTER MODEL NO. 40100500 Owner’s Manual ASSEMBLY & OPERATING INSTRUCTIONS This safety alert symbol identifies important safety messages in this manual. Failure to follow this important safety information may result in serious injury or death. LS102-778-0608...
-
Page 2: Table Of Contents
Table of Contents Page(s) Important Safety Information......................... 1-6 Intended Use ......................... 1 Personal Protective Equipment ....................1 General Safety ........................3 Safety Decals ........................Preparation of the Log ......................Work Area ........................... Operation of the Log Splitter ....................Repair and Maintenance Safety ..................... Hydraulic Safety ........................ -
Page 3: Important Safety Information
WARNING: Read and thoroughly understand all instructions and safety information before assembling or operating this log splitter. Failure to do so may cause serious injury or death. Do not allow anyone to operate this log splitter who has not read this manual. As with all power equipment, a log splitter can be dangerous if assembled or used improperly. -
Page 4: Safety Decals
SAFETY DECALS Make sure that all safety warning decals are in good condition and readable. Always replace missing or defaced decals. Write us or call 1-800-525-8322 and they will be sent to you at no charge. LOCATION: SIDE OF BEAM, WEDGE END PART NUMBER: 52036900 Keep all people and pets away from Read and understand manual... -
Page 5: Preparation Of The Log
PREPARATION OF THE LOG Both ends of the log should be cut as square as possible to help prevent the log from riding out of the splitter during operation. Do not split logs greater than 20 in. in length. WORK AREA NEVER operate the log splitter on slippery, wet, muddy or icy ground. -
Page 6: Repair And Maintenance Safety
REPAIR AND MAINTENANCE SAFETY NEVER operate your log splitter when it is in poor mechanical condition or in need of repair. ALWAYS unplug the power cable before performing any maintenance and repair. Periodically check that all nuts, bolts, screws, hydraulic fittings and hose clamps are tightened. NEVER alter your log splitter in any manner such as adding a rope or extenstion to the control lever or adding to the width or height of the wedge. -
Page 7: Fire Prevention
FIRE PREVENTION NEVER operate your log splitter near a flame or spark. Hydraulic oil is flammable and can explode. ALWAYS take a Class B fire extinguisher with you when operating this log splitter in dry areas as a precautionary measure against possible flying sparks. TRANSPORTATION NEVER move this log splitter while the motor is running. -
Page 8: Assembly Instructions
ASSEMBLY INSTRUCTIONS NOTE: This log splitter was partially assembled at the factory. Refer to the drawing and parts list should it become necessary to disassemble the unit for repair or replacement of parts. NOTE: Ensure the power supply is not connected while assembling the log splitter. STEP 1: Remove all the components from the crate. -
Page 9: Directions For Filling Hydraulic System
DIRECTIONS FOR FILLING HYDRAULIC SYSTEM Disconnect the control hand bar from its linkage part and take off the cushions from the front frame. Lift the towing handle and keep the tank in the vertical position. Disconnect the vent plug and dipstick from the front cylinder cover. Put the front frame of the unit in some container;... -
Page 10: Maintenance
Place the log splitter on a sturdy, level surface. Ensure the equipment is in safe working condition. Check all nuts, bolts and hydraulic fittings are tight. Check the switch, power cable and plug are not damaged. Check that all safety shields are in proper position. Check that the outlet’s main voltage and frequency match the data stated on the model plate (or “Technical Specifications”... -
Page 11: Parts List
PARTS BREAKDOWN FOR 40100500 LOG SPLITTER c t i n i l t l i f c i l n i l i t s n i l c i l p i l NOTE: Drawing and parts list are shown for reference only should it become necessary to disassemble the unit for repair or replacement of parts. -
Page 12: Parts Breakdown Illustration
PARTS BREAKDOWN FOR 40100500 LOG SPLITTER Page 10... -
Page 13: Notes
IMPORTANT NOTICE We, the manufacturer, reserve the right to change the product and/or specifications in this manual without notification. The manual is for information usage only and the pictures and drawings depicted herein are for reference only. WARRANTY This log splitter is guaranteed to be free from defects for one full year from the date of purchase. Do not return this product to the store for warranty issues or repair. -
Page 14: Warranty Information
SPECIFICATIONS " 0 " 9 " 2 " 7 " 4 " 1 " 8...
Need help?
Do you have a question about the 40100500 and is the answer not in the manual?
Questions and answers
Trying to change fluid in 500 log splitter can’t f.indtlop drain bolt
Is there anyone in Georgia who can actually make repairs to this lig splitter. I've been told the hydraulic pump is bad.
For repair services for the SpeeCo log splitter with part number 40100500 in Georgia, call 1-800-525-8322 to get the location of the nearest service center.
This answer is automatically generated