
Related Manuals for ZALMAN HD160XT


Summary of Contents for ZALMAN HD160XT
-
Page 2: English Version
HD160XT English version Please read this manual thoroughly before installation. Please visit our website and watch the HD160XT installation video to assist you in the installation process. www.zalman.co.kr www.zalmanusa.com... - Page 3 Congratulations on your purchase of Zalman’s HD160XT Home Theatre PC Enclosure! You are now about to experience Zalman’s world of silent computing. The HD160XT is designed for ultra quiet home theatre PC operation, utilizing optimized ventilation and anti-vibration reinforcements, making it ideal for environments that require silence such as living rooms, bedrooms, educational facilities, and offices.
- Page 4 If there is a problem with the unit and/or its components, please contact the retailer for a replacement. Disclaimer Zalman Tech Co., Ltd. is not responsible for any damages due to external causes, including but not limited to, improper use, problems with electrical power, accident, neglect, alteration, repair, improper installation, or improper testing.
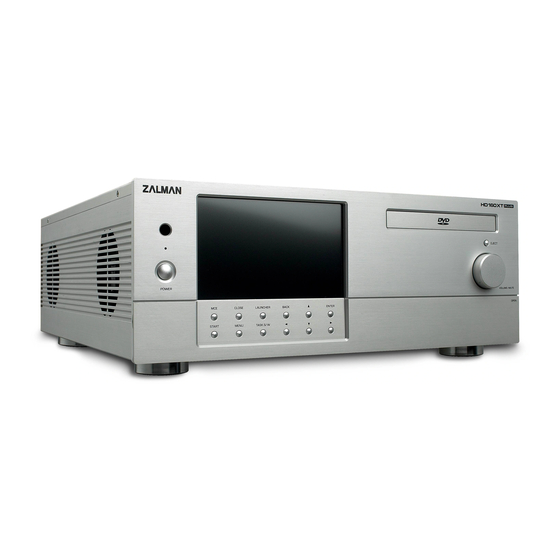
- Page 5 HD160XT 1) HD160XT Main Components Top Cover HDD Chassis ODD Chassis Main Chassis 2) Case Parts 20 HDD Bolts 20 Dampers (PH #6-32X10) 4 Power Supply Bolts 1 ODD Aluminum Bezel (PH #6-32X6) 1 Clamp 1 18 ODD / Motherboard Bolts(PWH M3X6) 1 User’s Manual...
- Page 6 HD160XT Remote Control Receiver System Power Indicator Power Button LCD Power Indicator LCD Settings - Menu LCD Settings - Enter / Auto Adjust LCD Settings - Cursor Control (Up/down) Audio (Headphone, Mic) Port IEEE1394 (Firewire) Port USB Port Card Reader Slot (MS/Pro/Duo, CF/Micro drive, MMC, SD,SM)
- Page 7 HD160XT 1) Optimized for High Performance Ultra Quiet HTPC Operation A. Designed for High TDP Processors Opening the Air Vent on the top of the case will facilitate the inflow of cool air from the outside for cooling the CPU.
- Page 8 HD160XT 2) Diverse Functions and Accommodations A. The front panel LCD provides user access to various features such as the Graphic Equalizer, Volume, CPU use, Network Speed, Time, Fan Speed etc. B. Touch Screen feature allows easy operation of programs with the use of a fingertip.
- Page 9 5) Ideal Home Theatre PC The ultimate high performance ultra quiet home theatre PC can be built with Zalman’s CPU Coolers, VGA Coolers, Power Supplies, and Northbridge Coolers. (CNPS9500, VF700, VF900, ZM460B-APS, ZM600-HP, ZM-NBF47 etc.)
- Page 10 HD160XT Enclosure Type Desktop Dimensions (DXWXH) 460mm X 435mm X 160mm (18.1” X 17.1” X 6.3”) Weight 6.9kg (15.2lb) Material Aluminum Motherboard Compatibility Standard ATX / micro ATX Power Supply Compatibility Standard ATX / ATX12V PCI/AGP Card Compatibility Full Size Drive Bays 5 X 3.5"...
- Page 11 HD160XT 1) Opening the Enclosure To remove the Top Panel of the enclosure, unscrew the six Bolts (FH M3x6). 2) Removing the ODD and HDD Chassis Remove the Bolts (PWH M4x5), and horizontally pull the ODD and HDD Chassis approximately 15mm (0.6inch) away from the Side and Front Panels, then lift them...
- Page 12 HD160XT 3) Assembling the Motherboard and Power Supply Mount the motherboard and power supply by using appropriate bolts. Mount the computer components (CPU, VGA, RAM etc.) onto the motherboard. To mount a microATX motherboard, first install the two enclosed microATX...
- Page 13 HD160XT 4) Installing 5.25” and 3.5” Drives (1) Install the 5.25” drive (ODD) and 3.5” drive (HDD) onto the ODD and HDD Chassis with the appropriate bolts. (2) Slide the ODD and HDD Chassis onto the enclosure’s Side Panel and Front Panel, then secure them onto the panels with the Fixing Bolts (PWH M4x5).
- Page 14 HD160XT 5) Connecting the Cables (1) Power and Data Transmission Cables Connect the Power and Data Transmission Cables (IDE or SATA) required for the HDD, ODD, FDD, VGA etc. (2) Power LED Cable Connect the Power LED Cable (2-Pin or 3-Pin) to the motherboard’s Front Panel Port (refer to the motherboard’s manual).
- Page 15 HD160XT (4) LCD and Control PCB Cables Connect the D-Sub (RGB) Cable to the system’s (VGA or motherboard) D-Sub (RGB) Port. Connect the Dual USB Cable that is connected to the USB Cable of the LCD and Control PCB to the motherboard’s USB Port.
- Page 16 HD160XT Connect Fan Cables 1 and 2 to the Rear Fans, and connect Fan Cables 3 and 4 to the Bottom Fan and Side Fan. Place the Temperature Sensors on a place of preference inside the enclosure. Connect the System Power Switch Cable (2 Pin) to the Motherboard’s Front Panel Port (refer to the motherboard’s manual).
- Page 17 HD160XT (5) Memory Card Reader Cable Connect the Internal USB Cable attached to the Memory Card Reader to the motherboard (refer to the motherboard’s manual). 1. The user MUST refer to the motherboard’s manual for the USB Port Pin arrangement before connecting the USB cable.
- Page 18 HD160XT 6) Attaching the Aluminum ODD Bezel (1) Connect power to the assembled system. Press the ODD Eject Button to eject the ODD Tray. (2) Remove the Plastic ODD Bezel. (3) Remove the Tape Film on the back side of the Aluminum ODD Bezel, and stick the Aluminum ODD Bezel onto the ODD Tray.
- Page 19 The noise level of the power supply (main factor of noise emission) will also significantly decrease due to better cooling efficiency. There must be good front to back airflow when placing the HD160XT in cabinets. When the Top Panel’s vent is opened, placement of other devices above the HD160XT can hinder CPU cooling performance.
- Page 20 Ultra Quiet VGA cooler VGA Cooler : Ultra Quiet VGA Cooler Power Supply : Power Supply equipped with a 120mm fan (HD160XT has a dedicated Air Vent for power supplies equipped with a 120mm fan)
Need help?
Do you have a question about the HD160XT and is the answer not in the manual?
Questions and answers