
Related Manuals for ABB PVS800-IS


Summary of Contents for ABB PVS800-IS
- Page 1 — ABB CENTRAL INVERTERS PVS800-IS inverter stations (1.645 to 4.156 Hardware manual...
- Page 3 Hardware manual PVS800-IS inverter stations (1.645 to 4.156 MW) Table of contents 1. Safety instructions 5. Mechanical installation 7. Electrical installation 8. Start-up © 2018 ABB Oy. All Rights Reserved. 3AXD50000255818 Rev A EFFECTIVE: 2018-06-04...
-
Page 5: Table Of Contents
Table of contents 5 Table of contents 1 Safety instructions Contents of this chapter ................Use of warnings ..................Safe installation, start-up and maintenance ............ General safety instructions ..............Safety instructions for the inverter compartment .......... Safe operation ..................2 Introduction to this manual Contents of this chapter ................ - Page 6 6 Table of contents 6 Checking the installation Contents of this chapter ................Checking that the installation is clean and undamaged ........Checking the installation of the inverter station ..........7 Electrical installation Contents of this chapter ................Routing the cables ................. Locations of the cable entries ..............
- Page 7 Table of contents 7 Derating ..................... Temperature derating ................Altitude derating ................Combined derating ................Derating Example ................11 Drawings Contents of this chapter ................Dimensions and layout ................Transportation drawing ................Lifting drawing ..................Foundation and external cabling layout ............Cable entry system example ..............
-
Page 9: Safety Instructions
Contents of this chapter This chapter presents the use of warnings in the manual and gives instructions for safe installation, start-up, use and maintenance of PVS800-IS inverter stations. Use of warnings Warnings caution you about conditions which can result in serious injury or death and/or damage to the equipment, and advise on how to avoid the danger. -
Page 10: Safe Installation, Start-Up And Maintenance
Select appropriate arc-proof clothing. Always follow the local safety regulations concerning the inverter stations. PVS800-IS is a low voltage (LV) device which is connected via a step-up transformer to the medium voltage (MV) grid. The PVS800-IS inverter station may only be energized and de-energized by an authorized person who has task-specific instructions for the operation of an MV substation and permission from the on-site foreperson in charge of electrical work. -
Page 11: Safety Instructions For The Inverter Compartment
Safety instructions 11 ■ Safety instructions for the inverter compartment WARNING! Perform the procedure below before starting work on the inverters. Ignoring the instructions can cause physical injury or death, or damage to the equipment. 1. Identify the inverter which you need to work on. Read the inverter safety instructions. See section Related documents (page 14). -
Page 13: Introduction To This Manual
This chapter provides information about the manual such as applicability, target audience and contents. It also lists the related documents. Applicability This manual is applicable to PVS800-IS inverter stations. Target audience This manual is intended for persons who transport, store, plan the installation, install, commission and maintain PVS800-IS inverter stations. -
Page 14: Related Documents
Related documents Document Code (English) Applicability Inverter hardware manuals and guides 3AXD50000009549 Whole inverter station PVS800-IS inverter station hardware manual PVS800-57B hardware manual 3AXD50000048300 Inverters Inverter firmware manuals and guides PVS800-57B central inverters firmware manual 3AXD50000048332 Inverters... -
Page 15: Hardware Description
This chapter provides an introduction to the PVS800-IS inverter station. Overview The PVS800-IS inverter station provides the DC to AC power conversion equipment required to connect a solar power generator (DC) to medium voltage substation equipment (AC) and ultimately to the MV power grid. -
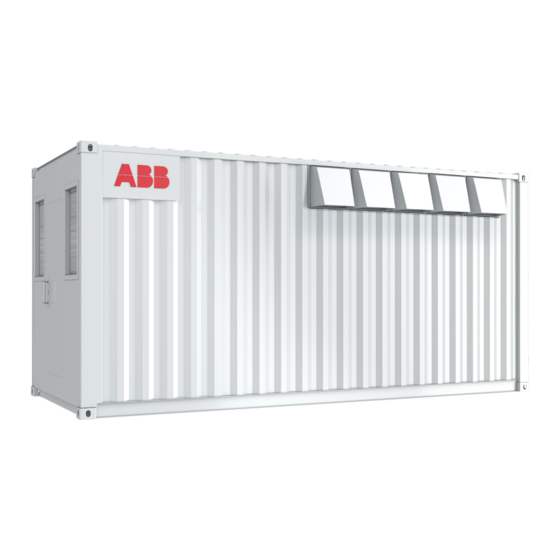
Page 16: Layout Drawing
16 Hardware description Layout drawing Main components: Exit door Inverters, PVS1 and PVS2 Air intakes with filtering systems with sand collection boxes Air outlets with weather protection hoods Local power enclosure, see Local power enclosure (page 39). Auxiliary voltage transformer (option +G344) Installation area for post assembled components (for example, monitoring), 500 x 1200 Note: Components must not block the air inlet area. -
Page 17: Main Circuit Diagram
Hardware description 17 Main circuit diagram The diagram below shows the main circuit of the PVS800-IS inverter station and an example MV substation with medium voltage switchgear and transformer. It also shows the alternative auxiliary power supplies for the inverter station. -
Page 18: Type Designation Label
Item Description Serial no. Serial number. Each inverter station has a unique serial number. For example: CG201341001 CG = ABB factory identification code 2013 = Manufacturing year 41 = Manufacturing week 001 = Manufacturing unit number Type Type designation key. -
Page 19: Type Designation Key
Hardware description 19 Type designation key The type designation describes the composition of the inverter station. The type designation is visible on the type designation label which is attached to the inverter station. The complete type designation is divided into sub codes: •... -
Page 21: Storing, Lifting And Transporting
Storing, lifting and transporting 21 Storing, lifting and transporting Contents of this chapter This chapter provides instructions for storing, lifting and transporting the PVS800-IS inverter station. Storing • To avoid condensation inside the inverter station, store it indoors in a dry (heated) warehouse. -
Page 22: Lifting
22 Storing, lifting and transporting Lifting Obey these instructions and the additional information given in section Lifting drawing (page 60): • Protect the corners of the inverter station against shock. • Lift the inverter station from the four lifting eyes located in the upper corners. •... -
Page 23: Transporting
• The PVS800-IS inverter station is built into a 20 foot HC (high cube) sea container form. The inverter station can be transported on a dedicated sea container trailer using the standard container attachment system. -
Page 25: Mechanical Installation
Mechanical installation 25 Mechanical installation Contents of this chapter This chapter provides instructions for selecting the location, and constructing the foundation for the PVS800-IS inverter station. These instructions do not substitute the local regulations which you must always obey. General guidelines WARNING! The pit for the foundation and the foundation must be designed by an experienced civil works engineer. - Page 26 26 Mechanical installation When selecting the columns, check the load carrying capacity of the ground and potential local special requirements (for example, earthquake or typhoon anchoring) of the construction area. Use columns suitable for the local conditions and requirements. The following picture shows an example of a concrete column foundation suitable for 100 kPa ground load carrying capacity.
-
Page 27: Preparation Of The Ground
Mechanical installation 27 Preparation of the ground 1. Dig a hole for the foundation and cables. 2. Use geotextile to prevent the mixing of gravel with surrounding soil. 3. Put coarse gravel at the bottom of the hole and fine gravel at the top. 4. -
Page 28: Adding Column Foundations
28 Mechanical installation Adding column foundations 1. Add or mold four steel reinforced concrete column foundations. 2. Check locations and heights carefully. The tops of the foundation columns must be at least 240 mm above the surrounding base ground. 3. Place bitumen sheets on top of the foundation columns. 4. -
Page 29: Constructing Earthing Electrode And Earthing
Mechanical installation 29 WARNING! Do not enter the inverter station or start cabling before checking that the installation is stable. ■ Constructing earthing electrode and earthing The main earthing busbar of the inverter station must be connected to the earthing busbar of the MV station and to an earthing electrode. -
Page 30: Adding Weather Protecting Hoods
30 Mechanical installation 5 cm/m tilting angle for ground level 15 cm air gap Weather protection hoods Thermal insulation Tiles Do not plant trees near the inverter station. If bushes will be planted, ensure that the planting compost base is at least one meter from the inverter station housing and that fully-grown bushes will not prevent maintenance access to the inverter station. -
Page 31: Checking The Installation
Checking the installation 31 Checking the installation Contents of this chapter This chapter describes how to check the installation of the PVS800-IS inverter station. WARNING! Only an authorized electrician is allowed to check the installation. Follow the Safety instructions (page 9) and the local safety regulations. -
Page 32: Checking The Installation Of The Inverter Station
32 Checking the installation Checking the installation of the inverter station Item Check all mechanical operating functions by operating them twice. Check that the paint is not damaged. Damaged areas must be repaired according to the instructions. Check that all cable inlets are securely installed. Check that unused cable openings are protected with protection caps. -
Page 33: Electrical Installation
Electrical installation 33 Electrical installation Contents of this chapter This chapter contains general instructions for earthing and cabling of the PVS800-IS inverter station. The instructions do not substitute the local regulations which must always be obeyed. WARNING! Only an authorized electrician is allowed to install the cabling to the inverter station. -
Page 34: Earthing
34 Electrical installation Earthing The PVS800-IS inverter station has a main earthing busbar for container earthing. Connect the inverter station to the earthing busbar of the MV station. Construct an earthing electrode for the MV substation according to the local regulations. Lead the copper connection wire from the MV substation’s earthing busbar to the main earthing busbar (MEB) of the... -
Page 35: Connecting Ac And Dc Cabling
Electrical installation 35 Connecting AC and DC cabling See PVS800-57B hardware manual (3AXD50000048300 [English]) and the wiring diagrams delivered with the unit. 1. Dig suitable cable trenches and protect the cables according to the local requirements. Use pipes, ducts, etc. 2. -
Page 36: Dc Input Cable Connection Procedure
36 Electrical installation ■ DC input cable connection procedure 1. Refer to the dimension drawings in the PVS800-57B hardware manual (3AXD50000048300[EN]). 2. Remove the shroud from the input power terminals. 3. Put the cable(s) into the inside of the cabinet. 4. -
Page 37: Ac Output Cable Connection Procedure
Electrical installation 37 ■ AC output cable connection procedure 1. Refer to the dimension drawings in the PVS800-57B hardware manual (3AXD50000048300[EN]). 2. Remove the shroud from the output power terminals. 3. Put the cable(s) into the cabinet. 4. If it is a shielded cable, prepare the cable ends and do the 360° grounding at the cabinet entry. -
Page 38: Connecting Alarm And Trip Signals From Mv Substation To Inverter Station
5. Fill the cable trenches. Note: A ready made PVS800-IS application program template is part of the delivery. The program can be used as a template for load control functionality during MV substation alarm and trip situations. Contact your local ABB representative for more information. -
Page 39: Local Power Enclosure
Local power enclosure Local power enclosure door closed. Metal enclosure, membrane cable glands and sockets on the door. Terminals to connect auxiliary power supply from PVS800-IS to MV substation Terminals to connection transformer IO alarm and trip signals from MV substation Terminals to connect 3-phase 400 VAC to inverter´s aux power supplies... -
Page 40: Connecting Auxiliary Power Supply From Inverter Station To Mv Substation
The local power enclosure also includes 3-phase power supply terminals reserved for a MV substation. If required you can use these terminals to supply power from PVS800-IS inverter station to the MV substation. The cable lead-through for the power supply is located in the bottom of the container next to the exit door. -
Page 41: Start-Up
Start-up 41 Start-up Contents of this chapter This chapter provides instructions for start-up of the PVS800-IS inverter station. WARNING! Only an authorized electrician is allowed to install, start up and maintain the inverter station. Follow the Safety instructions (page 9) and the local safety regulations. - Page 42 42 Start-up Task Additional information Pre-checking the transformer (voltage not connected) See the transformer manufacturer’s instructions. Pre-checking the inverters (voltage not connected) Perform the inverter commissioning tasks/checks PVS800-57B hardware manual to be done before power-up. (3AXD50000048300 [English]) and PVS800-57B central inverters firmware manual (3AXD50000048332 [English]).
- Page 43 Start-up 43 Task Additional information Close the AC disconnector [Q2] of the first inverter [PVS1] to be commissioned. Step away and out of inverter equipment room or container to wait inverter's first start. This can be done by setting start-up delay to inverter paramet- ers.
-
Page 45: Maintenance
The recommended maintenance intervals and component replacements are based on specified operational and environmental conditions. ABB recommends annual inspections to ensure the highest reliability and optimum performance. Consult your local ABB Service representative for more details on the maintenance. WARNING! Only an authorized electrician is allowed to service the inverter station. -
Page 46: Maintenance Intervals
46 Maintenance Maintenance intervals The table below lists the routine maintenance intervals recommended by ABB. Maintenance task Interval Instructions Cleaning the inverter compartment First check after commissioning, See section Cleaning the inverter then every 2 years. compartment (page 46). Replacing intake air filters 2 years in typical conditions. -
Page 47: Replacing The Intake Air Filters And Cleaning The Sandboxes
Maintenance 47 Replacing the intake air filters and cleaning the sandboxes WARNING! It is mandatory to turn off the inverters before changing the filters in order to prevent dust from the dirty filters flowing into the inverters. WARNING! Handle the filters gently. The filters are easily damaged if handled carelessly. WARNING! While cleaning sand collection boxes, make sure that you do not touch or damage the filters. -
Page 48: Cleaning The Exterior Surfaces Of The Inverter Station
Wash air inlets with a gentle, low pressure water flow. Use a mop to gently wash the air outlet louvres inside the weather protection hoods. Note: The design of air inlet may vary from the picture on the right. Consult ABB for detailed maintenance instructions if necessary. -
Page 49: Lubricating External Hinges, Locks And Seals
Maintenance 49 Lubricating external hinges, locks and seals ■ Materials • Cleaning materials • Hinge lubricant: Würth HHS2000 0893 106 (or similar spray) • Lock lubricant: Würth Maintenance Spray 0893 051 (or similar spray) • Door seal lubricant: Würth Rubber Care 0890 110 (or similar silicone free spray) Note: Do not use lubricants containing silicone. -
Page 50: Checking And Repairing Painted Surfaces
50 Maintenance 50 Maintenance Checking and repairing painted surfaces Checking and repairing painted surfaces Materials ■ Materials • Sandpaper or steel wire brush • Sandpaper or steel wire brush • Cleaning towels • Cleaning towels • Detergents. Würth Pro-Clean 0893 140 (or similar) •... -
Page 51: Checking And Repairing Unpainted, Zinc Coated Surfaces
Maintenance 51 Checking and repairing unpainted, zinc coated surfaces Maintenance 51 Materials Checking and repairing unpainted, zinc coated surfaces • Sandpaper ■ Materials • Cleaning towels and liquids • Sandpaper • Zinc coating on non painted surfaces: Würth Zinc 300 0892 200 with brush or Zinc •... -
Page 52: Checking And Cleaning The Grounding Bars And Points
52 Maintenance Checking and cleaning the grounding bars and points ■ Materials • Steel wool • Ensto SR1 joint compound (or similar) • 42839 Würth Protective Wax Spray (or similar). ■ Procedure WARNING! Follow the steps given in section Safety instructions for the inverter compartment (page 11). -
Page 53: Technical Data 53
Technical data 53 Technical data Contents of this chapter This chapter contains the technical data of the PVS800-IS inverter station. -
Page 54: Technical Data
54 Technical data Technical data Type designation 1645kW-C 1732kW-C 3290kW-C 3464kW-C PVS800-IS- Input data (DC) Maximum input power (P 2468 kW 2598 kW 2 × 2468 kW 2 × 2598 kW PV, max DC voltage range, MPP (U 550 to 850 V... - Page 55 Technical data 55 Type designation 1645kW-C 1732kW-C 3290kW-C 3464kW-C PVS800-IS- Local power enclosure (Auxiliary cabinet) External auxiliary supply connection 3/N/PE AC 400 V 50 Hz 3 x 20 A MCB 3x10 A MCB Input terminal size 16 mm Optional auxiliary transformer rating...
-
Page 56: Derating
4. Based on the calculation, in these conditions the inverter can produce 105.6% of its nominal power. In the unlikely event that the total equivalent temperature (site °C + altitude °C) exceeds the nominal temperature of 45 °C, contact ABB for information. -
Page 57: Drawings
Drawings 57 Drawings Contents of this chapter This chapter contains the additional drawings of the PVS800-IS inverter station. -
Page 58: Dimensions And Layout
58 Drawings Dimensions and layout... -
Page 59: Transportation Drawing
Drawings 59 Transportation drawing... -
Page 60: Lifting Drawing
60 Drawings Lifting drawing... -
Page 61: Foundation And External Cabling Layout
Drawings 61 Foundation and external cabling layout... - Page 62 62 Drawings...
-
Page 63: Cable Entry System Example
Drawings 63 Cable entry system example Cable entries for earthing, PSU, IO and AUX cables DC cables PVS1 AC cables PVS1 DC cables PVS2 AC cables PVS2... -
Page 64: Further Information
Product and service inquiries Address any inquiries about the product to your local ABB representative, quoting the type designation and serial number of the unit in question. A listing of ABB sales, support and service contacts can be found by navigating to www.abb.com/searchchannels. - Page 68 3AXD50000255818A © Copyright 2018 ABB. All rights reserved. Specifications subject to change without notice.