Table of Contents
Advertisement
Quick Links
Advertisement
Table of Contents

Related Manuals for ABB PVS800-57B


Summary of Contents for ABB PVS800-57B
- Page 1 — ABB SOLAR INVERTERS PVS800-57B central inverters Hardware manual...
- Page 2 — List of related manuals Hardware manuals and guides Code (English) PVS800-57B central inverters hardware manual 3AXD50000048300 PVS800-57B central inverters commissioning and maintenance manual 3AXD50000048331 Firmware manuals and guides PVS800-57B central inverters firmware manual 3AXD50000048332 Option manuals and guides ACS-AP-x Assistant control panels user’s manual 3AUA0000085685 Start-up and maintenance PC tool Drive composer user’s manual...
- Page 3 Hardware manual PVS800-57B central inverters Table of contents 1. Safety instructions 4. Planning the mechanical installation 2018 ABB Oy. All Rights Reserved. 3AXD50000048300 Rev B EFFECTIVE: 2018-11-28...
-
Page 5: Table Of Contents
Table of contents 1. Safety instructions Contents of this chapter ..........9 Use of warnings . - Page 6 Selecting the grid disconnecting device ........35 Selecting the DC input disconnecting device .
- Page 7 ABB PM564 ........
-
Page 9: Safety Instructions
Safety instructions 9 Safety instructions Contents of this chapter This chapter contains the safety instructions which you must obey when you install and operate the inverter and do maintenance on the inverter. Obey these safety instructions to prevent injury or death, or damage to the equipment can occur. Use of warnings Warnings tell you about conditions which can cause injury or death, or damage to the equipment. -
Page 10: Installation And Maintenance Safety
10 Safety instructions Installation and maintenance safety Electrical safety These warnings are for all personnel who do work on the inverter, its input and output cables, the transformer or photovoltaic generator. WARNING! Obey these instructions to prevent injury or death, or damage to the equipment. - Page 11 WARNING! Do not fasten the cabinet by electric welding and do not perform any welding work for the inverter housing when inverters are installed. ABB does not assume any liability for damages caused by electric welding as the welding circuit...
-
Page 12: Performing Electrical Work
12 Safety instructions Performing electrical work These precautions are for all personnel who do work on the inverter, its input and output cables, the transformer or the photovoltaic generator. WARNING! Obey these instructions to prevent injury or death, or damage to the equipment. - Page 13 Safety instructions 13 6. Install temporary grounding as required by the local regulations. Connect the AC and DC busbars (in both DC sections) to the PE with a temporary grounding tool. 7. Ask the person in control of the electrical installation work for a permit to work. 8.
-
Page 14: General Safety
Use caution when you move an inverter power module. Do not tilt the module. The module is heavy. It can topple over if you handle it carelessly. • Obey the instructions in the PVS800-57B Commissioning and maintenance manual (3AXD50000048331 [EN]). •... -
Page 15: Safe Start-Up And Operation
Safety instructions 15 Safe start-up and operation These warnings are for all personnel who commission, plan the operation or operate the inverter. WARNING! Obey these instructions to prevent injury or death, or damage to the equipment. • Keep the door of the inverter locked when it operates. Give the keys only to authorized personnel. - Page 16 16 Safety instructions...
-
Page 17: Introduction To The Manual
The flowchart refers to sections in this manual and in other manuals. Applicability This manual is applicable to PVS800-57B central inverters. Target audience This manual is intended for persons who plan the installation of, install, commission, use and service the inverter. -
Page 18: Contents Of The Manual
18 Introduction to the manual Contents of the manual Safety instructions – Safety instructions for the installation, commissioning, operation and maintenance of the inverter. Introduction to the manual – Introduction to the manual. Operation principle and hardware description – The operation principle and construction of the inverter in brief. -
Page 19: Terms And Abbreviations
In this manual, solar power system components based on photovoltaic effect are generator, module, called solar cell, solar module, solar array, solar string and solar array junction box string, array and as defined below. array junction box Programmable logic controller PSL2 Protocol used in optical fiber communication inside ABB inverters Photovoltaic... - Page 20 20 Introduction to the manual Term/Abbreviation Explanation Inverter power module SCADA Supervisory control and data acquisition Solar array Group of parallel-connected solar strings Solar array junction Device that connects outputs of multiple solar source circuits (strings) into a combined output circuit or circuits Solar cell Device that converts light directly into electricity by the photovoltaic effect Solar generator...
-
Page 21: Operation Principle And Hardware Description
Contents of this chapter This chapter gives a short description of the inverter’s operation principle and construction. Product overview The PVS800-57B is a central inverter for indoor use that converts, adjusts and transfers the power from solar generator to the electrical power system. -
Page 22: Block Diagram Of A Solar Generator System
Block diagram of a solar generator system The solar module string arrays are connected to the electrical power system through an inverter. 16...24 DC inputs per inverter Description Solar module (photovoltaic module) Solar string Solar array Solar generator Solar array junction box Inverter (PVS800-57B) -
Page 23: Simplified Main Circuit Diagram
Operation principle and hardware description 23 Simplified main circuit diagram -F41 -F40 +ISU2 -U1.1 -K1.1 -U1.2 -K1.2 +ISU1 -U1.1 -K1.1 -U1.2 -K1.2 -F51 -F50 -A21... -
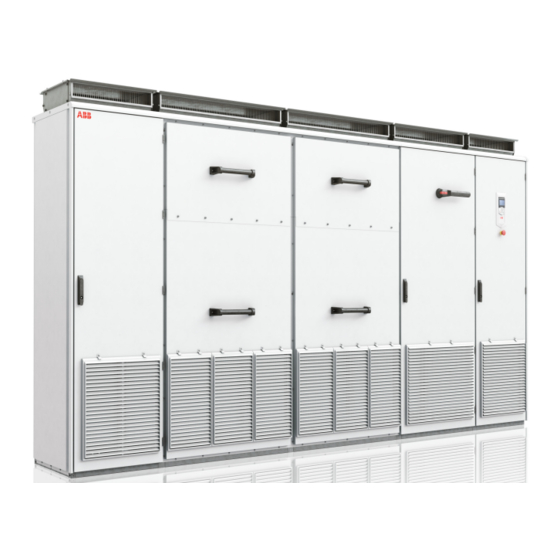
Page 24: Layout Overview
24 Operation principle and hardware description Code Description Code Description AC fuses AC contactors DC input fuses Power modules Backup fuse for SPD LCL filters DC side SPD DC disconnector Backup fuse for SPD AC breaker AC side SPD Grounding option DC contactors Layout overview An example of the inverter construction is shown below. - Page 25 Operation principle and hardware description 25 Front view Description Description DC cable lead-throughs AC contactor DC input cable terminals (fuse protected) Inverter power module Input DC fuses LCL filter Temporary grounding points for the DC AC output cable lead-throughs busbars DC main switch AC output cable terminals Aux.
-
Page 26: Overview Of Power And Control Connections
26 Operation principle and hardware description Overview of power and control connections BCU-12 CONTROL PANEL XD2D XPOW X485 TOOL LINK XD24 FENA-21/FSCA-01 SLOT 1 COMM ADP XR01 XR02 FSCA-01 SLOT 2 XR03 RS485 COMM ADP XDIO RESERVED SLOT 3 XSTO V1Tx/Rx COMM V2Tx/Rx... -
Page 27: Type Designation Labels
The type designation label of the inverter includes the ratings, valid markings, a type designation and a serial number. The type designation label is attached to the front cover of the inverter cabinet. Photovoltaic erac erter PVS800-57B-1732kW-C Air cooling IP41 -20...50 °C Protective Class: I S/N: 1163700001... -
Page 28: Type Designation Key
The option codes follow the basic code. Each option code starts with an identifying letter (common to the product series) and is followed by descriptive digits. The option codes are separated by plus signs. The selections are listed below. For more information, contact your local ABB representative. Basic code ... -
Page 29: Option Codes
Modbus RTU communication adapter K473 Ethernet adapter (Ethernet IP, Modbus/TCP, Profinet) 1-port K475 Ethernet adapter (Ethernet IP, Modbus/TCP, Profinet) 2-port K486 ABB remote monitoring adapter NETA-21 AC section options G440 AC current transformers, 3 pcs E203 Additional EMC filtering (IEC61000-6-4/FCC) - Page 30 30 Operation principle and hardware description...
-
Page 31: Planning The Mechanical Installation
Dimension drawings on page 61. For information on how to unpack and install the inverter, refer to the PVS800-57B commissioning and maintenance manual (3AXD50000048331 [English]). Planning the mounting of the inverter For detailed mounting drawings, refer to Dimension drawings on page 61. - Page 32 32 Planning the mechanical installation...
-
Page 33: Planning The Electrical Installation
ABB does not assume any liability whatsoever for any installation which breaches the local laws and/or other regulations. Furthermore, if the recommendations given by ABB are not followed, the inverter may experience problems that the warranty does not cover. -
Page 34: Requirements For The Transformer
ABB recommends dimensioning the transformer for at least 5% total harmonic distortion to withstand possible outside interference from the network. ABB recommends that the transformer is equipped with an off-load tap changer for voltage regulation on the high-voltage side of the winding with two 2.5% step points to the plus and... -
Page 35: Selecting The Grid Disconnecting Device
Planning the electrical installation 35 The inverter does not require a specific transformer notation. ABB recommends using traditional notations, such as Dy11d0, etc. The AC side of the inverter is designed only for IT (floating) networks, do not ground the neutral (star) point of the transformer on the inverter side or connect it to the neutral points of other windings. -
Page 36: Selecting The Power Cables
36 Planning the electrical installation Selecting the power cables General rules Dimension the DC input power and AC output power cables according to local regulations: • Dimension the cable to carry the inverter load current. See chapter Technical data page for the rated currents. -
Page 37: Sufficient Shield Conductivity To Suppress Emissions
Planning the electrical installation 37 Sufficient shield conductivity to suppress emissions To effectively suppress radiated and conducted radio-frequency emissions, the cable shield conductivity must be at least 1/10 of the phase conductor conductivity. The requirements are easily met with a copper or aluminum shield. The minimum requirement of the cable shield is shown below. -
Page 38: Not Allowed Ac Output Power Cable Types
38 Planning the electrical installation Not allowed AC output power cable types Symmetrical shielded cable with individual shields for each phase conductor is not allowed on any cable size for output cabling. Typical DC input power cable sizes The typical minimum DC input cable sizes based on the number of inputs and the nominal input current. -
Page 39: Selecting The Control Cables
It is recommended that the relay-controlled signals be run as twisted pairs. Relay cable type The cable type with braided metallic screen (eg, ÖLFLEX by LAPPKABEL, Germany) has been tested and approved by ABB. -
Page 40: Routing The Cables
40 Planning the electrical installation Routing the cables Install the DC power cable, output AC power cable and the control cabling on separate routes. The cable trays must have good electrical bonding to each other and to the grounding electrodes. Where control cables cross power cables, make sure that you set them at an angle as near to 90 degrees as possible. -
Page 41: Protecting In Short-Circuit Situation And Against Thermal Overload
Planning the electrical installation 41 Protecting in short-circuit situation and against thermal overload Protecting the inverter and AC output cable in short-circuit situations The inverter has internal AC fuses or optionally an AC breaker which restrict inverter damage in case of a short-circuit in the inverter. Install external protection (such as fuses) according to local regulations, appropriate AC line voltage and the rated current of the inverter to protect the AC output cable. -
Page 42: Protecting Against Ground Faults In The Dc Input Cable Or Solar Generator
42 Planning the electrical installation Protecting against ground faults in the DC input cable or solar generator The inverter has an insulation resistance measurement board which monitors the insulation. Because of the leakage currents of inverters and characteristics of the PV array, many ground fault monitoring devices do not work properly with them and non-PV- specific monitoring devices are not recommended. -
Page 43: Protecting The Contacts Of Relay Outputs
Planning the electrical installation 43 Protecting the contacts of relay outputs Inductive loads (relays, contactors and motors) cause voltage transients when switched off. When you connect inductive loads to the customer I/O, equip the loads with noise attenuating circuits (varistors, RC filters [AC] or diodes [DC]) to minimize the EMC emissions at switch-off. -
Page 44: Inverters Without Input Dc Fuses (Option +0F291)
44 Planning the electrical installation Inverters without input DC fuses (option +0F291) If the standard input DC fuses are not suitable for the customer application, the inverter can be delivered without input DC fuses (option +0F291). In this case, install appropriate DC fuses to protect the inverter DC circuit and the DC input cables in a short-circuit situation. -
Page 45: Technical Data
Technical data 45 Technical data Contents of this chapter This chapter contains the technical specifications of the inverter, for example, the ratings, sizes and technical requirements, provisions for fulfilling the requirements for CE and other markings. -
Page 46: Ratings
46 Technical data Ratings Solar inverter type PVS800-57B-1645kW-C PVS800-57B-1732kW-C Concept 4 x R8i module 4 x R8i module Input data (DC) Maximum input power (P 2468 kW 2598 kW PV, max DC voltage range, mpp (U 550...850 V 580...850 V... -
Page 47: Derating
Technical data 47 Derating Temperature derating The nominal power (100%) of the inverter is reached in +50 °C. In lower temperatures, the inverter can supply up to 120% power. If the ambient temperature exceeds the nominal ambient temperature, the load capacity (current and power) of the inverter decreases. Max. -
Page 48: Altitude Derating
4. Based on the calculation, in these conditions the inverter can produce 109.6% of its nominal power. In the unlikely event that the total equivalent temperature (site °C + altitude °C) exceeds the nominal temperature of 50 °C, contact ABB for information. -
Page 49: Fuses
Technical data 49 Fuses Solar inverter type PVS800-57B-1645kW-C PVS800-57B-1732kW-C DC input fuses - 16 DC inputs • Nominal current (I 315 A • Quantity 32 (optionally 16) • Max I 357 A SC, PV DC input fuses - 18 DC inputs •... -
Page 50: Dc Input Fuse Recommendations
50 Technical data DC input fuse recommendations The DC inputs are designed for Bussmann PV fuses. The table lists the mechanically suitable fuses for different input options. X = Standard fuses Number of inputs O = Optional fuses Fuses in + and - Fuses only in + or - Type PV-160AF2... - Page 51 Technical data 51 Dimensions of the recommended fuses (mm). 1 mm Size [mm] 91.4 82.5 Thread hole M12, 9.5 mm deep...
-
Page 52: Free Space Requirements
52 Technical data Free space requirements For cabinet dimensions, refer to Dimension drawings on page 45. Adequate free space above the inverter has to be reserved for installation and cooling. Required free space in from of the inverter for door opening, power module and LCL filter replacement is 850 mm. -
Page 53: Terminal And Lead-Through Data For The Control Cables
• 10...14 mm 2 pcs Tightening torques: *M12 70 Nm AC output connection specification Voltage PVS800-57B-1645kW-C: 380 V AC 3-phase +/- 10% PVS800-57B-1732kW-C: 400 V AC 3-phase +/- 10% Allowed electrical system 3-phase IT (ungrounded) system. Galvanic isolation for each inverter is type needed. -
Page 54: Dc Input Connection Data
Refer to Ratings on page 46. max(DC) Maximum DC voltage 1000 V DC max(DC) Operational DC voltage PVS800-57B-1645kW-C: 550...1000 V DC range, U PVS800-57B-1732kW-C: 580...1000 V DC mppt(DC) Voltage ripple < 3% Overvoltage category OVC II (IEC 62109, IEC 60664-1) -
Page 55: Efficiency
IEC 61683 and EN 50530. Note: Inverter efficiency cannot be calculated from inverter software parameter values. Maximum efficiency DC voltage 550 V 590 V 700 V 765 V 800 V PVS800-57B-1645kW-C 98.5 98.2 97.9 97.7 97.5 DC voltage 580 V 620 V... - Page 56 56 Technical data Efficiency curves PVS800-57B-1645kW-C PVS800-57B-1645kW-C 99,0 98,0 97,0 550 V 590 V 96,0 700 V 765 V 800 V 95,0 94,0 93,0 P / Pnom [%] PVS800-57B-1732kW-C PVS800-57B-1732kW-C 99,0 98,0 97,0 580 V 620 V 96,0 715 V...
-
Page 57: Ambient Conditions
Technical data 57 Ambient conditions Environmental limits for the inverter are given below. The inverter is to be used in indoor environment. Note: If the installation has ventilation ducts directly to outdoors, the back flow of moist and dusty air must be prevented. Operation Storage Transportation... - Page 58 To aid recycling, plastic parts are marked with an appropriate identification code. For further information on environmental aspects and recycling instructions for professional recyclers, contact your local ABB distributor. End of life treatment must follow international and local regulations.
-
Page 59: Applicable Standards
Technical data 59 Applicable standards Standard Name Certification EN/IEC 62109-1:2010 Safety of power converters for use in photovoltaic power Pending systems. Part 1: General requirements EN/IEC 62109-2:2011 Safety of power converters for use in photovoltaic power Pending systems. Part 2: Particular requirements for inverters EN/IEC 61000-6-2:2005 Electromagnetic compatibility (EMC) –... -
Page 60: Disclaimers
ABB and its affiliates are not liable for damages and/or losses related to such security breaches, any... -
Page 61: Dimension Drawings
Dimension drawings 61 Dimension drawings Contents of this chapter This chapter contains dimension drawings with dimensions in millimeters and [inches]. -
Page 62: Cabinet Dimensions
62 Dimension drawings Cabinet dimensions... - Page 63 Dimension drawings 63...
-
Page 64: Cabinet Attachment Points
64 Dimension drawings Cabinet attachment points... - Page 65 Dimension drawings 65...
-
Page 66: Ac And Dc Cabling Lead-Throughs
66 Dimension drawings AC and DC cabling lead-throughs... - Page 67 Dimension drawings 67...
-
Page 68: Ac Cabling
68 Dimension drawings AC cabling... - Page 69 Dimension drawings 69...
-
Page 70: Dc Cabling
70 Dimension drawings DC cabling... - Page 71 Dimension drawings 71...
- Page 72 72 Dimension drawings...
-
Page 73: Control Unit
BCU control unit The BCU-12 control unit is used in the PVS800-57B inverter. The BCU is mounted separately from the inverter module(s), and connected to the module(s) by fiber optic... -
Page 74: Layout And Connections
74 Control unit Layout and connections Item Description I/O terminals (refer to I/O terminals on page 75) SLOT 1 Fieldbus adapter module connection SLOT 2 Used for internal connections SLOT 3 Reserved SLOT 4 Not in use X205 Memory unit connection BATTERY Not in use (Holder for real-time clock battery) -
Page 75: Ac500 Plc
Control unit 75 I/O terminals Terminal Description Analog inputs Analog outputs Digital inputs XRO3 XD24 XPOW XDIO Digital input/outputs XD2D Not in use XD24 +24 V output (for digital inputs) XRO2 XETH Ethernet port XDIO XPOW External power input XRO1 Relay output RO1 XRO1 XRO2... -
Page 76: Abb Pm564
76 Control unit ABB PM564 No. Description 3 LEDs show the status of the CPU 6 yellow LEDs show the status of the digital input signals 2 yellow LEDs show the status of the analog input signals 6 yellow LEDs show the status of the digital output signals... -
Page 77: Abb Ai523
Control unit 77 ABB AI523 No. Description I/O bus Allocation between terminal No. and signal name 16 yellow LEDs show the signal status at the analog inputs (I0...I15) 1 green LED shows the status of the process supply voltage UP... -
Page 78: Abb Ai561
78 Control unit ABB AI561 Description I/O bus 1 green LED shows power supply state 1 red LED shows errors Terminal number Allocation of signal name Terminal block for input signals (20-pole) DIN rail... -
Page 79: Abb Dx571
Control unit 79 ABB DX571 Description I/O bus 16 yellow LEDs show the status of inputs I0 to Terminal number Allocation of signal name Terminal block for input signals (9-pole) Terminal block for input signals (11-pole) 2 holes for wall-mounting with screws... -
Page 80: Default I/O Connection Table
80 Control unit Default I/O connection table The default I/O connections of the BCU-12 control unit and the AC500 modules. BCU-12 (A41) Signal name Optional Interface type I/O terminal #1 GROUND IMPEDANCE Analog input 4…20 mA #1 GROUNDING CURRENT Analog input 4…20 mA M1 CABINET FAN SPEED REFERENCE... -
Page 81: Ac500 Module Ai523 #1 (A510)
Control unit 81 AC500 module AI523 #1 (A510) Signal/parameter name Optional Interface type I/O terminal M1 DC CURRENT MEASUREMENT Analog input ±4 V DC / ±10 V DC AI0 M1 DC SECTION HUMIDITY Analog input 0…20 mA / 4…20 mA M1 AC SECTION HUMIDITY Analog input 4…20 mA... -
Page 82: Ac500 Module Ai561 #2 (A521)
82 Control unit AC500 module AI561 #2 (A521) Signal/parameter name Optional Interface type I/O terminal M2 DC INPUT CURRENT 9 Analog input ±4 V DC / ±5 V DC M2 DC INPUT CURRENT 10 Analog input ±4 V DC / ±5 V DC M2 DC INPUT CURRENT 11 Analog input ±4 V DC / ±5 V DC... -
Page 83: Further Information
— Further information For more information on ABB products and services for solar applications, navigate to www.abb.com/solarinverters. - Page 84 © Copyright 2018 ABB. All rights reserved. Specifications subject to change without notice.