Advertisement
Quick Links
WH1080SE
Manuel (EN)
About this manual
Thank you and congratulations on selecting this professional weather station!
We are positive you will enjoy the benefits of accurate weather readings our
instruments offer. A solar powered weather station has the advantage of being
able to provide energy for long periods of time.
This manual will guide you step-by-step through setting up your device. Use this
manual to become familiar with your professional weather station, and save it for
future reference.
Glossary of Common Terms
DCF/WWVB/MSF
The DCF WWVB or MSF time signal is an AM modulated time-of-day signal broadcasted
by the Federal Government of Germany, NIST from USA or National Physical Lboratory.
The time base is generated from an atomic time generator which is accurate to 10 billion
of one second.
LCD
"LCD" is an acronym for "Liquid Crystal Display". This is a common type of
display screen used in televisions, computers, watches, and digital clocks.
BAROMETER & BAROMETRIC PRESSURE
A barometer is a device that measures the pressure of the air pushing on it—this
measurement is called the barometric pressure. We don't actually feel the
barometric pressure because the air pressure is pushing equally in every
direction.
RELATIVE AIR PRESSURE
Relative air pressure is the same as the barometric pressure. The calculation
of relative air pressure is a combination of the absolute air pressure and the
altitude.
ABSOLUTE AIR PRESSURE
Absolute air pressure is the actual air pressure on the barometer without regard
to altitude.
INCHES OF MERCURY (inHg)
Inches of Mercury are the common unit of measurement for air pressure in the
United States.
HECTOPASCALS (hPa)
Hectopascals are the common units of measurement for air pressure in the
- 1 -
Advertisement

Related Manuals for Froggit WH1080SE


Summary of Contents for Froggit WH1080SE
- Page 1 WH1080SE Manuel (EN) About this manual Thank you and congratulations on selecting this professional weather station! We are positive you will enjoy the benefits of accurate weather readings our instruments offer. A solar powered weather station has the advantage of being able to provide energy for long periods of time.
-
Page 2: Important Note
International System (SI) of measurement. The hectopascal holds the same value Important Note: Before inserting batteries, please carefully read the operation manual. The touch screen weather station includes a base station (receiver), an integrated outdoor unit consists of solar-panel/wind direction sensor/wind speed sensor/rain gauge/thermo-hygro sensor, USB cable The Base Station is equipped with a Touch Screen LCD Monitor and allows the display of a large variety of time and weather data. - Page 3 displayed time and weather data on a PC. Important Operation Notes All actions and functions of the weather station are started on the touch screen by slightly touching (not pressing!) the related areas, touch the flashing +, ON/OFF or – to make the corresponding selection or increase the value. Every time a programming step is activated by touching a switching area on the Touch Screen a tone will sound, and the back light is switched on for a few seconds as well.
- Page 4 mode from which all further settings can be performed by the user. If no RCC signal is detected in the initial setup, the transmitter will try once every 6 hours to get an RCC signal until a signal is received. Once the transmitter receives the RCC signal it will transmit the signal to the monitor.
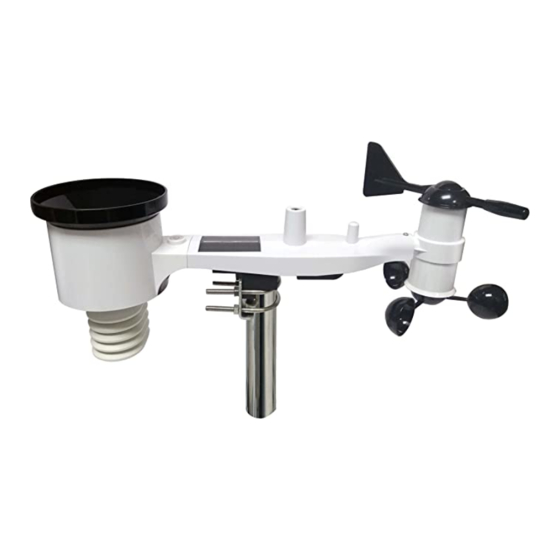
- Page 5 Figure 2 1. Wind Speed Sensor 2. Wind Vane 3. Thermo-hygro sensor 4. Rain collector 5. Bubble level 6. Solar panel 7. Antenna 8. U-Bolt 9. Battery compartment 10. Reset button 11. LED Indicator: light on for 4s if the unit power up. Then the LED will flash once every 48 seconds (the sensor transmission update period).
- Page 6 Figure 3: U-Bolt installation Loosely screw on the nuts on the ends of the U-bolts. You will tighten these later during final mounting. Final assembly is shown in Figure 4. Figure 4: U-Bolts and nuts installed The plate and U-Bolts are not yet needed at this stage but doing this now may help avoid damaging wind vane and wind speed cups later on.
- Page 7 Figure 5: Wind speed cup installation diagram 3. Install wind vane Push the wind vane onto the shaft on the opposite side of the wind cups, until it goes no further, as shown on the left side in Figure 6. Next, tighten the set screw, with a Philips screwdriver (size PH0), as shown on the right side, until the wind vane cannot be removed from the axle.
- Page 8 Figure 7: Battery installation diagram Note: f LED does not light up or is on permanently, make sure the battery is inserted the correct way and inserted fully, starting over if necessary. Do not install the batteries backwards as it may permanently damage the outdoor sensor.
- Page 9 5. Mount outdoor sensor Before you mount Before proceeding with the outdoor mounting detailed in this section, you need to make sure the base station can receive the data from outdoor sensor, while you keep the assembled outdoor sensor package nearby (although preferably not closer than 1.5m from the console).
- Page 10 Figure 9 Now look at the bubble level. The bubble should be fully inside the red circle. If it is not, wind direction, speed, and rain readings may not operate correctly or accurately. Adjust the mounting pipe as necessary. If the bubble is close, but not quite inside the circle, and you cannot adjust the mounting pipe, you may have to experiment with small wooden or heavy cardboard shims between the sensor package and the top of the mounting pole to...
-
Page 11: Set Up Display
7. Best Practices for Wireless Communication Note: To insure proper communication, mount the remote sensor(s) upright on a vertical surface, such as a wall. Do not lay the sensor flat. Wireless communication is susceptible to interference, distance, walls and metal barriers. - Page 12 Note: setting procedure can be exited at any time by touching any other function area (except “+”, “-” or “ON/OFF”). indoor temperature Activate the indoor temperature related setting by 1)Touch the INDOOR TEMPERATURE section, + button and – button will be flashing.
- Page 13 outdoor temperature Activate the outdoor temperature related setting by 1)Touch the OUTDOOR TEMPERATURE section, + button and – button will be flashing. Touch the + button or – button to Shift the display between Outdoor Temperature, Wind Chill and Dew Point. 2)Touch the OUTDOOR TEMPERATURE section again, + button and –...
- Page 14 Indoor humidity Activate the indoor humidity related setting by 1)Touch the INDOOR HUMIDITY section again to set the indoor humidity high alarm function, the +, ON/OFF and – button will be flashing, HI AL icon will light up. Touch the+ button or – button to change the value, hold the+ button or –...
- Page 15 1)Touch the WIND SPEED section, + button and – button will be flashing. Touch the + button or – button to Shift the display between Wind Average Speed and Gust Speed. 2)Touch the WIND SPEED section again, + button and – button will be flashing. Touch the + button or –...
- Page 16 5)Touch the rain section the fifth time to reset rain fall value to 0 by pressing the rain section for 3s, then 1h,24h,week,month and total rain will be reset to 0. Weather forecast 1)Touch the WEATHER FORECAST section, + button and – button will be flashing.
- Page 17 on indicating the alarm function has been enabled). 5)Touch the PRESSURE section the fifth time to set the pressure low alarm function, the +, ON/OFF and – button will be flashing, LO AL icon will light up. Touch the+ button or – button to change the value, hold the+ button or – button for 3s to change the number in great step.
- Page 18 1)Touch the DATE section, + button and – button will be flashing. Touch the + button or – button to shift between alarm time, date and week date. 2)Touch the DATE section again, + button and – button will be flashing. Touch the + button or –...
- Page 19 Maintance 1. Clean the rain gauge once every 3 months. Rotate the funnel counter-clockwise and lift to expose the rain gauge mechanism, and clean with a damp cloth. Remove any dirt, debris and insects. If bug infestation is an issue, spray the array lightly with insecticide. Clean the solar panel every 3 months with damp cloth.
- Page 20 PC. Connections and Software The wiring between Weather Station and PC takes place by means of an included USB cable. The EasyWeather software Download from: WIN: https://www.froggit.de/product_info.php?info=p316_wh1080-se-profi-funk-wetter station-solar-touchscreen-usb--neuer-aussenmast-.html MAC: https://www.froggit.de/product_info.php?info=p316_wh1080-se-profi-funk-wetterst ation-solar-touchscreen-usb--neuer-aussenmast-.html It must be installed on the PC.
- Page 21 When memory is full, it will take about two minutes to upload all history data into PC and it takes another two minutes to process all history data for graphic display. Further detailed PC software user manual can be found from the help menu. - 21 -...
-
Page 22: Specifications
Specifications Outdoor data Transmission distance in open field : 100m(300 feet) Frequency : 868MHz(Europe) : -40˚C--60˚C (-40℉ to +140℉) Temperature range Accuracy : + / - 1 °C : 0.1˚C Resolution Measuring range rel. humidity : 1%~99% Accuracy : +/- 4% in range 20-80%RH, +/- 6% in OTHER ranges : 0 –... - Page 23 Alarm duration : 120 sec Transmission power Power consumption Base station : 3XAA 1.5V LR6 Alkaline batteries (not included) Remote sensor : 2xAA 1.5V LR6Alkaline batteries (not included) : Minimum 12 months for base station Battery life Minimum 12 months for thermo-hygro sensor EasyWeather PC Software User Manual 1.0 General Information This Weather Station is a high quality, easy to use weather monitoring system...
-
Page 24: Installation Of The "Easyweather" Software
3.0 Installation of the “EasyWeather” Software Firstly, the Base Station and the Outdoor Sensors should be connected and checked for correct function (see Operation Manual for WS1080 Touch Screen Weather Station for setting up the Weather Station). After successful checking, install the “EasyWeather” software as follows: 1. - Page 25 All the settings from the base unit is mirrored into the PC software, so once you have done your setting on the base unit, then you don’t need to make any setting changes on the PC software. However you can still easily make any setting changes you wanted from the PC and download the changes into the base station(the setting change will be refreshed when next full minute arrives on the base station).
- Page 26 This section is used to set up PC software display, base station units. Once you made your choice, press Save to make the setting effective. Click Alarm button, enters the Alarm menu 4.1.2 - 26 -...
- Page 27 This section is used to set the desired time, high or low alarm value for the base unit, as well as able or disable the corresponding alarm function. Once you made your choice, choose Save to make the setting effective. If you don’t want to make any change, just press Cancel and exit without change.
- Page 28 4.2 Record option 4.2.1 Click History button, enters the History menu This section is used to display recorded history data in a spread sheet. If you wanted to see all history data in a desired time period, choose the time duration - 28 -...
- Page 29 and press Search to reload the history data. With the Export button, you can export the selected history data into excel format file for other application purpose. The software version 6.2 use .dat file format, the software version above 6.2 use .mdb format.
- Page 30 With the Export as image button, you can export the selected graph into .jpeg format file. You can change the Y axel by scrolling the mouse up and down roller. - 30 -...
- Page 31 What to do if graph function is not working This is the most encountered problem with this software. To make the graph function working properly, please check the following step: 1, find the folder where the “EasyWeahter.exe” file is located 2.
- Page 32 To upload data to Wunderground.com, you must first register on the Wunderground.com website. Registration is free. 1. Visit http://www.wunderground.com/ and select Join if you do not have an account. 2. Once registered with Wunderground.com you will need to sign up your station. To get started visit: http://www.wunderground.com/weatherstation/setup.asp - 32 -...
- Page 33 3. Enter your Station ID, and password into the ID and Password fields provided in the EasyWeather software, and select the Auto Upload checkbox. Please Note: Make sure you enter the ID in all capitals, and the password exactly as you chose it, both fields are case sensitive. 4.3.2 Upload to WeatherCloud 4.3.3 Upload your weather data to WeatherObservationWebsite (WOW)
- Page 34 Once you are logged in you will need to create a new WOW site. “Sites” are the means by which WOW organizes weather data you contribute. Basically, WOW builds a personal web site for your weather station. Associated with the web site is two items you will need to allow uploading of data: Site ID: This is an arbitrary number that is used to distinguish your site from another.
- Page 35 You will also need to establish a unique 6 digits PIN code that you should keep secret. It is the “Authentication Key.” Setup this number by clicking on “Edit Site”) and filling out the with a 6-digit number of your choice: You will need both “Site ID”...
- Page 36 5.0 “EasyWeather” Software on MAC OS Insert the CD-ROM into the CD-ROM Drive and double click the EasyWeather software icon, the main interface as below will be opened: The functions of MAC OS are the same to the windows version. Once the device is connected to MAC PC by USB cable, settings, alarms of all weather parameter can be done here.
- Page 37 5.1 Setting option: Please refer to 4.1.1 5.2 Alarm option: Please refer to 4.1.2 - 37 -...
- Page 38 5.3 Max/Min option 5.4 History option: Please refer to 4.2.1 - 38 -...
- Page 39 5.5 Graph Please refer to 4.2.2 5.6 Upload option: Please refer to 4.3 - 39 -...
- Page 40 5.7 Check software version Click About EasyWeather button, enters the About menu to check version information Special Notes about time synchronization between PC and sub-station: The PC software obtained its own time scale through the time interval marker from the base station history data, and the PC software automatically synchronizes the weather data with a time stamp calculated.
- Page 41 General safety instructions Danger of asphyxiation: Keep all packaging materials (plastic bags, rubber bands, etc.) away from children. There is a danger of suffocation! Danger of burns: Caution! Leaking / leaking battery acid can lead to burns! Avoid contact of battery acid with eyes, mucous membranes and skin.
- Page 42 This manual may contain errors and misprints. However, the information in this manual is regularly reviewed and corrections made in the next issue. We accept no liability for technical errors or printing errors, and their consequences. All trademarks and copyrights are acknowledged. www.froggit.de - 42 -...
- Page 43 Hereby we declare, HS-Group GmbH & Co.KG, Escherstr. 31, 50733 D-Cologne, that this product is in compliance with the essential requirements and other relevant provisions of Directive 2014/53/EU. The declaration of conformity for this product can be found www.froggit.de or on request. - 43 -...
Need help?
Do you have a question about the WH1080SE and is the answer not in the manual?
Questions and answers