Froggit WH3000SE Manual
Wi-fi internet wireless weather station
Hide thumbs
Also See for WH3000SE:
- Operation manuals (41 pages) ,
- Operation manual (82 pages) ,
- Manual (109 pages)
Table of Contents
Advertisement
Advertisement
Table of Contents

Related Manuals for Froggit WH3000SE


Summary of Contents for Froggit WH3000SE
- Page 1 WH3000SE Manual WH3000SE WI-FI Internet wireless weather station...
-
Page 2: Table Of Contents
PROFESSIONAL WEATHER STATION Operation Manual Table of Contents 1. Introduction ..................5 2. Warnings and Cautions ..............5 3. Quick Start Guide ................6 4. Pre-Installation Checkout and Site Survey ........7 4.1 Pre Installation Checkout ............. 7 4.2 Site Survey ................... 8 5. - Page 3 5.3 Best Practices for Wireless Communication ......18 5.4 Display console ................19 5.4.1 Vertical Desk Stand.............. 21 6. Display Console Operation ............23 6.1. Screen Display ................23 6.2. Initial Display Console Set Up ........... 24 6.3 Key function ................25 6.4 Setting mode................
- Page 4 6.5.2 Alarm mode setting: ............. 34 6.5.3 Alarm Setting Order: ............35 6.6 Max/min mode ................36 6.6.1 Press and release MAX/MIN key to display MAX data ..36 6.7 Calibration mode ................ 37 6.8 Other Features................38 6.8.1 Factory Reset/Clear Memory ..........38 6.8.2 Register New Transmitter ............
-
Page 5: Introduction
8.3 Mobile application – Check WU weather data and graph ..69 8.4 Mobile application – Remove or Add WU ID ......70 8.5 Mobile application – Set Units ............ 72 9. Registering WeatherUnderground.com through the PC or Mac ..74 10. -
Page 6: Quick Start Guide
3. Quick Start Guide weather station on a clear, dry day. Although the manual is comprehensive, much of the information contained may be intuitive. In addition, the manual does not flow properly because the sections are organized by components. The following Quick Start Guide provides only the necessary steps to install, operate the weather station, and upload to the internet, along with references to the pertinent sections. -
Page 7: Pre-Installation Checkout And Site Survey
Required Step Description Section Assemble and power up the Y shape sensor 5.2.1–5.2.3 Power up the display console and synchronize with Y shape sensor Mount the sensor array 5.2.4 Set date and time on console 6.4.5 Calibrate the relative pressure to sea-level 6.7.1 conditions (local airport) on console Reset the rain to zero on console... -
Page 8: Site Survey
4.2 Site Survey Perform a site survey before installing the weather station. Consider the following: 1. You must clean the rain gauge every few months and change the rechargeable batteries every 2-3 years. Provide easy access to the weather station. 2. -
Page 9: Setting Started
5. Setting Started 5.1 Contents Item Display Console Y shape outdoor sensor(Thermo-hygrometer / Rain Gauge / Wind Speed Sensor /Transmitter) Wind Vane 5V DC Adapter U-bolt with mounting clamps User manual Zip bag for 1pc 10mm single-head wrench... -
Page 10: Sensor Set Up
5.2 Sensor Set Up 1. Wind Vane 2. Wind Speed Sensor 3. UV sensor/ Light sensor 4. Thermo-hygro sensor 5. Rain collector 6. Bubble level 7. Solar panel 8. U-Bolt 9. Battery compartment 10. Reset button 11. LED Indicator: light on for 4s if the unit power up. Then the LED will... -
Page 11: Install U-Bolts And Mounting Pole
flash onceevery 16 seconds (the sensor transmission update period). Fehler! 5.2.1. Install U-bolts and mounting pole Verweisquelle konnte nicht gefunden werden. Installation of the U-bolts, which are in turn used to mount the sensor package on a pole, requires installation of an included metal plate to receive the U-bolt ends. -
Page 12: Install Wind Vane
Figure 2 The plate and U-Bolts are not yet needed at this stage but doing this now may help avoid damaging wind vane and wind speed cups later on. 5.2.2. Install wind vane Push the wind vane onto the shaft on the top of the sensor, unitl it goes further, as shown in figure 3. -
Page 13: Install Wind Speed
Figure 3 Figure 4 There are four alphabet letter of “N”,”E”,”S”and “W” around the wind direction, representing for the direction of North, East, South and West. Wind direction sensor has to be adjusted so that the directions on the sensor are matching with your real location. Permanent wind direction error will be introduced when the wind direction sensor is not positioned correctly during installation. - Page 14 Figure 5 Figure 6 5.2.4. Install Batteries Insert 2XAA batteries in the battery compartment. The LED indicator on the back of the transmitter will turn on for four seconds and normally flash once every 16 seconds (the sensor transmission update period). Figure 7 Figure 8...
-
Page 15: Mount Assembled Outdoor Sensor Package
Note: If no LED light up or is lighted permanently, make sure the battery is inserted the correct way or a proper reset is happened. Do not install the batteries backwards. You can permanently damage the outdoor sensor Note: We recommend lithium batteries for cold weather climates, but alkaline batteries are sufficient for most climates. - Page 16 Figure 10 Finally, place the sensor package on top of the prepared mounting pipe. Finally, place the sensor package on top of the prepared mounting pipe. The U-Bolts should be loose enough to allow this but loosen the nuts as Bolts should be loose enough to allow this but loosen the nuts as necessary.
-
Page 17: Reset Button And Transmitter Led
Note: Use the bubble level next to the rain sensor to make sure sensor array is completely level.If the sensor is not level,the rain gauge,UV and solar radiation sensors will not measure properly. 5.2.6 Reset Button and Transmitter LED In the event the sensor array is not transmitting, reset the sensor array. With an open ended paperclip, press and hold the RESET BUTTON for three seconds to completely discharge the voltage. -
Page 18: Best Practices For Wireless Communication
5.3 Best Practices for Wireless Communication Note: To insure proper communication, mount the remote sensor(s) upright on a vertical surface, such as a wall. Do not lay the sensor flat. Wireless communication is susceptible to interference, distance, walls and metal barriers. We recommend the following best practices for trouble free wireless communication. -
Page 19: Display Console
Glass (untreated) 5-15% Plastics 10-15% Wood 10-40% Brick 10-40% Concrete 40-80% Metal 90-100% 5.4 Display console 1. Insert the 5V AC adaptor into the back of the display console Note: Place the outdoor sensor array about 5 to 10 feet from the display console and wait several minutes for the remote sensors to synchronize with the display console. - Page 20 Figure 12 Note: The batteries are intended for back-up power only. The backlight will remain on for 5 seconds when on back up battery power only. Only when you use power adapter it will the back-light be continuously on. 3. Keep both sensor and the display console together for 15 minutes to lock in the sensor signals.
-
Page 21: Vertical Desk Stand
Figure 13 Note: Your display console should have readings in all sections. Wind and Rain will show 0’s (connected) until wind or rain occur or are simulated. Note: If you only use battery to power up display console, you must press LIGHT/SNOOZE key to light up the LCD before press any other key. - Page 22 Figure 14...
-
Page 23: Display Console Operation
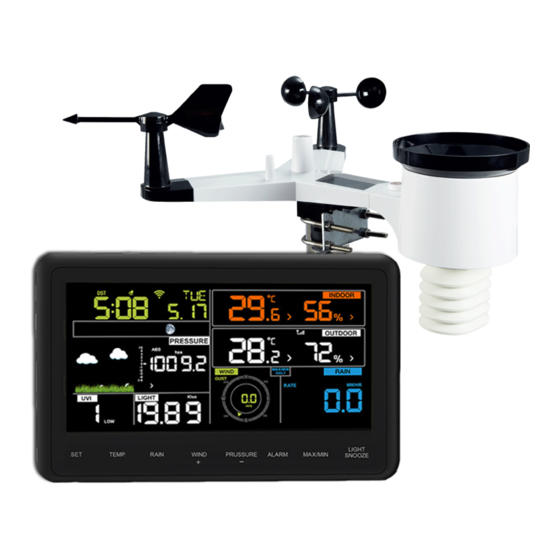
6. Display Console Operation 6.1. Screen Display 1.Time 10. Rain fall 2. Moon phase 11. Outdoor temperature 3. Barometric Pressure 12. Outdoor humidity 4. Weather forecast 13. RF icon 5. UV index 14. Indoor humidity 6. Light 15. Indoor temperature 7. -
Page 24: Initial Display Console Set Up
8. Wind direction 17. WIFI icon 9. MAX/MIN Daily 18. DST 6.2. Initial Display Console Set Up Connect the power adapter to power up the display console. The unit will show software version number 2 seconds after power reset. The unit will turn on all segments of the LCD for 3 seconds after power reset, the unit will start to register the outdoor channel for 3 minutes. -
Page 25: Key Function
6.3 Key function The console has eight keys for easy operation Description Hold this key to enter setting mode Press this key to view wind Chill, Heat Index, Dew TEMP. Point Temperature RAIN Press this key to view Rain Rate, event, Rain Day, Rain Week, Rain Month, and Rain total Press the RAIN key 2s to reset current display rain WIND +... -
Page 26: Setting Mode
MAX/MIN Press this key to view the MAX/MIN value of Temperature / Humidity/rain rate/rain day/wind/UVI/LIGHT/Absolute Pressure LIGHT Press this key to adjust LCD backlight brightness: /SNOOZE HI/MID/OFF Hold this key to register new transmitter Note: When power on, press WIND/+ and PRESSURE /-key to reset the weather station and clear all records memory, and clears all user settings to default. -
Page 27: Beep
6.4.1 BEEP: - Press the SET key for 2 seconds to select the beep section, ON/OFF section digits will start flashing, press the WIND/+ or PRESSURE/- key to select ON or OFF. “BEEP ON” will make the Beep sound on every key press. If you do not want the beep sound to be heard, select “BEEP OFF”... -
Page 28: Time Zone
PRESSURE/- key to select ON or OFF . (default ON, only WWVB) Note: DST time start at 1:00am GMT of the last Sunday in March and end at 1:00am GMT of the last Sunday in October. 6.4.4 Time zone - Press the SETkey forth time to select the Time zone section, time zone section digits will start flashing,press the WIND/+or PRESSURE/- key to select the value . -
Page 29: Pressure
- Press the SET key again time to select day. Note: Press the WIND/+or PRESSURE/-key to set the value. Note: If user to change minute value, second will auto clear to 0. 6.4.6 Pressure 1) Viewing Absolute vs. Relative Pressure To switch between absolute and relative pressure, press and hold the [PRESSURE -] button for two seconds. - Page 30 The rate of change of pressure graphic is shown to the left of the barometric pressure and signifies the difference between the daily average pressure and the 30 day average (in hPa). 3) Viewing Pressure History Press the [PRESSURE -] button to view the 12 hour, 24 hour, 48 hour and 72 hour pressure average.
-
Page 31: Light
The standard sea-level pressure is 29.92 inHg (1013 mb). This is the average sea-level pressure around the world. Relative pressure measurements greater than 29.92 inHg (1013 mb) are considered high pressure and relative pressure measurements less than 29.92 inHg are considered low pressure. -
Page 32: Wind Speed
Note: every 60 second the unit will measure indoor temperature, indoor humidity and pressure. If temperature is to lower than minimum range, will display --.-, if it is higher than highest range, will display --.-. 6.4.9 Wind speed - Press the SETkey 16th to select wind speed unit ( km/h, mph, knots, m/s, bft;default: km/h ). -
Page 33: Moon Phase
Reset week rain, will auto reset day rain Reset month rain, will auto reset week and day rain. Reset total rain, will auto reset month, week and day rain. Note: Rain rate: the last 10 minutes rainfall multiplication 6. Rain event: It start to record the rain event value form the rain falls, the rain event is over and value reset to 0 if last 24 hour rainfall less 1mm and the last 1 hour no rainfall.. -
Page 34: Alarm Mode
6.5 Alarm mode 6.5.1 Display of Alarm value Press and release ALARM key to display high alarm Press ALARM key again to display low alarm Note: - Press RAIN key to select display rate or day rain alarm data. - Press WIND/+key to select display wind or gust alarm data. - Press ALARM key third time or press LIGHT /SNOOZE key back to normal mode 6.5.2 Alarm mode setting:... -
Page 35: Alarm Setting Order
mode: Press the WIND/+ or PRESSURE/- to arm/disarm alerts and adjust alert values. Press the SET key to confirm & move to the next item. Press the ALARM key to on/off the alarm Note: when alert is triggered, the current triggering source icon for time, icon for high value and... -
Page 36: Max/Min Mode
10) High wind setting 11) High gust setting 12) Rain rate high setting 13) Rain day high setting 6.6 Max/min mode 6.6.1 Press and release MAX/MIN key to display MAX data - Press TEMP. key to view wind chill, heat index and dew point max. - Press RAIN key to view rain rate, rain day, rain week and rain month max. -
Page 37: Calibration Mode
- Press TEMP. key to view wind chill and dew point min. - Press PRESSURE/-to hold 2 seconds to view pressure absolute and relative min. Note: press and hold 2s MAX/MIN button to reset all max or min. press MAX/MIN key third time back to normal mode or press LIGHT /SNOOZE key back to normal mode. -
Page 38: Other Features
- Press the WIND/+and PRESSURE/- key to adjust values. - Press the SET key to confirm & move to the next item. - Press the ALARM key to reset any adjusted value. - Press the LIGHT /SNOOZE key at any time to exit. Calibration Order: Indoor temperature offset calibrated (range +/-5˚C, default: 0 degrees) -
Page 39: Register New Transmitter
2. Apply power by connecting the AC adapter. 3. Wait for all of the segments to appear on the screen,. 4. Press and hold the WIND/+ and PRESSURE/- keys at the same time until the console power up sequence is complete (about 5 seconds). -
Page 40: Tendency Indicators
6.8.4 Tendency indicators Tendency arrows allow you to quickly determine of temperature or pressure are rising and falling in a three hour update period, updated every 30 minutes. Eg. : At 3:00 - compare to 12:00 data; at 3:30 -compare to 12:30 ….. etc Tendency Humidity Temperature... -
Page 41: Weather Forecast
6.8.6 Weather forecast There are six color forecast icons use changing atmospheric pressure to predict weather conditions for the next 6-hours. Please allow at least one month for the weather station to learn the barometric pressure over time. Sunny Partly sunny Cloudy Rainy Snowy... - Page 42 Storm rainy Storm Snowy Note: Snowy icon will appear in place of rainy icon when the outdoor temperature is below 0˚C (32 F). Weather Forecasting Description and Limitations In general, if the rate of change of pressure increases, the weather is generally improving (sunny to partly cloudy).
-
Page 43: Snooze
because the forecast is a prediction 24-48 hours in advance. In most locations, this prediction is only 70% accurate and it is a good idea to consult the National Weather Service for more accurate weather forecasts. In some locations, this prediction may be less or more accurate. - Page 44 Accuracy : +/- 5% Rain volume display : 0 – 6000mm (show --- if outside range) Accuracy : + / - 10% Resolution : 0.1mm (if rain volume < 1000mm) 1mm (if rain volume > 1000mm) Wind speed : 0-50m/s (0~100mph) (show --- if outside range) Accuracy: +/- 1m/s (wind speed<...
-
Page 45: Live Internet Publishing
Measuring range air pressure : 700-1100hPa (20.67-32.5inHg) Accuracy : +/-3hpa Resolution : 0.1hPa (0.01inHg) Alarm duration : 120 sec Measuring interval indoor data : Power consumption Base station : 5V DC adaptor (included), Power Consumption: 0.5 Watts (1.25 Watts during WiFi configuration mode) 8. -
Page 46: Connecting The Weather Station Console To Wifi
text data for more detailed analysis and use iPhone, iPad and Android applications available at Wunderground.com. Weather Underground is a subsidiary of The Weather Channel and IBM. Weather https://weathercloud.net Weathercloud is a real-time Cloud weather social network formed by observers from around the world. -
Page 47: Download Mobile Application
password, on purpose! Then, after final outdoor installation, come back and change the password after clearing console history. That will start uploading to the services with a clean slate. 8.1.1 Download mobile application Wi-Fi configuration is done using your mobile device, either iOS or Android. - Page 48 Start searc Operate as per the Select the device you device. If t information, tick the have from the device in your WL box to confirm Select the device you Operate as per the Start searching the list, then press Next have from the device will jump to information, tick the...
- Page 49 Press Scan and select you SSID from the list, Start to connect your then enter your WiFi phone to the weather...
- Page 50 Upload Setting Your console is capable of sending your sensor data to select internet-based weather services: Wunderground.com,...
- Page 51 Weathercloud.net and, wow.metoffice.gov.uk. User need to register at the select website to get the station ID and password Note:User can register Wunderground.com directly through WS View APP, other two registering through the web browser...
- Page 52 Upload your weather data to Wunderground.com If register successfully, Upload your weather data to Register at Wunderground.com Wunderground.com you’ll receive a Station ID and Station Enter your valid e-mail password / key.. You address and will also receive an password to obtain the Input Station ID &Station e-mail about the Station ID &Station Key...
- Page 53 Select OK to fill in theStation ID and Station password / key automatically. PressSaveYour station ID will be added on the WU StationID. Upload to Wunderground.com Setting finish.
- Page 54 Upload your weat data...
- Page 55 to Weathercloud.net You will th Register at to add a d Weathercloud.net “Create d Visit weathercloud.net your stati and enter a Username, Email and Password to sign up After regi station, ta Respond to the “Weather validationemail from “Key” pre Weathercloud (it may take a few minutes) Enter the...
- Page 56 Upload your weather data to WeatherObservationWebsite (WOW) Register at The actual form is longer, WeatherObservatio but all questions should be nWebsite self-explanatory. Upload your weather data to WOW Complete and submit the Choose create a new form. You will shortly account receive an email with you will be presented...
- Page 57 Follow instructions on the screen and login to the site Once you are logged in you will need to create a new WOW site. “Sites” are the means by which WOW organizes weather data you contribute. Basically, WOW builds a personal web site for your weather station. Associated with the web site is two items you will need to allow uploading of data: Site ID: This is an arbitrary number that is used to distinguish your site...
- Page 58 Begin setting up a new site by clicking “Enter a Site”: You will be presented with a form where you detail your station’s location You will be presented with a form where you detail your station’s location and a bunch of other settings related to how you wish the site to operate. ings related to how you wish the site to operate.
-
Page 59: Ios User
gefunden werden. ) and filling out the with a 6-digit number of your digit number of your choice: You will need both “Site ID” and “Authentication Key” to setup the upload need both “Site ID” and “Authentication Key” to setup the upload configuration for WOW in the Weather Server. - Page 60 Configure Device Note:If you own a dual band router (2.4 GHz and 5.0 GHz),make sure you connect to the 2.4 GHz band, otherwise it will fail to connect the weather station to WiFi.
- Page 61 Operate as per the Select the device you Tap on the settings icon and information, tick the box have from the device list, select “Configure a New to confirm “completed then press Next Device”. operation”, press Next.
- Page 62 Press Sycn and select your select your WiFi network you want and return to WiFi network from the WLAN list, then enter your WiFi WS Wiew App password and press Next. Connection success, it Select device WiFi. The Press button “Select will jump to device named “...
- Page 63 It may have chance to happen that it cannot return back the same WiFi network which you selected on step 4) The window “Please connect your mobile Wi-Fi to xxxx(WiFi Network name) and return to WS View App” will pop up. Press OK to continue.
- Page 64 Upload your weather data to Register at If register successfully, Wunderground.com Wunderground.com you’ll receive a Station Enter your valid e-mail ID and Station address and password password / key.. You Input Station ID &Station to obtain the Station ID will also receive an Key, pressSave.
- Page 65 Upload your weather data to Weathercloud.net Input Weathercloud ID & Weathercloud Key, press Save. Then press Next. ump to the screen about Upload your weather data to WeatherObservation Website (WOW) If you don’t have Weathercloud ID and Key, press “ Register at Weathercloud.net”to open your web browser to activating the Register with Weathercloud.net option.
- Page 66 Upload your weather data to WeatherObservationWebsite (WOW) Input Weathercloud ID & Weathercloud Key, press Save.Then press Finish. ump to the Device List home screen If you don’t have WOW ID and Key, press “ Register at WeatherObservationWebsite” to open your web browser to activating the Register with WOW option.
-
Page 67: Mobile Application - Device List
8.2 Mobile application – Device list You are able to see your console through the “Device List” menu option: Tapping on your console’s entry in the device list will bring you to the page where you can change WU registration information. If you want to stop your console upload data to Wunderground, delete your Station ID and select “Save”. - Page 68 Mobile application – Device List (Android) Mobile application – Device List (iOS)
-
Page 69: Mobile Application - Check Wu Weather Data And Graph
8.3 Mobile application – Check WU weather data and graph In the mobile application tap Menuchoose WU Dashboardand you will be presented with a page listing current conditions for that station. If you have added multiple WU IDs, tap on the WU Station ID to switch to view data from other IDs. -
Page 70: Mobile Application - Remove Or Add Wu Id
8.4 Mobile application – Remove or Add WU ID Mobile application – WU Daseboard (iOS) If you have previously registered your console for use with wunderground.com and wish to remove this device data display from App, use the “Manage WU Station” menu option after tapping on the settings icon, select“Delete”your console from the list and confirm you wish to delete the station. - Page 71 Mobile application –Remove or Add WU ID (Android)
-
Page 72: Mobile Application - Set Units
Mobile application –Remove or Add WU ID (iOS) 8.5 Mobile application – Set Units You may want to change the units in which sensor values are reported. To do so, click on the “Configure Units” menu after tapping on the settings icon. - Page 73 Mobile application – Change units (Android)
-
Page 74: Registering Weatherunderground.com Through The Pc Or Mac
9. Registering WeatherUnderground.com through the PC or Mac Mobile application – Change units (iOs) 1. Visit Wunderground.com and select the Join link at the top of the page. Select the Free sign up option. - Page 75 2. Select More | Register Your PWS. 3. Click Send Validation Email. Respond to the validation email from Wunderground (it may take a few minutes). 4. Select More | Register Your PWS again and enter all of the information requested.
- Page 76 5. After registering your station, make a note of the following: Station ID Station Key / Password Enter the Station ID (ID), Station Key (Password) and Station Number (StationNum) into the WS View. Below figure is an example, and your station ID and password will be different.
- Page 77 Note: Your station ID will have the form: KSSCCCC###, where K is for USA station (I for international), SS is your state, CCCC is your city and ### is the station number in that city. In the example above, KAZPHOEN424 is in the USA (K), State of Arizona (AZ), City of Phoenix (PHOEN) and #424.
- Page 78 WunderStation iPad App Visit: http://www.WunderStation.com to download the WunderStation iPad app.
- Page 79 Mobile Apps Visit: http://www.wunderground.com/download/index.asp for a complete list of Mobile apps for iOS and Android. Alternately, you can find your data on your mobile device’s web browser.
-
Page 80: Maintenance
10. Maintenance 1. Clean the rain gauge once every 3 months. Rotate the funnel Rotate the funnel counter-clockwise and lift to expose the rain gauge mechanism, and clockwise and lift to expose the rain gauge mechanism, and clean with a damp cloth. Remove any dirt, debris and insects. If bug clean with a damp cloth. -
Page 81: Troubleshooting Guide
Clean the solar radiation sensor and solar panel every 3 months with damp cloth. Replace batteries every 1-2 years. If left in too long, the batteries may leak due to environmental challenges. In harsh environments, inspect the batteries every 3 months (when cleaning the solar panel). - Page 82 Problem Solution Outdoor sensor The sensor array may have initiated properly and array does not the data is registered by the console as invalid, and communicate to the console must be reset. Press the reset button the display as described in Section 5.2. console.
- Page 83 Problem Solution There may be a temporary loss of communication due to reception loss related to interference or other location factors, or the batteries may have been changed in the sensor array and the console has not been reset. The solution may be as simple aspowering down and up the console(remove AC power and batteries, wait 10 seconds, and reinsert AC power and batteries).
- Page 84 Problem Solution Temperature Make certain that the sensor array is not too close to sensor reads too heat generating sources or strictures, such as high in the day buildings, pavement, walls or air conditioning units. time. Use the calibration feature to offset installation issues related to radiant heat sources.
- Page 85 Problem Solution versa). Example, KAZPHOEN11, not KAZPH0EN11 3. Make sure the date and time is correct on the console. If incorrect, you may be reporting old data, not real time data. 4. Make sure your time zone is set properly. If incorrect, you may be reporting old data, not real time data.
- Page 86 Problem Solution 5. The console does not support guest networks. Notes on the return of batteries according to §12 BatterieVO: Batteries do not belong in the household waste. Please dispose of all batteries as required by law, disposal in domestic waste is expressly prohibited.
- Page 87 information in this manual is regularly reviewed and corrections made in the next issue. We accept no liability for technical errors or printing errors, and their consequences. All trademarks and copyrights are acknowledged.
- Page 88 HS Group GmbH & Co. KG Escherstr.31 50733 Koeln Germany Telefon 0221 / 367 48 05 E-Mail info@hs-group.de Registergericht Amtsgericht Koeln HRA 26493 Komplementaer: HS Group Verwaltungsgesellschaft mbH Sitz Koeln Registergericht Amtsgericht Koeln HRB 64734 Geschaeftsfuehrer: Peter Haefele, Carl Schulte UStId DE237971721 WEEE Reg.
- Page 89 Hereby we declare, HS-Group GmbH & Co.KG, Escherstr. 31, 50733 D-Cologne, that this product is in compliance with the essential requirements and other relevant provisions of Directive 2014/53/EU. The declaration of conformity for this product can be found www.froggit.de or on request.
Need help?
Do you have a question about the WH3000SE and is the answer not in the manual?
Questions and answers