Table of Contents
Advertisement
Manual (EN)
Contents
Glossary of Common Terms ....................................................................................... 2
OVERVIEW ................................................................................................................ 4
Display console .................................................................................................. 4
Features ............................................................................................................. 4
Set up Guide ............................................................................................................... 5
1. Outdoor Sensor Set Up .................................................................................. 6
1.1. Install wind vane .................................................................................. 7
1.2. Install wind speed ................................................................................ 9
1.3. Install Batteries .................................................................................... 9
1.4. Mount outdoor sensor ....................................................................... 10
1.5 Reset Button and Transmitter LED ..................................................... 10
2. Best Practices for Wireless Communication ................................................. 11
3. Display Unit Set up ....................................................................................... 13
3.1. Display Console Layout..................................................................... 13
3.2. Initial Display Console Set Up ........................................................... 14
Console Operation .................................................................................................... 16
Program mode .................................................................................................. 16
1. Quick Display Mode ...................................................................................... 16
2. Setting Mode ................................................................................................ 23
3. ALARM MODE.............................................................................................. 30
4. Max/Min Mode .............................................................................................. 32
5. History mode ................................................................................................ 32
6. Other Console Functions ............................................................................... 33
6.1 Weather Tendency indicators .................................................................. 33
6.2 Moon Phases .......................................................................................... 33
6.3 Beaufort Scales (Wind Speed) ................................................................ 34
6.4 Recording storage capacity used ............................................................ 34
Specification .............................................................................................................. 35
Live Internet Publishing............................................................................................. 36
1. WiFi Connection to the Weather Station ConsoleError! Bookmark not defined.
1.1 Download mobile appliacation .................. Error! Bookmark not defined.
1.2 Connect the console to Wi-Fi .................. Error! Bookmark not defined.
1.2.1 Android user .................................... Error! Bookmark not defined.
1.2.2 iOs user ............................................. Error! Bookmark not defined.
2. Mobile application - Device list....................... Error! Bookmark not defined.
3. Mobile application -Check WU weather data and graphError! Bookmark not defined.
4. Mobile application - Remove or Add WU ID ... Error! Bookmark not defined.
5. Mobile application - Set Units ........................ Error! Bookmark not defined.
1
Advertisement
Table of Contents

Related Manuals for Froggit WH4000


Summary of Contents for Froggit WH4000
-
Page 1: Table Of Contents
Manual (EN) Contents Glossary of Common Terms ..................2 OVERVIEW ........................ 4 Display console ....................4 Features ......................4 Set up Guide ....................... 5 1. Outdoor Sensor Set Up .................. 6 1.1. Install wind vane .................. 7 1.2. Install wind speed ................9 1.3. -
Page 2: Glossary Of Common Terms
Registering WeatherUnderground.com through the PC or Mac ........ 65 PC Software Operation ..................... 65 Maintenance ......................72 Troubleshooting Guide ....................73 About this manual Thank you on selecting this Professional WI-FI Weather Station! This device provides accurate weather readings and is Wi-Fi capable to stream live data from your weather station to the internet so that users can run remote monitoring of weather condition. - Page 3 RELATIVE AIR PRESSURE Relative air pressure is the same as the barometric pressure. The calculation of relative air pressure is a combination of the absolute air pressure and the altitude. ABSOLUTE AIR PRESSURE Absolute air pressure is the actual air pressure on the barometer without regard to altitude.
-
Page 4: Overview
An added feature of the Weather Station is that all the weather data and programs can be viewed and set on a PC Software via Wi-Fi connection. OVERVIEW Display console DC connector Backlight OFF/LOW/HIGH Adjustable Note: The backlight switch only works when the device is connected to a DC adapter. -
Page 5: Set Up Guide
⚫ Wind speed in mph, km/h, m/s, knots or Beaufort ⚫ Wind direction with 360 degrees ⚫ Wind chill, dew point and heat index temperature display. ⚫ Barometric, weather forecast. ⚫ MAX, MIN value with time stamp. ⚫ High/ low alarm. ⚫... -
Page 6: Outdoor Sensor Set Up
section (insert batteries in the Display Console firstly, Outdoor Sensor secondly). Attention: ⚫ Do not mix old and new batteries ⚫ Do not use Rechargeable batteries. ⚫ Use Lithium batteries for sensor array when outdoor temperature is lower than 0 degrees Celsius ⚫... - Page 7 10. Battery door 11. Reset button 1.1. Install U-bolts and metal plate Installation of the U-bolts, which are in turn used to mount the sensor package on a pole, requires installation of an included metal plate to receive the U-bolt ends. The metal plate, visible in Figure on the right side, has four holes through which the ends of the two U-Bolts will fit.
-
Page 8: Install Wind Vane
Figure 2: U-Bolts and nuts installed The plate and U-Bolts are not yet needed at this stage but doing this now may help avoid damaging wind vane and wind speed cups later on. Handling of the sensor package with wind vane and speed cups installed to install these bolts is more difficult and more likely to lead to damage. -
Page 9: Install Wind Speed
wind direction, representing for the direction of North, East, South and West. Wind direction sensor has to be adjusted so that the directions on the sensor are matching with your real location. Permanent wind direction error will be introduced when the wind direction sensor is not positioned correctly during installation. -
Page 10: Mount Outdoor Sensor
Figure 7 Figure 8 Note: If no LED light up or is lighted permanently, make sure the battery is inserted the correct way or a proper reset is happened. Do not install the batteries backwards. You can permanently damage the outdoor sensor Note: We recommend lithium batteries for cold weather climates, but alkaline batteries are sufficient for most climates. -
Page 11: Best Practices For Wireless Communication
With an open ended paperclip, press and hold the RESET BUTTON for proper reset: LED turns on while RESET button pressed, and resume normal after Reset button is released: LED will be lit momently every 16s. Figure 11 2. Best Practices for Wireless Communication Note: To insure proper communication, mount the remote sensor(s) upright on a vertical surface, such as a wall. - Page 12 intermittent communication. 3. Line of Sight Rating. This device is rated at 300 feet line of sight (no interference, barriers or walls) but typically you will get 100 feet maximum under most real-world installations, which include passing through barriers or walls. 4.
-
Page 13: Display Unit Set Up
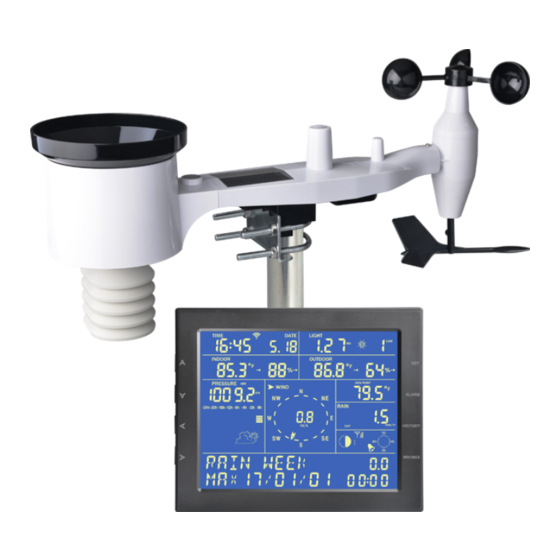
3. Display Unit Set up 3.1. Display Console Layout 1.Time 2.Indoor Temperature 3.Indoor Humidity 4.Barometric Pressure 5. Barometric Pressure graph 6.Weather Forecast icon 7. Dynamic information display area 8.RF signal 9. Alarm icon 10. Memory status 11.Wind direction 12.Rain fall 13.Wind speed/Gust speed 14.wind chill/Dew point/Heat index 15.Outdoor Humidity... -
Page 14: Initial Display Console Set Up
3.2. Initial Display Console Set Up 3.2.1 The unit will turn on all segments of the LCD for 5 seconds after power reset and display unit information(Frequency, FSK/ASK, EU/USA, Version) , then the unit will start to register the outdoor channel for 3 minutes. 3.2.2 Full display 3.2.3... - Page 15 SET: Enter the setting mode ALARM: Display high or low alarm function / turn on/off the alarm HISTORY: Display history records / return to normal mode MAX/MIN: Display the MAX, MIN value Move to previous information( normal mode) or + ( programming mode) Move to next information( normal mode) or–...
-
Page 16: Console Operation
Console Operation Program mode The screen is divided into 10 segments for selection and there are message display panel on the bottom. There are six program modes: normal, setting mode, history mode, alarm mode, max/min mode and calibrated mode. All the modes can be exited at any time by pressing the HISTORY key, or waiting for a 30 second timeout to take effect. - Page 17 figures. If there are multiple messages, they will change every 5 seconds, or you can push the “ ” or “ ” keys to force a change to another message at any time. When alarm conditions are active, corresponding messages will display here. 1.1 Time and date This segment displays the current time and date.
- Page 18 1) Maximum light strength value of the day. 2) Maximum light strength value since last reset 3) Maximum UV index value of the day. 4) Maximum UV index value since the last reset. 1.3 Indoor temperature / humidity This segment displays the current indoor temperature and humidity, as measured at the location of console.
- Page 19 1.5 Barometric This segment displays the current barometric pressure, a historical graph of pressures, and a pictorial weather forecast. When the arrow symbol “ ” is in this segment, press SET key to shift display absolute (ABS) or relative (REL) pressure. The absolute pressure is the pressure measured at your console’s location (altitude).
- Page 20 Minimum relatively barometric pressure since last reset Maximum absolute barometric pressure of the current day Minimum absolute barometric pressure of the current day Maximum absolute barometric pressure since last reset Minimum absolute barometric pressure since last reset 1.6 Wind and gust speed This segment displays wind related information.
- Page 21 This segment displays calculated values related to temperature and pressure. The values that can be displayed are “wind chill”, “heat index” and “dew point.”by press SET key. Wind chill and heat index are perceptual values that indicate the air temperature as experienced by humans, as opposed to the measured ambient air temperature.
- Page 22 When the arrow symbol “ ” is in this segment, press SET key to view below rain readings: RAIN RATE: Amount of rain accumulated in past 60 minutes RAIN EVENT: A single period of rainfall not interrupted by a rain rate of 0.
-
Page 23: Setting Mode
2. Setting Mode In normal mode, press SET key for 2 seconds to enter the setting mode. Then press ” ”button to transfer among different setting function : ⚫ TIME SETTING ⚫ UNIT SETTING ⚫ RECORD SAVE INTERVAL ⚫ RAIN SEASON SETTING ⚫... - Page 24 2.2 UNIT SETTING ” key to enter “UNIT SETTING” After entering setting mode, press” ” key to to enter the following sub-setting: display. Then press” Light unit select (lux, fc, w/m2) Temperature unit select (C, F) Pressure unit select (hpa, inhg, mmhg) Wind speed unit select (km/h, mph, knots, m/s, bft) Rainfall unit select (mm, inch) 2.3 RECORD SAVE INTERVAL...
- Page 25 Press buttons to change the historical graph time between 12 and 24 hours. 2.6 KEY BEEP SETTING ”button the fifth time to enter to “KEY BEEP SETTING” Press” display. Press the ” ” button to start setting button beep. Press buttons to switch on/off the button beep.
- Page 26 OUT HUMI OFFSET: Offset for outdoor humidity ABS PRESS OFFSET: Offset for absolute barometric pressure. REL PRESS OFFSET: Offset for relatively barometric pressure. WIND DIR OFFSET: Wind direction can be adjusted by 0-359°. For southern hemisphere installations, the wind direction need to change by 180°.
- Page 27 of 0 are appropriate and correct, this generally cannot be done for relative barometric pressure readings. To understand consider the following. Absolute barometric pressure can be calibrated at manufacturing time by comparing with a precise instrument that measures pressure at the same location.
- Page 28 your location. Click on “Estimate Elevation” and observe the result. For an example we will use a console location at 42 ft. above sea level. 3. This tool will provide the ground level elevation at your location, so you will need to add the right amount for how high above ground level your console is.
- Page 29 Codes” at https://www.world-airport-codes.com or a similar reference. Enter your location or nearby airport name, and press “Search.” Select the correct airport from your search results and click on it. For example, search for “Mountain View” and click on “Moffet Field.” 6.
-
Page 30: Alarm Mode
pressure, it too is correct. The first procedure above generally works quite well, but for stations at fairly high altitudes (e.g. 5,000 ft. or higher) it may be more incorrect than at lower altitudes. In such cases comparisons with other known correct, and nearby at similar altitude, stations may help. - Page 31 etc.) 3.1 HIGH ALARM SETTING In the “high” alarm mode, Press key to switch between the various possible alarms and press key to change the value setting for a particular alarm. Press the SET button to switch on or/off the alarm. TIME ALARM –Set time alarm.
-
Page 32: Max/Min Mode
8) DEW POINT LOW ALARM --Set dew point low alarm Press HISTORY button or wait for 30 seconds at any time to return to normal mode. 4. Max/Min Mode In Normal Mode, press the MIN/MAX button to enter the max/min mode. In this mode, you can view all minimum/maximum records of weather parameters. -
Page 33: Other Console Functions
P 1=Page 1 (Each page has 32 data records) R 01= data record 01 YEAR 16=year 2016 The time and date of the record displays on the time section.. Press the button to switch to next/pre record. Press the button to switch to next/pre page. Under history mode, push the “SET”... -
Page 34: Beaufort Scales (Wind Speed)
WAXING CRESCENT MOON FIRST QUARTER MOON WAXING GIBBOUS MOON FULL MOON WANING GIBBOUS MOON LAST QUARTER MOON WANING CRESCENT MOON 6.3 Beaufort Scales (Wind Speed) If you have selected the use of Beaufort wind speed units, you can use the table below for reference. Wind speed Beaufort number Description... -
Page 35: Recording Storage Capacity Used
64-73mph(103-117.5kph) Violent storm 74mph or above(119.1kph) Hurricane 6.4 Recording storage capacity used The console can store historical sensor data on internal storage. The storage is permanent and will not be lost if there is a power outage. There is room for 3,552 records and you can see how much of this storage is used by inspecting the “storage capacity used”... -
Page 36: Live Internet Publishing
Light: 0-200k Lux Accuracy: +/-15% Measuring interval outdoor sensor: 16 sec Indoor data Measuring interval pressure / temperature: 48 sec Indoor temperature range: 0˚C--50˚C (14°F to + 140°F) (show --- if outside range) Resolution: 0.1˚C Measuring range rel. humidity: 10%~99% Resolution: 1% Measuring range air pressure: 300-1100hPa (8.85-32.5inHg) Accuracy: +/-3hpa under 700-1100hPa... - Page 37 Hosting Service Website Description Ecowitt Weather https://www.ecowitt.net Ecowitt is a new weather server that can host a bunch of sensors that other services don’t support at this time. Weather WeatherUndeground.com Weather Underground is Undergound a free weather hosting service that allows you to send and view your weather station data real-time, view graphs...
-
Page 38: Download Mobile Appliacation
Website (WOW). WOW a llows anyone to submit their own weather data, anywhere in the world. Customized Supports uploading to Website your customized website, if the website has the same protocol with Wunderground or Ecowitt 1. WiFi Connection for the Weather Station Console To send weather data to these services you must connect your console to the internet via Wi-Fi. -
Page 39: Connect The Console To Wi-Fi
1.2 Connect the console to Wi-Fi 1.2.1 Android user: Now activate the application you have downloaded on your mobile device. The following instructions will generally show screen shots for the Android application side by side. Configure Device Start searching the device. Select the device you Operate as per the If the device is in your... - Page 40 Start to connect your Press Scan and select phone to the weather you SSID from the list, station then enter your WiFi “EasyWeather-WIFI” password press Next. your router. If you own a dual band Configure successfully router (2.4 GHz and 5.0 it will jump to “Upload GHz),make sure...
- Page 41 record your sensors data. Supports uploading all the sensors data to Ecowitt Weather server. For other weather services, Only server- supported data will be uploaded. On the ecowitt.net Finish the registration on Press the upper left menu uploading page, enable the the Ecowitt page button and select Devices.
- Page 42 Note: When select device address on map, please wait till the map display before select your address. Note: Please put in the correct time zone to get the correct time. Because the time will be updated to internet time automatically while WIFI connection.
- Page 43 b. Upload your weather data to Wunderground.com On the If register successfully, Register at Wunderground.com Wunderground.com you’ll receive a Station uploading page, input ID and Station Enter your valid e-mail Station ID & Station Key, password / key. You address and press Save.
- Page 44 Select OK to fill in the Station ID Station password automatically. Press Save Your station ID will be added on the WU StationID. Upload to Wunderground.com Setting finish. Press Next. Jump to the screen about Upload your weather data to Weathercloud.net Press Back if you don’t want to upload the data to other website.
- Page 45 c. Upload your weather data to Weathercloud.net Upload your weather data to Register at You will then be prompted Weathercloud.net Weathercloud.net to add a device/ Select “Create device” and enter Visit weathercloud.net your station’s information: Input Weathercloud ID & and enter a Username, Weathercloud Key, press Email and Password to Save..
- Page 46 d. Upload your weather data to WeatherObservationWebsite (WOW) The actual form is longer, Upload your weather Register at data to WOW WeatherObservatio but all questions should be nWebsite self-explanatory. Input Weathercloud ID & Complete and submit the Choose create a new Weathercloud Key, press form.
- Page 47 builds a personal web site for your weather station. Associated with the web site is two items you will need to allow uploading of data: Site ID: This is an arbitrary number that is used to distinguish your site from another. This number appears (in brackets) next to or underneath the name of your site on the site information page, for example: 6a571450-df53-e611-9401-0003ff5987fd Authentication Key: This is a 6-digit number that is used to ensure data...
- Page 48 You will also need to establish a unique 6 digits PIN code that you should keep secret. It is the “Authentication Key.” Setup this number by clicking on “Edit Site”) and filling out the with a 6-digit number of your choice: You will need both “Site ID”...
-
Page 49: Ios User
e. Upload your weather data to Customized Websit If you want to upload data to your customized website, select Enable button (display blue) and select the protocol type. The website should has the same protocol with Wunderground or Ecowitt. Input all the information needed. Press Save. 1.2.2 iOs user: Activate the application you have downloaded on your mobile device. - Page 50 Configure Device Note:If you own a dual band router (2.4 GHz and 5.0 GHz),make sure you connect to the 2.4 GHz band, otherwise it will fail to connect the weather station to WiFi.
- Page 51 Operate as per the Select the device you Tap on the settings icon and information, tick the box select “Configure a New have from the device list, to confirm “completed Device”. then press Next operation”, press Next. 4)Press Sycn and select your select your WiFi network WiFi network from the WLAN you want and return to...
- Page 52 Press button “Select Connection success, it Select device WiFi. The will jump to “Upload WiFi” to go to Wi-Fi device named Setting” screen “EasyWeather-WIFxxxxI”” Setting automatically. and return to WS View App It may have chance to happen that it cannot return back the same WiFi network which you selected on step 4) The window “Please connect...
- Page 53 Upload your weather data to Ecowitt Website ecowitt.net Finish the registration on Press the upper left menu uploading page, enable the the Ecowitt page button and select Devices. ON button(displayed blue) Press Add Device and input uploading If you have account and interval time.
- Page 54 Upload your weather data to Wunderground.com Upload your weather data to If register successfully, Register at Wunderground.com Wunderground.com you’ll receive a Station ID and Station Enter your valid e-mail Input Station ID & Station password / key.. You address and password to Key, press Save.
- Page 55 If you don’t have Weathercloud ID and Key, press “ Register at Weathercloud.net”to open your web browser to activating the Register with Weathercloud.net option. Please refer 8.1.2.1 Register at Weathercloud.net. The operation is same Upload your weather data to WeatherObservationWebsite (WOW) Input Weathercloud ID &...
- Page 56 e. upload your weather data to Customized Website If you want to upload data to your customized website, select Enable button (display blue) and select the protocol type. The website should has the same protocol with Wunderground or Ecowitt. Input all the information needed. Press Save.
-
Page 57: Mobile Application - Device List
2 Mobile application – Device list You are able to see your console through the “Device List” menu option: Tapping on your console’s entry in the device list will bring you to the page where you can change WU registration information. If you want to stop your console upload data to Wunderground, delete your Station ID and select “Save”. - Page 58 3 Mobile application – Check WU weather data and graph In the mobile application tap Menu choose WU Dashboard and you will be presented with a page listing current conditions for that station. If you have added multiple WU IDs, tap on the WU Station ID to switch to view data from other IDs.
-
Page 59: Mobile Application - Remove Or Add Wu Id
4 Mobile application – Remove or Add WU ID If you have previously registered your console for use with wunderground.com and wish to remove this device data display from App, use the “Manage WU Station” menu option after tapping on the settings icon, select “Delete”... -
Page 60: Mobile Application - Set Units
Mobile application –Remove or Add WU ID (iOS) 8.5 Mobile application – Set Units You may want to change the units in which sensor values are reported. To do so, click on the “Configure Units” menu after tapping on the settings icon. - Page 61 Mobile application – Change units (Android) Mobile application – Change units (iOs)
-
Page 62: Registering Weatherunderground.com Through The Pc Or Mac
Registering WeatherUnderground.com through the PC or Mac If you have not already done setup for wunderground.com during the Wi-Fi setup, you can do so later. Perform the following steps: 1. Visit Wunderground.com and click Join as the right top arrow indicates and select the Sign up for free option. - Page 63 Note: Your station ID will have the form: KSSCCCC###, where K is for USA station (I for international), SS is your state, CCCC is your city and ### is the station number in that city. In the example above, KAZPHOEN424 is in the USA (K), State of Arizona (AZ), City of Phoenix (PHOEN) and #424.
- Page 64 There are also some very useful mobile apps. The URLs provided here go to the Web version of the application pages. You can also find them directly from the iOS or Google Play stores: • WunderStation: iPad application for viewing your station’s data and graphs https://itunes.apple.com/us/app/wunderstation-weather-from-your-neighb orhood/id906099986...
-
Page 65: Pc Software Operation
5929 PC Software Operation This professional weather station can use PC software for remote set or monitor on your computer or laptop. Connect the display console with the pc software: Switch on your PC, Download the EasyWeather software from: https://www.froggit.de/product_info.php?info=p356_wh4000se-wifi-intern... - Page 66 et-funk-wetterstation---wunderground--pc-anbindung--auswertungssoftw are.html “WeatherSmartIP Setup.exe” to install it in your PC Double click 3. Before connect the display console to PC, you need to ensure the device has connected to wifi via app WS View. And then make sure your PC has used the same wifi network(You need additional wireless network card(not included) to connect the wifi for desktop computer).
- Page 67 6. Then it takes several minutes for the display console to connect the pc software. 7. When Connected successfully and the pc soft will display the weather data from the console...
- Page 68 7. Basic Functions of the "WeatherSmartIP" Software System Setting...
- Page 69 Alarm Max/Min Day...
- Page 70 Max/Min History Calibration...
- Page 71 Record History...
-
Page 72: Maintenance
Graph Maintenance 1. Clean the rain gauge once every 3 months. Rotate the funnel counter-clockwise and lift to expose the rain gauge mechanism, and clean with a damp cloth. Remove any dirt, debris and insects. If bug infestation is an issue, spray the array lightly with insecticide. -
Page 73: Troubleshooting Guide
Clean the solar radiation sensor and solar panel every 3 months with damp cloth. Replace batteries every 1-2 years. If left in too long, the batteries may leak due to environmental challenges. In harsh environments, inspect the batteries every 3 months (when cleaning the solar panel). When replacing the batteries, apply a corrosion preventive compound on the battery terminals. - Page 74 Problem Solution solution may be as simple as powering down and up the console. Make sure you have fresh batteries in the display console. With the sensor array and console 10 feet away from each other, remove the batteries from the display console and wait 10 seconds.
- Page 75 Problem Solution than 5’), move the sensor assembly away from the display console. Make sure the remote sensors are not transmitting through solid metal like aluminum siding (acts as an RF shield), or earth barrier (down a hill). Move the display console around electrical noise generating devices, such as computers, TVs and other wireless transmitters or receivers.
- Page 76 Problem Solution station barometer to an official local weather station (reference Section 2.1) The barometer is only accurate to ± 0.08 inHg within the following relative pressure range: 27.13 to 32.50 inHg, which corresponds to an altitude of -2,200 to 2,700 feet.
- Page 77 Problem Solution 2. Confirm your station ID is correct. The station ID is all caps, and the most common issue is substituting an O for a 0 (or visa versa). Example, KAZPHOEN11, not KAZPH0EN11 3. Make sure the date and time is correct on the console.
- Page 78 General safety instructions Danger of asphyxiation: Keep all packaging materials (plastic bags, rubber bands, etc.) away from children. There is a danger of suffocation! Danger of burns: Caution! Leaking / leaking battery acid can lead to burns! Avoid contact of battery acid with eyes, mucous membranes and skin.
- Page 79 This manual may contain errors and misprints. However, the information in this manual is regularly reviewed and corrections made in the next issue. We accept no liability for technical errors or printing errors, and their consequences. All trademarks and copyrights are acknowledged. www.froggit.de...
- Page 80 Hereby we declare, HS-Group GmbH & Co.KG, Escherstr. 31, 50733 D-Cologne, that this product is in compliance with the essential requirements and other relevant provisions of Directive 2014/53/EU. The declaration of conformity for this product can be found www.froggit.de or on request.
Need help?
Do you have a question about the WH4000 and is the answer not in the manual?
Questions and answers