Table of Contents
Advertisement
Advertisement
Table of Contents

Related Manuals for Siamp Monaco


Summary of Contents for Siamp Monaco
- Page 1 BATICUVETTE/BIDET VERSO SCB 350 ASSEMBLY INSTRUCTIONS...
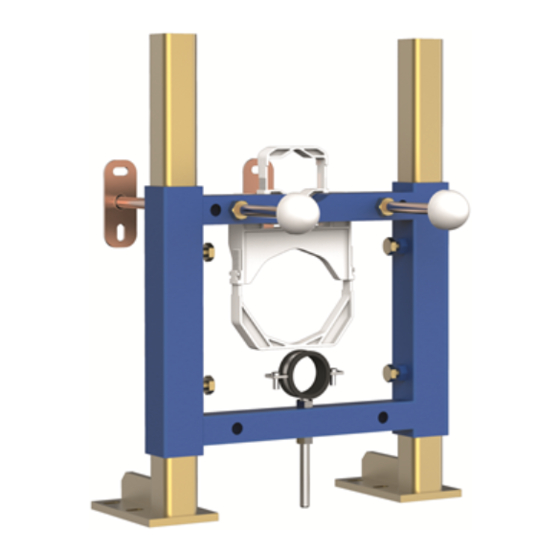
- Page 2 DESCRIPTION...
- Page 3 Elbow bend fixation clip Wall brackets (x2) Elbow bend fixation Washer (x4) Pipe fixation clip Wall screw (x4) Pipe fixation Wall plugs (x4) Fixation screw and washer ( x4) Collar bidet (x1) Bowl fixing strip (x2), length 400mm Flexible sleeve (x 2) Bowl fixing kit Metal pegs (x6) Adjustable legs (x2)
- Page 4 TYPES OF INSTALLATION ➊ Fixed to a thin partition wall ➋ Built in to the rising column USEFUL MEASUREMENTS I - Minimum depth of the frame = 140mm II - Thickness of the cladding Y – 400 – 80- x mm Or, x = thickness of the cera- mics at the bowl fixation level This calculation does not take...
- Page 5 I - ASSEMBLING THE BOWL FIXATION RODS ➋ ➊ ➊ Measure the between-axis of the bowl (A) ➋ Place the rods (f) in the holes in the frame corresponding to the between-axis and fix them in place with 2 nuts. II - ADJUSTING THE FRAME HEIGHT Place the frame in its final position ➊...
- Page 6 III - PREPARING THE FIXATION ➌ ➋ ➊ Mark the drilling points ➊ ➋ Remove the frame and drill to a depth of 55 mm at maximum, using an 8 mm diameter drill bit for ground metal plugs. For wall plugs use a 10 mm diameter drill bit, and drill to a depth of 70 mm ➌...
- Page 7 V - PREPARING THE BOWL EVACUATION CONNECTION ➊ Measure the diameter of the evacuation pipe at the place where it will be attached to the fixation clip. ➋ Attach the fixation clip using 2 screws and washers (e) and adjust the height according to the measured diameter.
- Page 8 VI - PUTTING THE FRAME INTO PLACE ➊ Put the frame into its final place and attach it with the metal pegs, they must be inserted into the holes without any effort. VII - CONNECTING THE WATER SUPPLY AND BOWL EVACUATION ➊...
- Page 9 VIII - WATER TRIALS ➊ ➊ Insert the water supply pipe and the evacuation pipe into the holes on the bowl. Place the bowl in the frame ➋ Turn the water on and flush ➌ ➍ Check that the arrival and evacuation pipes are sealed (watertight) ➎...
- Page 10 X - CONNECTING THE BOWL Read the instructions for the bowl and lid before starting. Using a ruler placed as in the drawing below, make a Take the pipes off the bowl and insert them into the ➊ ➋ mark on the bowl side of the 2 supply pipes.
- Page 11 X - CONNECTING THE BOWL (continued) B + 20 mm ➓ Inser t the water supply and evacuation pipes into the bowl. Then place the bowl on the two fixation rods. To make insertion of the supply and evacuation pipes easier, use soapy water.
- Page 12 Make a water test checking no water leakage is occurring. Uninstall bidet from the frame. You have just installed a “baticuvette” toilet from SIAMP’s range and VERSO we would like to thank you for putting your trust in us.
Need help?
Do you have a question about the Monaco and is the answer not in the manual?
Questions and answers