
Related Manuals for Dräger Carina


Summary of Contents for Dräger Carina
- Page 1 Instructions for use Carina Sub-Acute Care Ventilator WARNING To properly use this medical device, Software 3.2n read and comply with these instruc- tions for use.
- Page 2 PEEP, Air. Trademarks Trademark Trademark owner ® AutoFlow Dräger ® Carina Dräger ® SyncPlus Dräger ® VentStar Dräger ® DrägerService Dräger ™ MEDIBUS.X Dräger ® Virex Diversey BIPAP 1) Trademark used under license Instructions for use Carina SW 3.2n...
- Page 3 NOTE A NOTE provides additional information intended to avoid inconvenience during operation. Instructions for use Carina SW 3.2n...
-
Page 4: Target Groups
Specialist medical knowl- Dräger recommends arranging a service contract edge in the use of the prod- with DrägerService. Abbreviations and symbols For explanations refer to sections "Abbreviations" and "Symbols" in chapter "Overview". Instructions for use Carina SW 3.2n... -
Page 5: Table Of Contents
Preparing Carina ..... . . 34 Carina with trolley ..... . . 36 Configuration. - Page 6 Trolley....... . 134 Alarm system of Carina ....135 Alarm delays.
- Page 7 Monitoring ventilation ....14 Backup ventilation with an independent manual ventilation device ....14 Instructions for use Carina SW 3.2n...
-
Page 8: For Your Safety And That Of Your Patients
Dräger recommends that the medical device is only used together with accessories listed in the current list of accessories. Instructions for use Carina SW 3.2n... -
Page 9: Not For Use In Areas Of Explosion Hazard
The responsibility for selecting the best level of pa- – IEC 60601-1-2 (electromagnetic compatibil- tient monitoring lies solely with the user of the med- ity) ical device. – IEC 60601-1-4 (software-controlled func- tions) – IEC 60601-1-8 (alarm systems) Instructions for use Carina SW 3.2n... -
Page 10: Functional Safety
In any case, strictly observe the instructions for use of the other devices. Instructions for use Carina SW 3.2n... -
Page 11: Disposable Products
Sterile accessories CAUTION Risk of medical device failure and of patient injury Do not use sterile-packaged accessories if the packaging has been opened, is damaged, or if there are other signs of non-sterility. Instructions for use Carina SW 3.2n... -
Page 12: Product-Specific Safety Information
Do not use the medical device in hyperbaric Do not allow the medical device to come into chambers. contact with sources of ignition. Instructions for use Carina SW 3.2n... - Page 13 When the device generated if the actual inspiratory oxygen is on the trolley, do not tilt the trolley more than concentration differs from the set oxygen con- 10°. centration. Instructions for use Carina SW 3.2n...
-
Page 14: Monitoring Ventilation
Changes in these parameters may be caused by: – Acute changes in the patient's condition – Incorrect settings and faulty handling – Device malfunctions – Failure of power and gas supplies If the built-in monitoring fails, use substitute moni- toring. Instructions for use Carina SW 3.2n... -
Page 15: Application
Intended use ......16 Definition of sub-acute care ... . . 16 Instructions for use Carina SW 3.2n... -
Page 16: Intended Use
Application Intended use Carina is a long-term ventilator for patients who are – For non-invasive and invasive ventilation. dependent on ventilators or who require respiratory – For patients with at least 100 mL tidal volume. support. – The device is intended for use by qualified med- –... -
Page 17: Overview
Overview Carina basic device ....18 Top ........18 Bottom . -
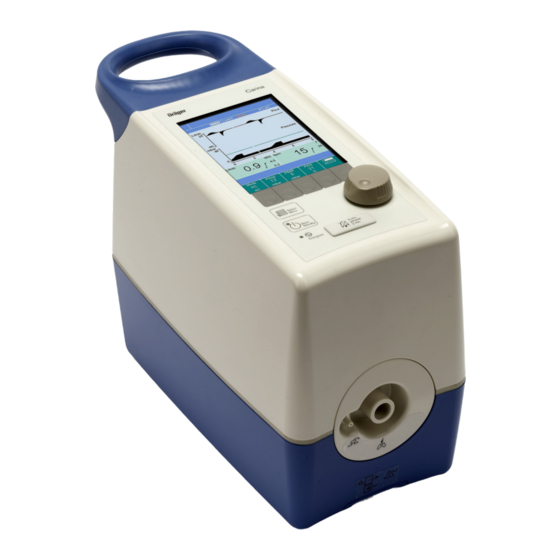
Page 18: Carina Basic Device
Alarm LED flashes red Warning Alarm LED flashes yellow Caution Switch for selecting breathing circuit with Alarm LED lights yellow Note leakage valve or breathing circuit with expira- tory valve, protected by sliding cover Instructions for use Carina SW 3.2n... -
Page 19: Patient Connection Panel (Front)
C Connection for pilot line (for breathing circuit K Ventilation slots with expiratory valve) L Connection for external battery (no longer fitted from 2017 onwards) M Connection for power cable N No function O Connection for nurse call Instructions for use Carina SW 3.2n... -
Page 20: Trolley
G Red locking lever for column holder (under Wall mounting Bed mounting base) H Double castors with locking brake, set of 4 A Clamp with threaded handle B Spacer with 2 buffers C Carina holder Instructions for use Carina SW 3.2n... -
Page 21: Range Of Functions
– MVi and VTi correspond to the calculated inspir- – Measured value list atory tidal volume of the patient. – Set value list – VC-SIMV, VC-AC and SPN-CPAP/PS (VG) control the calculated inspiratory tidal volume of the patient. Instructions for use Carina SW 3.2n... -
Page 22: Gas Supply
Gas supply Optional bed and wall mountings are available for fixing Carina to a bed or wall. An internal turbine supplies Carina with ambient air. supply – High Pressure Oxygen (HPO) from the central gas supply system or from compressed gas cyl- inders –... -
Page 23: Abbreviations
Frequency Hopping Spread Spec- magnetic resonance trum Pascal, unit of pressure 1 mbar = Inspiratory O concentration 100 Pa = 1 hPa 1 bar = 100 kPa = 1000 hPa HEPA High Efficiency Particulate Air Instructions for use Carina SW 3.2n... - Page 24 Respiratory rate of apnea ventila- tion (set value) SELV Safety Extra Low Voltage SPN- Spontaneous – Continuous Posi- CPAP/PS tive Airway Pressure/Pressure Support, spontaneous breathing with continuous positive pressure level and with or without pressure support Instructions for use Carina SW 3.2n...
-
Page 25: Symbols
Gas inlet (emergency air inlet) Power supply – internal battery Gas outlet (oxygen overflow) Power supply – external battery Information on disposal Mains power supply Charge state of internal battery 90 BF type application mode to 100 % Instructions for use Carina SW 3.2n... - Page 26 Do not use if packaging damaged! Use by Not made with natural rubber latex Non-sterile STERILE Relative humidity Ambient pressure Temperature limitation Keep away from oil and grease Keep away from sunlight Lot number Keep dry Instructions for use Carina SW 3.2n...
-
Page 27: Operating Concept
......31 Display of associated ventilation parameters . . 31 Instructions for use Carina SW 3.2n... -
Page 28: Operating And Display Unit
Press key to open the associated function or the associated ventilation parameter on the screen. C Rotary knob for setting and confirming functions and parameters Set: Turn the rotary knob. Confirm: Push the rotary knob. Instructions for use Carina SW 3.2n... -
Page 29: Screen
D Display for 2 measured values (value 1, value 2), configurable E Information line, e.g., for information when the limit of the setting range is reached. F Display of functions and ventilation parameters. The display is activated by the associated key. Instructions for use Carina SW 3.2n... -
Page 30: Color Coding
(B). The following menus can be selected: – Vent.set. for ventilation settings, for detailed description see page 67 – Alarms menu for display and setting alarm lim- its, for detailed description see page 81 Instructions for use Carina SW 3.2n... -
Page 31: Setting Ventilation Modes
The color changes to yellow. 3 To set the value turn the rotary knob (B). 4 To confirm the value push the rotary knob (B). The color of the key changes to dark green. Instructions for use Carina SW 3.2n... - Page 32 This page intentionally left blank. Instructions for use Carina SW 3.2n...
-
Page 33: Assembly And Preparation
Power supply from the external battery..49 Preparing Carina..... . . 34 Power supply from the internal battery ..49 Installing the inlet filter . -
Page 34: Safety Information For Preparation
2 Insert the inlet filter (A) into the holder from be- low, fold it up and push it into the holder (B) until Pillows and blankets will block air feed. it locks into position. Do not place the device on the patient's bed. Instructions for use Carina SW 3.2n... - Page 35 Assembly and preparation 1 Place Carina on a horizontal, stable surface. 2 Keep ventilation slots (A) clear. 3 Keep emergency air inlet and oxygen overflow (B) clear. Toppling stability Do not tilt the device more than 15° while in use to ensure that it cannot topple over.
-
Page 36: Carina With Trolley
2 Accessories such as the standard rail handle (B) or universal holder with standard rail (B) are firmly attached. 3 The locking levers of the Carina holder (C) are closed. 4 The rubber components (D) of the device holder are in good condition. -
Page 37: Attaching Accessories To The Trolley
(D) on the holder to ensure that it is horizontal. locating pins (E). 4 Move Carina parallel to the base plate (F) of the device holder until it is resting safely on the base plate. -
Page 38: Attaching The Battery Holder
420 to 870 mm (16.54 to 34.25 in) WARNING Risk of damage to gas cylinders during trans- port Install gas cylinders so the pressure reducers are clear and do not project from the side of the trolley. Instructions for use Carina SW 3.2n... -
Page 39: Safety Information On Breathing Circuits And Additional Components
When using additional components, particular care and monitoring are required. Check the patient state and the volume values of the device more frequently. Observe the instructions for use for the filters and components. Instructions for use Carina SW 3.2n... -
Page 40: Using Bacterial Filters
Risk of infection If no inspiratory bacterial filter is used, the pa- tient can be infected by aspirated ambient air. Use an inspiratory bacterial filter. Fit the bacterial filter onto the inspiratory port. Instructions for use Carina SW 3.2n... -
Page 41: Connecting Breathing Circuits
The device does not take account of the com- pliance of the breathing circuit. The volume losses must be manually cor- rected. For additional information, see chapter "Volume losses during ventilation" on page 144. Instructions for use Carina SW 3.2n... -
Page 42: Breathing Circuit With Leakage Valve
(E). Observe the direction. When using the disposable breathing circuit When using the disposable breathing circuit VentStar Carina LeakV (MP00312) the leakage VentStar Carina ExpV(MP00312) the leakage valve is permanently fixed to the breathing valve is permanently fixed to the breathing hose. -
Page 43: Connecting The Breathing Gas Humidifier
WARNING Risk of patient injury Increased resistance values may cause hy- poventilation. When using a breathing gas humidifier do not use an additional heat and moisture ex- changer (HME). Instructions for use Carina SW 3.2n... -
Page 44: Attaching The Breathing Gas Humidifier
7 Connect the pilot line (H) to the plug (I). 2 Fit the bacterial filter (A) to the inspiratory port (B). 3 Connect the breathing hose (C) to the bacterial filter and the breathing gas humidifier (D). Instructions for use Carina SW 3.2n... -
Page 45: Breathing Gas Humidifier Without Inspiratory
5 Position the water trap (F) vertically at the low- direction. est point of the hose connection. 7 Connect the pilot line (H) to the plug (I). 6 Connect the leakage valve (G). Observe the di- rection. Instructions for use Carina SW 3.2n... -
Page 46: Passive Humidifier
4 Fix the expiratory valve (D) to the port on the breathing hose (C). Observe the direction. When using the disposable breathing circuit VentStar Carina ExpV (MP00312) the leakage valve is permanently fixed to the breathing hose. 2 Fit the bacterial filter (A) to the inspiratory port 5 Fit the heat and moisture exchanger (E) to the (B). -
Page 47: Preparing Aeroneb Pro Medication Nebulizer
When using a medication nebulizer, use only single hoses with a separate valve (MP00220, MP00224). Observe the instructions for use of the Aeroneb Pro nebulizer. Observe the "Safety information on breathing circuits and additional components" on page 39. Instructions for use Carina SW 3.2n... -
Page 48: Connecting The Power Supply
The device mains plug must be easily accessible to ensure that the device can be disconnected from the power supply at any time. Instructions for use Carina SW 3.2n... -
Page 49: Power Supply From The External Battery
Restore the external power supply immediately to The LED flashes or lights depending on the avoid any interruption in ventilation. charge of the internal battery. The external battery pack (EBP) has an internal charger. Instructions for use Carina SW 3.2n... -
Page 50: Connecting The Gas Supply
Only use compressed gases approved for Use suitable external monitors. medical use. The compressed gases must be free of dust and oil particles and dry. Instructions for use Carina SW 3.2n... -
Page 51: Connecting The Nurse Call
2 min. key is pressed, the acoustic alarm signal on the device and the nurse call are suppressed for 2 minutes. During this time, new alarms that occur are not signaled by the nurse call. Instructions for use Carina SW 3.2n... -
Page 52: Safety Information For Using The Nurse Call
Risk of nurse call failure is a risk of electric shock from the housing of the medical device. Carina can be integrated into a distributed alarm system by means of the nurse call inter- Only connect devices with safety extra-low volt- face. -
Page 53: Using The Medibus Or Medibus
Assembly and preparation Using the MEDIBUS or MEDIBUS.X protocol MEDIBUS and MEDIBUS.X are software protocols WARNING for data transfer between Carina and other medical Risk of electric shock devices (e.g., patient monitors) or other devices (e.g., computers for data management systems). -
Page 54: Intrahospital Patient Transport
Only start intrahospital patient transport if the internal battery is sufficiently charged. CAUTION Risk of damage to device or personal injury If Carina is placed on the bed when transporting patients, the device may fall down. Do not place the device on the patient's bed. CAUTION... -
Page 55: Moving The Trolley
Moving the trolley 1 Release all 4 locking brakes (A). 2 Hold and move the trolley by the standard rail handle (B) or the trolley column (C). Parking the trolley Lock all 4 locking brakes. Instructions for use Carina SW 3.2n... - Page 56 This page intentionally left blank. Instructions for use Carina SW 3.2n...
-
Page 57: Getting Started
Starting ventilation ..... 63 Auto wake-up ......63 Instructions for use Carina SW 3.2n... -
Page 58: Safety Information On Getting Started
Powering on the device Set the power switch (A) to Carina runs the selftest. The screen shows the pro- gress display for the selftest. After the selftest the screen shows the last defined ventilation mode and the last defined parameters. -
Page 59: Checking Readiness For Operation
– Lower alarm limit Paw – Apnea ventilation Connecting the test lung Use only the test lungs specified in the list of acces- sories. Connect the appropriate test lung to the breath- ing circuit. Instructions for use Carina SW 3.2n... -
Page 60: Checklist
Ramp: 0.2 s Start ventilation by pressing the Start/Standby key. Squeeze the test lung together during in- spiration for 2 consecutive me- chanical breaths, so that the Paw high alarm limit is ex- ceeded. Instructions for use Carina SW 3.2n... - Page 61 Simulate spontaneous breath- ing by squeezing the test lung. Then stop the breathing. After a successful device check, Carina is ready for use with the patient. After the device check Switch Carina to standby mode, see page 77. Instructions for use Carina SW 3.2n...
-
Page 62: Selecting The Application Mode
Dräger recommends the use of an external O monitor in the breathing circuit for measurement of the current O concentration. Position the sensor (A) of the oxygen monitor directly at the inspiratory port (B) of Carina. Instructions for use Carina SW 3.2n... -
Page 63: Starting Ventilation
1 Check readiness for operation, see page 59. 1 Connect the patient. 2 Sett ventilation modes and ventilation parame- 2 Carina starts ventilation on detection of the in- ters, see page 67. spiratory effort with the previously set ventila- 3 Setting the alarm limits, see page 84. - Page 64 This page intentionally left blank. Instructions for use Carina SW 3.2n...
-
Page 65: Operation
Safety information for LPO ....73 Connecting the O concentrator to Carina ..74 Setting LPO mode ..... . 75 Setting the O concentration . -
Page 66: Safety Information On Ventilation
Critical airway pressures may result with Vol- ume Guarantee. Set Pmax accordingly. CAUTION The Apnea !!! alarm is only displayed in an apnea situation if apnea monitoring is activated. Set the apnea alarm time Tapn. Instructions for use Carina SW 3.2n... -
Page 67: Setting Ventilation
Setting ventilation parameters The section describes how ventilation modes and ventilation parameters are set. The factory default ventilation parameters and setting ranges are Prerequisite: Carina displays the last set ventilation listed. mode. For the detailed description of the ventilation modes and parameters see section Description of the ventilation modes, page 145. -
Page 68: Setting Ranges For Ventilation
6) For SPN-CPAP/PS the following applies: Only with deactivated Volume Guarantee VG. For PC-BIPAP and VC-SIMV the following applies: only with trigger activated 7) Only with apnea ventilation activated. 8) Only in NIV application mode with Volume Guarantee VG deactivated. 9) Only with Aut.Adapt function activated. Instructions for use Carina SW 3.2n... -
Page 69: Non-Invasive Ventilation (Niv)
NOTE Masks with anti-asphyxia valve and exhalation ports (airflow masks) are not recommended for use with Carina. Use only masks with standard el- bows (not airflow masks). Otherwise the accuracy of the volume measurement may be impaired. Instructions for use Carina SW 3.2n... -
Page 70: Using Apnea Ventilation
Description of apnea ventilation, see page 155. 1 Press the (A) key twice. Menu 3 is set. 2 Press the Apn.Vent. (B) key. Select (F) On by turning the rotary knob and push to confirm. Instructions for use Carina SW 3.2n... -
Page 71: Using The Autoadapt Function
Select the value by turning the rotary knob (F) and push to confirm. C D E The ventilation parameters can be modified at any time. AutoAdapt executes the initial adaptation with reference to the modified ventilation parameters. Instructions for use Carina SW 3.2n... -
Page 72: Displaying Setting And Measured Values
2 Press the key for Aut.Adapt (B). Select Off by turning the rotary knob (F) and push to confirm. Displaying setting and measured values Prerequisite: Carina is in ventilation mode. Measured values depending on the valve in use Valve Volume measured values... -
Page 73: Locking Keys
WARNING Risk of patient injury Moist oxygen may affect the function of the device. Only operate an O concentrator without hu- midifier. Drain or remove a humidity system on the O concentrator before use. Instructions for use Carina SW 3.2n... -
Page 74: Connecting The O 2 Concentrator To Carina
O con- centrator the LPO feed will be blocked. Observe the instructions for use of the oxygen source used, e.g., the O concentrator. Instructions for use Carina SW 3.2n... -
Page 75: Setting Lpo Mode
Operation Setting LPO mode Prerequisite: Carina is in standby mode. 1 Press the Select Menu (A) key. 2 Press the Config. (B) key. 3 Press the (C) key. 4 In menu 2 press the O suppl. (D) key. 5 Select LPO (E) by turning the rotary knob and push to confirm. - Page 76 Minute volume in L/min Diagram for operation with leakage valve (MP00312) as a function of Pmean and LPO flow 2.5 L/min O 5 L/min O 10 L/min O Mean airway pressure in mbar (cm H Instructions for use Carina SW 3.2n...
-
Page 77: Standby Mode
Standby is displayed. A single tone sounds. 2 To confirm the standby mode, push the rotary knob (B). Carina is in standby mode. The LED in the (A) key flashes. The message Standby activated and the alarm message Standby – Patient not ventilated are displayed on the screen. -
Page 78: Ending Operation
67. For automatic continuation of ventilation with Auto wake-up, see page 63. Ending operation Prerequisite: Carina is in standby mode. Set the power switch (A) to . The device switches off. The device cannot be switched off during ventila- tion. -
Page 79: Improving The Display Accuracy Of The Charge State Of The Internal Battery
6 Connect the power cable again. The internal battery is charged, the LED flashes. Charge the internal battery completely until the LED remains steady. Do not interrupt the charging process. If there is no improvement, inform DrägerService. Instructions for use Carina SW 3.2n... - Page 80 This page intentionally left blank. Instructions for use Carina SW 3.2n...
-
Page 81: Alarms
Switching off alarm limits ....85 Suppressing the acoustic alarm signal and the nurse call ..... . 86 Instructions for use Carina SW 3.2n... -
Page 82: Display Of Alarms
Repetition signal Visual alarm signals High 2x 5 tones Every 6 sec- onds Carina displays the following visual alarm signals: Medium 3 tones Every 6 sec- – The alarm message is displayed in the alarm onds line (A), e.g.: 1 tone... -
Page 83: Alarm Priorities
Cause – Remedy" on page 97. Confirming alarms The following alarms must be confirmed: – Airway pressure high !!! – Check settings !! – Invalid date ! To confirm, press the rotary knob. Instructions for use Carina SW 3.2n... -
Page 84: Setting The Alarm Limits
2 Press the Alarms (B) key. 1 Touch the corresponding key for the alarm limit. The device shows the defined alarm limits. 2 Set the value by turning the rotary knob and push to confirm. Instructions for use Carina SW 3.2n... -
Page 85: Switching Off Alarm Limits
The set limit can be exceeded. Switching off alarm limits WARNING Risk of patient injury When alarm limits are switched off, Carina cannot monitor the patient. Alarm limits may only be switched off if the safety of the patient is not jeopardized by the absence of an alarm. -
Page 86: Suppressing The Acoustic Alarm Signal And The Nurse Call
Press the Audio paused 2 min. (A) key. The acoustic alarm signal and alarm generation by the nurse call are suppressed for a maximum of 2 minutes. Inlet filter missing !! The device displays the (B) symbol in the alarm line. Instructions for use Carina SW 3.2n... -
Page 87: Configuration
Selecting Ti or I:E ..... . 93 Setting the night mode....94 Instructions for use Carina SW 3.2n... -
Page 88: Overview
Ti / I:E For selection of the used set- To display additional configurable parameters: ting for Ti or I:E ratio 3 Press the (C) key. Menu 3 Night For switching night mode on or off Instructions for use Carina SW 3.2n... -
Page 89: Service Menu
The system time can only be set in standby mode. firmed. After opening the system information menu, the Carina shows the functions of the service menu: current system time is shown in white. – Syst.info (system information) Positions of system time: –... -
Page 90: Displaying The Contact Information
Displaying the contact information Prerequisite: The Service menu is open. Press the Contact key. The following information for contacting DrägerService is displayed: – Organization – Telephone number – Customer ID – City Instructions for use Carina SW 3.2n... -
Page 91: Setting The Alarm Volume
Prerequisite: The Config. menu is opened. 1 Press the Screen key. 2 Select Curves or Measure by turning the rotary knob and push to confirm. The current setting is shown in the Screen key. Instructions for use Carina SW 3.2n... -
Page 92: Screen Display Curves
5 Select the measured value for Value 2 in the same way. A Pressure waveform as bar graph B 4 Fields for measured values: – MVi (MV) – VTi (VT) Instructions for use Carina SW 3.2n... -
Page 93: Selecting The Application Mode
Prerequisite: The Config. menu is opened. 1 Press the key. 2 In menu 2 press the Ti / I:E key. 3 Select Ti or I:E by turning the rotary knob and push to confirm. Instructions for use Carina SW 3.2n... -
Page 94: Setting The Night Mode
130 seconds. If the device is actuated or an alarm is active, the screen is switched on immedi- ately. To switch off Select Off by turning the rotary knob and push to confirm. Instructions for use Carina SW 3.2n... -
Page 95: Problem Solving
Additional messages on the screen ..103 Emergency ventilation ....103 Instructions for use Carina SW 3.2n... -
Page 96: Failure Of The Power Supply
Restore the O supply immediately. If the turbine fails: The device can no longer ventilate. Disconnect the patient from the device and im- mediately resume ventilation using another, in- dependent ventilator. Instructions for use Carina SW 3.2n... -
Page 97: Alarm - Cause - Remedy
Alarm texts in parentheses indicate technical alarms that are entered in the logbook. The entries for technical alarms in the logbook are only availa- ble in English. Instructions for use Carina SW 3.2n... - Page 98 Inform DrägerService. AutoAdapt active ! AutoAdapt function is active. If it is not required, switch off the function. Otherwise wait for the Tadpt time. Instructions for use Carina SW 3.2n...
- Page 99 Breath. circuit incorrect !!! Breathing circuit without leak- Connect breathing circuit with age valve connected, al- leakage valve or set Carina to though Carina is set to "breathing circuit with expira- "breathing circuit with leak- tory valve" with the switch on age valve".
- Page 100 The device has overheated Ensure free air feed at inlet fil- for external reasons. ter. Remove blockages from (Int. temperature high !!!) breathing circuit and breathing circuit connections (foreign bodies, kinked hoses). Lower the ambient temperature. Instructions for use Carina SW 3.2n...
- Page 101 Disconnect the patient from the device and immediately re- sume ventilation using an- other, independent ventilator. Inform DrägerService. O2 calibration failed ! Calibration of O dosing is Inform DrägerService. faulty. (O2 calibration failed !) Instructions for use Carina SW 3.2n...
- Page 102 VT not reached, Pmax ! The measured VT is lower Check setting of Pmax and VT. than the defined VT and the maximum allowable pressure is reached. Instructions for use Carina SW 3.2n...
-
Page 103: Emergency Ventilation
Emergency ventilation is a pressure-controlled ven- tilation with reduced quality. The trigger function is deactivated. Volume Guarantee is no longer avail- able. Functions are not monitored. Instructions for use Carina SW 3.2n... - Page 104 This page intentionally left blank. Instructions for use Carina SW 3.2n...
-
Page 105: Reprocessing
Special reprocessing measures ... . 110 After reprocessing ..... 110 Instructions for use Carina SW 3.2n... -
Page 106: Dismantling
Dismantle and reprocess the breathing gas hu- midifier and the medication nebulizer in accord- ance with the corresponding instructions for use. Dismantle and dispose of the bacterial filter and HME in accordance with the corresponding in- structions for use. Instructions for use Carina SW 3.2n... -
Page 107: Information On Reprocessing
CAUTION Risk of defective products Signs of wear may appear on reusable products, e.g., cracks, deformations, discoloration or peel- ing. Check the products for signs of wear and replace them if necessary. Instructions for use Carina SW 3.2n... -
Page 108: Classifications For Reprocessing
Observe the instructions for use for the compo- nents. Non-critical – Carina basic device – Trolley with accessories – O supply hose – Hinged arm – Bed and wall mountings Semi-critical B – Reusable water trap Instructions for use Carina SW 3.2n... -
Page 109: Validated Reprocessing Procedures
– Electric shock at switch-on Repeat steps 1 to 4 as required. – Device malfunctions 5 Check product for visible damage and replace it Make sure that no liquid penetrates into the if necessary. device. Instructions for use Carina SW 3.2n... -
Page 110: Reprocessing Semi-Critical Components
Keep spring-loaded valves open during reprocess- 3 Select a suitable program. ing. After reprocessing Preparations before reusing Assemble and prepare the device for operation, see chapter "Assembly and preparation". Check readiness for operation, see chapter "Getting started". Instructions for use Carina SW 3.2n... -
Page 111: Maintenance
Replacing the inlet filter....115 Charging the internal battery ... . 115 Instructions for use Carina SW 3.2n... -
Page 112: Overview
Measures intended to determine and assess the actual state of a medical device Preventive mainte- Recurrent specified measures intended to maintain the functional condition of a nance medical device Repair Measures intended to restore the functional condition of a medical device after a device malfunction Instructions for use Carina SW 3.2n... -
Page 113: Inspection
– There is no visible damage 4 Using the instructions for use, check that all components and accessories needed to use the product are available. 5 Check the electrical safety according to IEC 62353. Instructions for use Carina SW 3.2n... -
Page 114: Preventive Maintenance
Every 3 years Visual inspection, clean and Specialized service replace affected parts if nec- personnel essary Repair Dräger recommends that all repairs are carried out by DrägerService and that only authentic Dräger repair parts are used. Instructions for use Carina SW 3.2n... -
Page 115: Replacing The Inlet Filter
Charge regularly depending on the ambient tem- perature: – at –20 to +35 °C every 3 months – at +35 to +55 °C once a month Instructions for use Carina SW 3.2n... - Page 116 This page intentionally left blank. Instructions for use Carina SW 3.2n...
-
Page 117: Disposal
Disposal of inlet filters ....119 Disposal of the Medical Device ... 119 Instructions for use Carina SW 3.2n... -
Page 118: Safety Information For Disposal
In countries other than the Federal Repub- lic of Germany, the respective national regulations must be observed. Instructions for use Carina SW 3.2n... -
Page 119: Disposal Of Inlet Filters
Dispose of filters with municipal waste. Disposal of the Medical Device At the end of its service life: Consult the relevant waste disposal company for appropriate disposal. Observe the applicable laws and regulations. Instructions for use Carina SW 3.2n... - Page 120 This page intentionally left blank. Instructions for use Carina SW 3.2n...
-
Page 121: Technical Data
Trolley ....... 134 Alarm system of Carina ....135 Alarm delays . -
Page 122: Ambient Conditions
Pressure limitation Pmax Range (leakage valve) 5 to 40 mbar (or hPa or cm H Range (expiratory valve) 5 to 50 mbar (or hPa or cm H Resolution 1 mbar (or hPa or cm H Instructions for use Carina SW 3.2n... - Page 123 0.1 to 2.0 s Resolution 0.1 s Trigger sensitivity Trigger Range Off, Normal, Sensitiv. Apnea ventilation Apn.Vent. Range On, Off Respiratory rate with apnea ventilation RRapn Range 5 to 50/min Resolution 1/min Instructions for use Carina SW 3.2n...
-
Page 124: Performance Characteristics
The specified resistances take the breathing gas humidifier in account where neces- sary but not additional accessories such as bacte- rial filters or HMEs. See the applicable instructions for use for these components for the resistance. Instructions for use Carina SW 3.2n... - Page 125 <3.5 mbar (or hPa or cm H expiratory valve 2165619 breathing hose with 8412217 hu- <2 mbar (or hPa or cm H midifier chamber, 2 x 2165627 breathing hose, 8404985 water trap and MP00224 leakage valve Instructions for use Carina SW 3.2n...
- Page 126 <2.5 mbar (or hPa or cm H expiratory valve F&P RT219 breathing circuit with MP00224 <2 mbar (or hPa or cm H leakage valve F&P RT219 breathing circuit with MP00220 <2.5 mbar (or hPa or cm H expiratory valve Instructions for use Carina SW 3.2n...
-
Page 127: Displayed Measured Values
0 to 4.0 L, BTPS Resolution 1 mL Accuracy ±10 % of measured value or ±20 mL, whichever is greater (without leakage, and taking account of hose compliance correction, "Volume losses during ventilation" on page 144) Instructions for use Carina SW 3.2n... - Page 128 Range 0 to 80 mbar (or hPa or cm H Flow waveform display Flow Range –160 to +160 L/min Airway pressure bar graph Pressure Range 0 to 60 mbar (or hPa or cm H Instructions for use Carina SW 3.2n...
-
Page 129: Monitoring Functions
0, 15, 30, 60, 90, 120 s Invasive ventilation (Tube) 0, 15, 30, 60 s Respiratory rate RR high Alarm If the alarm limit has been exceeded for one minute Range 10 to 74/min, Off Resolution 1/min Instructions for use Carina SW 3.2n... -
Page 130: Operating Data Characteristics
The external battery pack (EBP) is a component of the Carina medical system. Gas supply operating pressure 2.7 bar to 6 bar 270 kPa to 600 kPa 40 psi to 87 psi flow 0 to 120 L/min connection Country-specific Instructions for use Carina SW 3.2n... - Page 131 MEDIBUS.X protocol MEDIBUS protocol Baud rate 9600 baud Data bits Parity None Stop bit MEDIBUS.X protocol Baud rate 19200 baud Data bits Parity Even Stop bit Pin assignment Pin 2 Pin 3 Pin 5 Instructions for use Carina SW 3.2n...
- Page 132 93/42/EEC, Annex IX UMDNS code – Universal Medical Device Nomen- 14-355 clature System – Nomenclature for medical de- vices GMDN code – Global Medical Device Nomencla- 42411 ture – Worldwide nomenclature for medical de- vices Instructions for use Carina SW 3.2n...
-
Page 133: Factory-Set Ventilation Parameters
Ventilation mode PC-BIPAP Pinsp 15 mbar (or hPa or cm H PEEP 5 mbar (or hPa or cm H 12/min Ramp Auto 1 : 1 40 % suppl. Operating temperature 25 °C (77 °F) Instructions for use Carina SW 3.2n... -
Page 134: Trolley
Technical data Trolley Dimensions with Carina holder (height x width x depth) Trolley 1 (63 cm) 730 x 570 x 670 mm (28.7 x 22.4 x 26.4 in) Trolley 1 (78 cm) 880 x 570 x 670 mm (34.7 x 22.4 x 26.4 in) -
Page 135: Alarm System Of Carina
84. The alarm system is activated when Carina is Carina has a nurse call interface which can be used started. After the selftest the screen shows the last for a distributed alarm system. According to... -
Page 136: Alarm Delays
If the alarm limit is exceeded in 2 consecutive breathing phases MV low !!! 60 s at start of ventilation and after reset of the alarm Airway pressure low !!! RR high !!! 60 s Instructions for use Carina SW 3.2n... -
Page 137: Emc Declaration
Impulse voltages (surges) (IEC 61000-4-5) Voltage, external conductor – external conductor: ±1 kV Voltage, external conductor – protective ground con- ductor: ±2 kV Magnetic fields at a mains frequency of 50 Hz 30 A/m (IEC 61000-4-8) Instructions for use Carina SW 3.2n... -
Page 138: Recommended Separation Distances From Mobile High-Frequency Communication
In order to attain the full functional integrity of this device, a separation distance of at least 1.0 m (3.3 ft) is required between the device and wireless high-frequency communication equipment. Instructions for use Carina SW 3.2n... -
Page 139: Connections To It Networks
– Removing devices from the network – Connections to medical devices from third- – Adding other devices to the network party manufacturers – Performing upgrades or updates to devices that are connected to the network Instructions for use Carina SW 3.2n... - Page 140 – Data have incorrect time-stamps. – Overloading of the device due to a very high network load (e.g., as a result of Denial-Of-Ser- vice attacks) may result in temporary deactiva- tion of the interface. Instructions for use Carina SW 3.2n...
-
Page 141: Principles Of Operation
......161 Volume measurement ....162 Instructions for use Carina SW 3.2n... -
Page 142: Pneumatic Function Description
(3) through a venturi (R2). The pressure switch valve (V1) in the measuring unit (3). differential generated there is measured by the flow sensor (DPS1) and used to regulate the flow. Instructions for use Carina SW 3.2n... - Page 143 One check valve (CV9) restricts the pressure in the low- pressure O inlet to <1 bar by discharging excess oxygen to the ambient air. Instructions for use Carina SW 3.2n...
-
Page 144: Volume Losses During Ventilation
The patient is ventilated at the following settings: quired volume. – 8418655 breathing circuit – Pinsp = 25 mbar (25 cm H – PEEP = 5 mbar (5 cm H Volume loss not compensated by the device: 60 mL Instructions for use Carina SW 3.2n... -
Page 145: Description Of The Ventilation Modes
500 ms to Synchronization the beginning of the expiration. The mandatory breaths can be triggered by the pa- The synchronization of the mandatory breath re- tient's inspiratory effort on PEEP level. duces the expiratory time. Instructions for use Carina SW 3.2n... - Page 146 The pressure support is also terminated as soon as the duration of support exceeds a maximum inspir- atory time Timax. The maximum inspiratory time is limited to 130 % of Ti or a maximum of 4 seconds. Instructions for use Carina SW 3.2n...
-
Page 147: Vc-Ac (Optional)
Ti. A non-synchronized mandatory breath is triggered at the latest at the end of the expiratory time (backup respiratory rate). The minimal number of mandatory breaths is deter- mined by the respiratory rate RR. Instructions for use Carina SW 3.2n... - Page 148 VT may deviate from the set tidal volume VT in in- peak inspiratory pressure PIP changes as the com- dividual breaths, but a constant tidal volume VT is pliance changes, as is normal with constant-vol- applied over time. ume breaths. Instructions for use Carina SW 3.2n...
-
Page 149: Pc-Bipap
This prevents pressure rise from the lower pressure level PEEP the mandatory breath being applied during sponta- to the upper pressure level Pinsp is defined with neous expiration. the Ramp setting. Instructions for use Carina SW 3.2n... - Page 150 The pressure support is also terminated as soon as the duration of support exceeds a maximum inspir- atory time Timax. The maximum inspiratory time is limited to 130 % of Ti or a maximum of 4 seconds. Instructions for use Carina SW 3.2n...
-
Page 151: Pc-Ac
A non-synchronized mandatory breath is triggered the Ramp setting. at the latest at the end of the expiratory time (backup respiratory rate). The minimal number of mandatory breaths is deter- mined by the respiratory rate RR. Instructions for use Carina SW 3.2n... -
Page 152: Spn-Cpap/Ps
Psupp, the lung mechanics (resistance and compliance) and the patient's respiratory drive. The pressure rise from the lower pressure level PEEP to the upper pressure level Psupp is defined with the Ramp setting. Instructions for use Carina SW 3.2n... - Page 153 When the pressure support is not switched on, the patient's spontaneous breathing is supported by the PEEP value set. Δ Psupp above PEEP Pressure rise PEEP Start of inspiration End of inspiration Timax Inspira- tory flow Instructions for use Carina SW 3.2n...
- Page 154 With volume support the support pressure automat- ically adapts to the changes in lung conditions (re- sistance and compliance) and the requirement for spontaneous breathing of the patient. Instructions for use Carina SW 3.2n...
-
Page 155: Additional Settings For Ventilation
VTapn setting. If the patient has successfully triggered at least 5 breaths per minute, the device automatically ter- minates apnea ventilation. The device switches back to the previous ventilation mode. Instructions for use Carina SW 3.2n... -
Page 156: Trigger
Principles of operation Trigger The trigger is used to synchronize mandatory Carina uses 3 trigger criteria to detect the breathing breaths with spontaneous breathing. The trigger is effort of the patient: also used for triggering and terminating the sup- – Flow gradient (flow change rate) ported breaths with SPN-CPAP/PS, PC-BIPAP/PS –... -
Page 157: Pressure Rise Ramp
The device provides the flow with a sinusoidal waveform. The device detects the breathing efforts of the pa- tient in patients with triggered ventilation. Flow dos- ing is faster than with patients who are not breath- ing spontaneously. Instructions for use Carina SW 3.2n... -
Page 158: Autoadapt
8 mbar/min will not be exceeded. Because the pressures remain below the therapeu- tic level during the Tadpt time, the patient condition must be continuously monitored. Set the alarm lim- its accordingly. Instructions for use Carina SW 3.2n... -
Page 159: Therapy Types
Under these conditions the volume of CO rebreathed by the patient is further increased with increased tidal volume. Instructions for use Carina SW 3.2n... -
Page 160: Additional Functions
Non-invasive ventila- 0 to 120 s tion As soon as Carina has detected an inspiratory ef- fort with the aid of the trigger criteria or a reconnec- tion, ventilation will be continued with the previous settings. Trigger criteria, see page 156. -
Page 161: Syncplus
SyncPlus is based on 3 main functions: – Multi-sense trigger – Automatic leakage compensation – Cycle learning technology Multi-sense trigger Carina uses 3 trigger criteria during inspiration and expiration to detect the breathing effort of the pa- tient: – Pressure – Flow –... -
Page 162: Volume Measurement
VTi and MVi, it is important to en- sure that the measurement is not affected by leak- ages. NOTE Carina cannot automatically compensate for hose compliance. Breathing circuit with leakage valve The displayed values for VTi and MVi show the vol- ume applied to the patient's lung. -
Page 163: Index
Getting Started ......57 Opening menu ..... . . 88 Instructions for use Carina SW 3.2n... - Page 164 Service menu ......89 Non-Invasive Ventilation ....69, 159 Instructions for use Carina SW 3.2n...
- Page 165 Volume losses ......144 Volume measurement ....162 Instructions for use Carina SW 3.2n...
- Page 166 These instructions for use apply only to the fol- lowing device with the specified serial number: Carina SW 3.2n If no serial number has been filled in by Dräger, these instructions for use are provided for gen- eral information only and are not intended for use with any specific medical device.
Need help?
Do you have a question about the Carina and is the answer not in the manual?
Questions and answers